How to Recover Deleted or Lost Partition on Mac

Partitions can vanish on your Mac without much warning - maybe you deleted one by accident, macOS glitched during an update, or a power cut damaged the metadata. Whatever the cause, Disk Drill offers a reliable Mac partition recovery option that can restore access to lost or deleted Mac partitions - even in tougher cases like file system damage or drive issues. macOS Sequoia Ready!

Partitions on Mac OS X
How to Recover Deleted or Lost Partition on Mac

Multiple Partition Recovery Methods

Disk Drill restores lost or deleted partitions on your Mac using three powerful recovery methods.
Universal Partition Search

This method scans the disk for known partition headers. If it finds one, Disk Drill lets you browse the folder structure as if the partition never vanished. You’ll usually see your original file names and folders still intact, which makes recovery a whole lot easier.

Scan for Lost HFS+ Partition

In this method, Disk Drill locates reformatted HFS+ partitions and rebuilds them using the backup copy of the header. It uses the header to attempt recovery of data structures present before the reformatting occurred and mounts found data as a virtual disk image.

Rebuild HFS+ Catalog File

In cases where HFS+ partitions cannot be mounted correctly, this recovery method tries to rebuild the catalog file. The rebuilt file is mounted as a virtual disk image and can be scanned for lost data.

Steps to Recover Lost Partition on Mac

1. Install Disk Drill for Mac

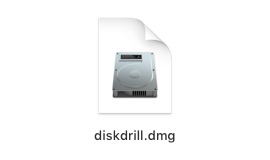
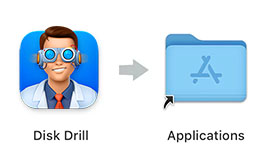
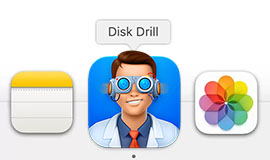
To get started, download and install the free version of Disk Drill for Mac. We highly recommend installing it on a different drive than the one you’re recovering from (this helps prevent any chance of overwriting lost data). Once it’s installed, you can drag it into your Dock from the Applications folder for quick access.

  • Download Disk Drill
    1

    Download Disk Drill

  • Drag to Applications Folder
    2

    Drag to Applications Folder

  • Launch Disk Drill
    3

    Launch Disk Drill

2. Connect External Drive

Whether you’re trying to recover a lost partition from your Mac’s internal drive, an external disk, a USB stick, or a memory card, make sure that device is connected before you launch Disk Drill. And if you’re planning to recover data to another external drive (which we do recommend), plug that in now too. 

On Macs with Apple Silicon (M1–M4) or a T2 chip, Disk Drill requires a kernel extension (kext) to access the system disk. You’ll need to grant full disk access and adjust security settings. The app will show clear instructions when this applies.

Once everything’s done, go ahead and open Disk Drill.

recover files from external hard drive mac

3. Choose the Right Approach to Recover a Deleted macOS Partition

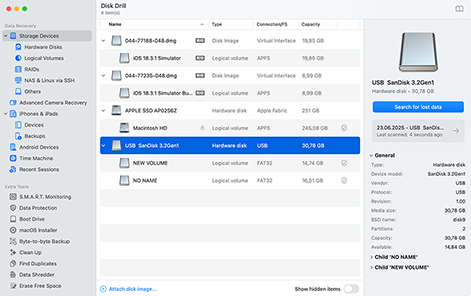
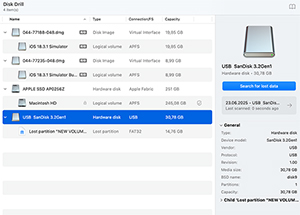
Once you’ve opened Disk Drill, you’ll see a list of available devices that can be scanned. What you do next depends on how the data loss happened. From here, you can follow one of three common paths.

Choose the Right Approach to Recover a Deleted macOS Partition
Select the Disk Where the Partition Was Lost

3.1. Select the Disk Where the Partition Was Lost

If you know which disk holds the deleted Mac partition you maybe removed by mistake, select it from the list and click “Search for lost data.” When the pop-up appears, choose “Universal Scan.” Disk Drill will then begin scanning the drive for lost data.

You can also right-click the disk and choose “Scan for lost partition” to target partition structures specifically.

Scan Unpartitioned Space

3.2. Scan Unpartitioned Space (If Available)

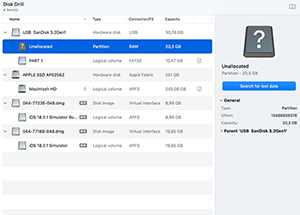
If you expand the list of partitions under the disk where the data was lost and see entries like “Unallocated,” “Not partitioned,” or “Basic Data Partition,” there’s a good chance that’s where your missing partition used to be. Scanning that specific area can really help: it narrows the search, speeds things up, and makes it easier to find what you’re actually looking for.

img
3.3. Create a Byte-to-Byte Disk Image (For Damaged Disks)

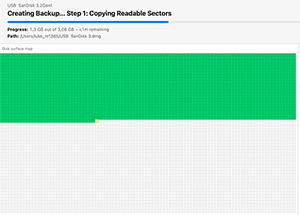
If the disk shows signs of failure or data loss occurred during a crash, power cut, or system error, it’s best to avoid scanning it directly. Instead, create a Byte-to-byte disk image first. This makes an exact copy of the drive so you can scan it safely, without putting more stress on the hardware. Disk Drill includes this feature under the “Extra Tools” menu. Once the image is created, mount it in the app and scan that instead.

4. Let Disk Drill Scan for Data

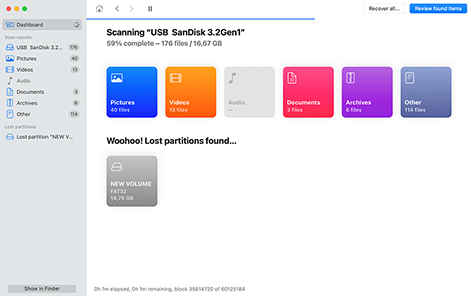
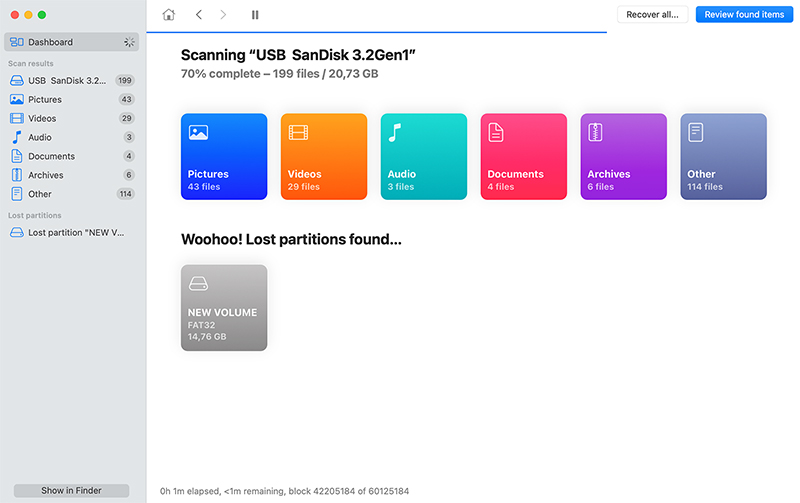
Once you select a drive, unallocated space, or a disk image, Disk Drill kicks off a full scan. This process can take a while (especially if the disk is large), so give it some time.

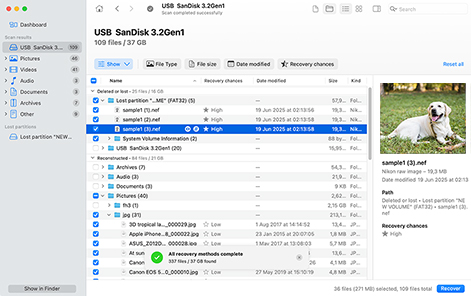
You’ll see files begin to appear in real-time, grouped into categories like Pictures, Documents, Video, and so on. If the app detects any recoverable partitions during the scan, they’ll show up at the bottom of the window under “Lost partitions found…”.

It’s tempting to jump in early, but we recommend waiting until the scan finishes. You’ll get a notification when it’s done, and your results will be more complete and accurate.

Let Disk Drill Scan for Data

5. Review & Recover Found Data

Once the scan finishes, you’ll land in Disk Drill’s results window. You’ll see a list of files and folders, some with original names, others with generic ones, depending on the condition of your file system. You can switch between “tree view” and “icon view” to make browsing and previewing easier. 

To narrow things down, sort the results by file type, date, or name. When you find the files you want, check the box next to each one and click “Recover”. There’s also a “Recover all…” button next to “Review found items” if you want to restore everything at once.

Review & Recover Found Data
!

That's it! You now know how to recover deleted partition on macOS. Why not download the free Disk Drill Basic today and give it a try?

Lost Partition Scenarios on Mac

There are multiple ways you can lose a partition full of important data on your Mac. Here are some of the most common issues you may face that may require you to restore a partition on Mac.

Accidental Data Deletion

Accidental deletion

You can easily make a mistake and manually delete one of your disk’s partitions.

Inadvertent formatting

Inadvertent formatting

Formatting the wrong partition can lead to substantial amounts of lost data.

Incorrect command usage

Incorrect command usage

You may have used some operating system commands that damaged the partitions.

Power failure

Power failure

Sudden power failures can wreak havoc on your system and delete a disk partition.

OS update

Upgrade issues

Problems with operating system upgrades can result in logical partition damage.

Corrupted partition table

Corrupted partition table

The partition table can become corrupted, making it impossible to access its data.

Malware

Malware and viruses

Malware and virus infections can be responsible for deleting a Mac partition.

Physical damage

Physical damage

Exposing a disk to excessive heat or moisture can lead to a lost partition.

Recover Deleted Partitions from any Storage Device

Disk Drill enables you to recover a deleted partition from any type of disk-based storage media. Here are some of the devices that can have their partitions restored with this versatile recovery tool.

PC / Mac
PC / Mac

Dell®, HP®, Acer®, Asus®, MacBook Pro®, MacBook Air®, Apple iMac® and more

HDD / SSD*
HDD / SSD*

HP®, Samsung®, Seagate®, Toshiba®, WD®, LaCie®, Intel®, Adata® and more

USB Drive
USB Drive

SanDisk®, Samsung®, Kingston®, Corsair®, Patriot®, PNY®, Verbatim®, Silicon Power® and more

SD / CF Card
SD / CF Card

SanDisk®, Transcend®, Toshiba®, Lexar®, Integral®, SP®, PNY®, Kingston® and more

Digital Camera
Digital Camera

Samsung®, HP®, Sony®, GoPro®, Canon®, Sigma®, Nikon®, Epson®, Panasonic® and more

Android**
Android**

Samsung Galaxy®, Lenovo®, Huawei®, OnePlus®, Google Pixel®, LG® and more

!

* If TRIM is disabled. Learn more >
** For rooted Android devices.

File Types Supported for Mac Partition Recovery

No matter what types of files were stored on your lost partition, Disk Drill can help recover them. Even if the partition itself, or any of its metadata, can’t be found, Disk Drill can still locate and restore files based on their signatures. Its advanced scanning engine recognizes over 400 file types. Here are some examples of the file types that can be restored.

Audio
Audio

MP3 (MPEG Audio Stream, Layer III), AIF, AIFC, AIFF (Audio Interchange File), WMA (Windows Media audio files)

Images
Images

BMP, JPEG, JP2, GIF, TIFF, PSP. Polaroid/Sigma: X3F. Pentax: PEF. Adobe: AI, APM, IDML, INDB, INDD, INDL, INX, LRCAT, PSB, PSD.

Video
Video

AVI, FLV (Flash video), M4V (iTunes video), MP4 (MPEG-4 video), MPG (MPEG video), WMV (Windows Media Video)

Documents
Documents

DOCX (Microsoft Word), PDF (Portable Document Format), PPTX (Microsoft PowerPoint), XLSX (Microsoft Excel Spreadsheet)

Archives
Archives

ZIP (Extended Zip File), RAR (WinRAR Compressed Archive), DMG (Mac OS X Disk Image), 7Z (7-Zip Compressed), CAB (Windows Cabinet File)

Other Files
Other Files

ACCDB (Microsoft Database), DB (Paradox), SQL (bundled SQL queries), MYO (MYOB Limited Windows File), OTF (OpenType Font)

Supported File Systems for Partition Recovery on Mac

Disk Drill can recover data from a deleted partition regardless of the file system used for storage. The tool is fully compatible with all of these file systems that you might be using on your Mac.

APFS

APFS

Apple File System is the newest file system format used by macOS and iOS systems. It supports full disk encryption and is optimized for use with modern solid-state drives and is designed to be used with large storage volumes.

HFS

HFS

HFS stands for Hierarchical File System and is the original file system used for organizing files on a Macintosh hard disk. It was not designed to handle large disks and does not make very efficient use of disk space.

HFS+

HFS+

The Hierarchical File System Extended was developed by Apple to address shortcomings in the HFS format. It reduces the minimum cluster size which enables the operating system to use disk space more efficiently.

NTFS/NTFS5

NTFS/NTFS5

The New Technology File System was developed as the file system for Windows NT. It is a Windows-specific file system that can be scanned from a Mac with Disk Drill. It also supports BitLocker-encrypted NTFS partitions

FAT/FAT32/exFAT

FAT/FAT32/exFAT

The File Allocation Table and Extended File Allocation Table file systems are native to the Windows operating system. You can scan a disk formatted in this way with Disk Drill for Mac and recover its lost files.

EXT2/EXT3/EXT4

EXT2/EXT3/EXT4

Disk Drill supports the Linux EXT2/EXT3/EXT4 and Btrfs file systems for scanning and data recovery. EXT-based formats are widely used across Linux systems and offer reliable support for large files and volumes.

Technical Specifications for Disk Drill for Mac

OS support
OS support:

Versions of Disk Drill are available for all versions of macOS from 10.5 through the newest version macOS Sequoia (15.5).

Hardware Requirements
Hardware Requirements:

Disk Space: 1GB minimum free space
CPU: 64-bit (x86-64) compatible CPU 1.0 GHz or faster
RAM: at least 4GB

Stable release
Stable release:

Disk Drill 6
Version: 6.0.2020

Tips to Help Prevent Lost Partitions

Here are some tips to help you minimize the chances of a lost disk partition on your Mac. Following these recommendations gives you the best chance of recovering a deleted partition on Mac with recovery software.
Stop using the card

Stop using the disk

To preserve the physical data on the disk or partition, stop using the device immediately when you suspect data loss.

No reformatting

No reformatting

Don’t attempt to reformat the drive until you have completed the macOS partition recovery procedure with a software tool.

No writing

No writing

Don’t write any data to other unaffected partitions on the disk as this risks overwriting the items you hope to recover.

Stop using the device

Don’t recreate partitions

Trying to recreate a partition may make it impossible to use recovery software to restore the data it contains.

No disk utilities

No disk utilities

Do not run disk utilities before you undelete the partition. Disk maintenance activities reduce recovery chances.

Steer clear of viruses

Use reliable software

Make sure to use a reliable Mac partition repair application. An ineffective tool can cause additional damage and data loss.

Frequently Asked Questions

by Disk Drill Team

How to recover a lost partition on Mac?

To recover a lost partition on Mac using Disk Drill, follow these steps.

  1. Download and install Disk Drill for Mac. Don’t perform the download and installation on the disk that lost a partition to protect the data from being overwritten or corrupted.
  2. Launch the app and choose the device with the lost partition from the disk list. If you are recovering from an external device, connect it to your Mac computer before starting Disk Drill.
  3. Click the Recover button to start scanning the device for lost files and folders.
  4. Preview the files that can be recovered and make your selections. Choose a safe storage location for the recovered data that is not on the affected device.
  5. Click Recover again to perform the recovery.
What is the best recovery partition tool for Mac?

For most users, Disk Drill is the best all-around option. It covers all the basics (and more) through a clean and beginner-friendly UI. It’s a great tool if you need to recover a lost partition or data in general without getting too technical.

If you want more control over the process (like editing file signatures or working with raw disk structures), R-Studio is a powerful alternative. It’s geared more toward advanced users and data recovery professionals.

You can also try TestDisk, a free, command-line tool focused on repairing partition structures rather than recovering individual files. It’s not the easiest to use, but can be an effective Mac partition recovery tool in the right hands.

Another option is DiskWarrior, which doesn’t recover data directly but is designed to repair damaged file systems and directory structures (especially on older HFS+ drives).

More information on the best programs to recover lost partitions on Mac can be found in our full review.

How do I recover a partition on my Mac's hard drive?

If you need to recover a lost partition from your Mac or MacBook’s internal hard drive (and that’s the only disk in the system) the safest way to do it is by using an external drive.

Here’s what that means: get an external SSD or hard drive with enough free space. Install Disk Drill (or any partition recovery software) on that external drive, not your internal one. Then, recover the lost data to that same external drive.

This setup avoids writing new data to the drive you’re trying to recover from, which helps prevent permanent loss. It also keeps things cleaner and safer when scanning your Mac’s system disk.

If you have an Apple Silicon or T2-based Mac, make sure to pick recovery software that can work with it.

What is the recovery partition on a Mac?

The Mac recovery partition is an alternative method of restoring system software without the use of an installation DVD. The partition allows you to repair or erase your hard drive and install a new copy of the operating system. You can also use the partition to restore your Mac from a Time Machine backup.

How do I restore a partition from a RAW disk on a Mac?

If your disk or one of its partitions shows up as RAW, macOS won’t be able to access it like a normal volume. That usually means the file system is damaged or missing, but the data itself may still be recoverable.

You can use Disk Drill to safely scan the RAW disk and extract files from it, even if macOS can’t mount it. Here’s how to do it:

  1. Connect the RAW disk to your Mac.
  2. Launch Disk Drill and look for the drive in the list under “Storage Devices”. It might not show a partition name, but the physical disk should appear.
  3. Click "Search for lost data." Disk Drill will scan the entire disk and attempt to locate lost files, regardless of the file system.
  4. Preview and recover the files you need. Save them to a different drive to avoid overwriting anything.

Does reinstalling macOS delete everything?

No, it does not. Reinstalling replaces the system files but leaves user data and most preferences alone.

Can I recover a deleted APFS/HFS+ partition on Mac?

If a partition using APFS or HFS+ was deleted, recovery is often possible, as long as the data hasn’t been overwritten. Disk Drill supports both APFS and HFS+ file systems and can scan the full disk (not just visible volumes) to search for lost partitions and recover files from them. There’s a good chance the folder structure and file names will still be recoverable too.

Can I recover the partition using macOS built‑in tools?

macOS doesn’t include a built-in tool specifically for partition recovery. Disk Utility can help you repair a volume or reformat a drive, but it won’t recover a deleted or lost partition (or restore the files from it).

If you're dealing with actual data loss, you’ll need to use third-party software like Disk Drill, TestDisk, or R-Studio to scan the disk and recover the missing data.

Can I continue to use my Mac after losing a partition?

It depends on where the lost partition was.

If the partition was on an external drive, then yes, you can keep using your Mac normally. Just avoid writing anything new to that external disk until you’ve tried to recover the data. The less you touch it, the better your recovery chances.

But if the lost partition was on your internal system drive, it’s a different story. Even routine actions like browsing the web or saving files can overwrite parts of the disk where your lost data might still live. In that case, it’s best to stop using the Mac, boot from an external drive, and run recovery tools from there.

Either way, don’t install recovery software on the same drive you're trying to recover from. That’s rule number one.

Can I rebuild partition table on Mac if it is corrupt, but data is intact?

In some cases, yes - but it’s not something macOS handles on its own.

If the partition table is damaged but the data on the drive is still intact, tools like Disk Drill, TestDisk, or R-Studio can help. They can recover your files.

TestDisk, in particular, is built specifically for this purpose. It’s designed to recover lost or deleted partitions and rebuild damaged partition tables. The interface is text-based, so it’s not super beginner-friendly, but it’s powerful and free.

Disk Drill
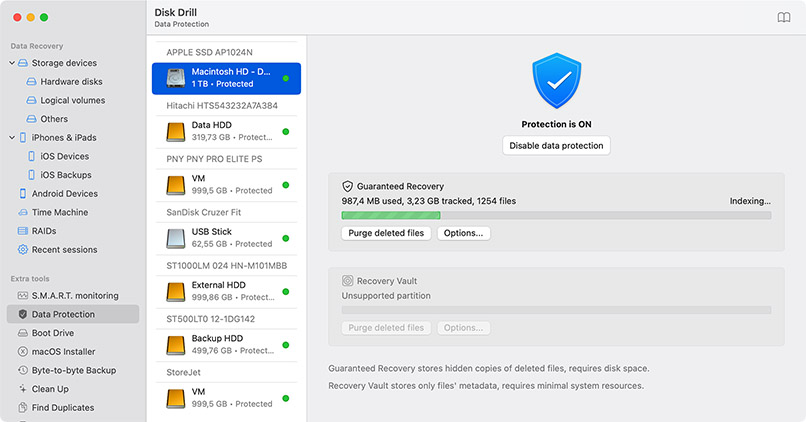
Discover the easy partition recovery in Disk Drill for Windows. Free data protection available

More How To's on file recovery on Mac OS X

How do I recover lost data?

See what Disk Drill fans say

AN Jay AN Jay
Disk Drill is a professional but extremely simple Mac data recovery software that helps you rescue data on your Mac disks, external or internal hard drives, memory cards, cameras, iPods Classic, etc. Disk Drill will recover deleted files on your Mac!
Read more
tutsplus.com tutsplus.com
We'll all experience data loss at some point in our computer-using lives so the more we can prevent it, the better. But when that fateful day does happen, you now know that there’s still a lot more you can do and data recovery isn't as scary (or expensive) as it sounds! Jordan Merrick
Read more
Used by world famous companies