Let’s face it: losing photos sucks. While you can always reinstall your operating system and applications, it’s much more difficult to recover deleted photos in Windows 10. However, it’s not impossible.
If you follow our instructions and act quickly enough, you should be able to retrieve most—if not all—recently deleted photos without taking your computer apart or paying an expensive professional to retrieve deleted photos for you.

We recommend you start with the first method if you haven’t yet made any attempt to recover your deleted photos. If you have, feel free to start with any method you want.
Where Do Permanently Deleted Photos Go on Windows?
Typically, when you delete a photo in Windows 10, it will be sent to the Recycle Bin. The same is true for NTFS-formatted external hard drives, which will have their own hidden $RECYCLE.BIN folder.
However, there are times when deleted photos don’t go to the Recycle Bin. In this case, they’re considered permanently deleted. This can happen if:
- The files are deleted using Shift + Del, which bypasses the Recycle Bin.
- The Recycle Bin has been disabled (preventing files from going there)
- The Recycle Bin has been emptied, either manually or automatically.
- The data was too large for the Recycle Bin, causing it to be deleted instantly.
- Your photos were deleted from an SD card or similar external storage device that uses a file system that doesn’t support the Recycle Bin.
Can Permanently Deleted Photos Be Recovered?
Even after being permanently deleted, however, there’s usually a chance of getting it back. The chances of recovering this data depend on a few factors like the following:
💽 Type of Storage Device (HDD or SSD)
- HDDs (Hard Disk Drives): HDDs retain permanently deleted data until it’s overwritten by new data, allowing you to recover it.
- SSDs (Solid-State Drives) with TRIM enabled: TRIM causes all deleted data to be erased periodically. Recovering photos after TRIM is run is almost impossible.
⏳ Time Since Deletion
- The longer the drive is in use, the higher the risk that the deleted files will be overwritten.
- Windows 10 runs automatic defragmentation once a week by default, which rearranges data on the disk. In any case, keeping the HDD or SSD connected and running can only do more harm.
👆 Whether the Device Has Been Used
The fastest way of losing deleted photos for good is continued use of the drive. Each file you save to the drive risks the deleted photos being overwritten. Data that has been overwritten is no longer recoverable, as there would be nothing left of the original data.
Here’s what you need to do next:
- Stop using the drive immediately after your photos have been deleted. Every action risks the photos becoming lost for good.
- If you accidentally deleted photos from an external drive or memory card, remove it straight away and don’t use it until you’re ready to perform recovery.
- If you’re fortunate enough to have a backup, check the backup first. If not, your best option is data recovery software if you follow the right process.
- If the photos were deleted from your system drive (C:), do not install the recovery software on the same drive, as this will overwrite the files you’re trying to recover.
How to Recover Deleted Photos from the Recycle Bin on Windows 10
The Recycle Bin is by far the easiest way how to restore deleted photos in Windows 10, provided they made it there. As we mentioned, there are some cases where the photos will skip the Recycle Bin and be permanently deleted. If your photos have already been permanently deleted, check out the next method.
Follow these steps to recover deleted photos from the Recycle Bin in Windows 10:
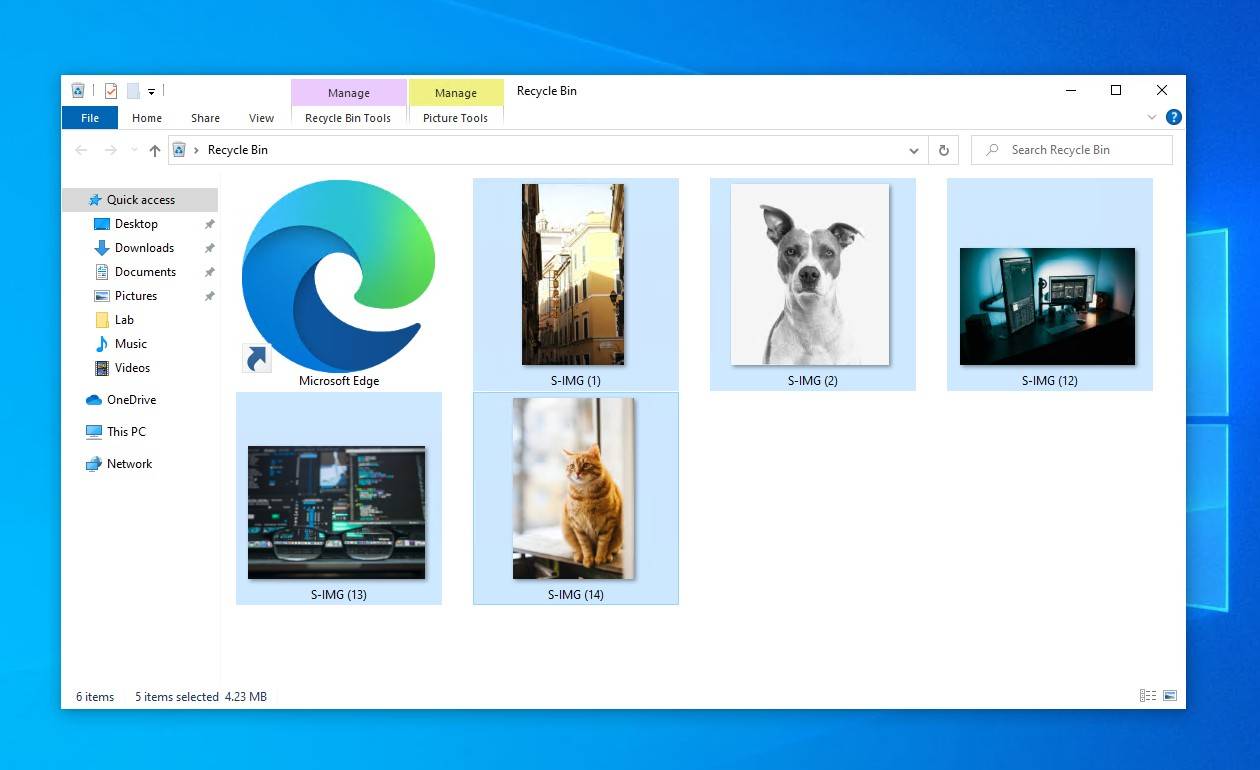
- Double-click on the Recycle Bin icon on your desktop.
- Select the deleted pictures you want to recover.
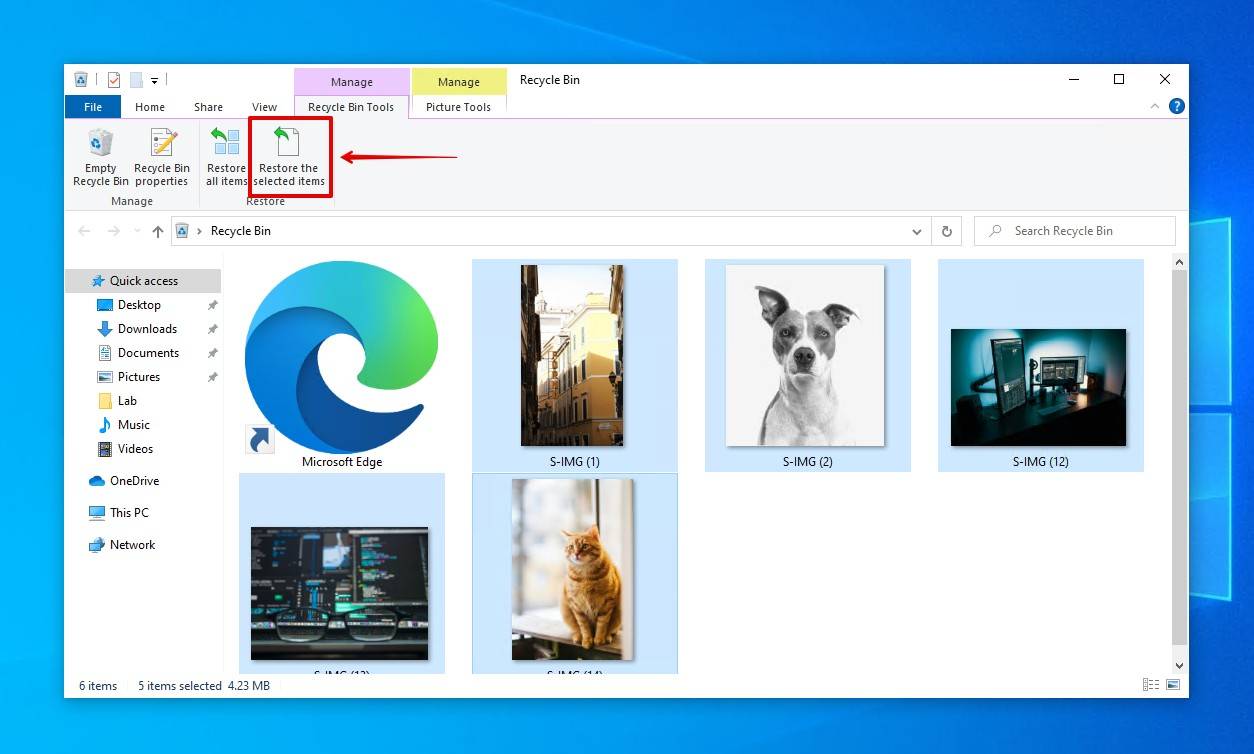
- Click on the Restore the selected items option located in the Recycle Bin Tools tab.
How to Recover Permanently Deleted Photos from PC
Without a backup, photo recovery software is the only way how to recover deleted photos on Windows 10 that can’t be found in the Recycle Bin. We recommend Disk Drill because it excels at recovering a wide range of photo formats, like JPG, PNG, TIFF, DNG, and R3D. It can also recover RAW image formats, which many other recovery options don’t. Additionally, it uses several scanners, improving your overall odds of recovering data by utilizing file system records (of which FAT32, exFAT, and NTFS are supported) and file signatures.
In any data loss situation, it’s always a good idea to work on a byte-to-byte copy instead of the actual drive. In a lost or deleted state, your data is liable to being overwritten by the myriad of processes running in the background. Program updates, defragmentation, and TRIM commands are all operations that could cause the data to become unrecoverable. A byte-to-byte copy is an exact snapshot of your drive, which preserves the data in its current state and maintains your chances of recovery.
This is how to recover deleted photos on Windows 10 using Disk Drill:
- Download Disk Drill and install it. Avoid installing it on the same drive you’re recovering data from. Once it’s installed, open it.
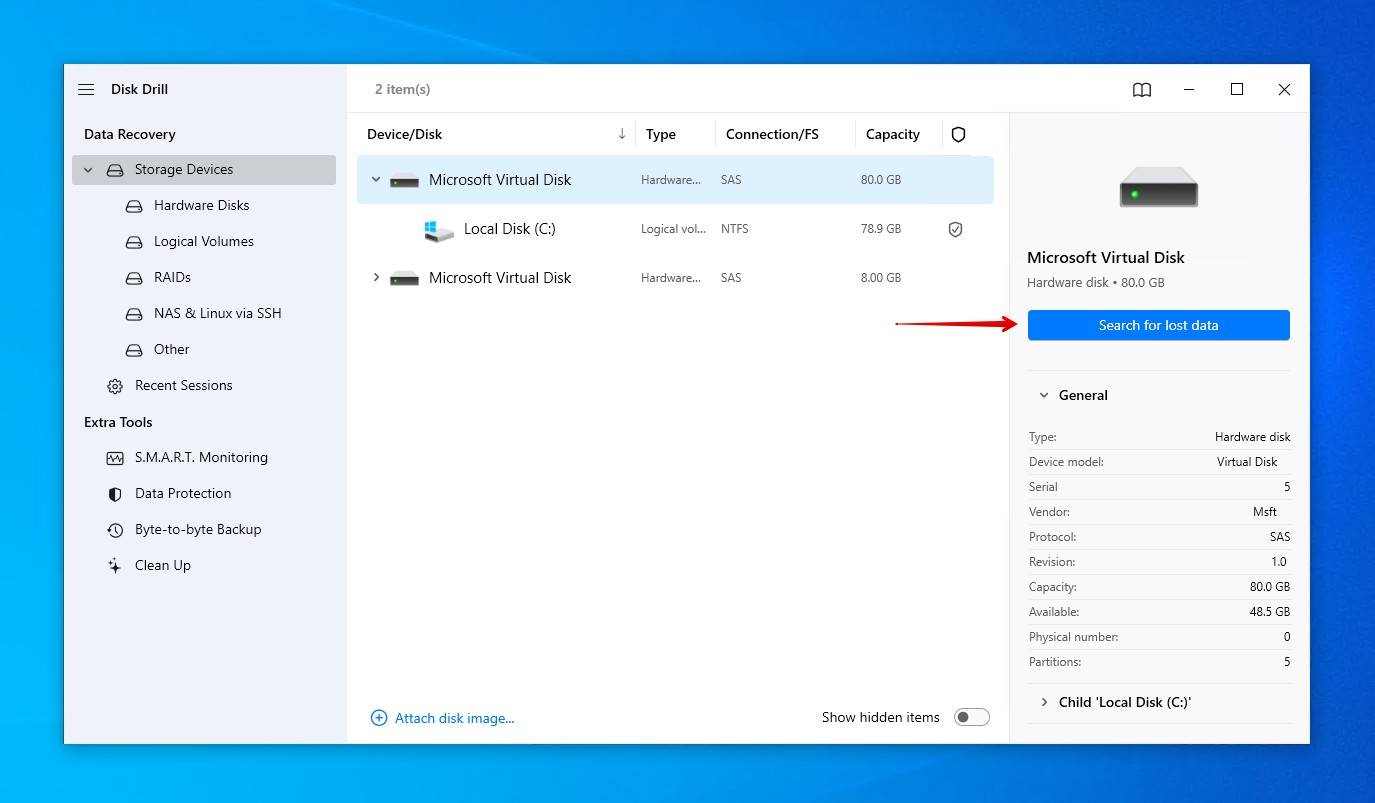
- Select the storage device from which you want to retrieve the deleted photos. Scanning the partition itself may reduce the scan time, but scanning the disk yields more results. Click Search for lost data.
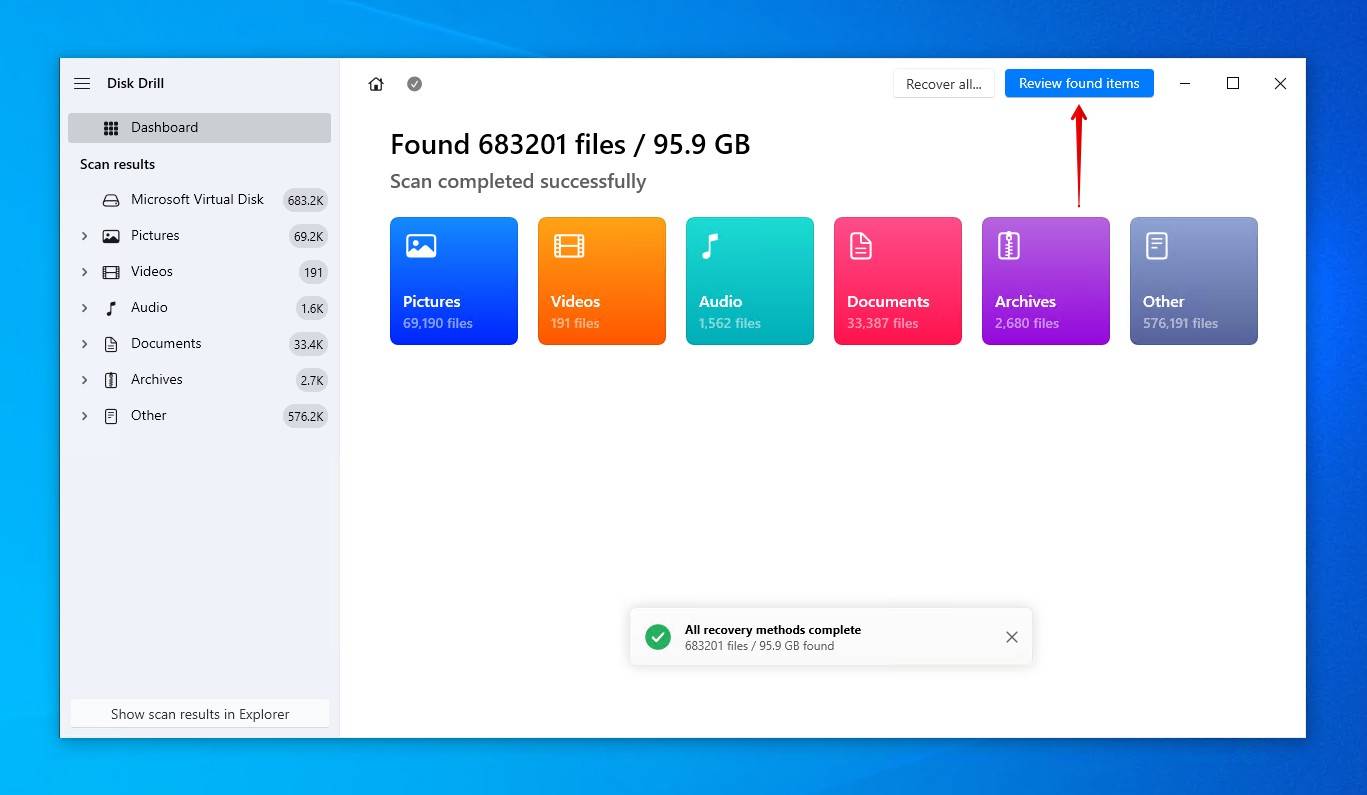
- Click Review found items at any point during the scan to see what Disk Drill has found. You also have the option of clicking one of the colored file format icons to filter the results or recover everything by clicking Recover all.
- Preview and select which photos you want to recover. Previewing the files before recovery is always important, but even more so when it comes to recovering photos as it’s an easy way of determining if the file is intact. Click Recover when you’re ready.

- Choose where you want to save the recovered files. Be sure to choose a separate physical storage device to avoid corrupting your data. Click Next to complete photo recovery.

How to Retrieve Photos from Windows 10 Backup
There’s a good reason why experts constantly preach about the importance of backups: they work. If you’ve been taking advantage of the backup features present in the Windows operating system, you’re in luck because you should be able to easily recover all deleted photos.
Windows 10 has two backup utilities: File History and Backup and Restore. File History is the primary backup utility that works by periodically taking snapshots of your data and storing them on another drive. This allows you to recover the data, along with previous versions of it. Backup and Restore is an older backup utility that focuses on traditional, single-copy backups with the option of keeping a system image backup.
Given this may be your first time recovering deleted photos on a PC from one of these backups, we’ve included the necessary steps below.
Follow these steps to retrieve deleted photos with Windows 10 File History:
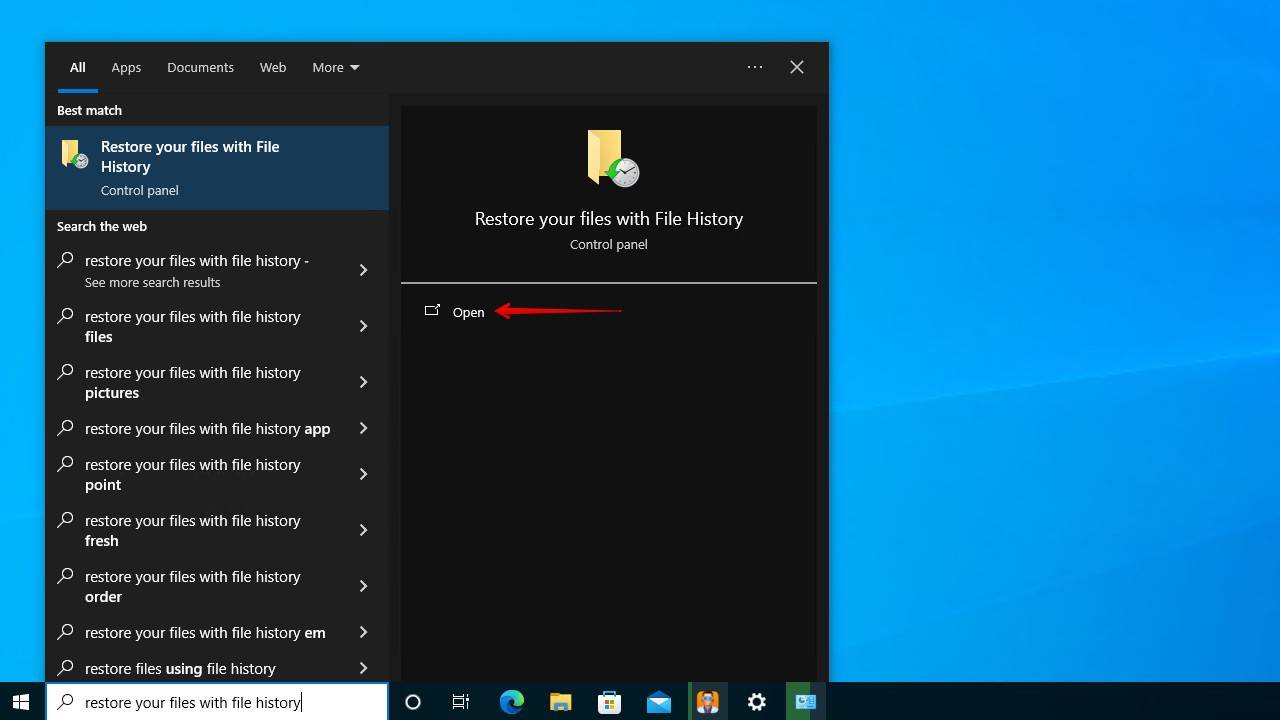
- Open Start, type “Restore your files with File History,” and hit Enter.
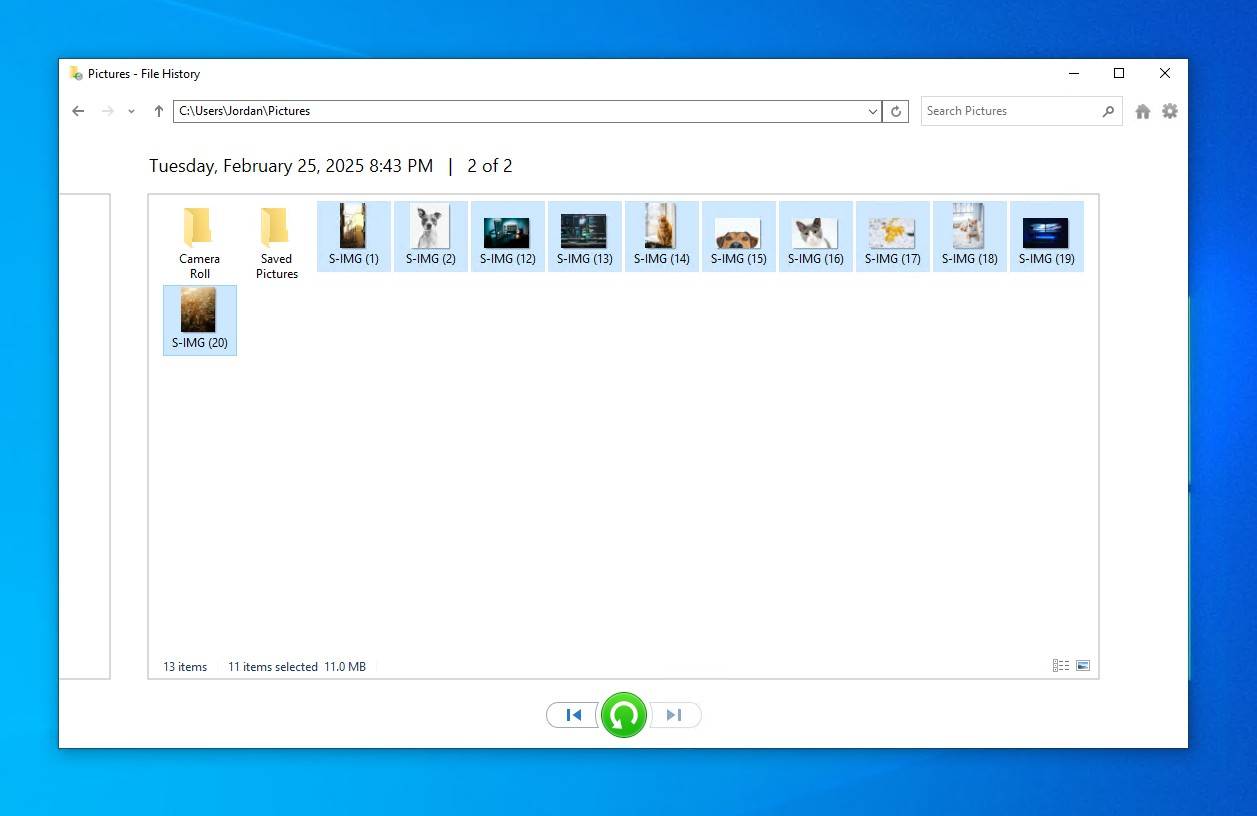
- Find the deleted pics and select the version you want to restore.
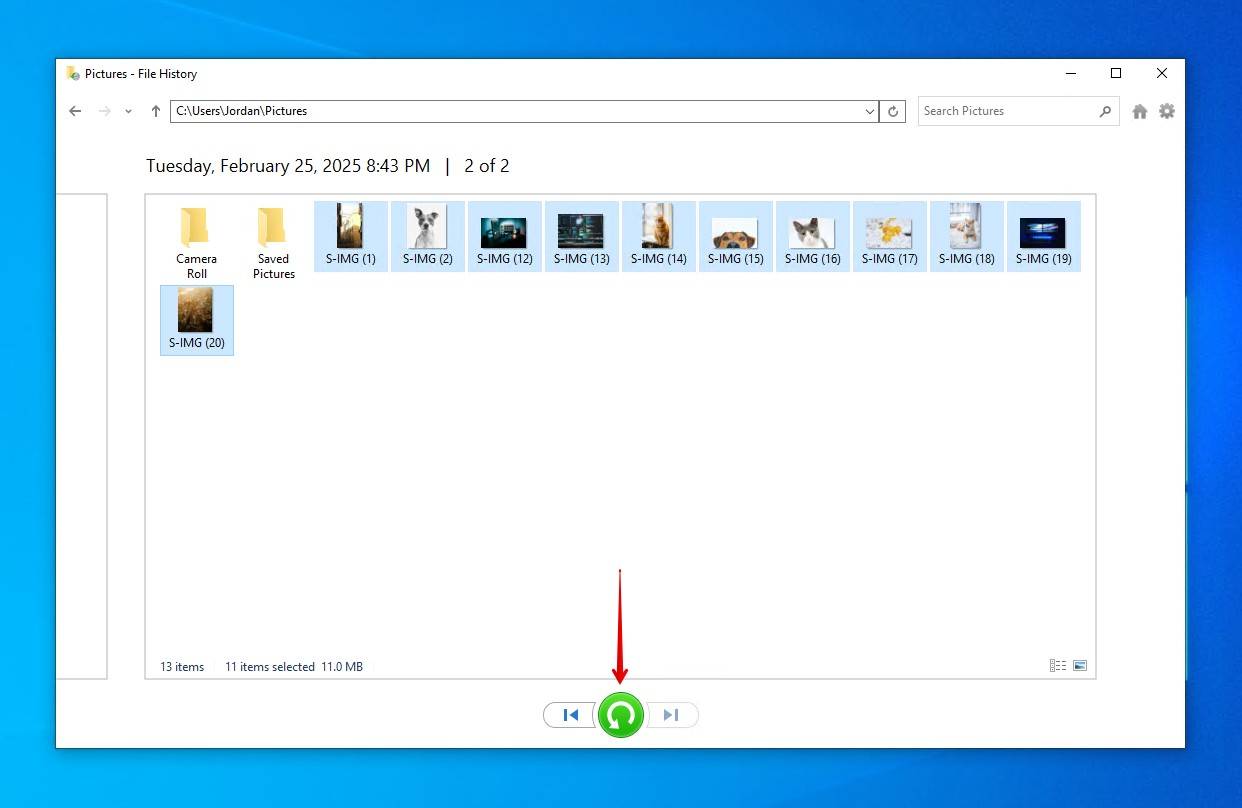
- Click the Restore icon to recover the deleted pics to their original location.
Follow these steps to retrieve deleted photos from older system image backups:
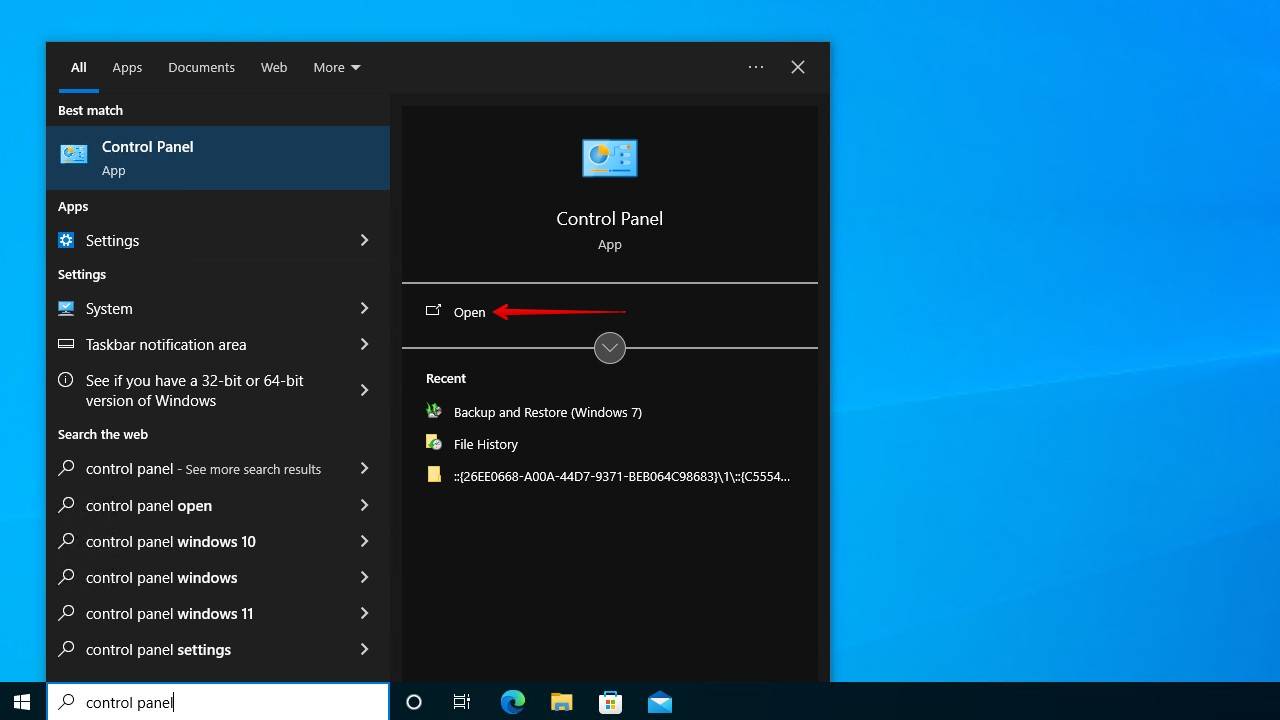
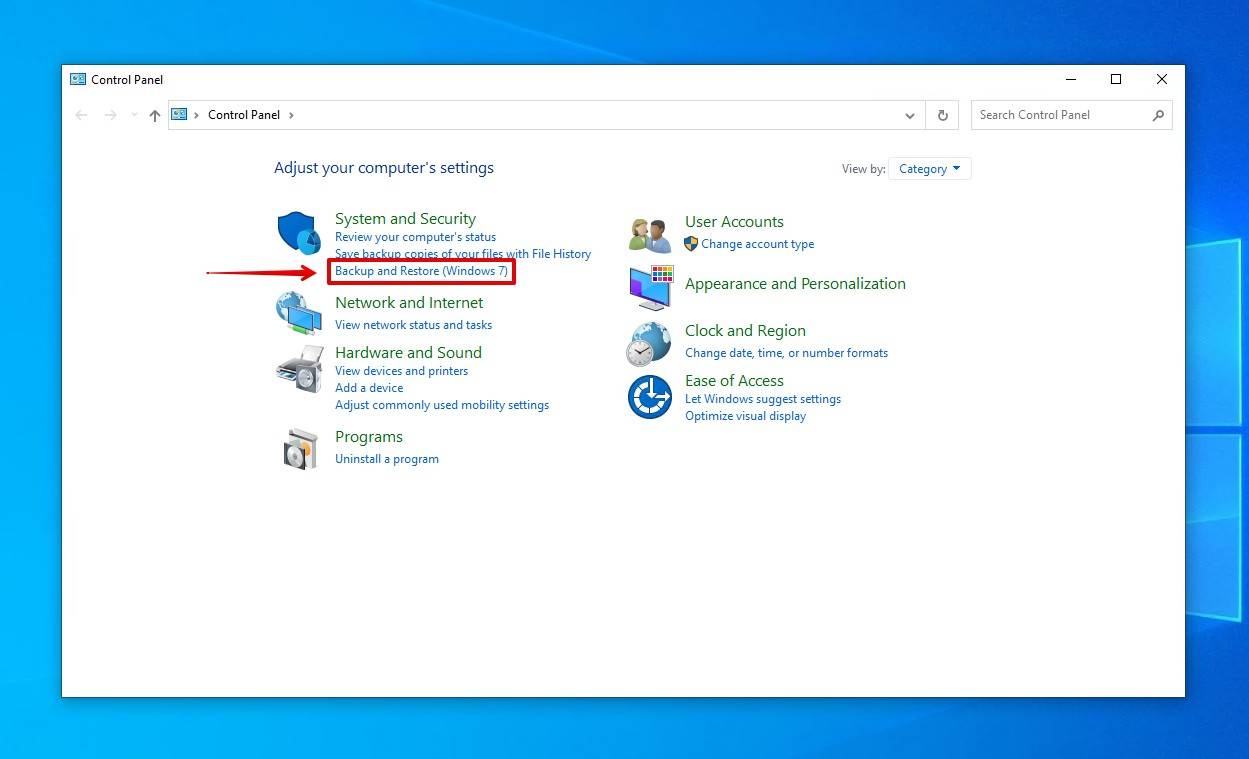
- Open Start, type “Control Panel,” and hit Enter.
- Navigate to System and Security > Backup and Restore (Windows 7).
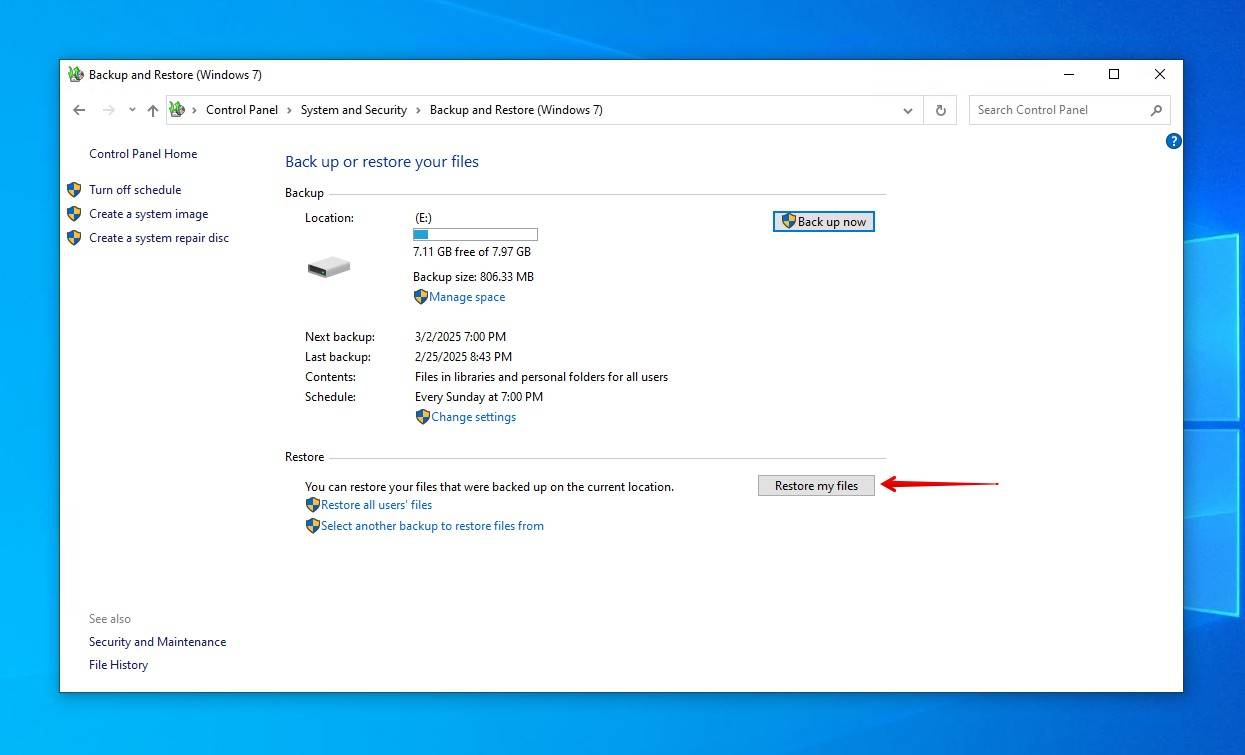
- Click Restore my files.
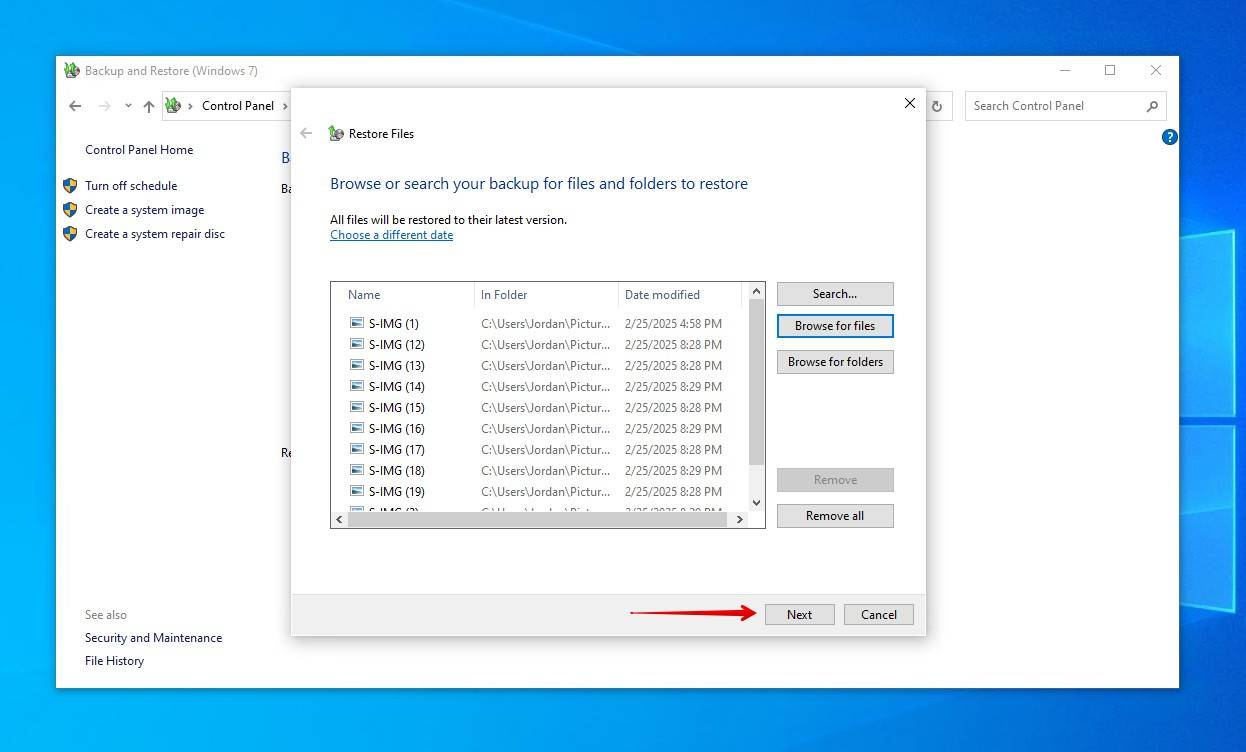
- Select the deleted photos. Click Next.
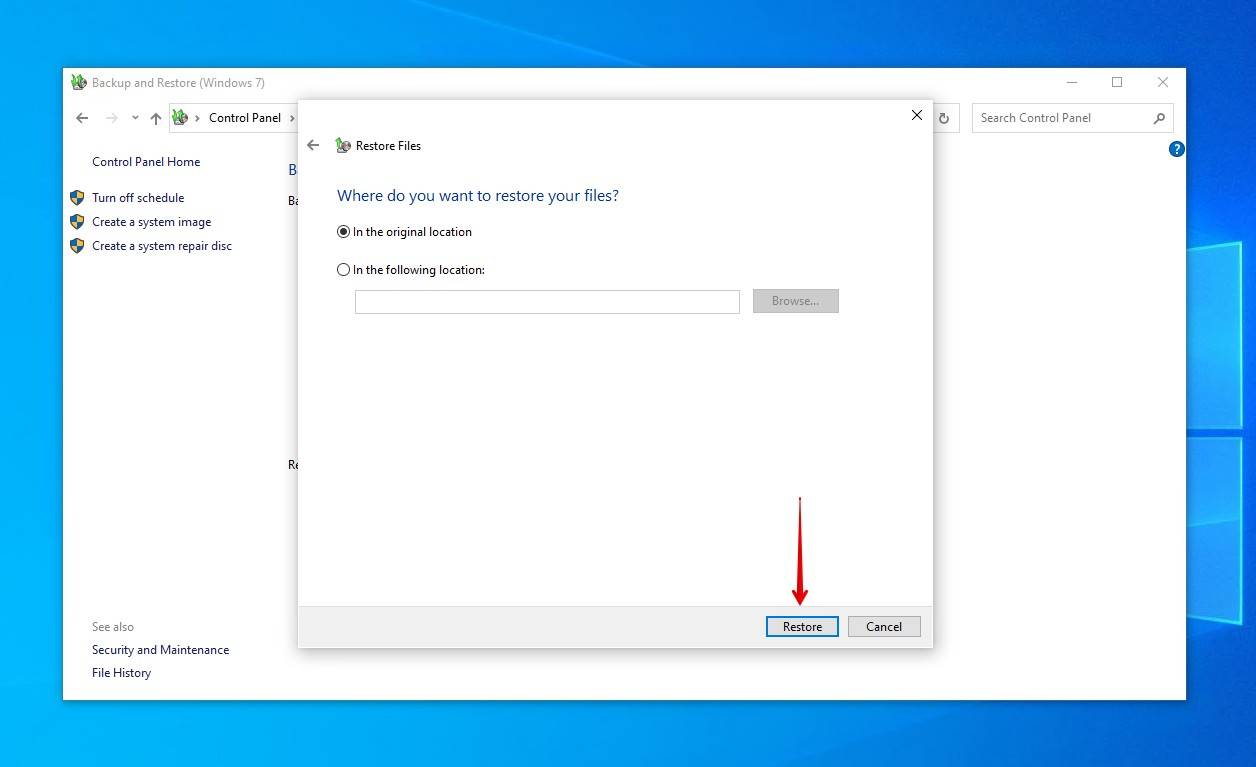
- Choose a recovery location and click Restore.
How to Recover Deleted Photos from a PC Using the Cloud
Cloud solutions like OneDrive, Google Drive, and Dropbox are oftentimes used as a means of simple off-site storage. Sometimes it’s happening and you may not even know it, which could be used to your advantage. If you happen to have a cloud storage service installed on your computer, there’s a chance that recover lost photos on your PC by downloading them from the cloud.
Here are some common cloud storage applications that you may find on your PC:
- OneDrive – Microsoft’s own cloud storage solution, OneDrive is installed with Windows by default. If you sign into Windows with a Microsoft account, OneDrive OneDrive would no doubt have asked for your sync preferences in the past. It automatically backs up your libraries, which includes Pictures, so you should check your local OneDrive folder or log in with your browser to see if your photos are there.
- Google Drive – This also includes Google Photos, which comes preinstalled with many Android phones and automatically backs up photos to your Drive (provided the setting is enabled). Google Drive will back up anything included in the local Google Drive folder, so check there or sign in online and see if the deleted photos can be recovered.
- Dropbox – Dropbox is another common cloud storage solution. Like Google Drive, it can be set up on your smartphone or tablet to automatically back up photos. Check your Dropbox folder or sign in with a browser.
How to Restore Deleted Photos via Data Recovery Services
The options we’ve mentioned aren’t suitable for every situation. Perhaps you’re dealing with a laptop that has an integrated SSD that can’t be removed, or the data recovery process seems too complex and you’d rather not risk recovering the data yourself. In either case, the best way to recover permanently deleted photos from a Windows 10 computer is send the storage device to a data recovery center.
Using a data recovery service is the costliest option but by far the most successful. This is because you’ll be working directly with data recovery experts who know how to recover permanently deleted photos from laptops, desktops, and almost any other kind of device, without risking further loss.
Here’s a quick look at what’s involved when using a data recovery service to recover deleted photos:
- Visit cleverfiles.com/data-recovery-center and click Start Recovery.

- Choose a service level based on how fast you need the deleted photos recovered.

- Fill in the work order with your personal data and any useful information pertaining to the storage device and its status. When you’re ready, click Complete my work order.

How to Improve the Chances of Successful Photo Recovery on Windows PC
It would be great if all data recovery jobs were successful. Unfortunately, nothing is guaranteed when it comes to data recovery because there are many factors that influence your chance to recover deleted photos on Windows 10that the OS can’t see.
Knowing what you can do to improve your chances of successful photo recovery is a good idea. To some, the following insights may be common sense, but experience tells us that even seasoned Windows users tend to forget them.
- 💾 Work on a byte-to-byte backup where possible – It cannot be overstated how important it is that you stop using the drive with the deleted images, as echoed in this post on Tech Community. Even if you’re not interacting with it yourself, your system is constantly performing operations in the background that could result in data being overwritten, like moving files around, automatic software updates, and general maintenance. Instead, creating a byte-to-byte backup of the drive and scanning that instead is the recommended option.
- ✂️ Disable TRIM, if you can do so quick enough – TRIM is the bane of data recovery. Once a TRIM command is issued, the data is gone. There’s no telling when your SSD will run a TRIM command, which is why you should either (a) immediately disable TRIM once your drive is visible, or (b) keep the SSD unpowered and have a data recovery service handle it. Keep in mind that, even though TRIM is catastrophic when run in a recovery context, it has a very real function that helps prolong the life of your SSD. Therefore, before disabling it for good, consider its pros and cons before using it in the future.
- 💽 Implement a proper backup strategy – Keeping a copy of your data on hand is the only guaranteed data recovery option. There are plenty of backup strategies available, a very popular one being the 3-2-1 backup rule, but even the simplest step of copying your data to another drive can be the difference between having that data and losing it. If you don’t already, get a drive you can use specifically for backups, or look into your cloud storage options for easy, off-site storage.
By following this simple but crucial advice, you may never find yourself Googling how to recover deleted photos from a computer, whether a desktop or otherwise, ever again.
Summary
Knowing how to find a deleted photo is a skill many learn in a time of stress. Even so, you will leave this article knowing a little bit more about how your photos are stored, as well as how to recover deleted photos on a laptop or desktop even if they’re considered “permanently deleted”.
If nothing else, the most practical piece of advice you should take away from this article is that keeping a regular backup of your data is the only guaranteed way to recover any permanently deleted files on Windows.
FAQ
Deleted photos remain recoverable until the data is overwritten or erased. This means, theoretically, the deleted photos can remain on the drive indefinitely if it’s no longer used. With HDDs, the data can no longer be recovered if new data occupies the same physical location. The same is true for SSDs, but you must also consider TRIM and its effects on deleted data.
One available recovery option in Windows 10 is called Restore Previous Versions, and, as its name suggests, it can be used to restore previous versions of deleted or lost files, including photos. To use it, do the following:
- Open File Explorer.
- Select the folder in which the deleted photos were located.
- Right-click on the folder and select Restore previous versions from the context menu
- Select which previous version you would like to restore and click Restore.
As long as you have a backup of your deleted photos, you should be able to restore them without any software. Here’s how to recover deleted photos from a computer without software:
- Open File Explorer.
- Right-click on the folder where your deleted photos were located.
- Select Properties and go to the Previous Versions tab.
- Select a previous version of the folder and click Restore.
If there’s no backup available, it means that you can’t recover permanently deleted photos in Windows 10 without software. In that case, we recommend you use Disk Drill.
That depends on several factors. If the photos were recently deleted from a storage device that’s not encrypted and doesn’t use TRIM, then it’s very likely that they can still be recovered using a specialized data recovery software application like Disk Drill.
