When a storage device suddenly becomes RAW, Windows can’t read its file system, so all stored data becomes inaccessible. Fortunately, RAW drive recovery is possible using specialized software tools that can scan the drive’s contents directly, even without a functioning file system. If you’ve never recovered files from a RAW hard drive before, this guide will walk you through the proven recovery methods that can help restore your data within minutes.
Why RAW Hard Drive Can Be Recovered

The term “RAW hard drive” refers to any hard drive whose file system has become corrupted or unreadable by the operating system. Since the OS can’t identify whether the drive is formatted as NTFS, FAT32, exFAT, or any other file system type, it instead marks it as “RAW” in the Disk Management tool in Windows or its counterparts on other operating systems.
Common causes of a drive becoming RAW include:
- 😧 User error during partitioning
- ❌ Interrupted disk operations damaging critical file system metadata
- ⚙️ Hardware issues like bad sectors, head crashes, or mechanical failures
- 🪫 Power surges or voltage fluctuations that cause data corruption or physical damage
- 💽 Hard drive firmware problems
- ⌛️ Natural wear and tear that causes the drive’s lifespan to be exceeded
The problem is that the file system essentially serves the same function as a map or table of contents for your data. As The Linux Information Project explains, filesystems provide “a very intuitive means for organizing and finding files” while also managing metadata (information about your files).
More specifically, the filesystem tells your computer exactly where each file starts and ends, what space is available for new files, and how existing files are organized. Without this navigation system, your computer can’t locate or access any of the files stored on the drive, even though the actual data remains physically present on the storage medium when the file system suddenly becomes RAW.
Since your data is still there on the hard drive, RAW data recovery is possible.
However, you need to hurry and approach it correctly because any attempts to use or fix the drive before recovering your files could lead to permanent data loss.
How to Recover Files from a RAW Drive
There are several methods to recover data from a RAW drive, regardless of whether it was originally formatted as NTFS, FAT32, or exFAT. Since different recovery methods can yield different results, you might need to try multiple approaches to recover all your files. We recommend following these methods in the order presented below, as this approach typically provides the best results while minimizing the risk of data loss.
Many users have successfully recovered data from RAW drives using these methods. For instance, one user on X reported:
Definitely get the DiskDrill software. I have gotten files back from damaged hard drives that even repair shops said they couldn’t fix without sending it to a lab and doing the $10k full physical procedure
— 🔥 METAL Q 🔥 (@Quincinerate) January 31, 2024
Another user on Reddit successfully located nearly 1TB of data from a RAW partition after a partition move operation crashed, demonstrating that recovery is possible even with large amounts of data.
Method 1: Recover Data from a RAW Drive using Disk Drill
When dealing with a RAW drive, your first solution of choice should be data recovery software because attempting to fix or repair the drive before recovering your files could lead to permanent data loss of your valuable data.
Disk Drill is an excellent choice in this regard because of how well it can handle RAW drives even when Windows shows formatting errors or can’t access the file system. This is thanks to its ability to bypass the corrupted file system and scan the drive’s contents directly to locate and restore your files based on their signatures (around 400 unique signatures are supported by the software) and file system metadata from remnant partitions.
Here is how to recover data from a raw drive:
- Download, install, and launch Disk Drill for Windows.

- Select the RAW storage device on which the deleted files were stored and click Search for lost data.
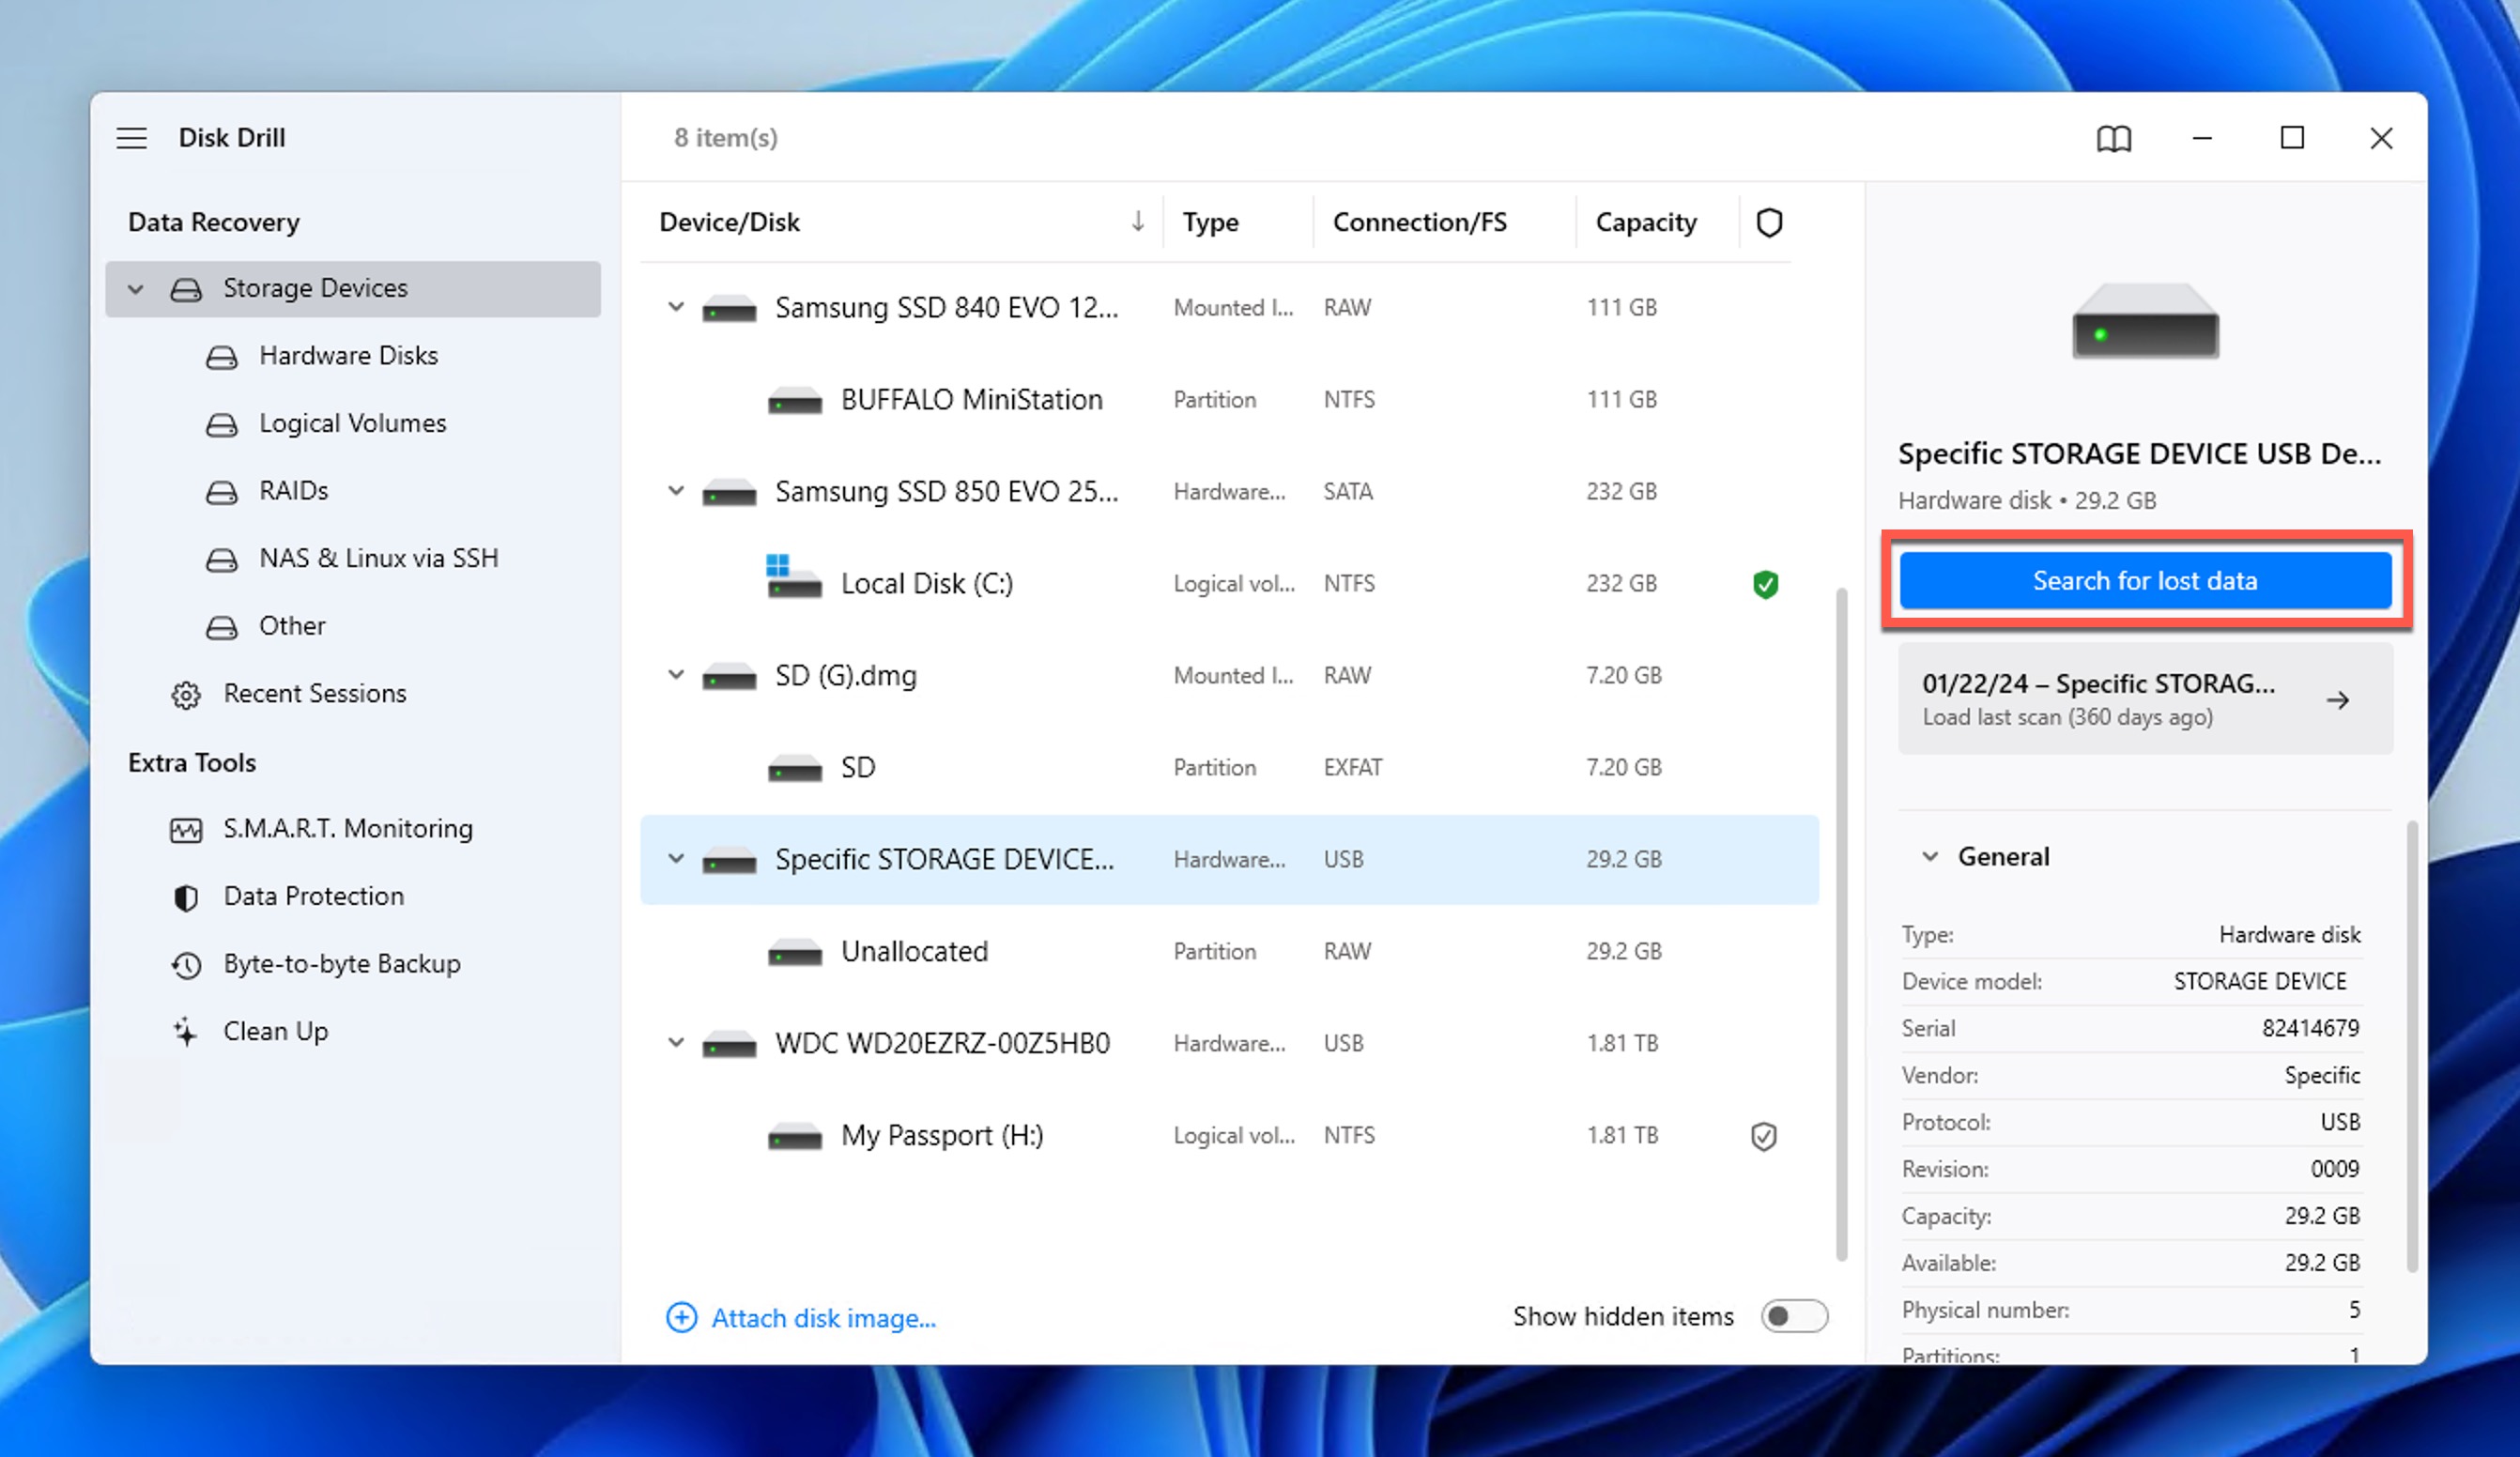
- Wait for the scan to finish or click Review found items to see found files right away (Disk Drill will continue scanning in the background).
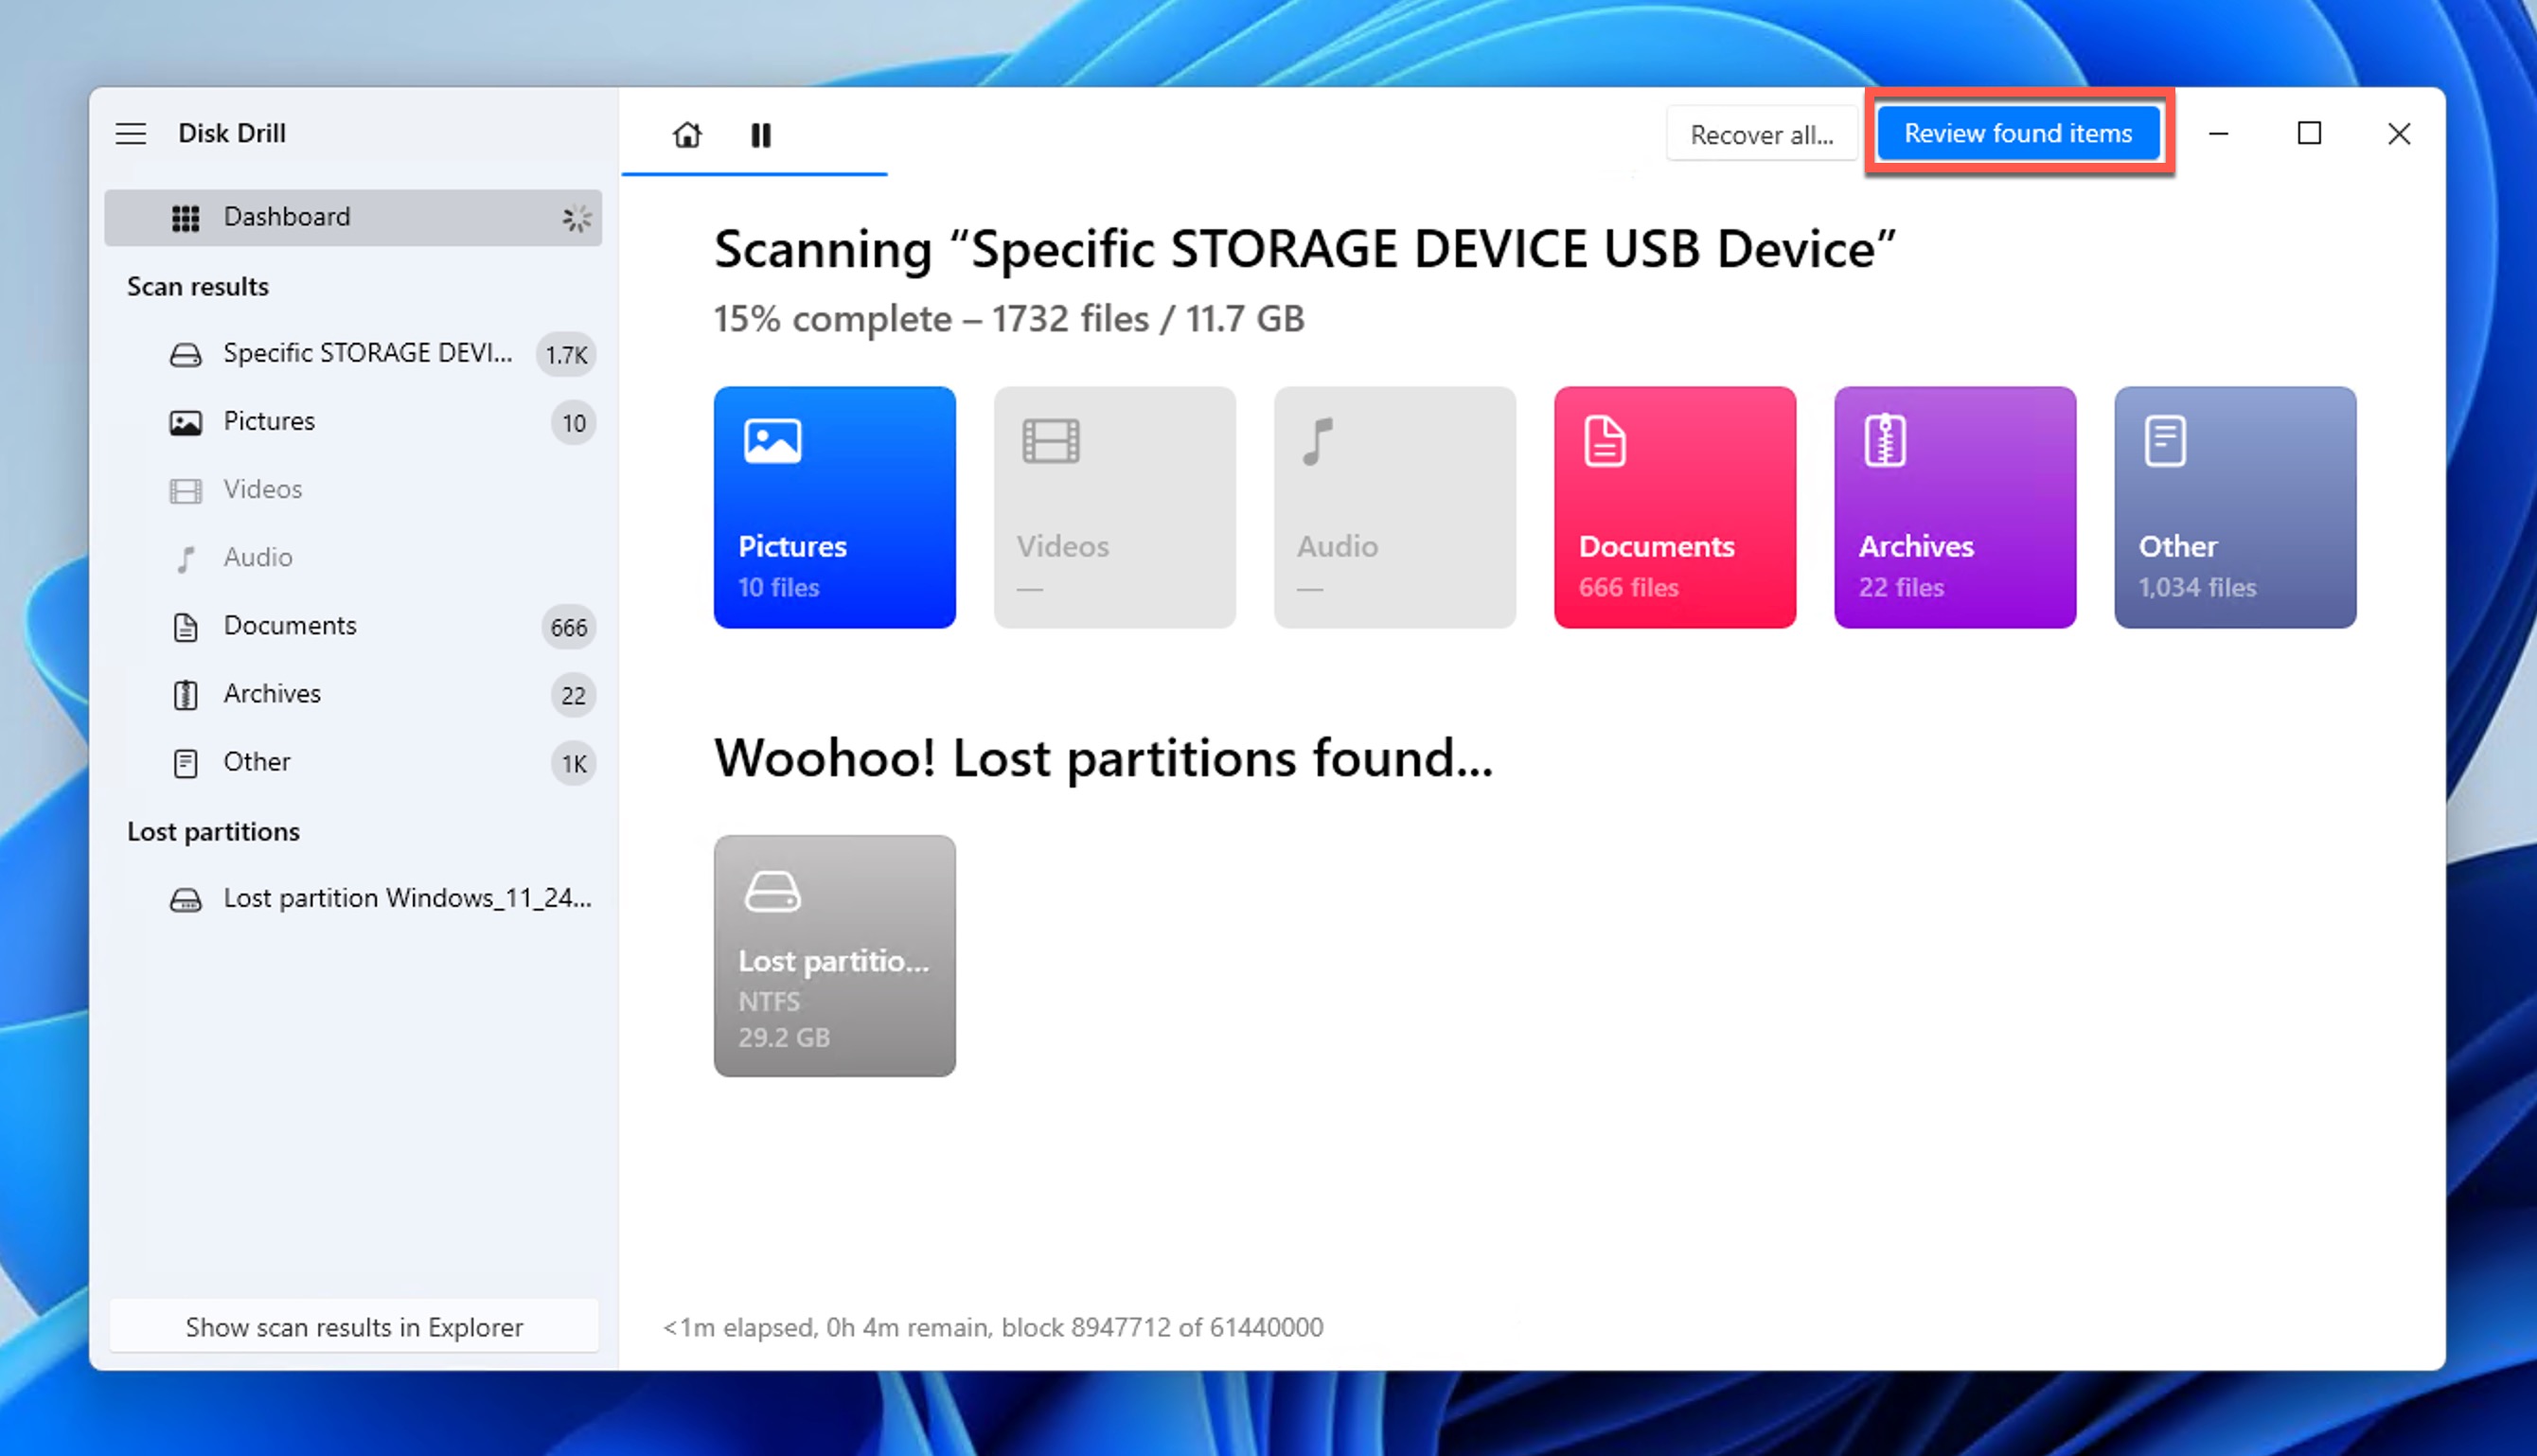
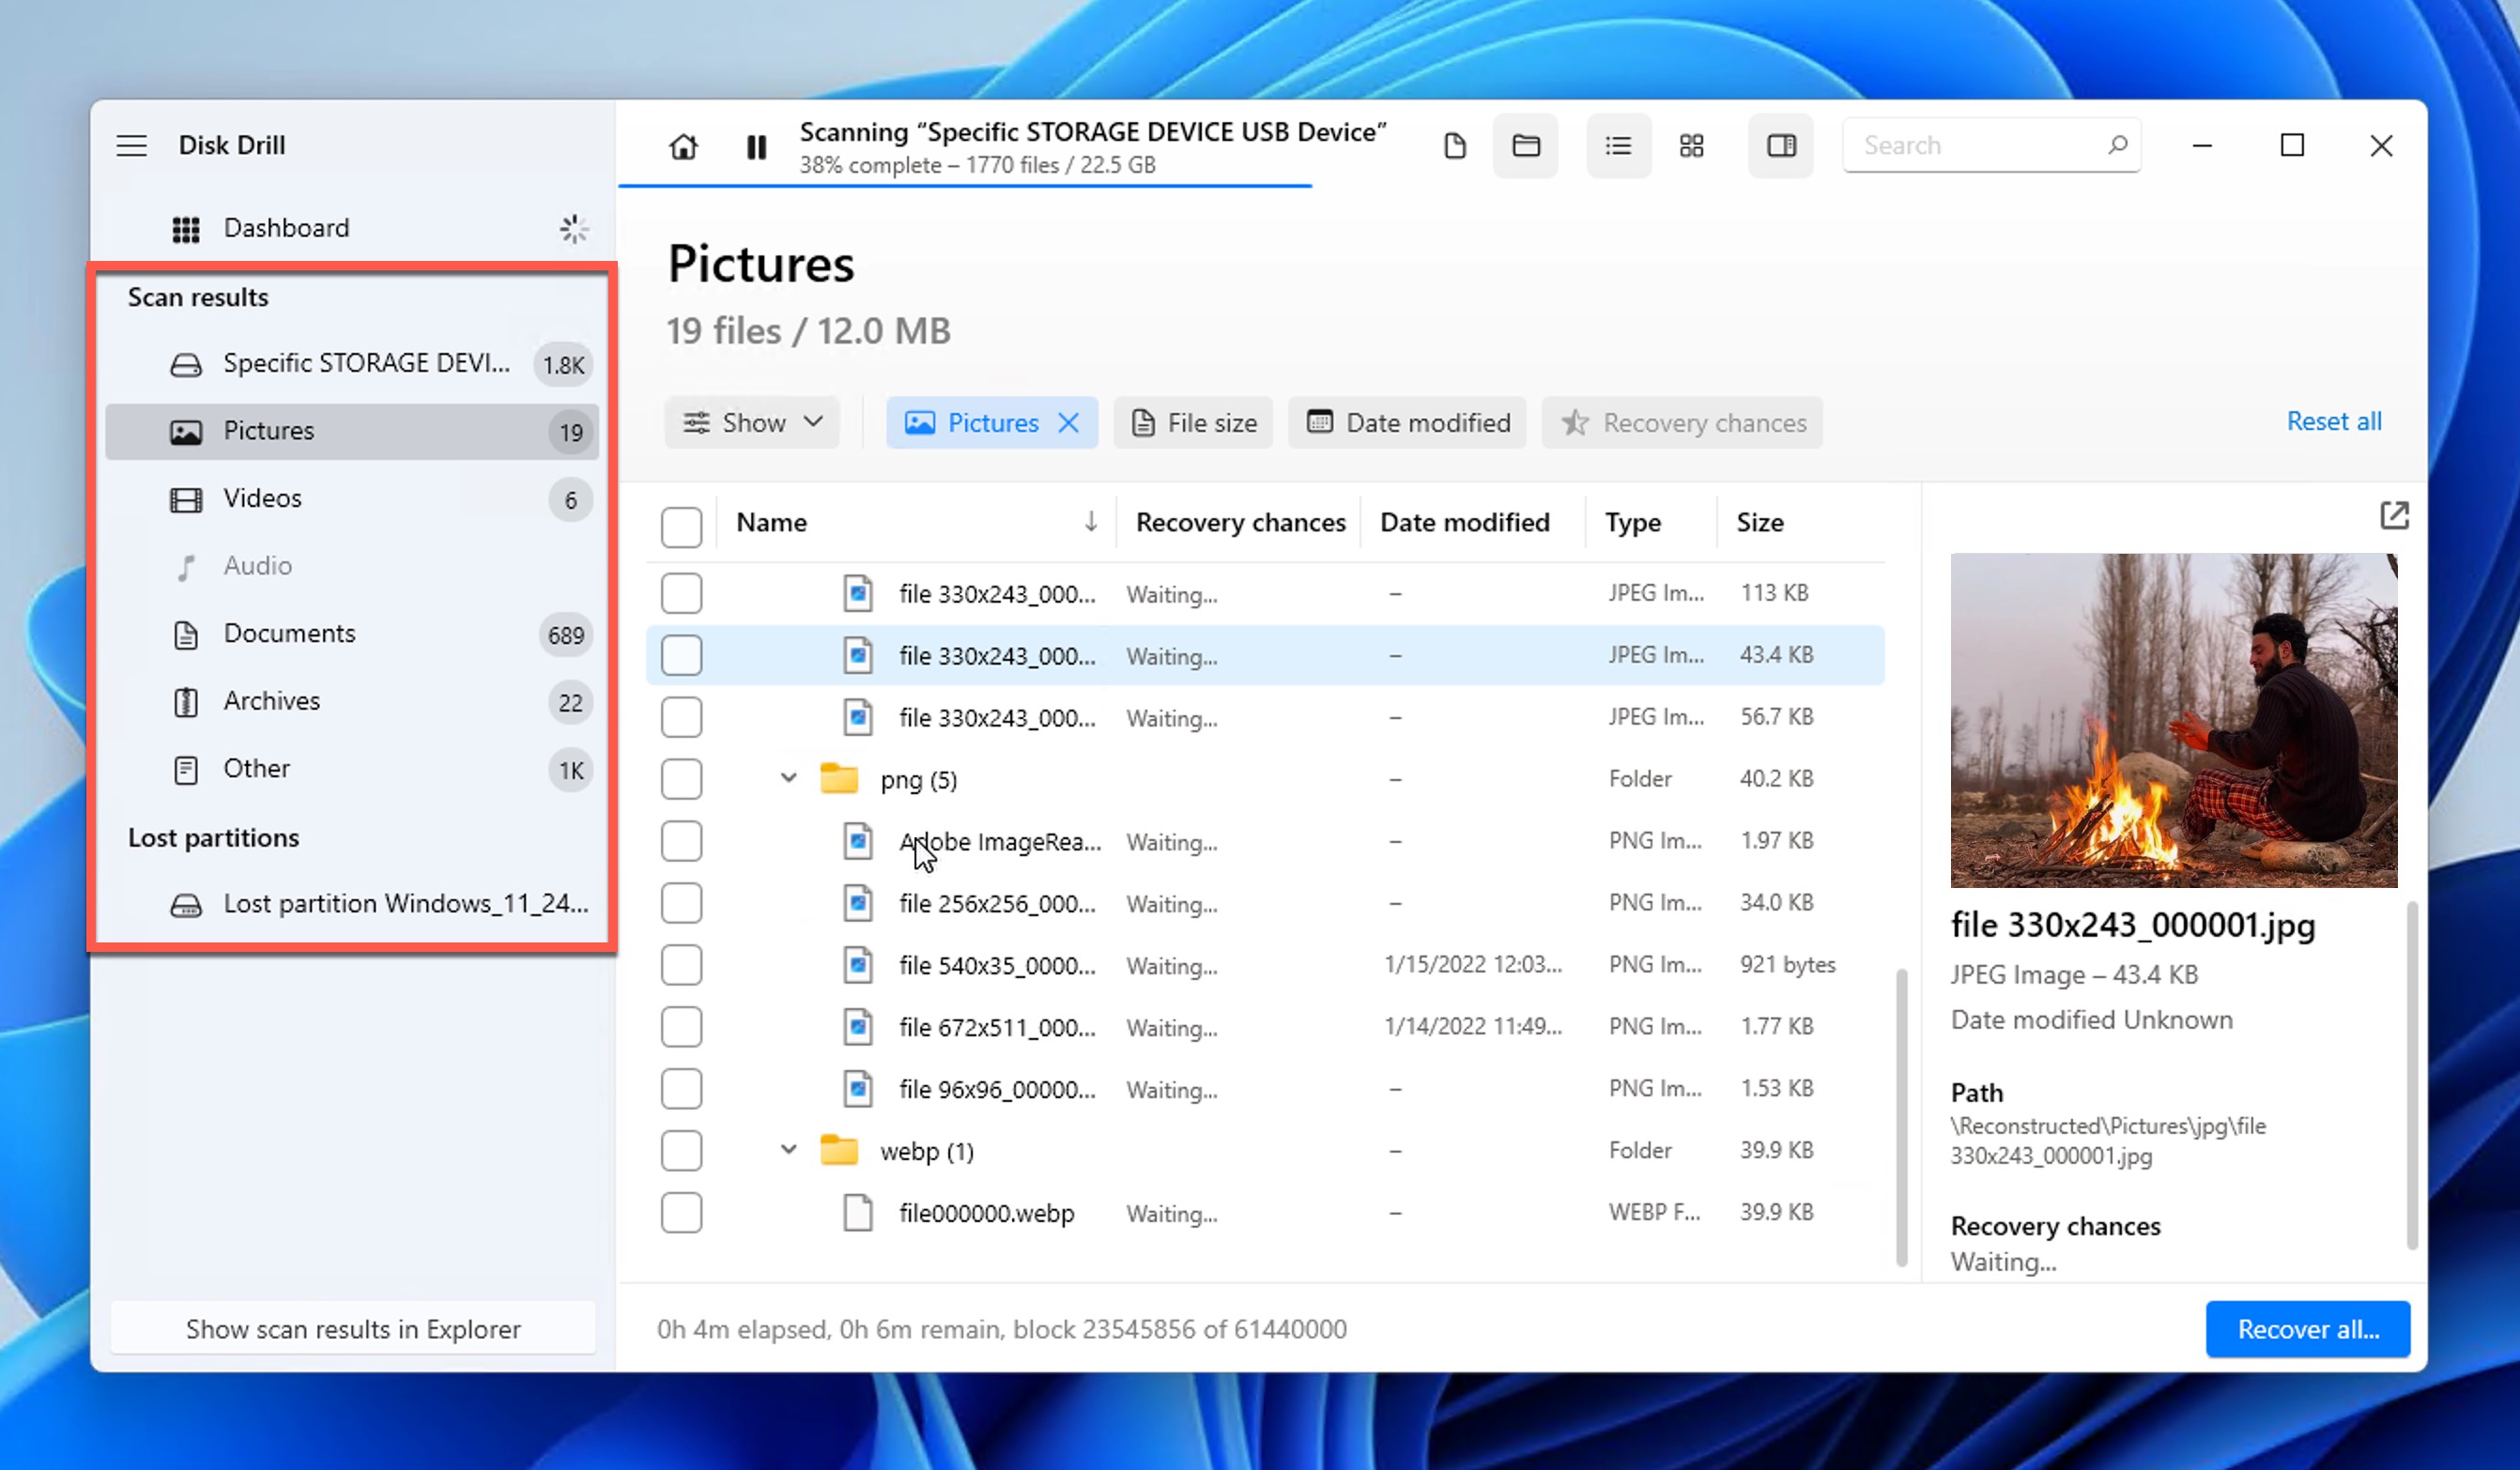
- Use the file format filters on the left to narrow down the scan results until you find the file you’re looking for. Select it to see its preview on the right.
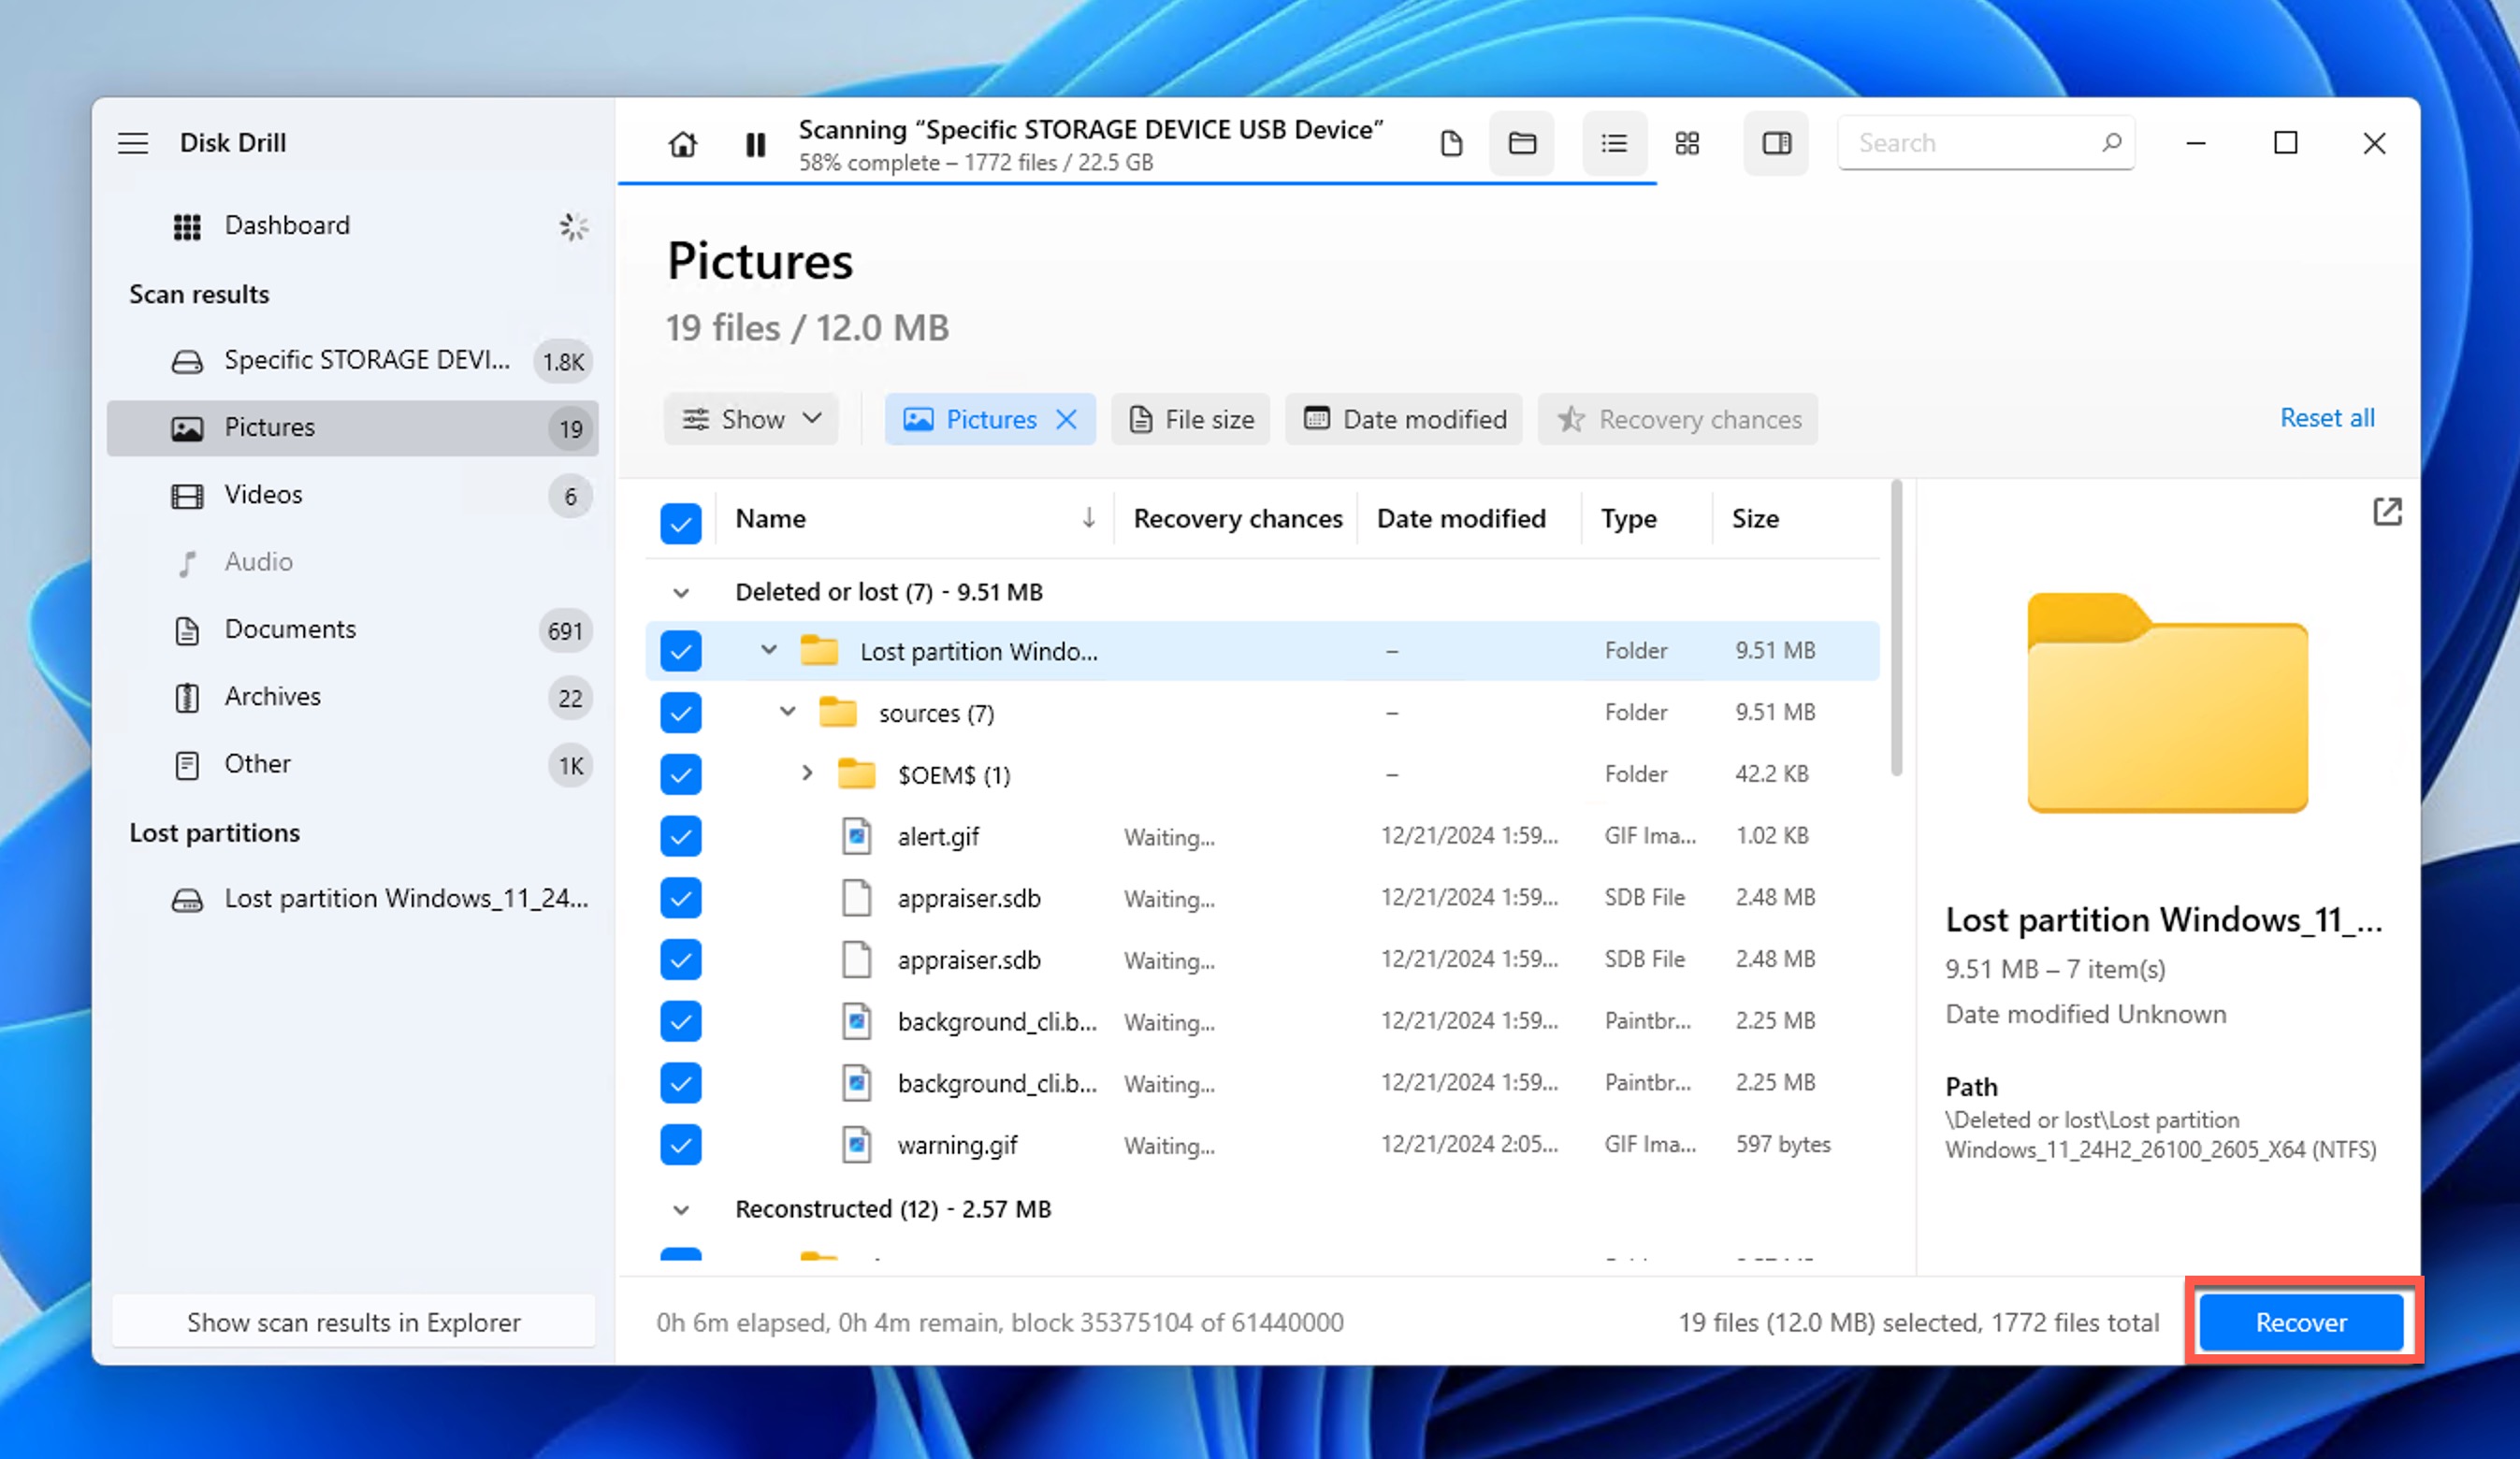
- Click the checkbox next to the file and click the blue Recover button at the bottom.
- Specify the recovery folder and click OK.
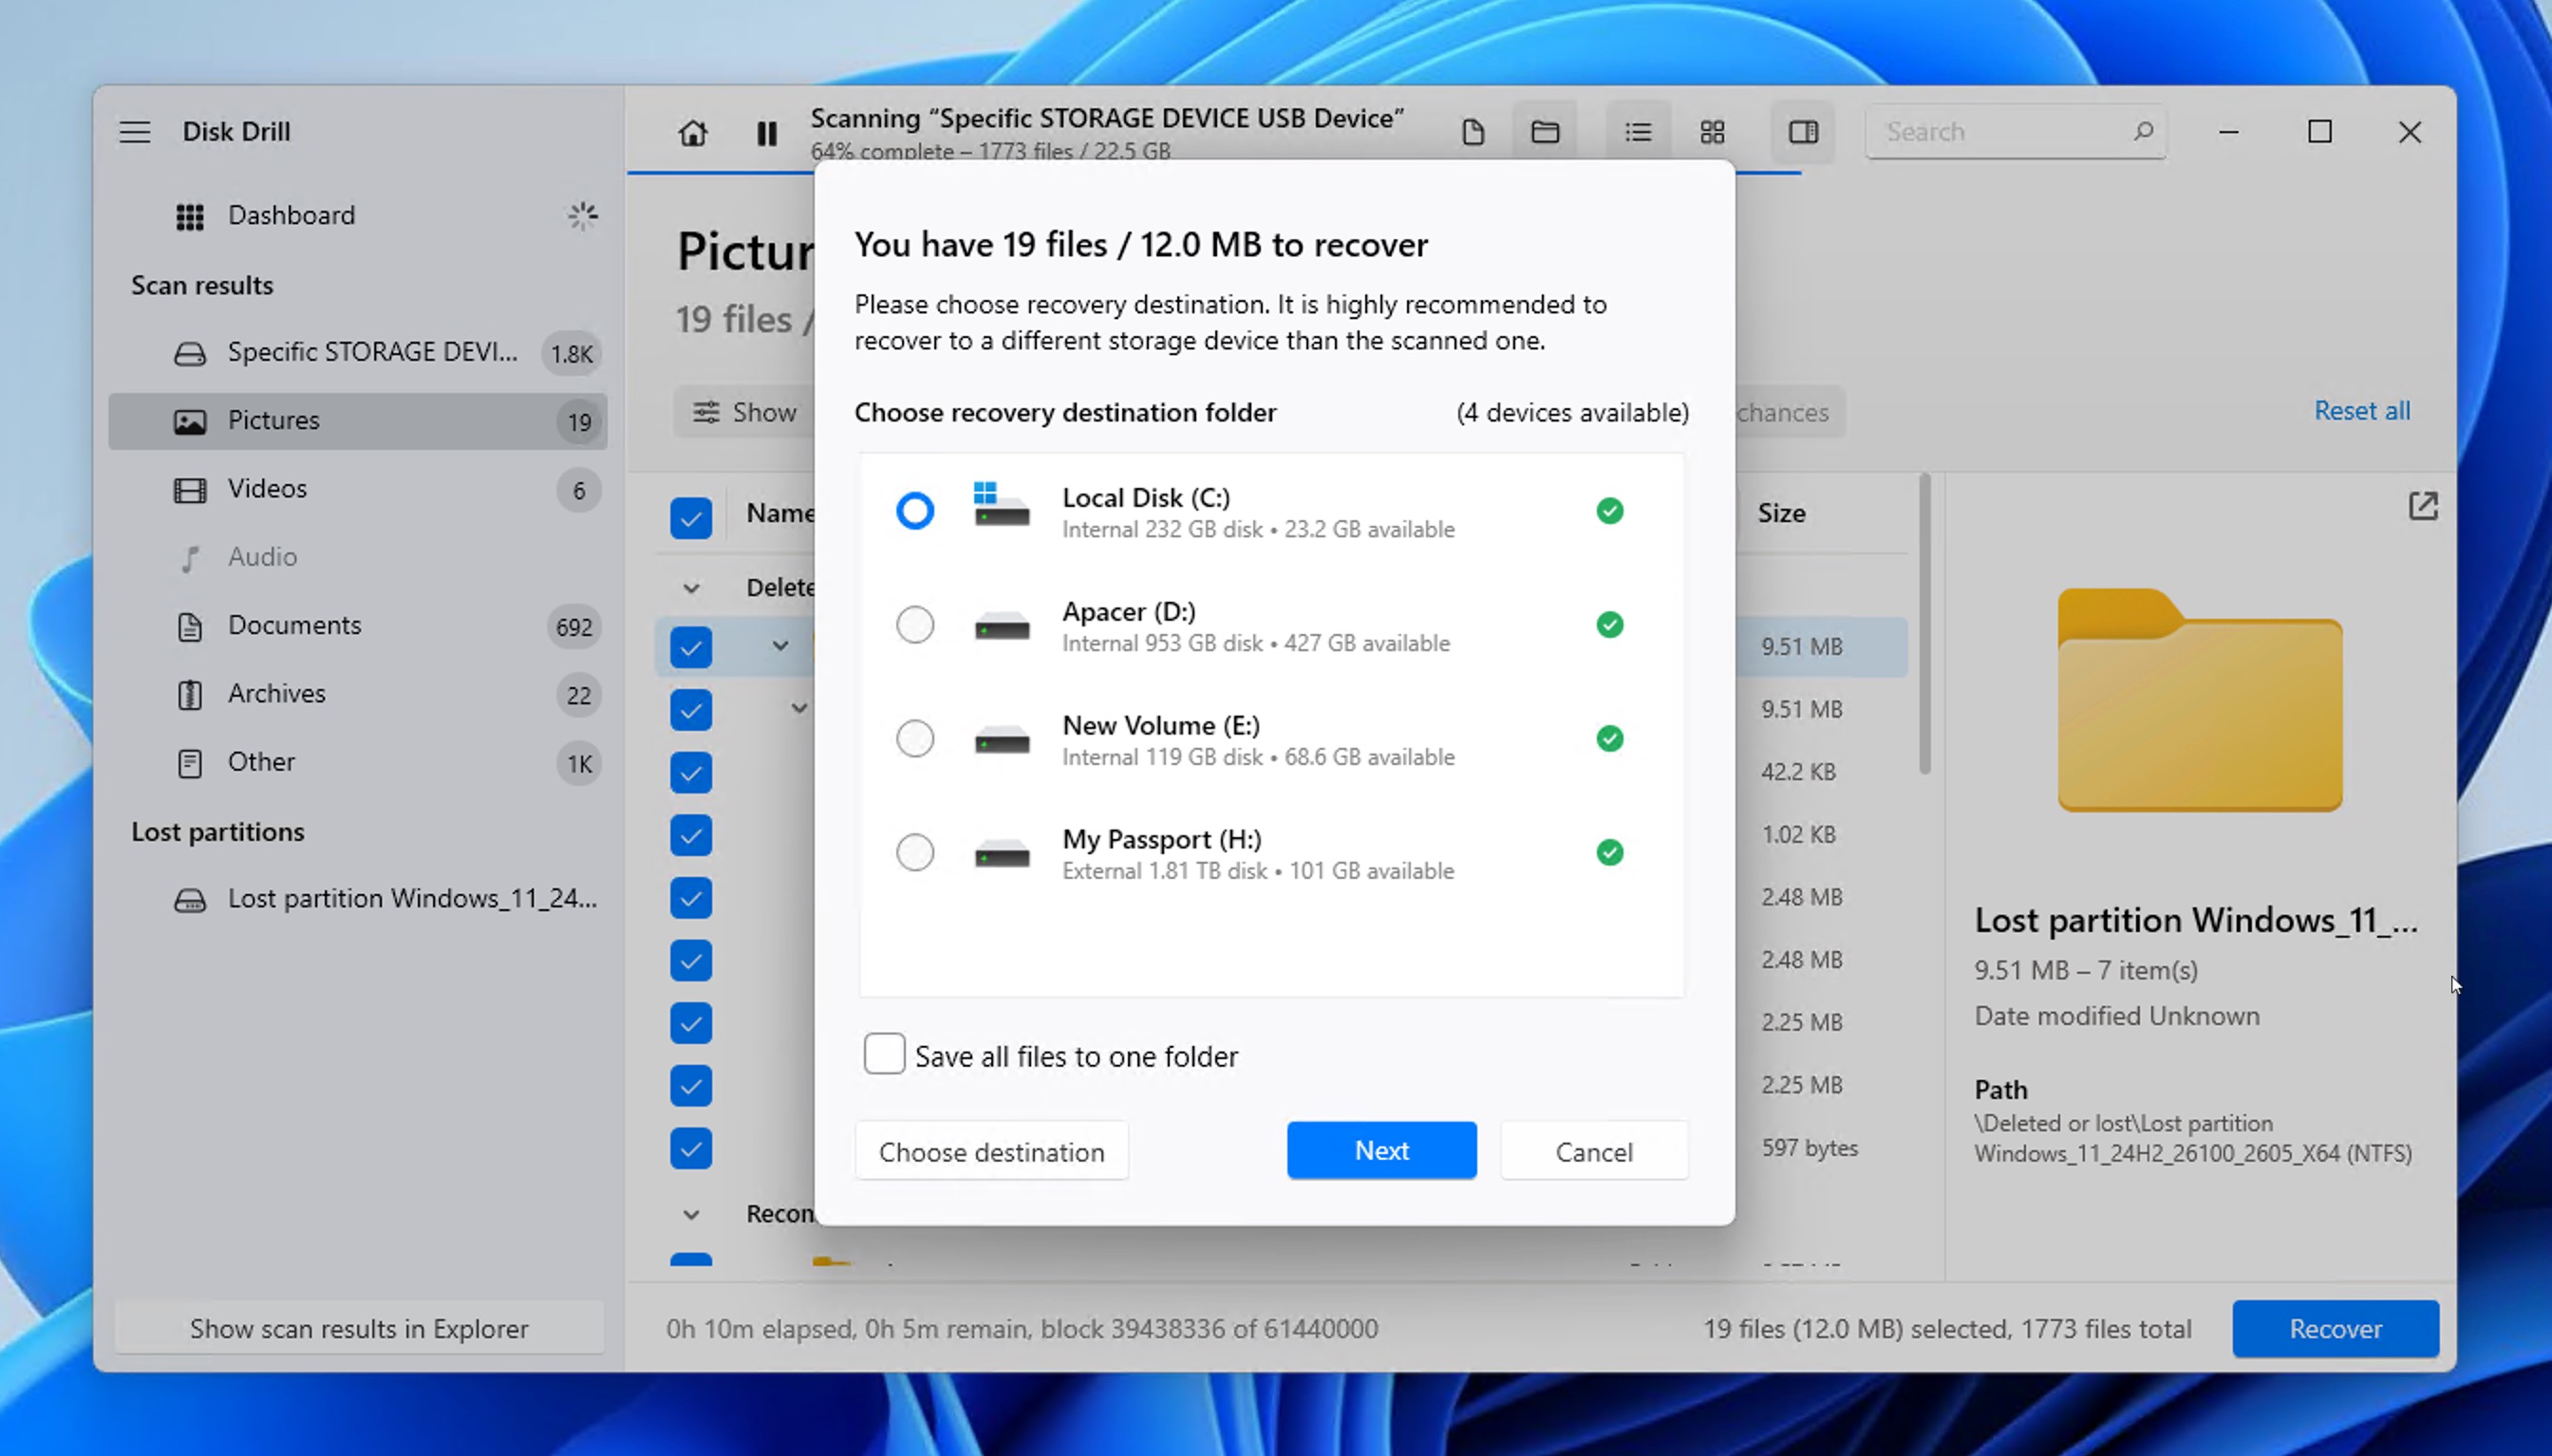
As you can see, all it takes are five simple steps to recover inaccessible data from a RAW drive using Disk Drill. The free version of Disk Drill for Windows can restore up to 500 MB of data, and you can easily upgrade to Disk Drill PRO for unlimited recovery.
Method 2: Repair RAW Partition Using TestDisk
TestDisk is a free and open-source data recovery utility whose purpose is to recover lost partitions.
Many users have reported success with TestDisk—for instance, a Redditor was able to recover their entire 3TB Plex library after their partition became RAW—despite the fact that it doesn’t have a graphical user interface, so it’s significantly less intuitive than Disk Drill.
If you’re not afraid of the command line, then you can follow our detailed guide on how to repair a RAW drive with TestDisk:
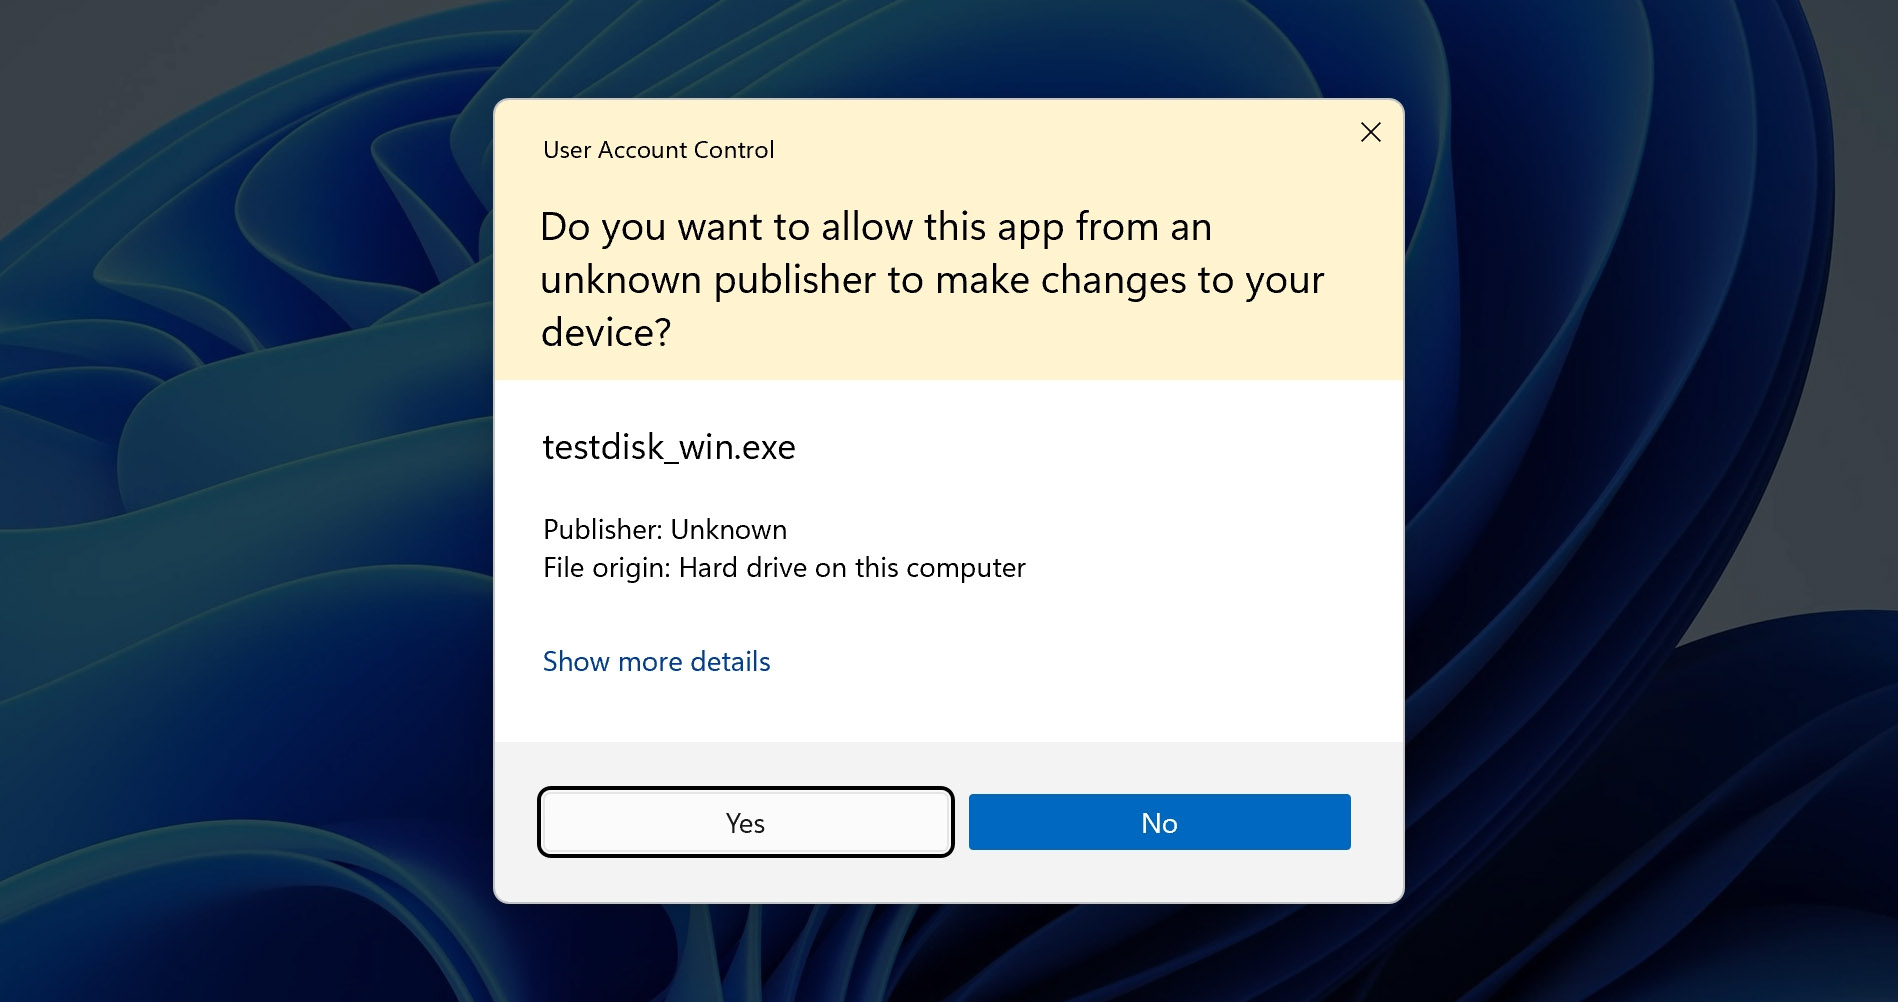
- Download TestDisk, extract the files, and run TestDisk with administrator privileges.
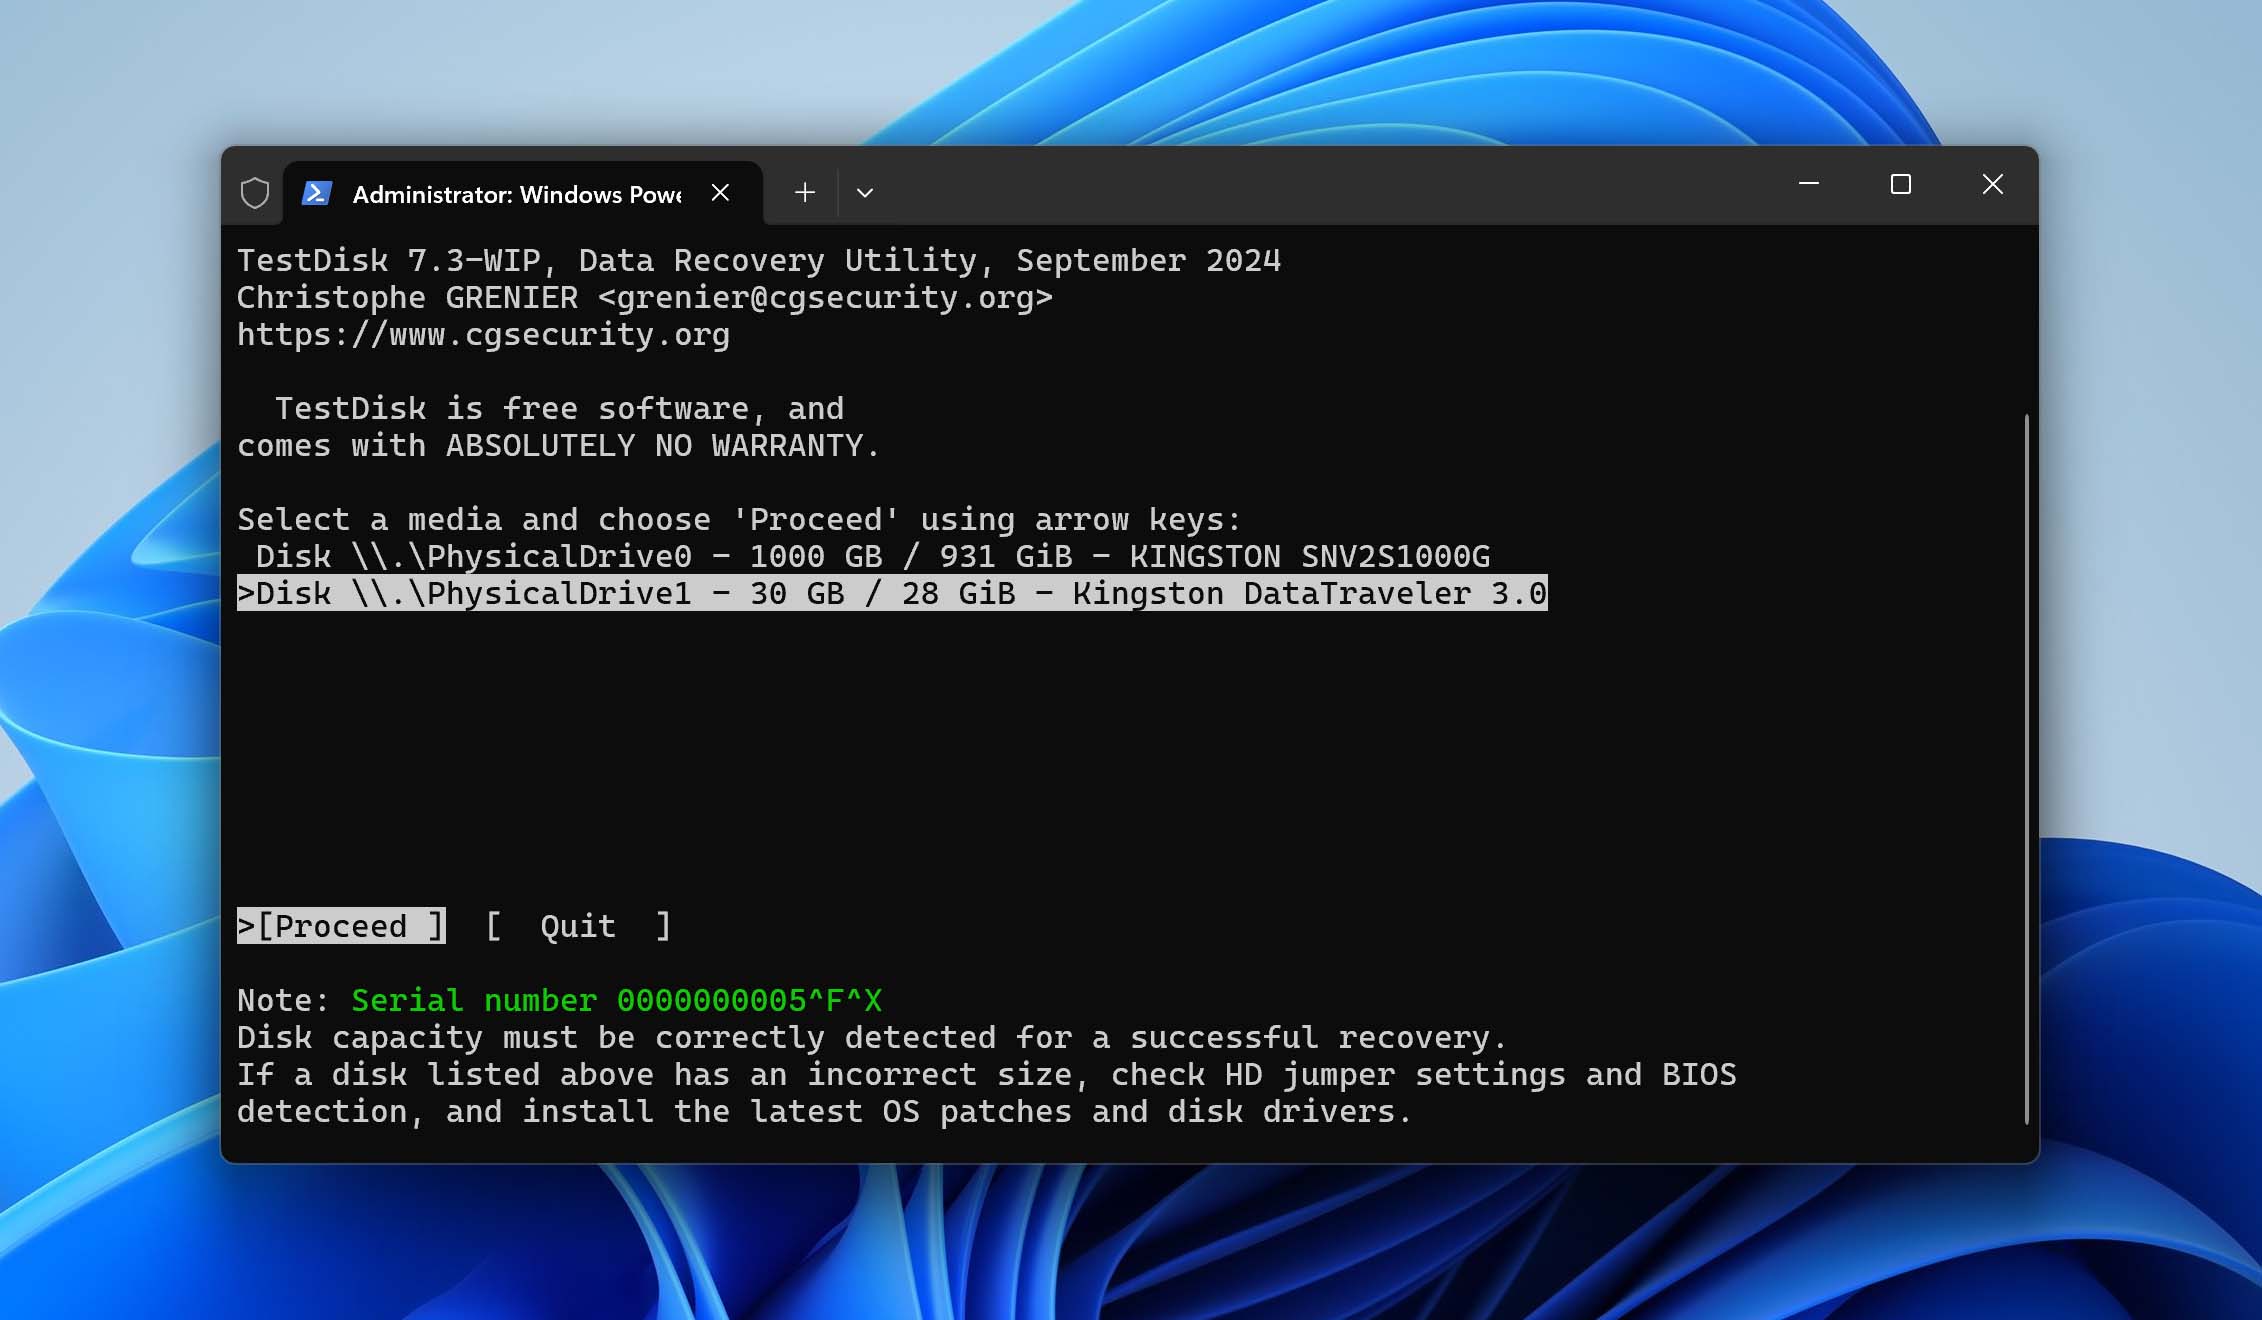
- Select your RAW drive from the list of detected storage devices and press Enter.
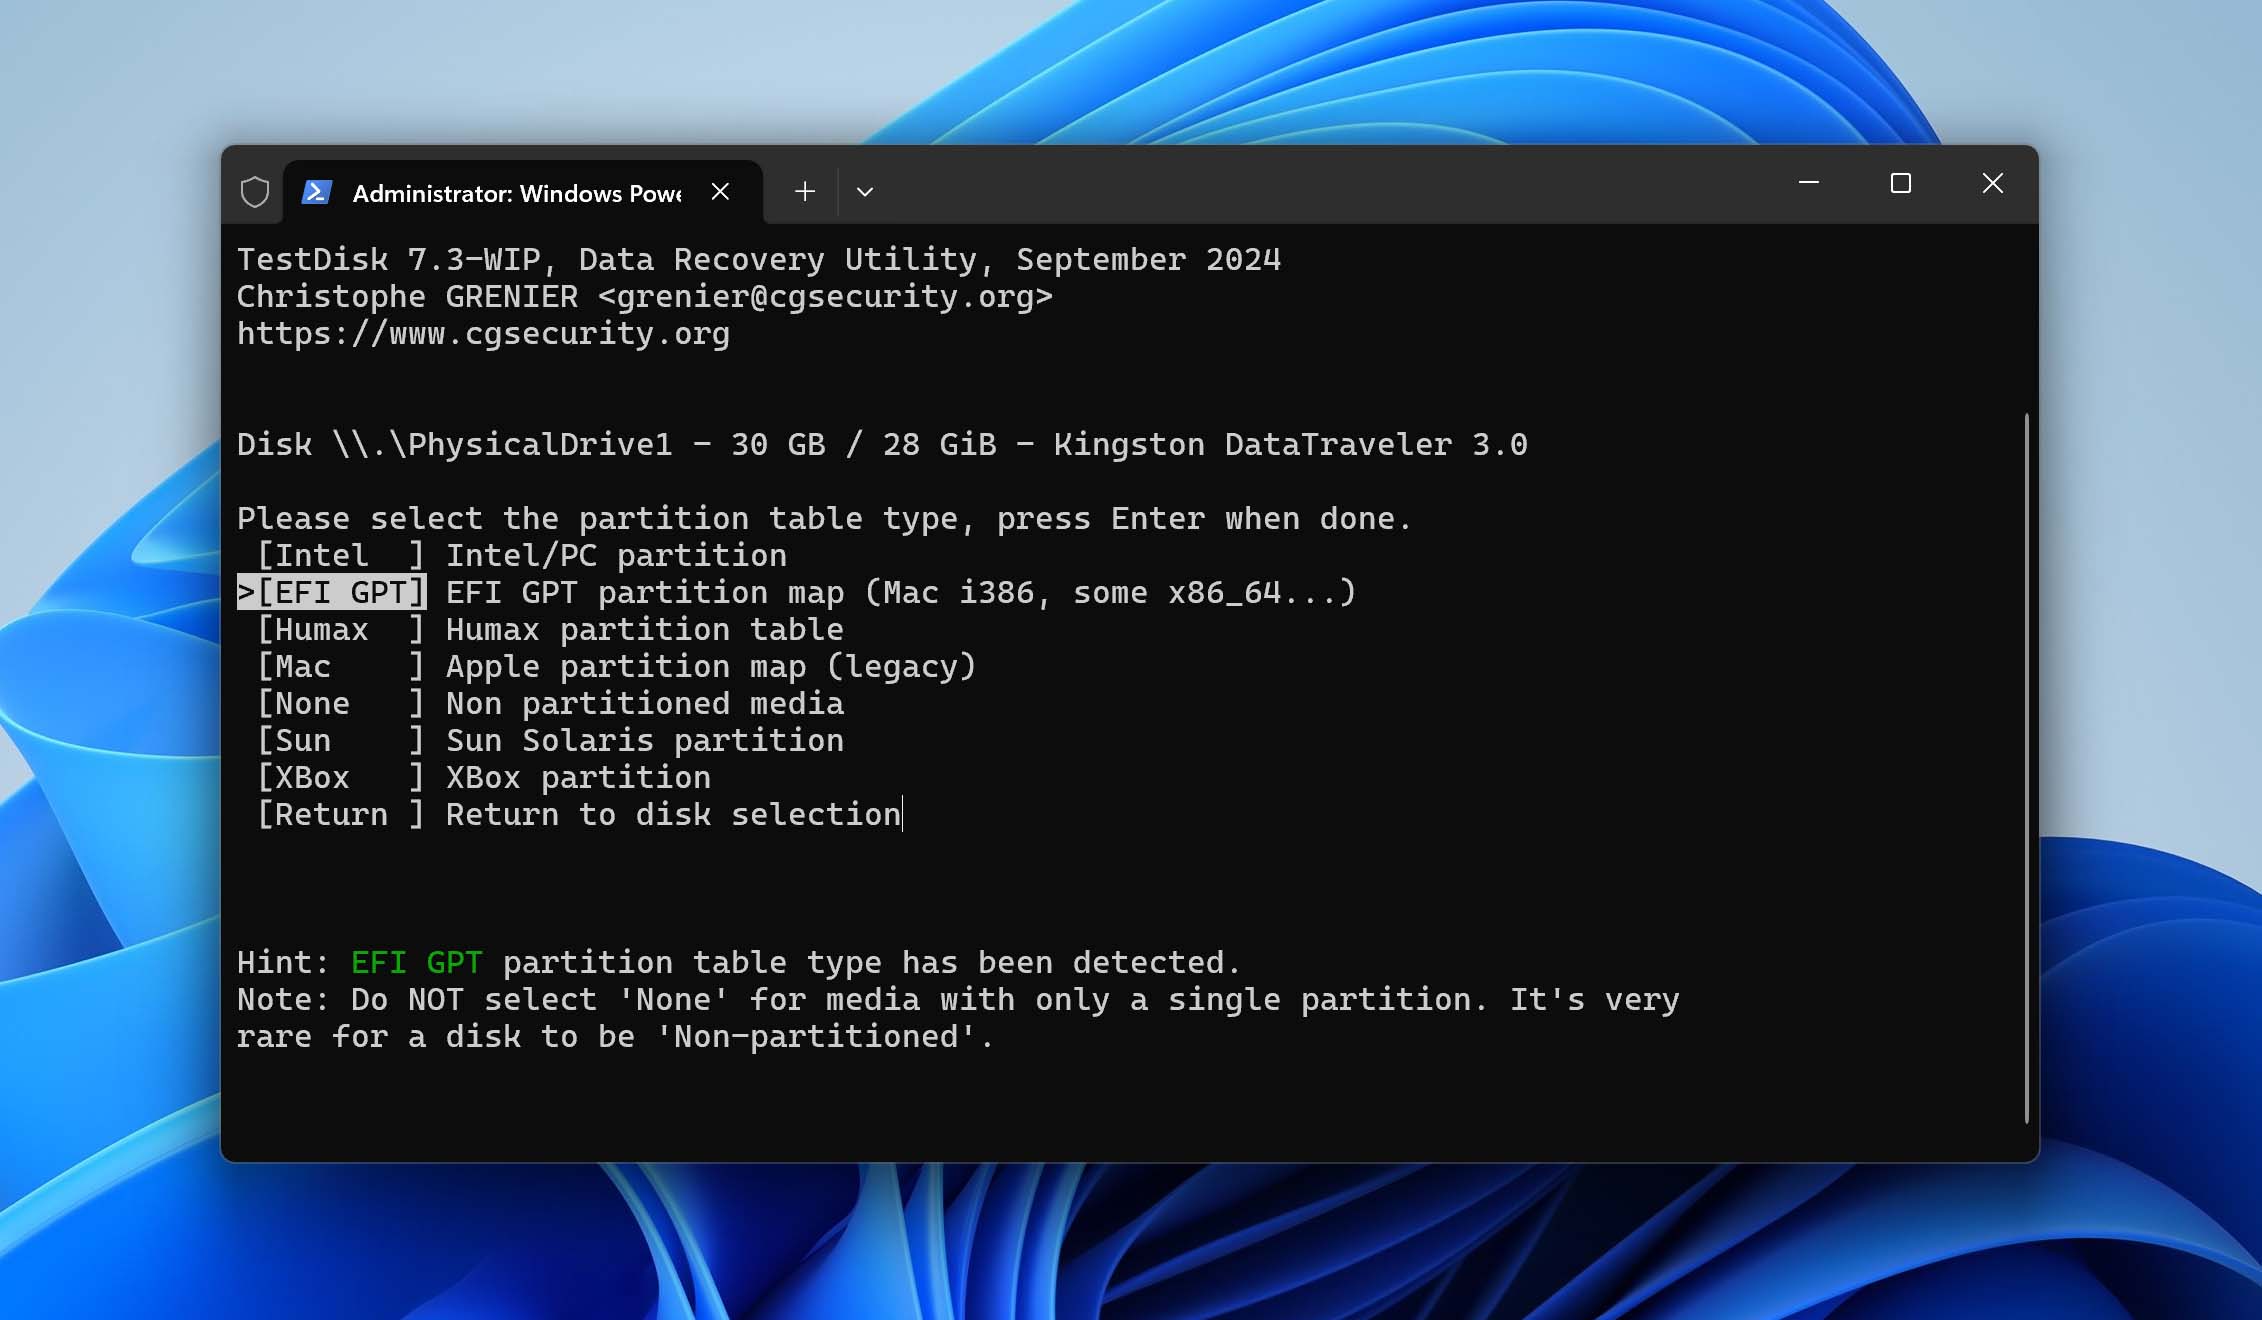
- Choose your partition table type (TestDisk usually auto-detects this correctly).
- Select Analyze from the main menu to examine the current partition structure.
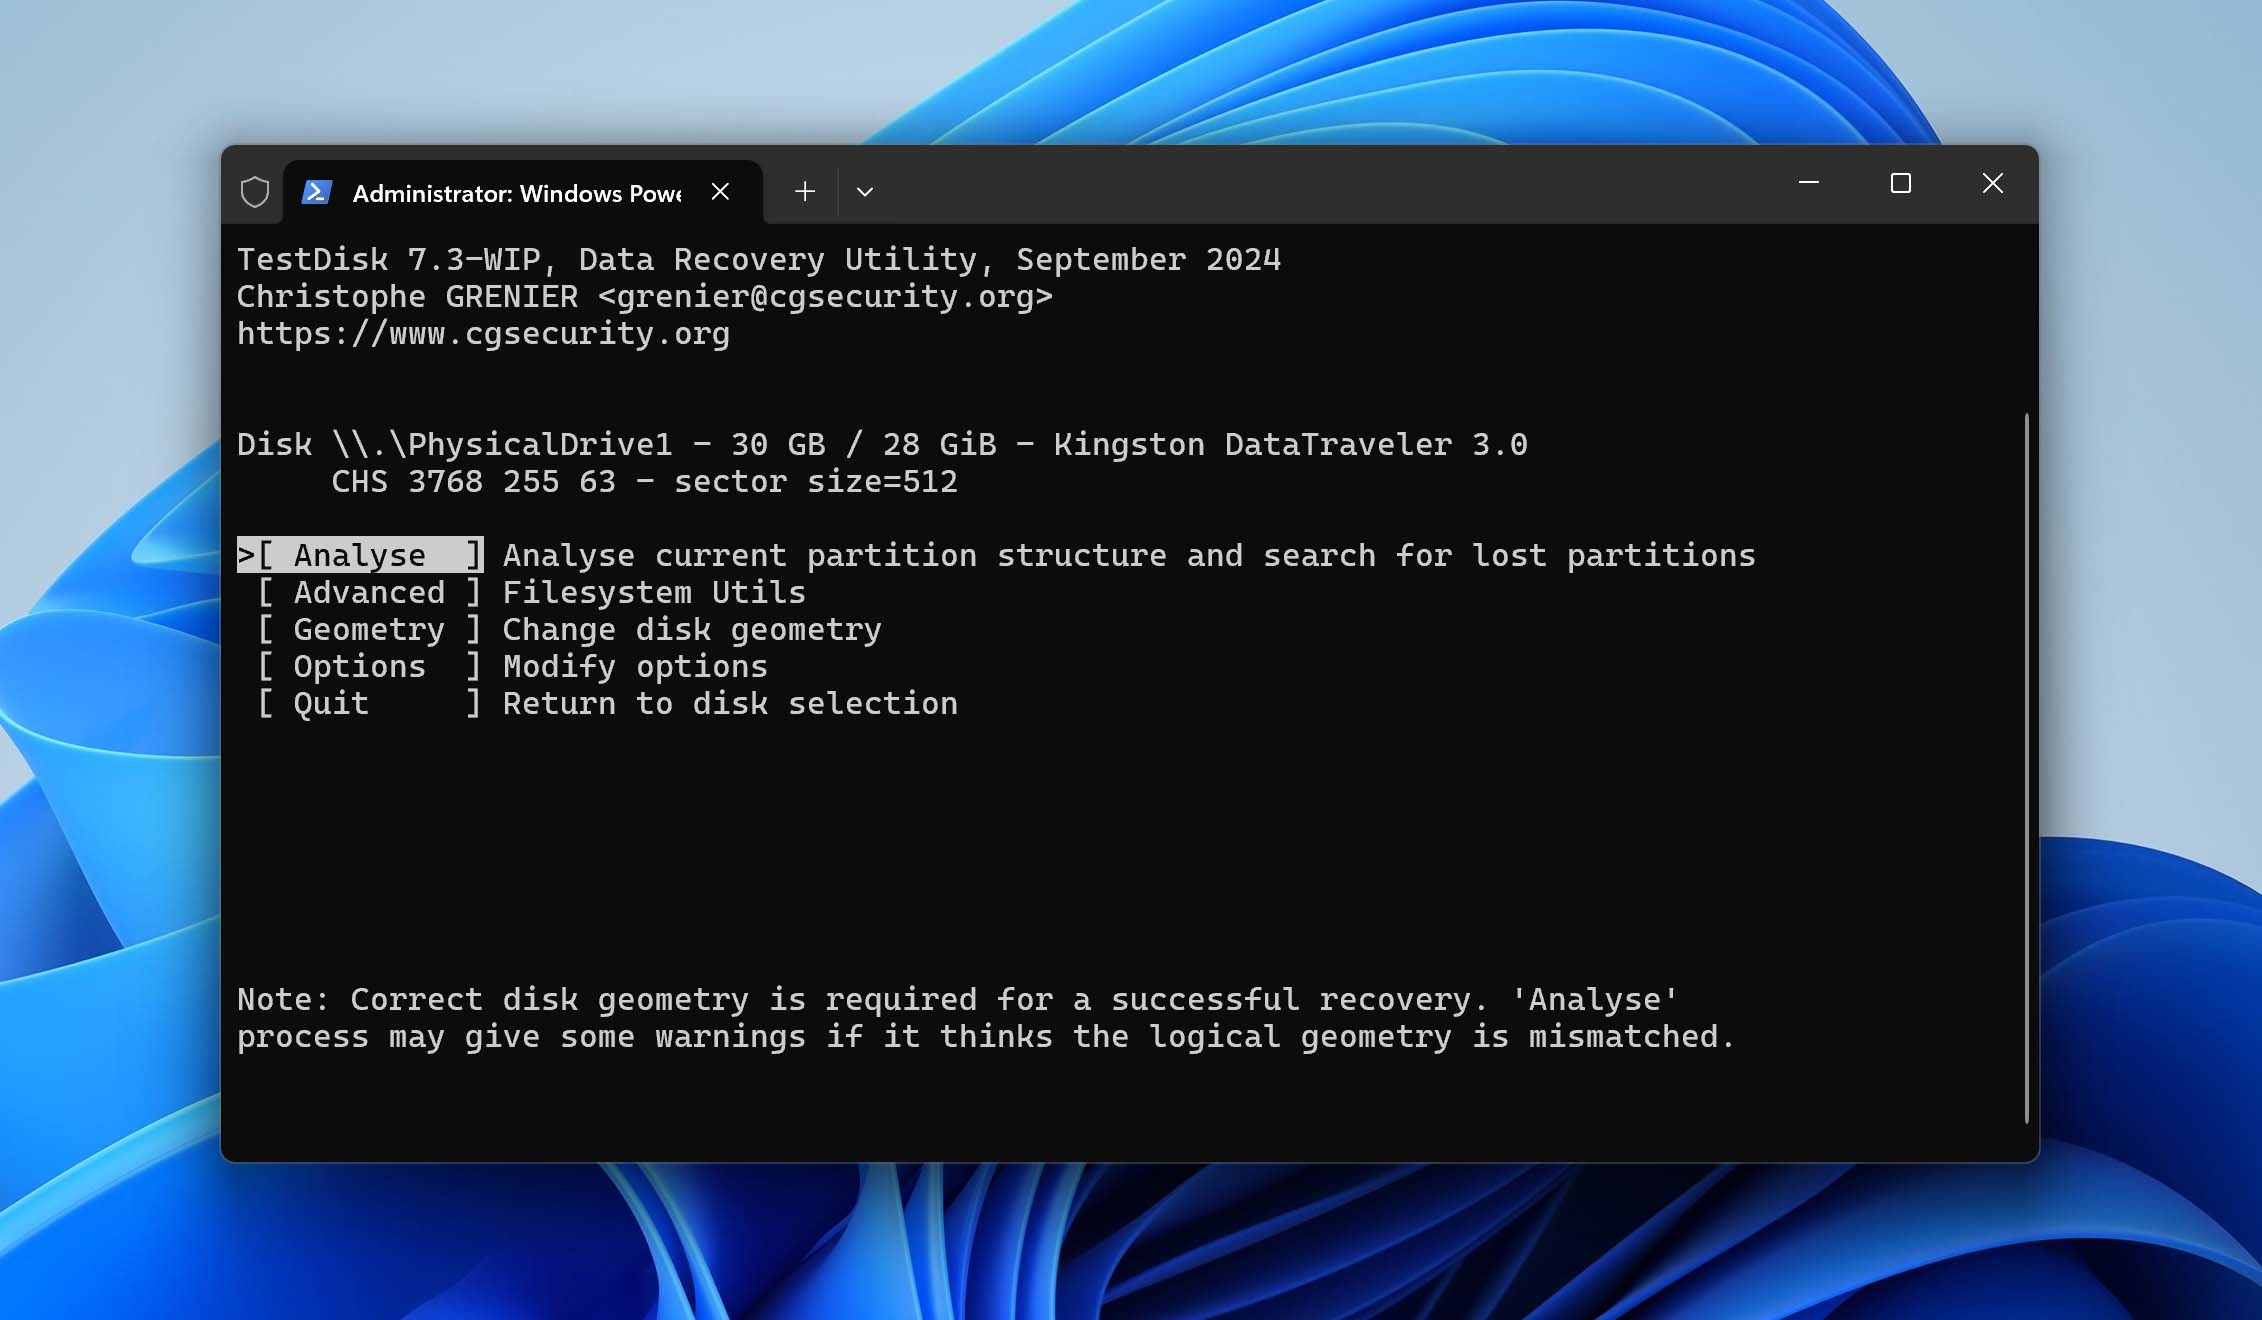
- Run Quick Search first to scan for lost partitions using partition table data. If Quick Search doesn’t find your partition or shows incorrect results, use Deeper Search for a more thorough scan. This mode will look for file system signatures and backup boot sectors.
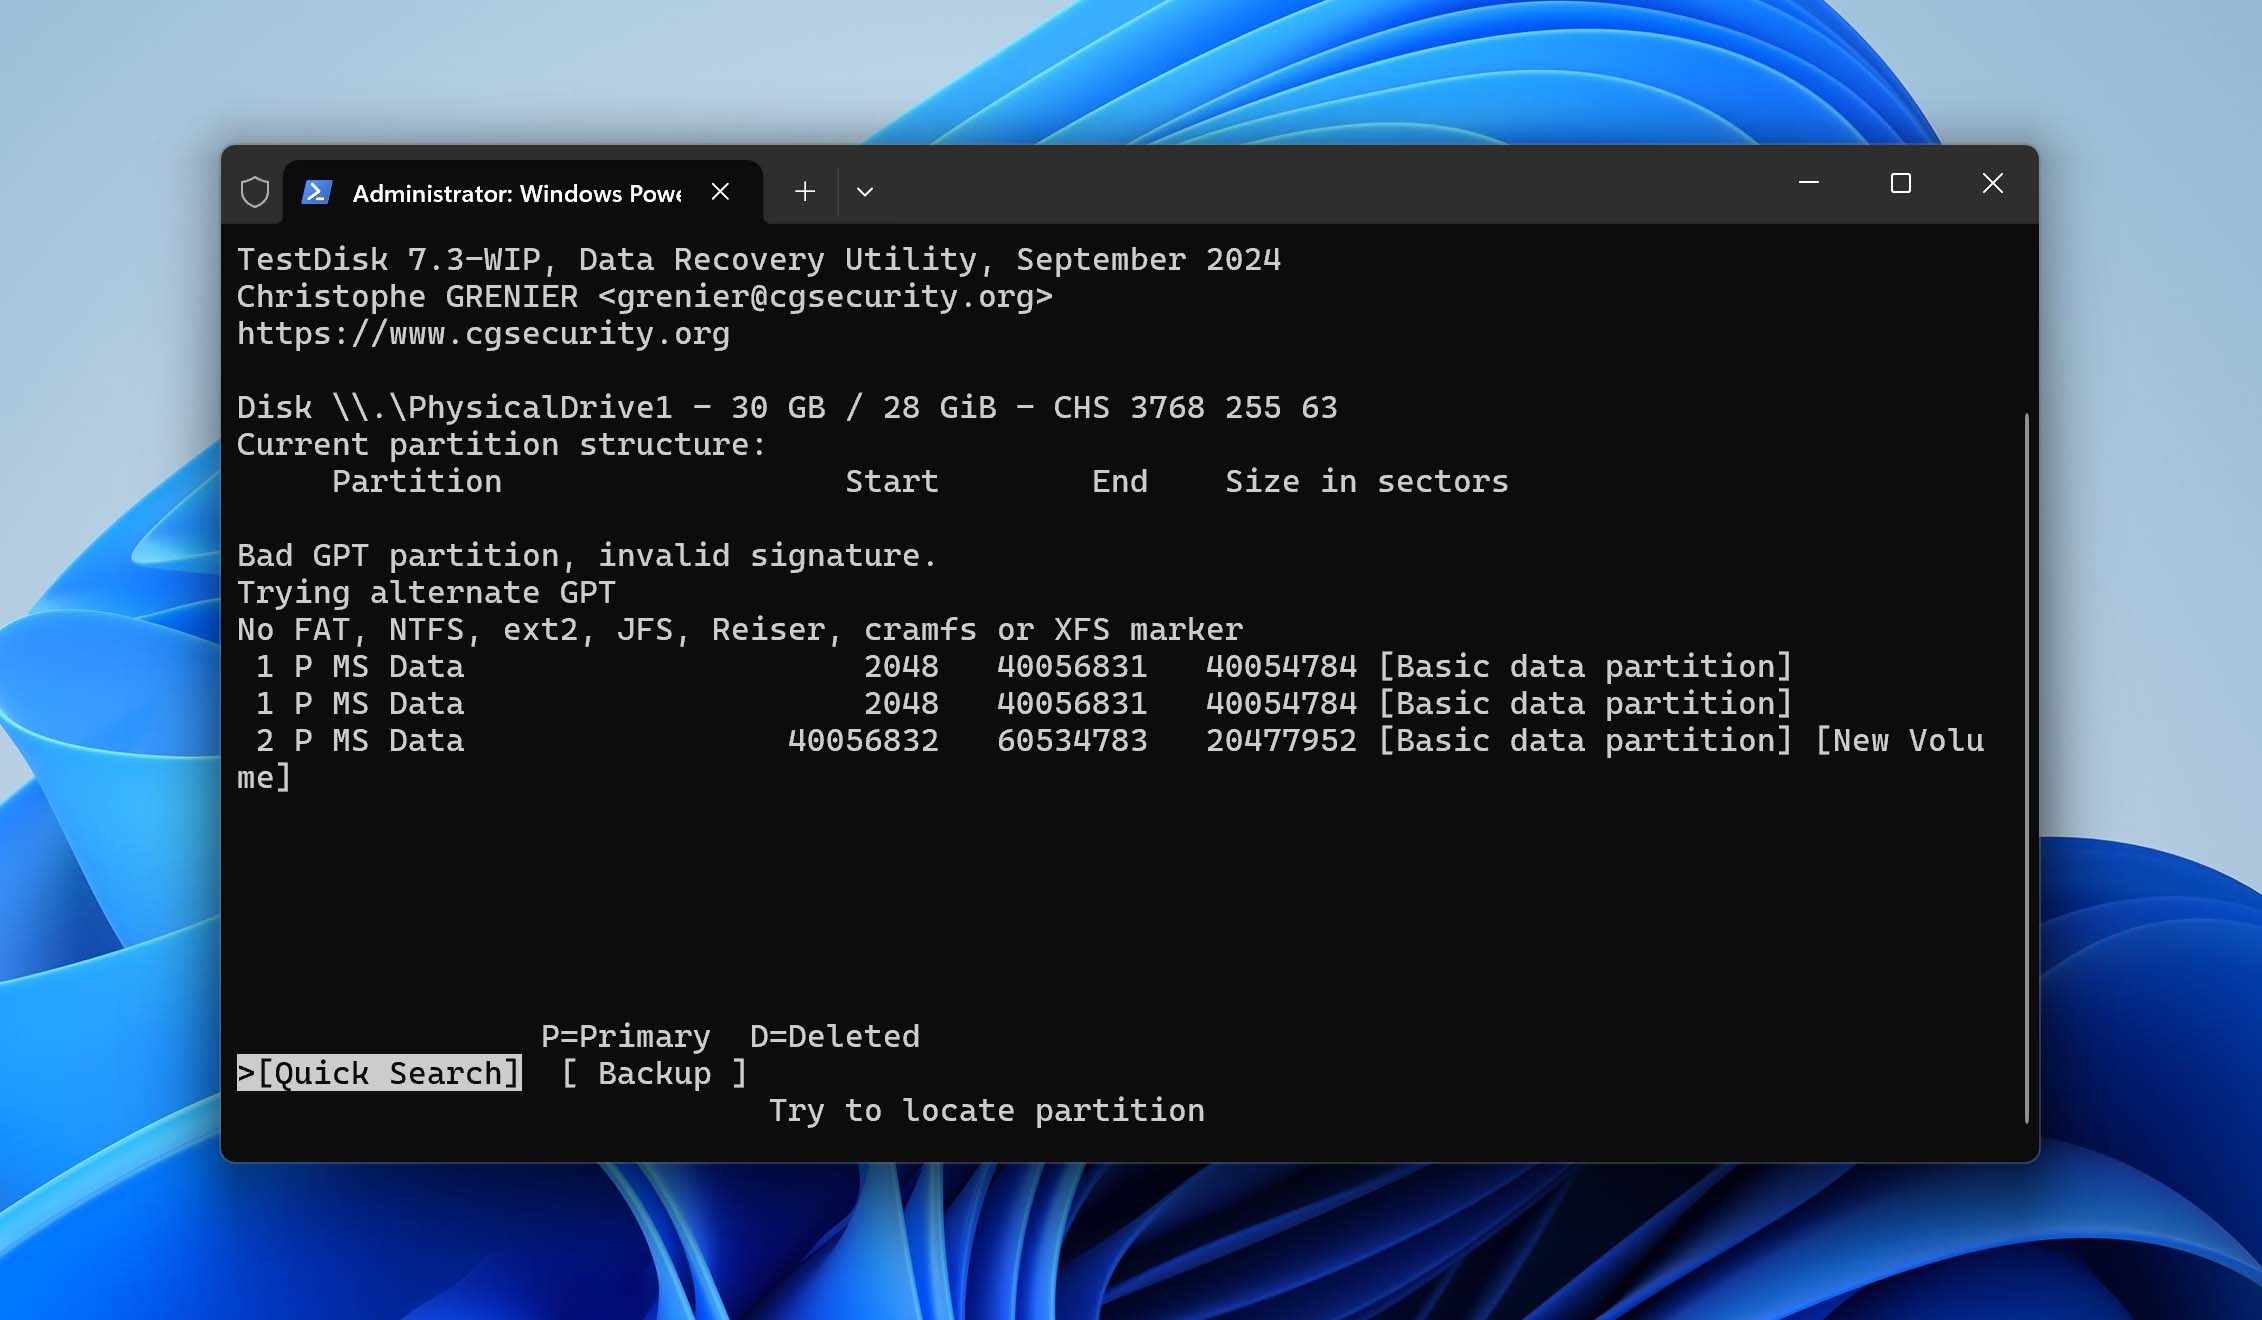
- Once TestDisk finds your partitions, you can press p to preview the files in each detected partition to verify it’s the correct one, use left/right arrow keys to change a partition’s status (set it to Primary or Logical as appropriate), and press Enter to confirm your selections.
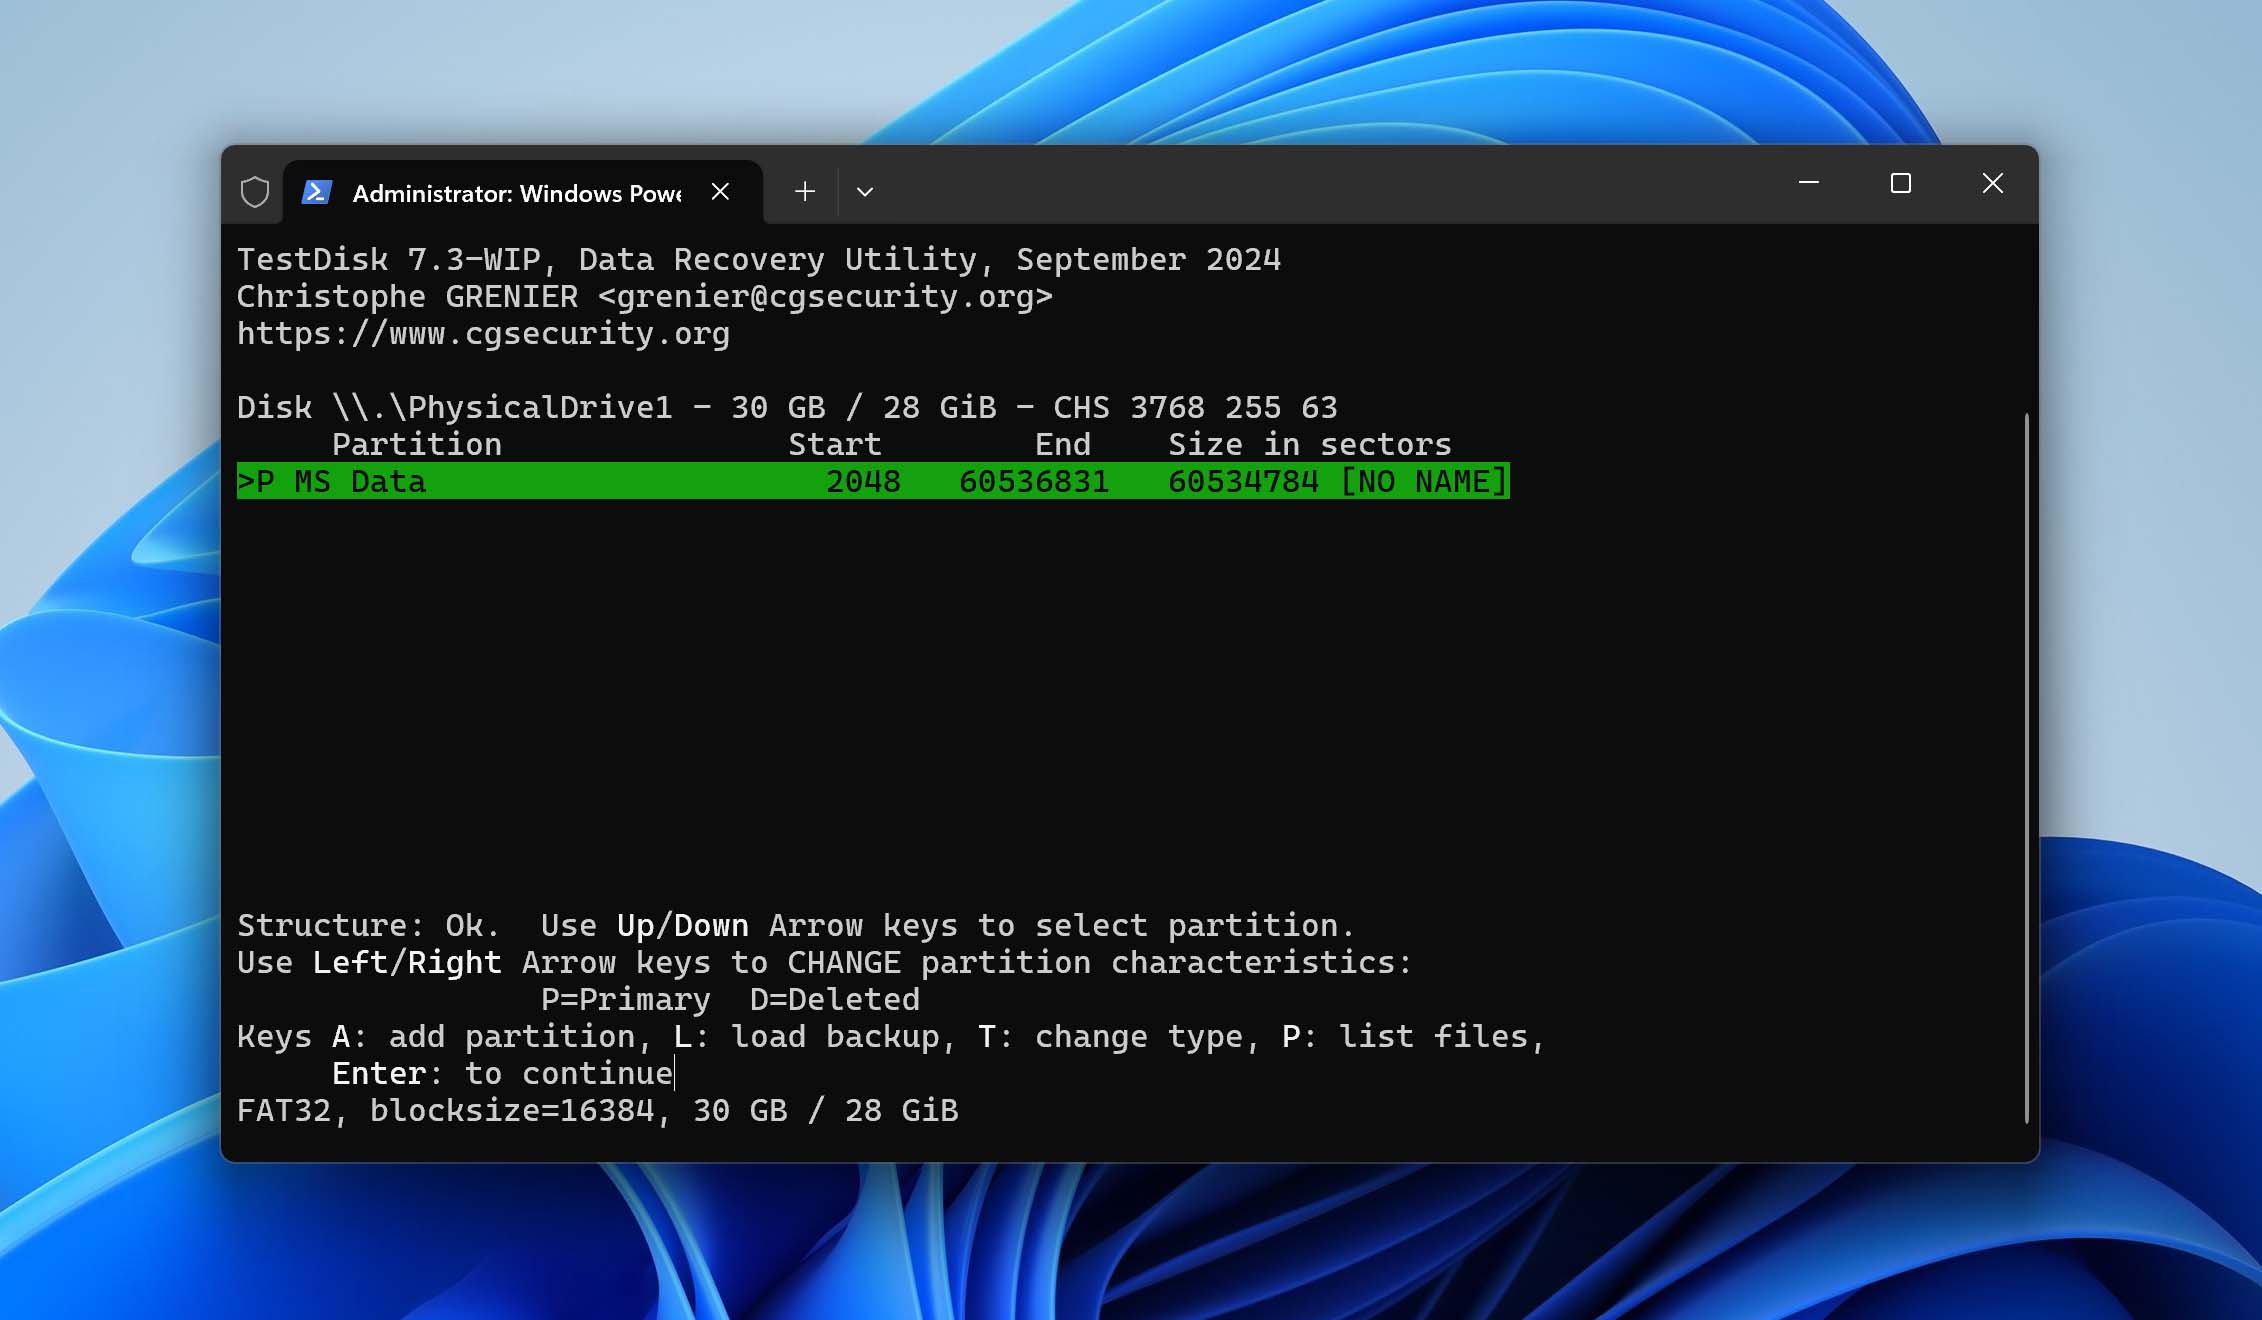
- When you’ve verified the correct partitions are selected, choose Write to save the new partition structure.
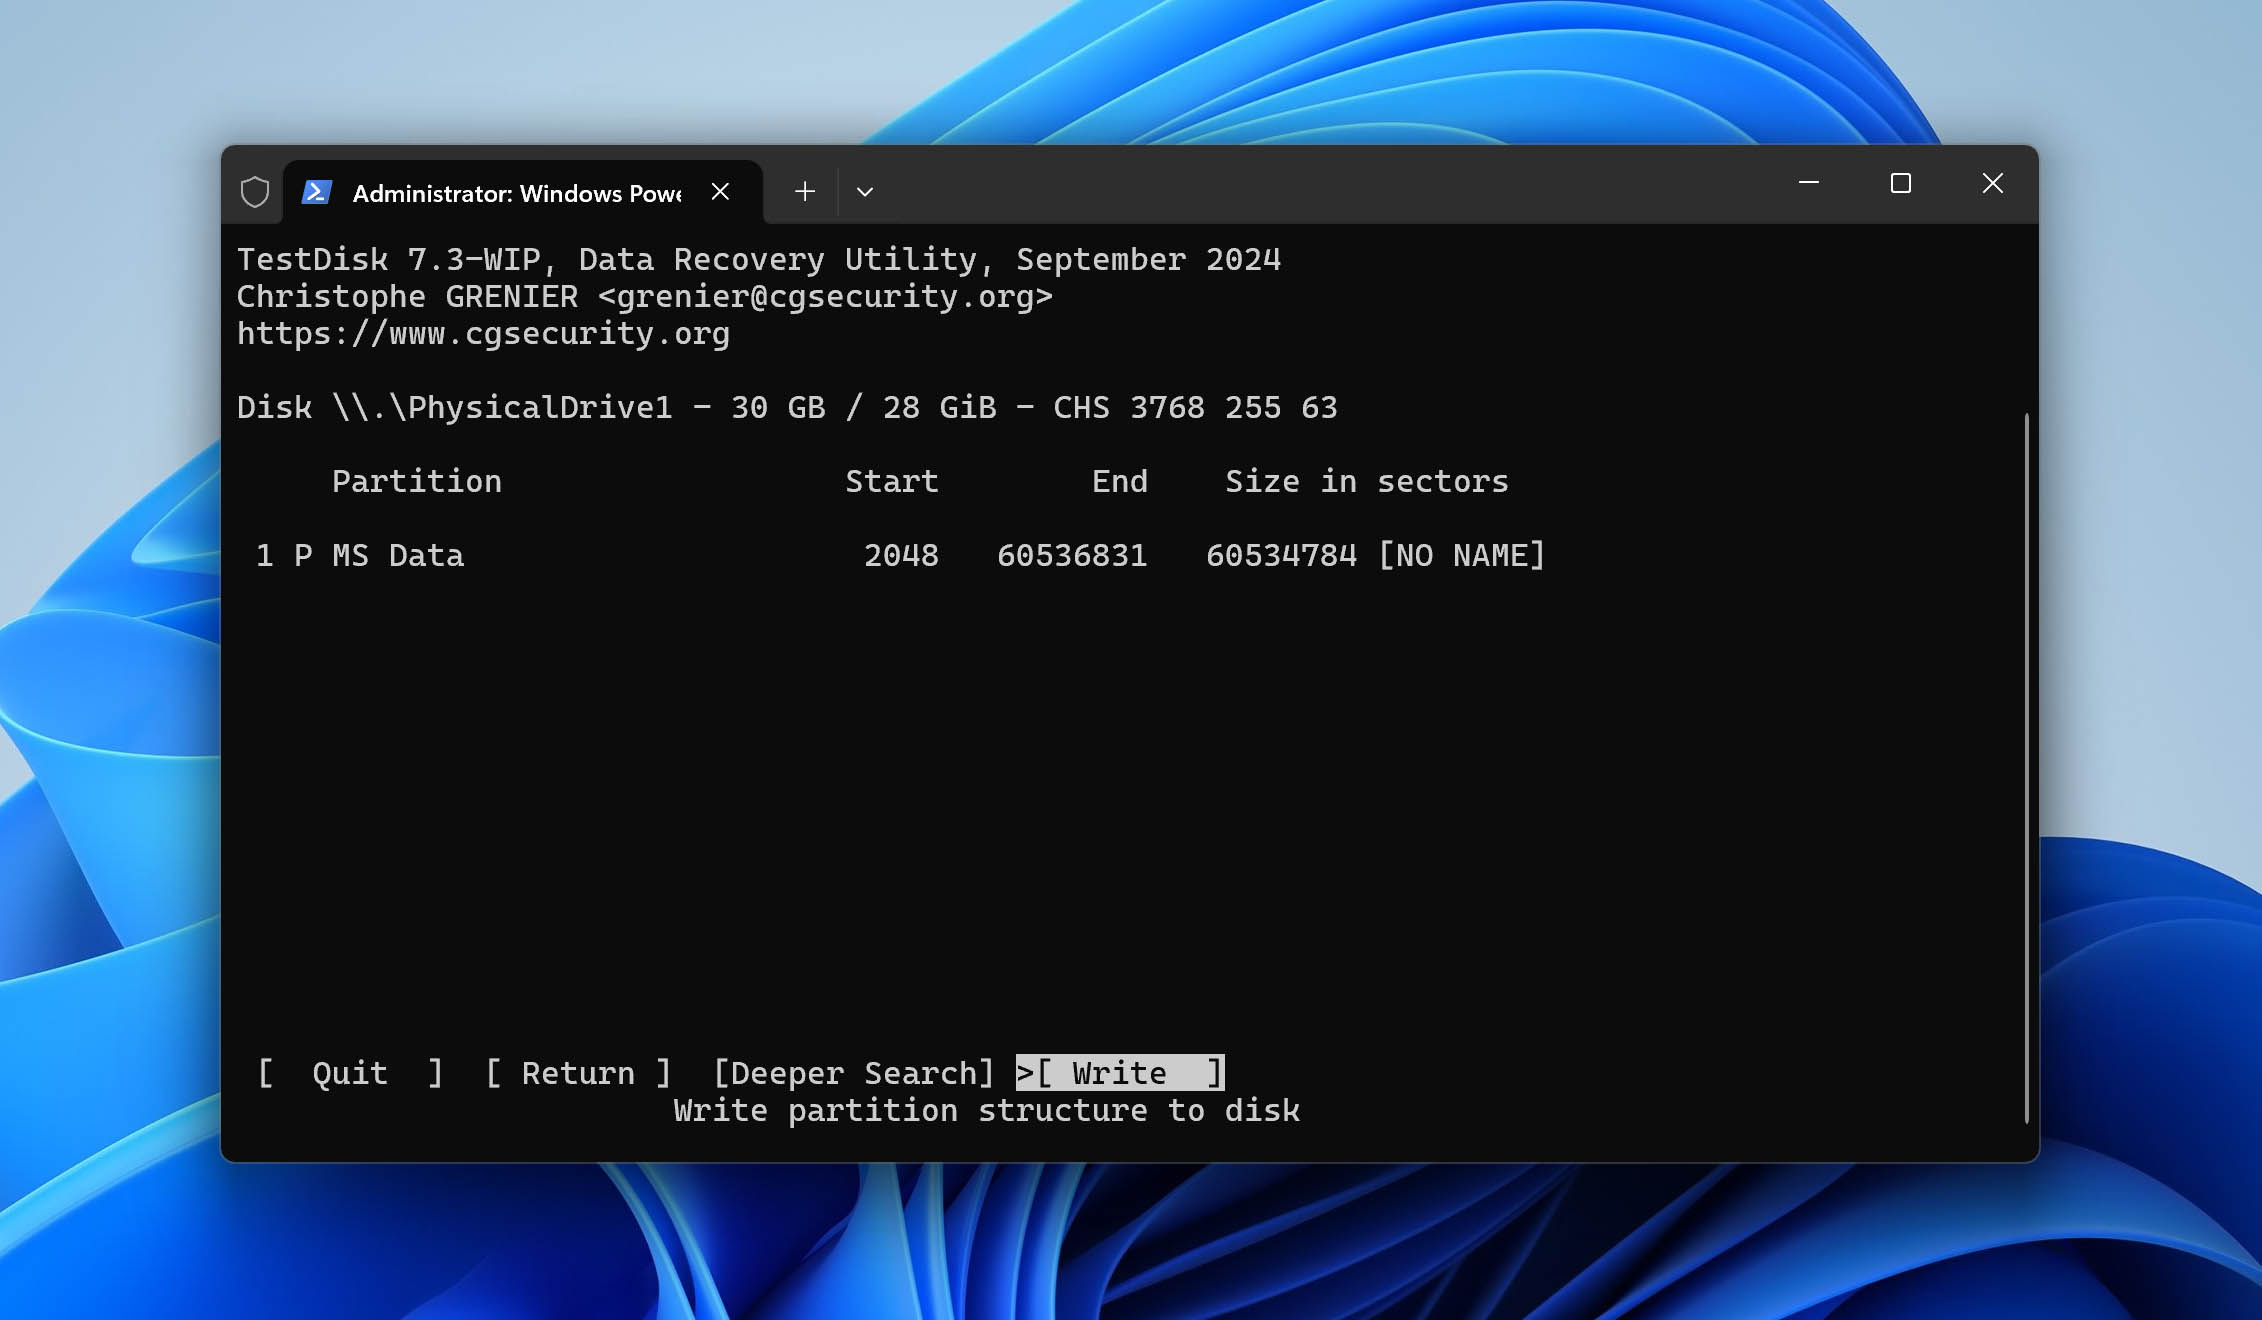
Finally, restart your computer to apply the changes. You should then be able to access the recovered partition from File Explorer.
Method 3: Recover Files from Backups
When direct RAW hard drive recovery methods fail to deliver the desired results, it’s time to explore existing backups, which might not be completely up-to-date, but it’s always better to recover at least some lost data than no data at all.
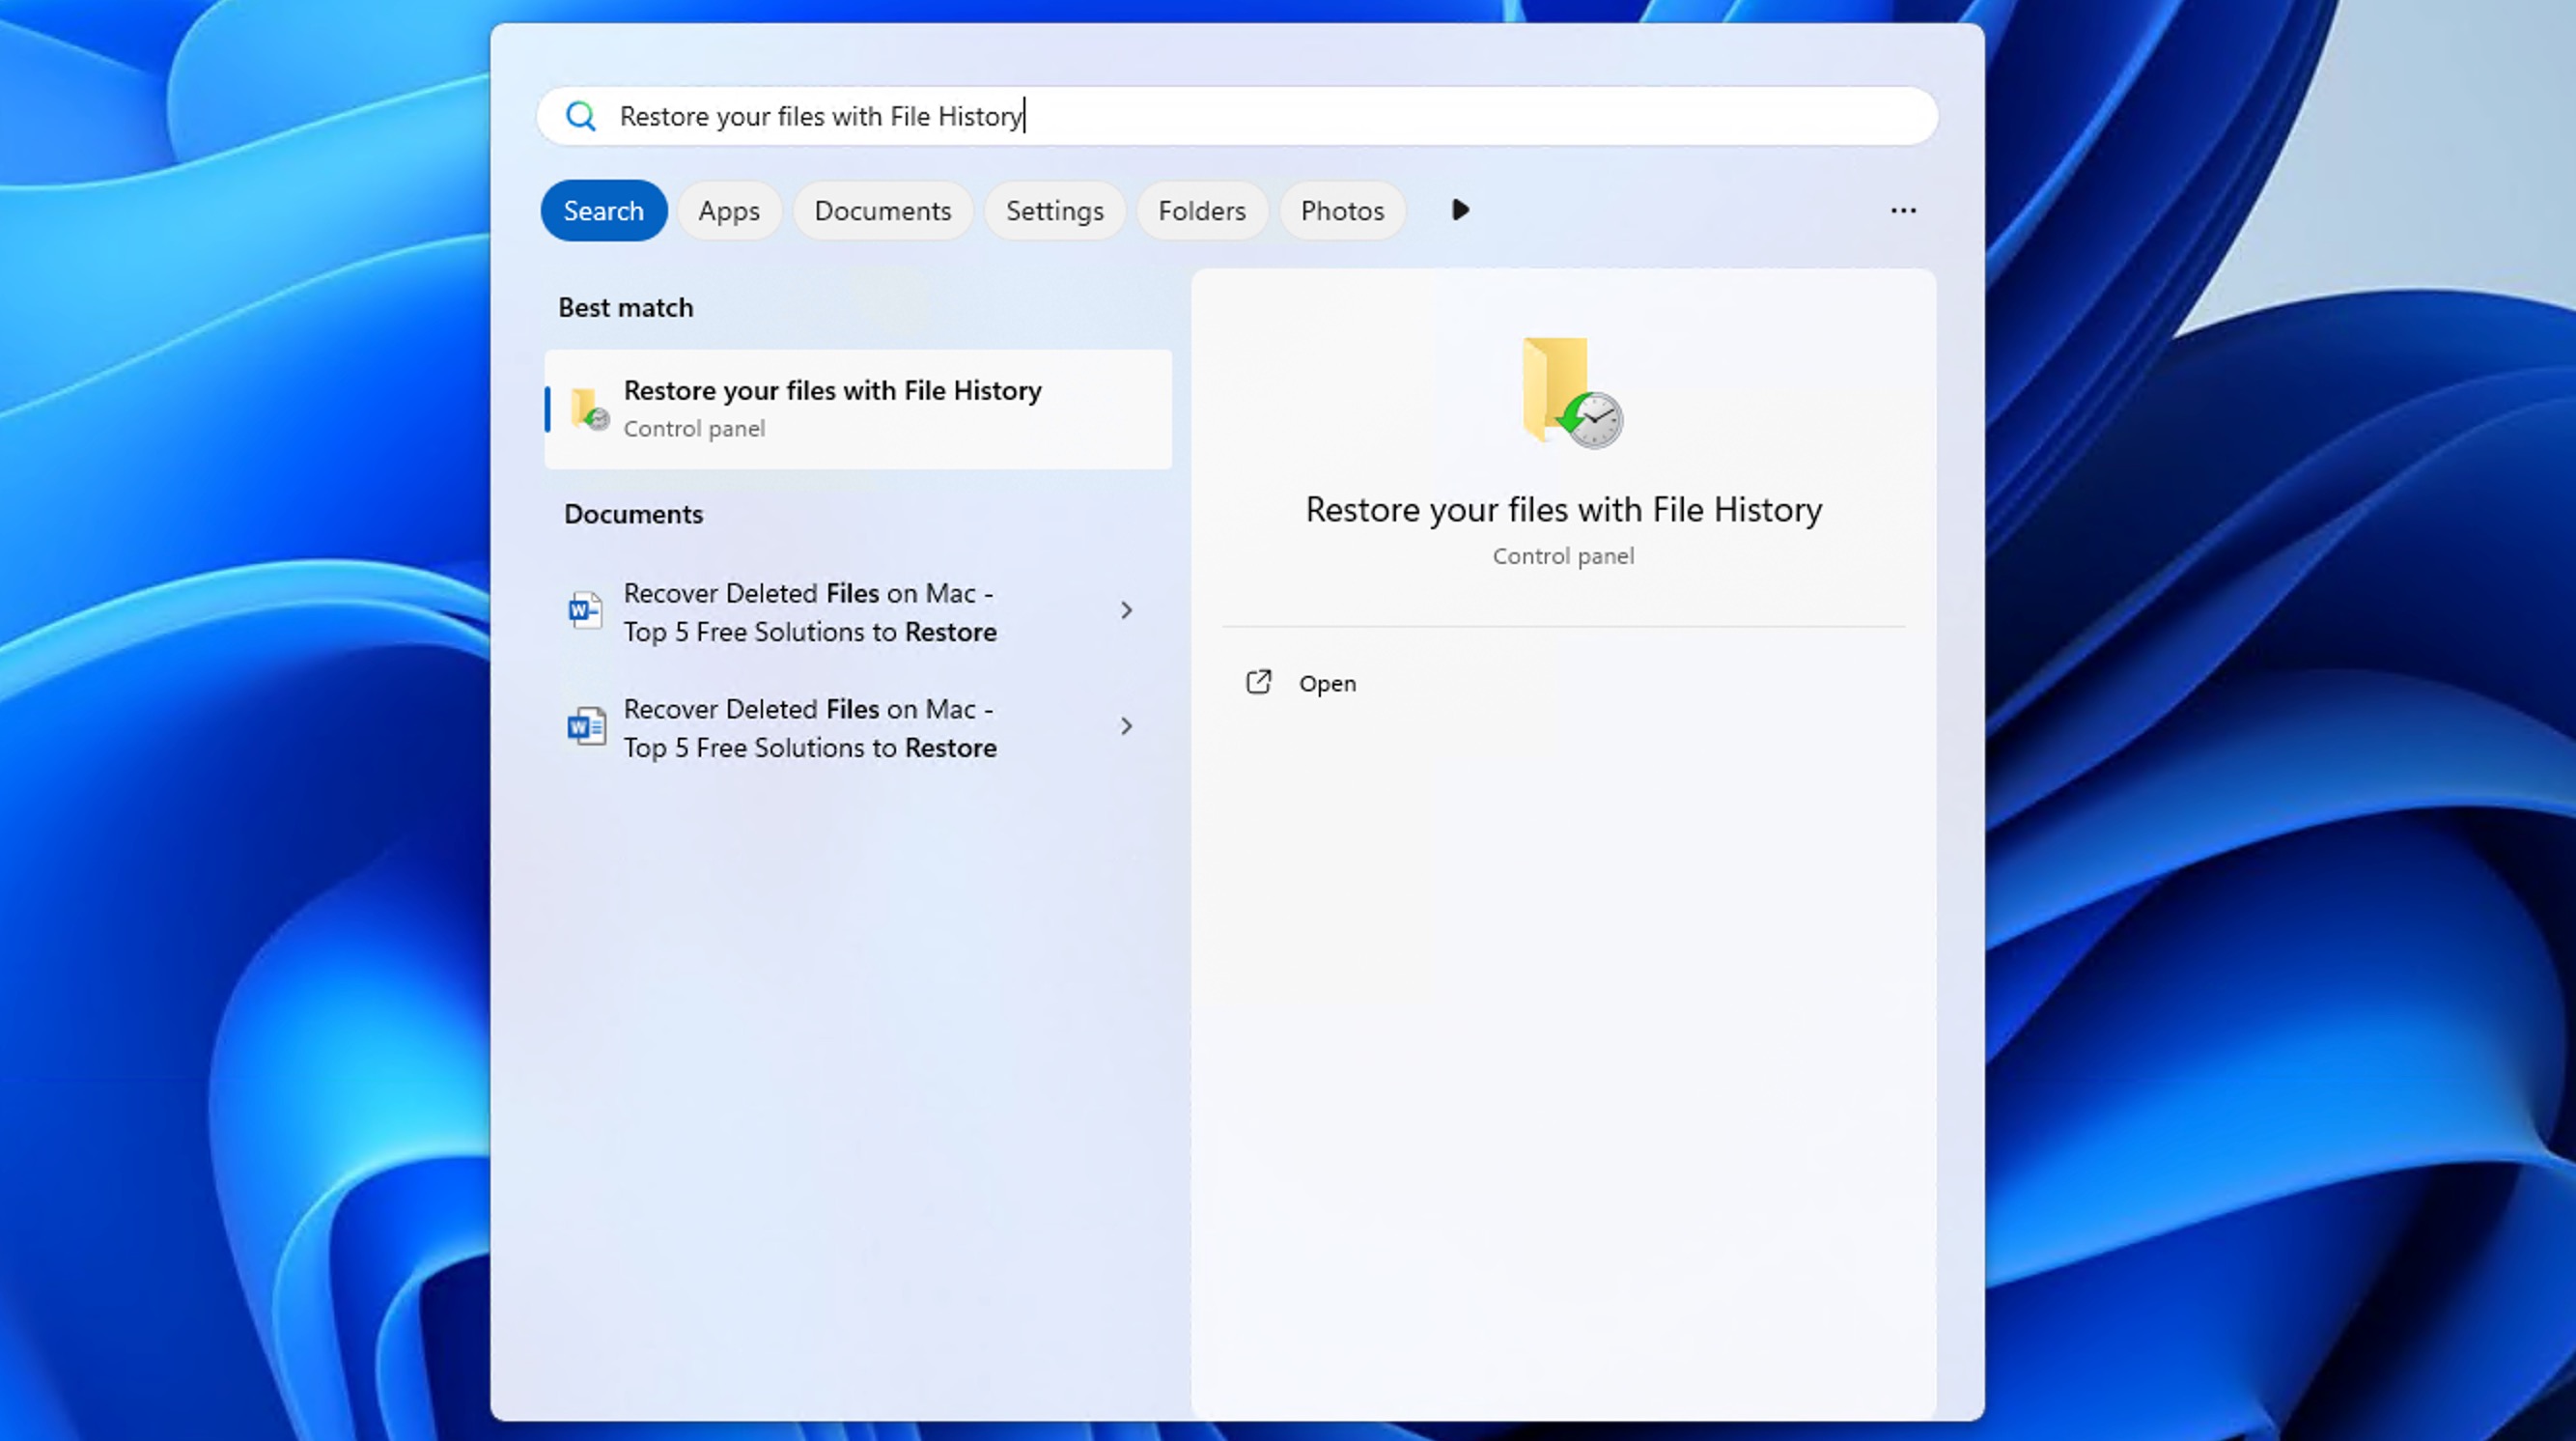
Many different backup solutions exist, and the specific recovery instructions you need to follow depend on which backup system you are using. For example, many Windows users rely on File History because Microsoft includes it with the OS. Here’s how it can be used to restore data after a RAW hard drive incident:
- Open the Start menu and type “Restore your files with File History.”
- Click on the corresponding control panel item.
- Navigate through your backup history using the arrow keys to find the most recent working version of your files.
- Select the files or folders you want to restore.
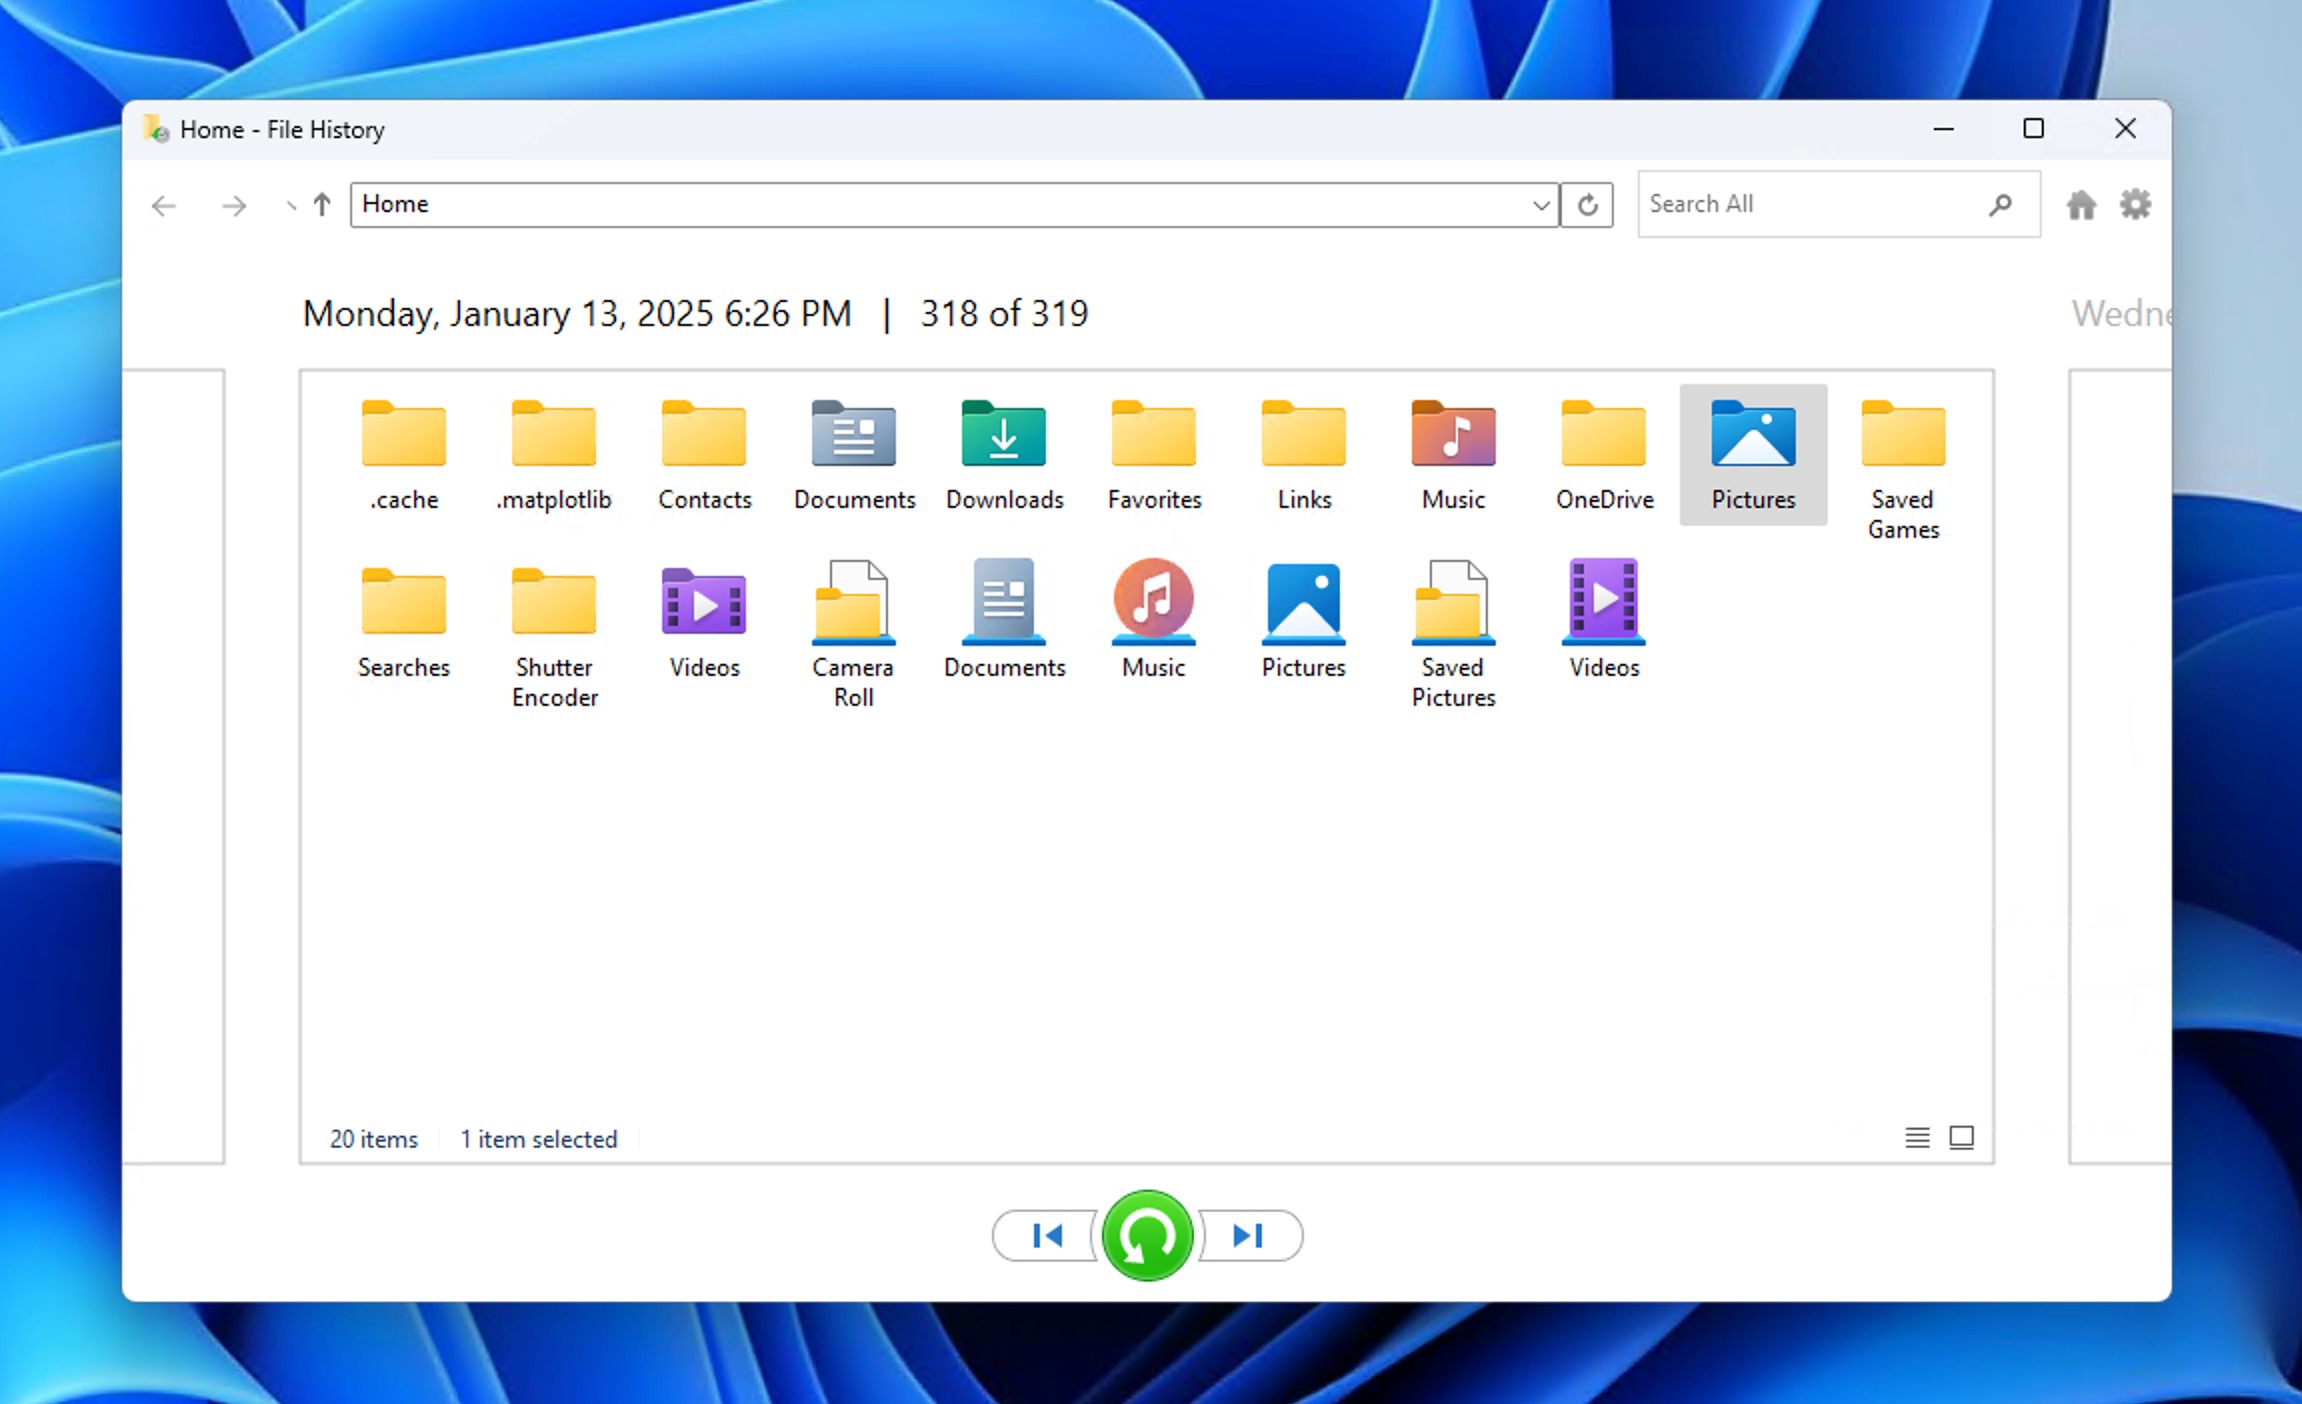
- Click the green Restore button to recover the files to their original location.
📝 Note: By default, File History only backs up files in your Desktop, Documents, Pictures, Music, Videos, and Downloads folders. You can only restore files from other locations if you’ve manually added them to your File History backup.
Method 4: Ship the Drive to a Data Recovery Service

Just because DIY methods that let you recover data from a RAW drive are readily available doesn’t mean you have to do everything yourself. There are many professional data recovery services that would be more than happy to take a look at your drive and perform RAW disk recovery for you.
While certainly more expensive than DIY methods, professional data recovery services are equipped with advanced tools and have a wealth of experience, allowing them to successfully tackle even the most complicated cases of data loss.
How to Fix a RAW Drive without Losing Data
Now that you’ve secured your valuable files using one of the recovery methods described above, it’s time to fix your RAW drive and make it usable again. The methods below will help you repair or recreate the drive’s file system and restore it to normal operation.
Method 1: Fix Your RAW Drive without Formatting
Windows includes a built-in utility called CHKDSK (Check Disk) that can fix different file system errors. While CHKDSK typically cannot run on RAW drives since they lack a recognizable file system, there’s one exception where it can work.
This exception occurs when the drive was previously formatted as NTFS and became RAW due to a damaged boot sector. In such cases, CHKDSK may be able to identify the underlying NTFS file system and restore the boot sector from its backup copy, effectively returning the drive to its proper NTFS state. Here’s how to try CHKDSK in such cases:
- Open the Start menu, search “cmd,” and launch the Command Prompt as administrator.
- Paste the following command inside the Command Prompt:
chkdsk X: /f(replace X with the letter assigned to the RAW drive). - Hit Enter on your keyboard and wait for CHKDSK to finish.
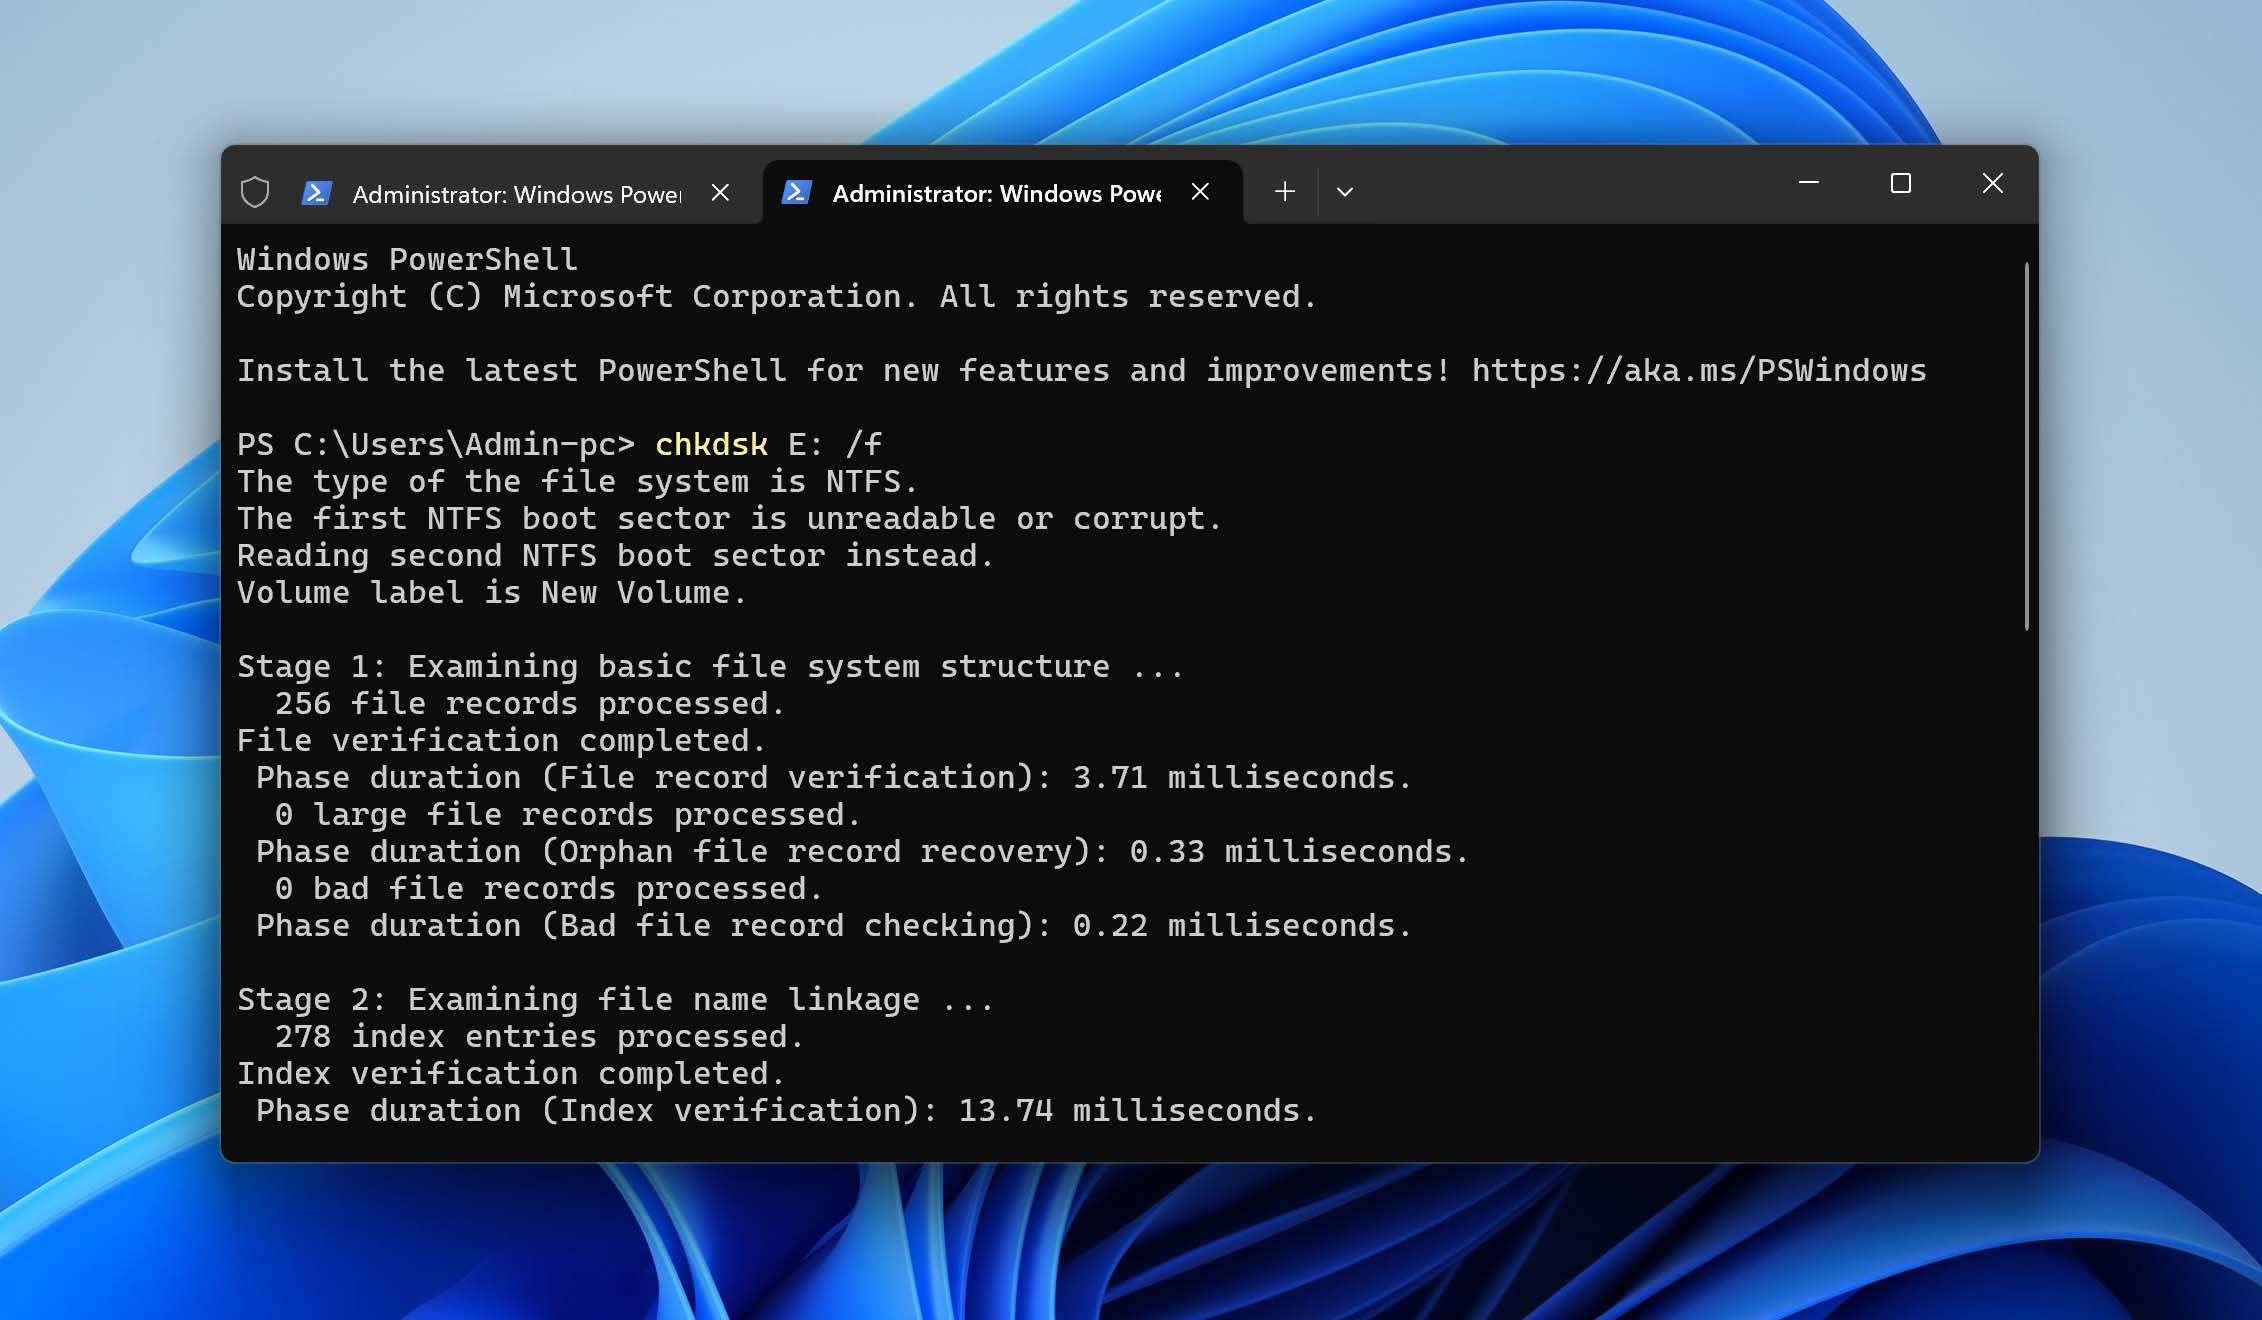
If you can’t use the CHKDSK utility because your RAW drive doesn’t have a drive letter assigned to it, then the next method should be able to help you.
Method 2: Fix Any RAW Drive without Data Loss
One way to fix a RAW drive without data loss is to find the missing partition using specialized software and restore it back to its original place on the drive.
While you could use TestDisk, which we’ve described in the previous section of this article, there are also solutions with a graphical user interface. One such solution is DiskGenius, and this is what you need to do to perform RAW file system recovery with it:
- Download DiskGenius from its website and install it on your computer.
- Launch it and select the RAW drive.
- Click the Partition Recovery button.
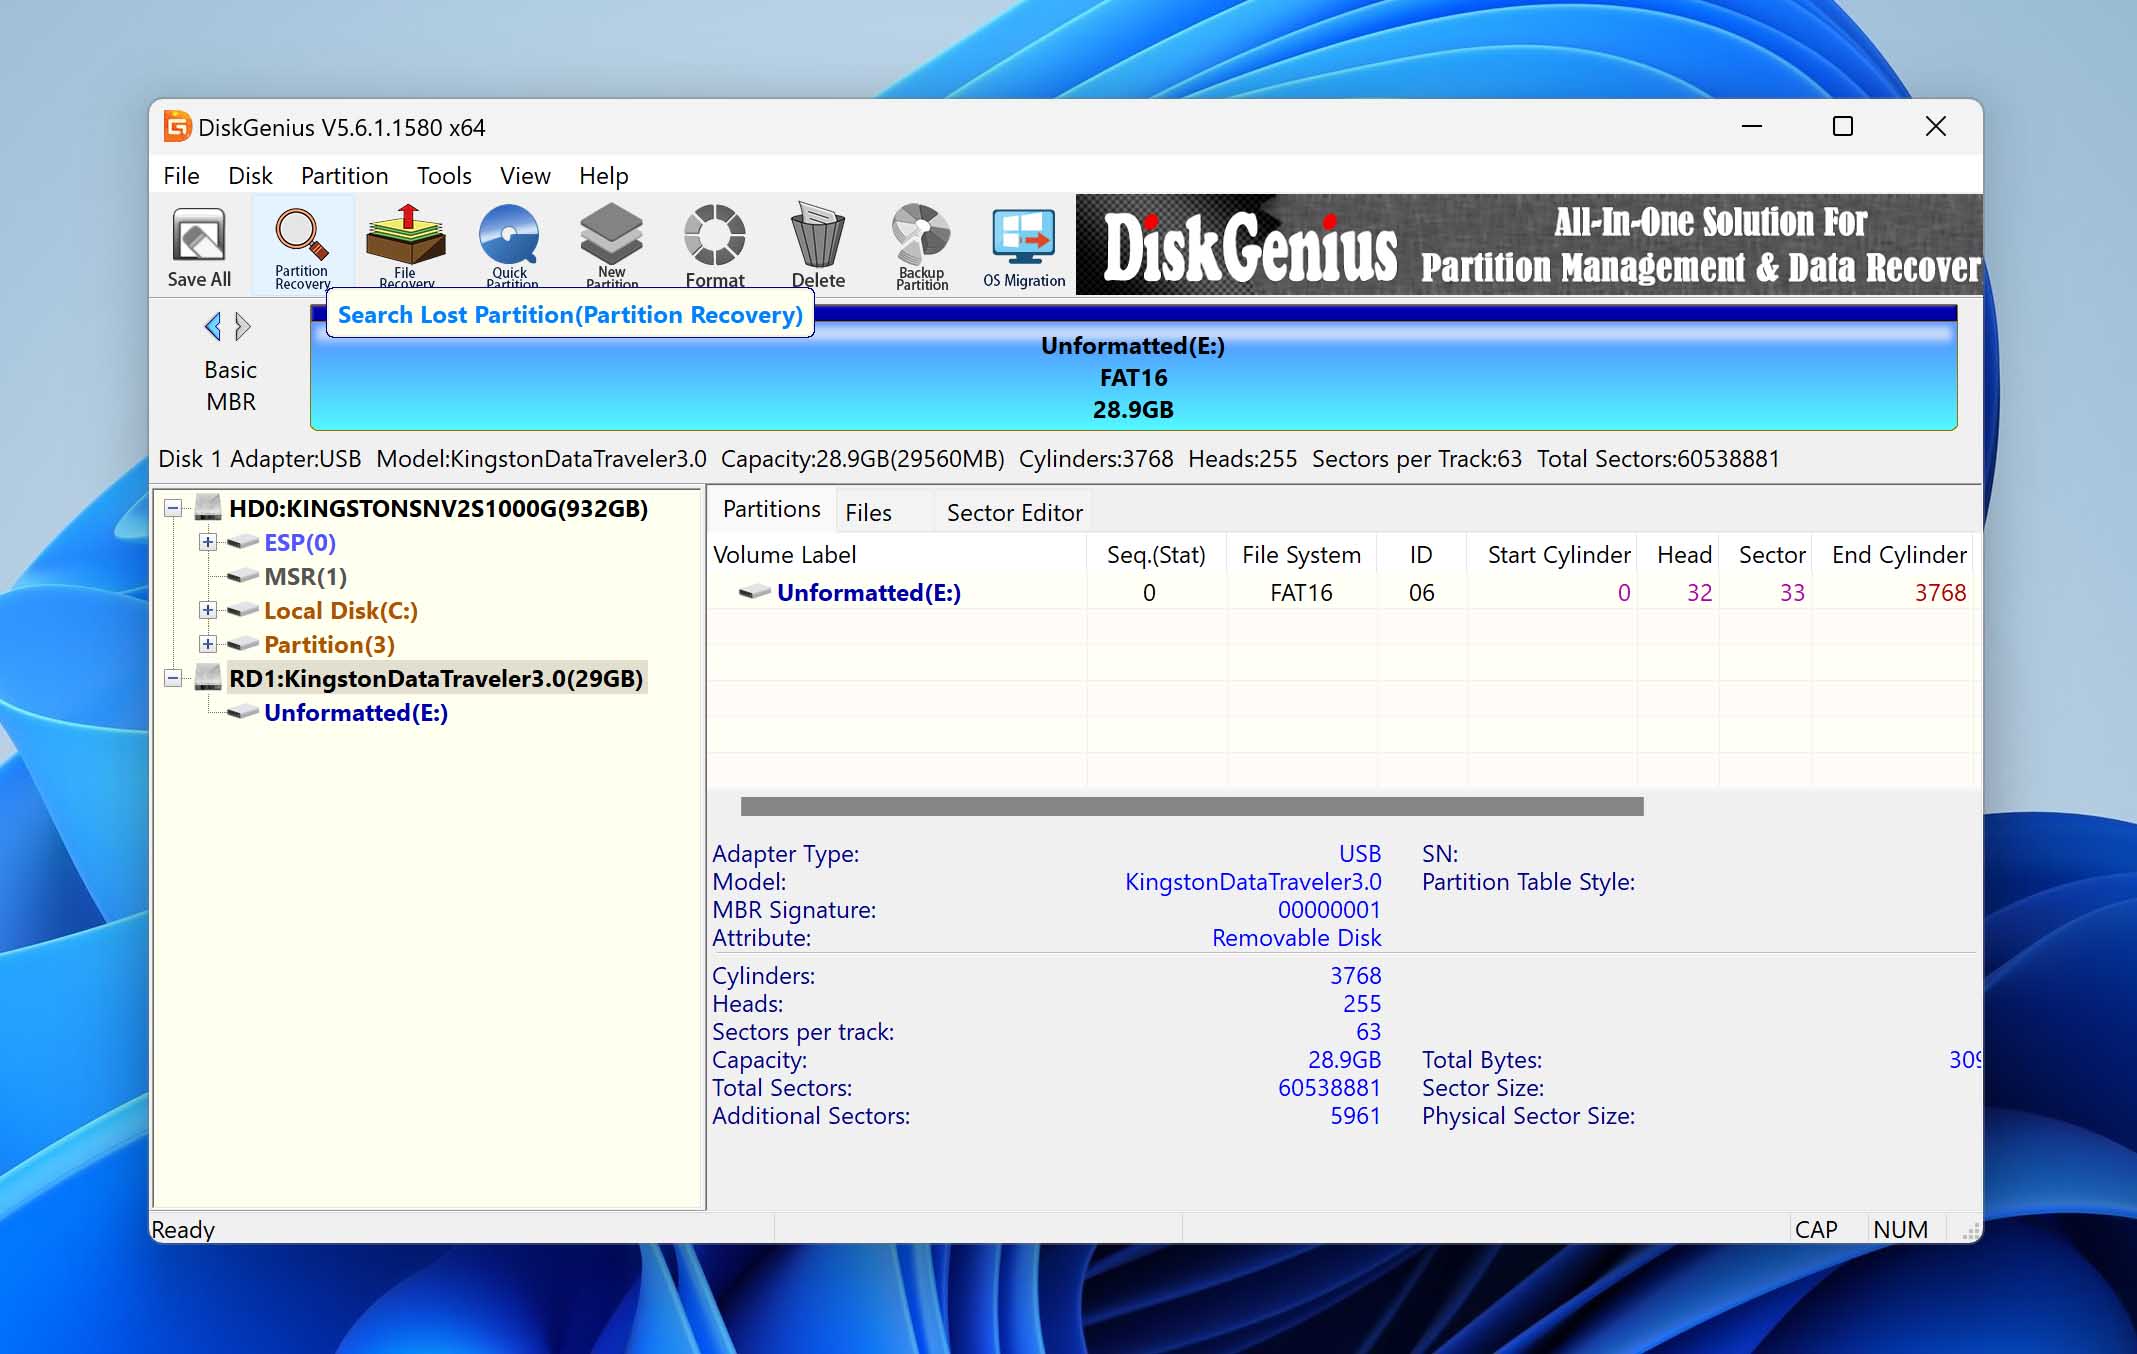
- Follow the recovery wizard.
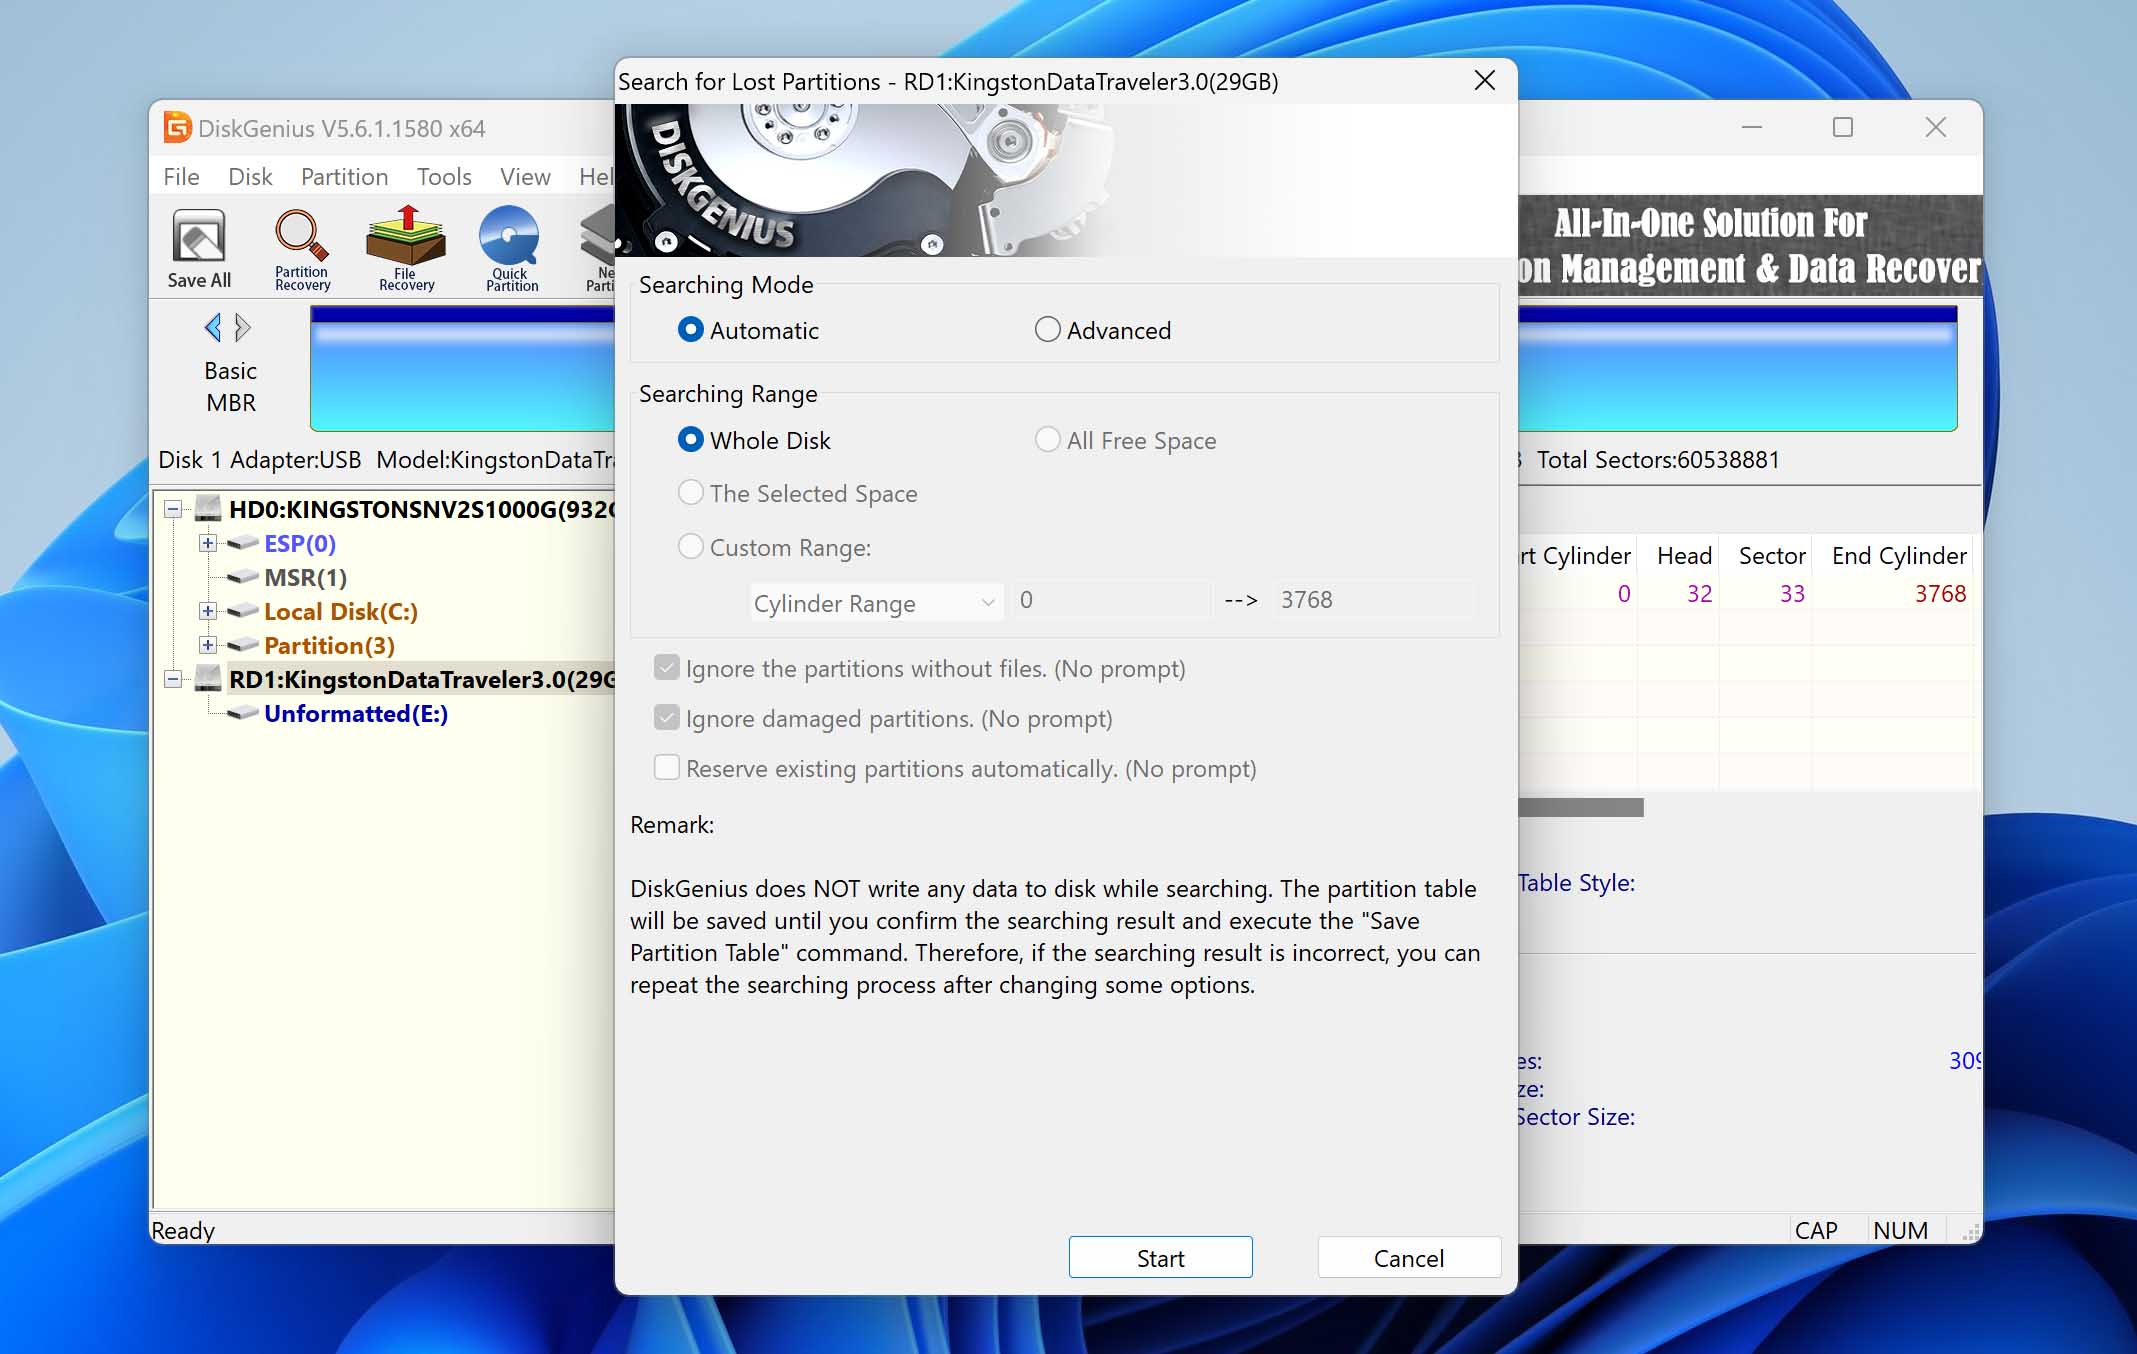
- Once you’ve found the missing partition, click Save All to save the new partition table.
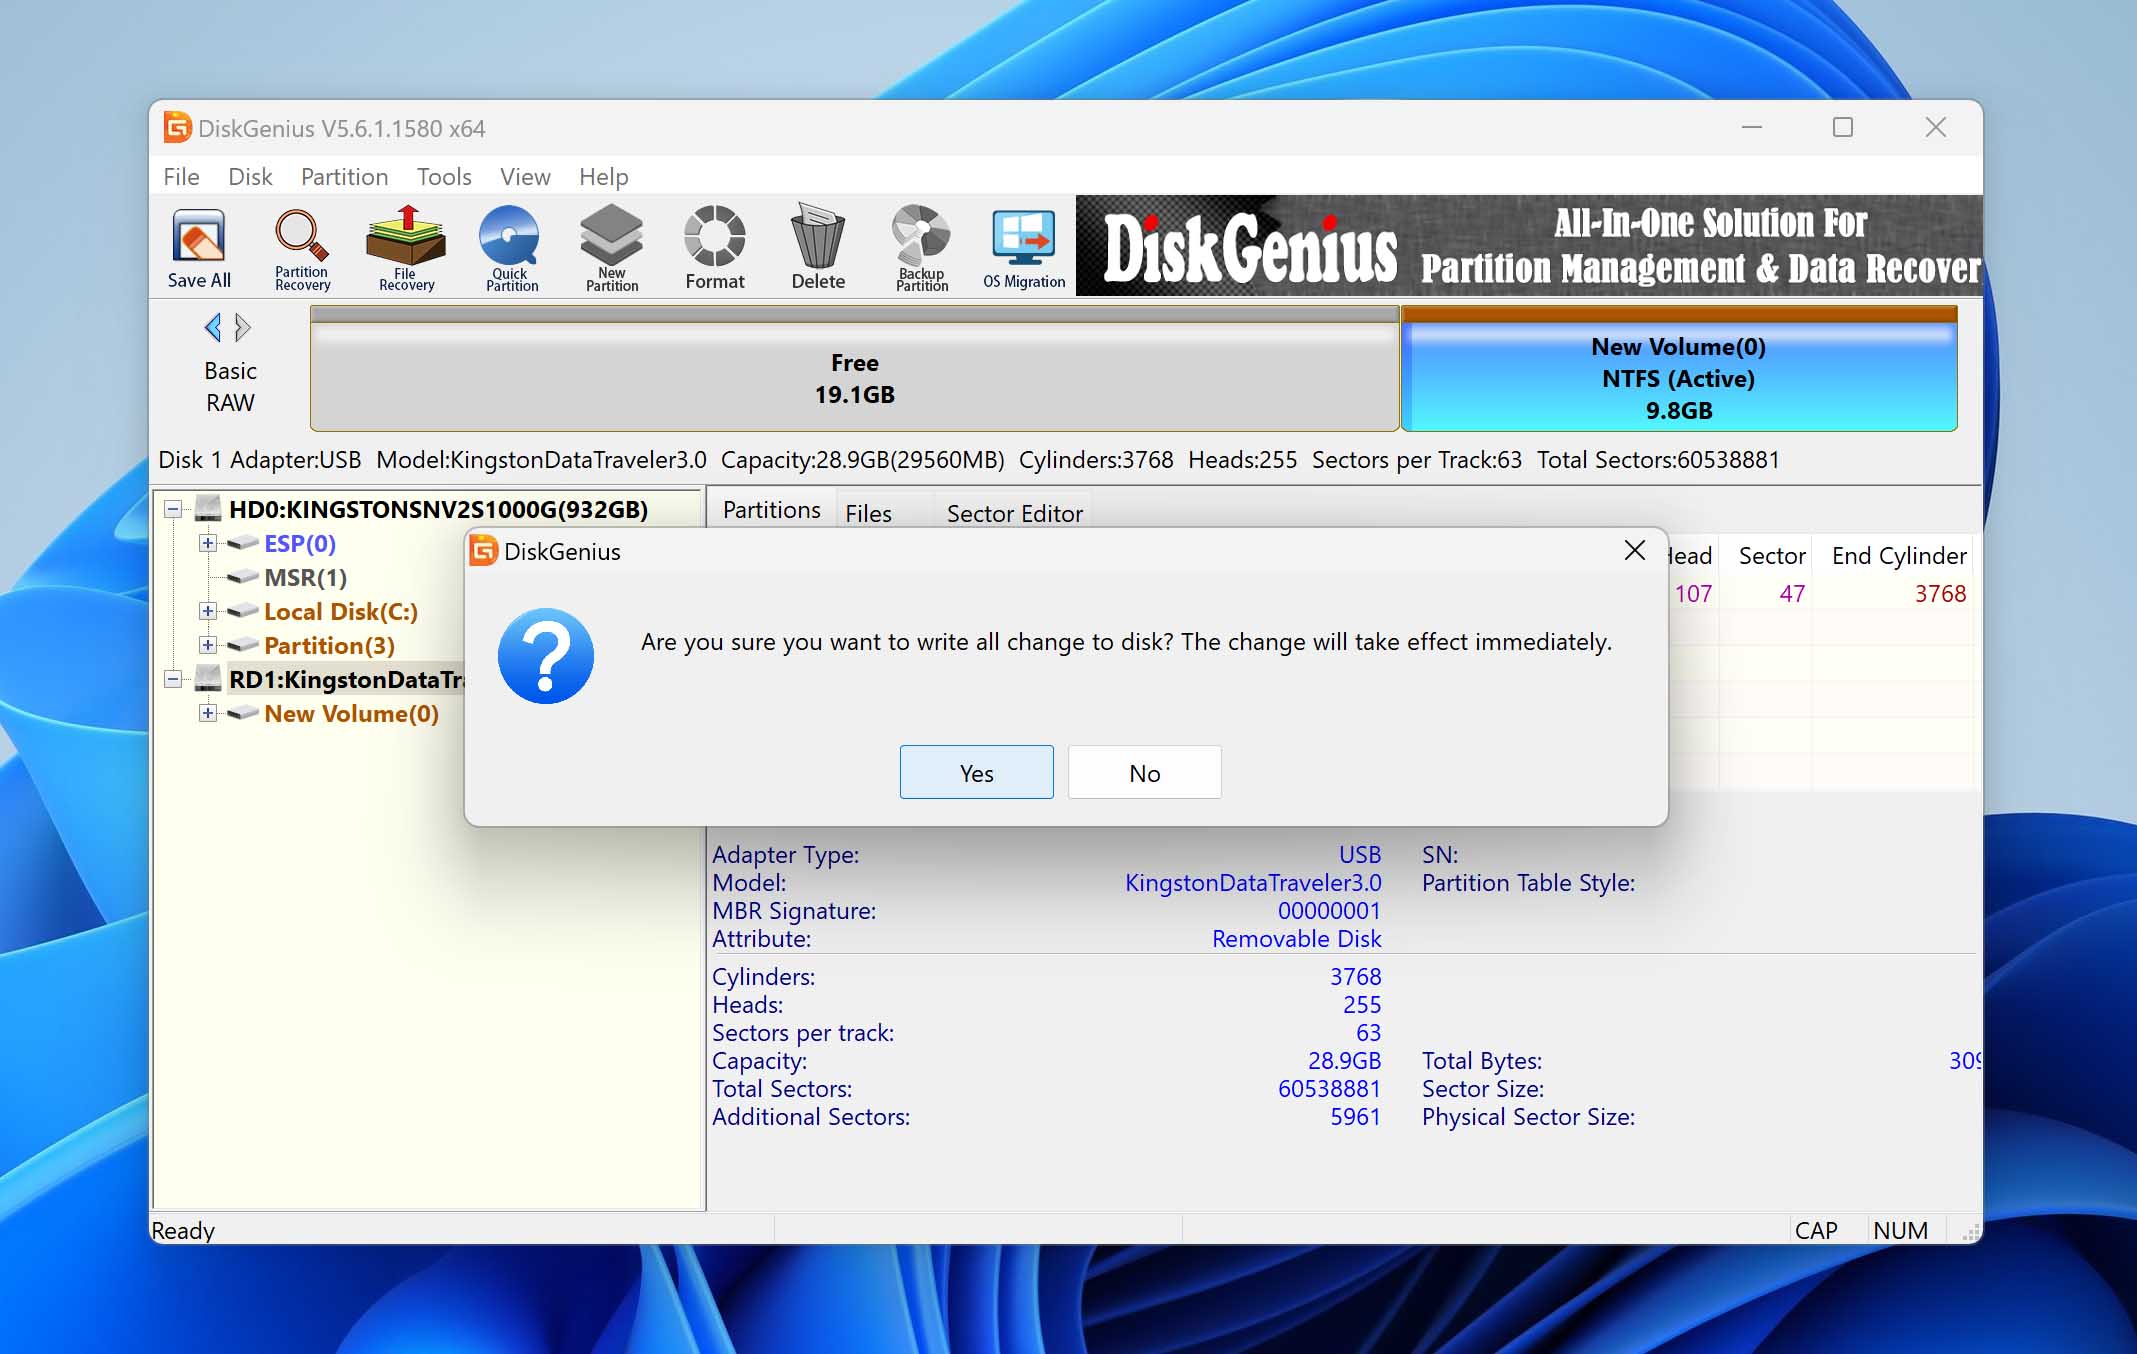
DiskGenius also has other features that can help you recover data from a RAW drive, so make sure to explore them as well.
Method 3: Fix a RAW Drive by Reformatting It
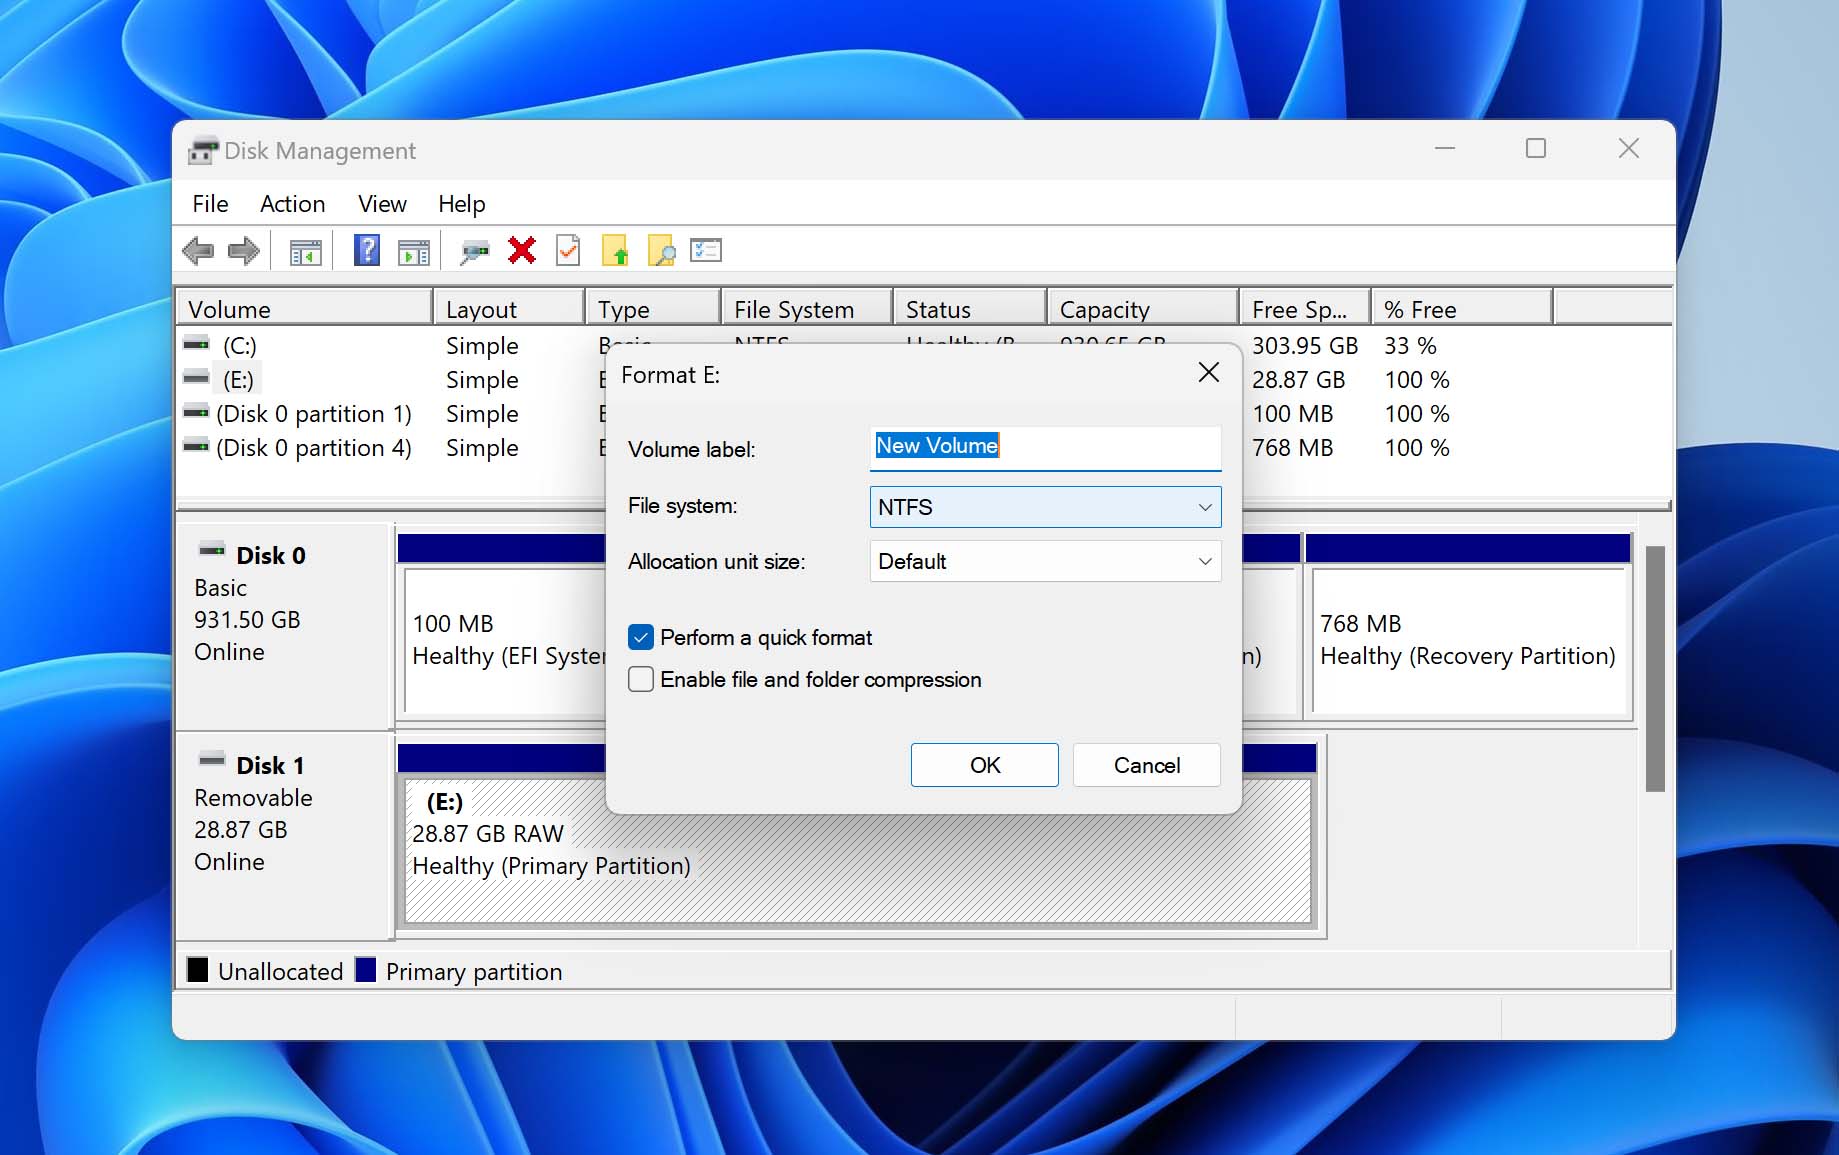
Since the main issue with RAW drives is the lack of a functioning file system, you can restore them to working order by reformatting them. However, formatting will erase all data on the drive, so if you haven’t already recovered your important files using one of the methods described earlier in this guide, you should do so before proceeding with formatting.
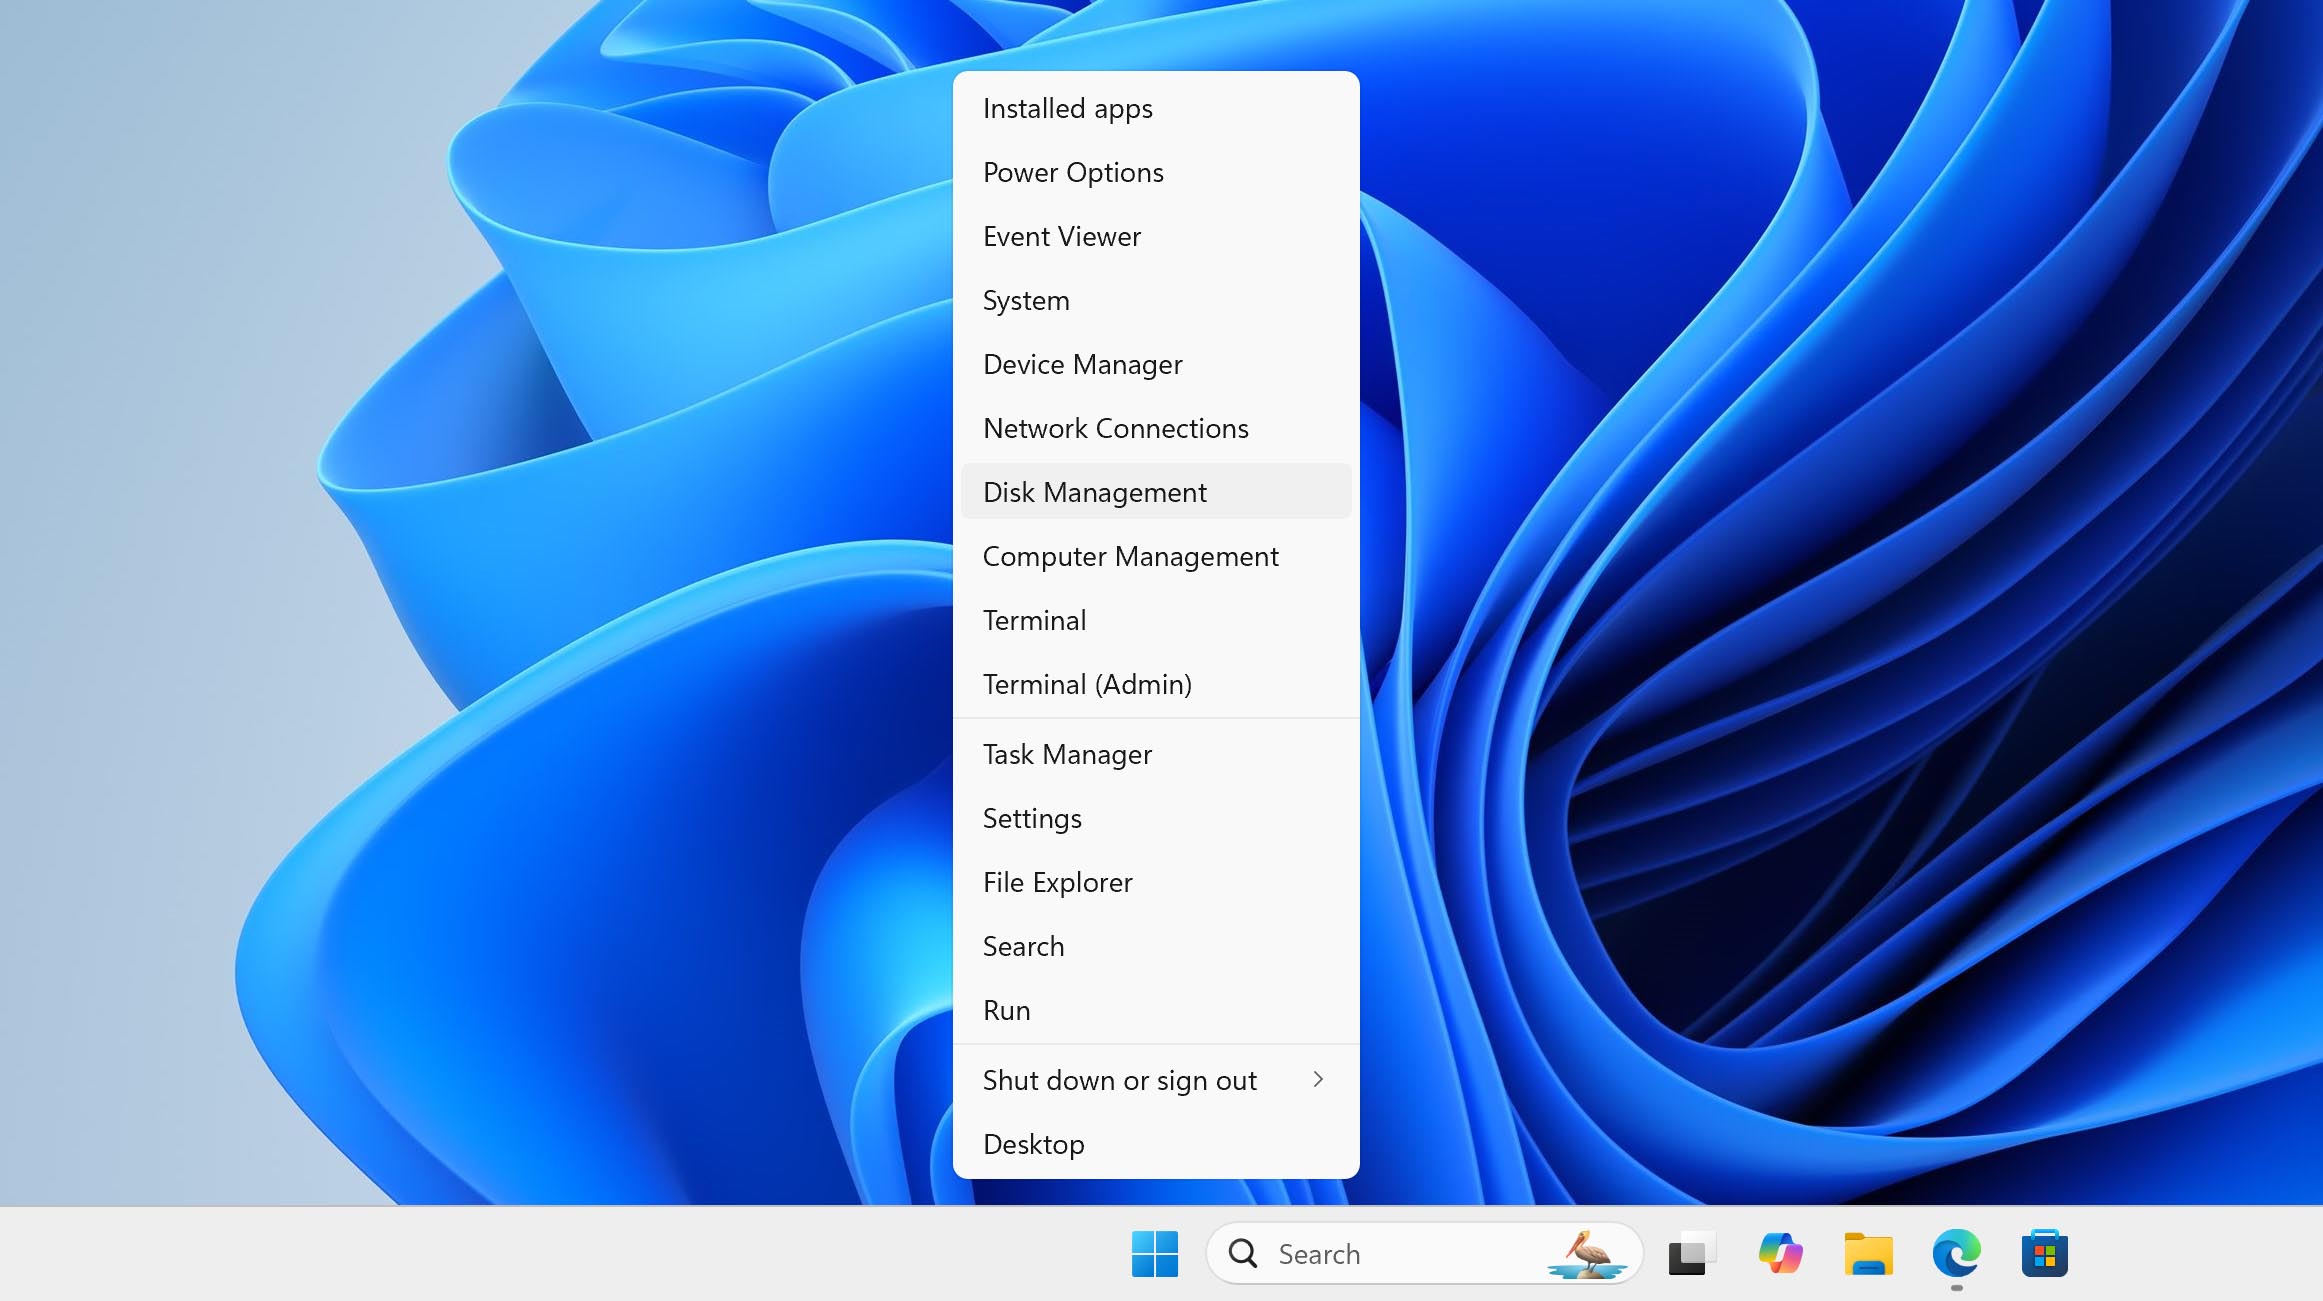
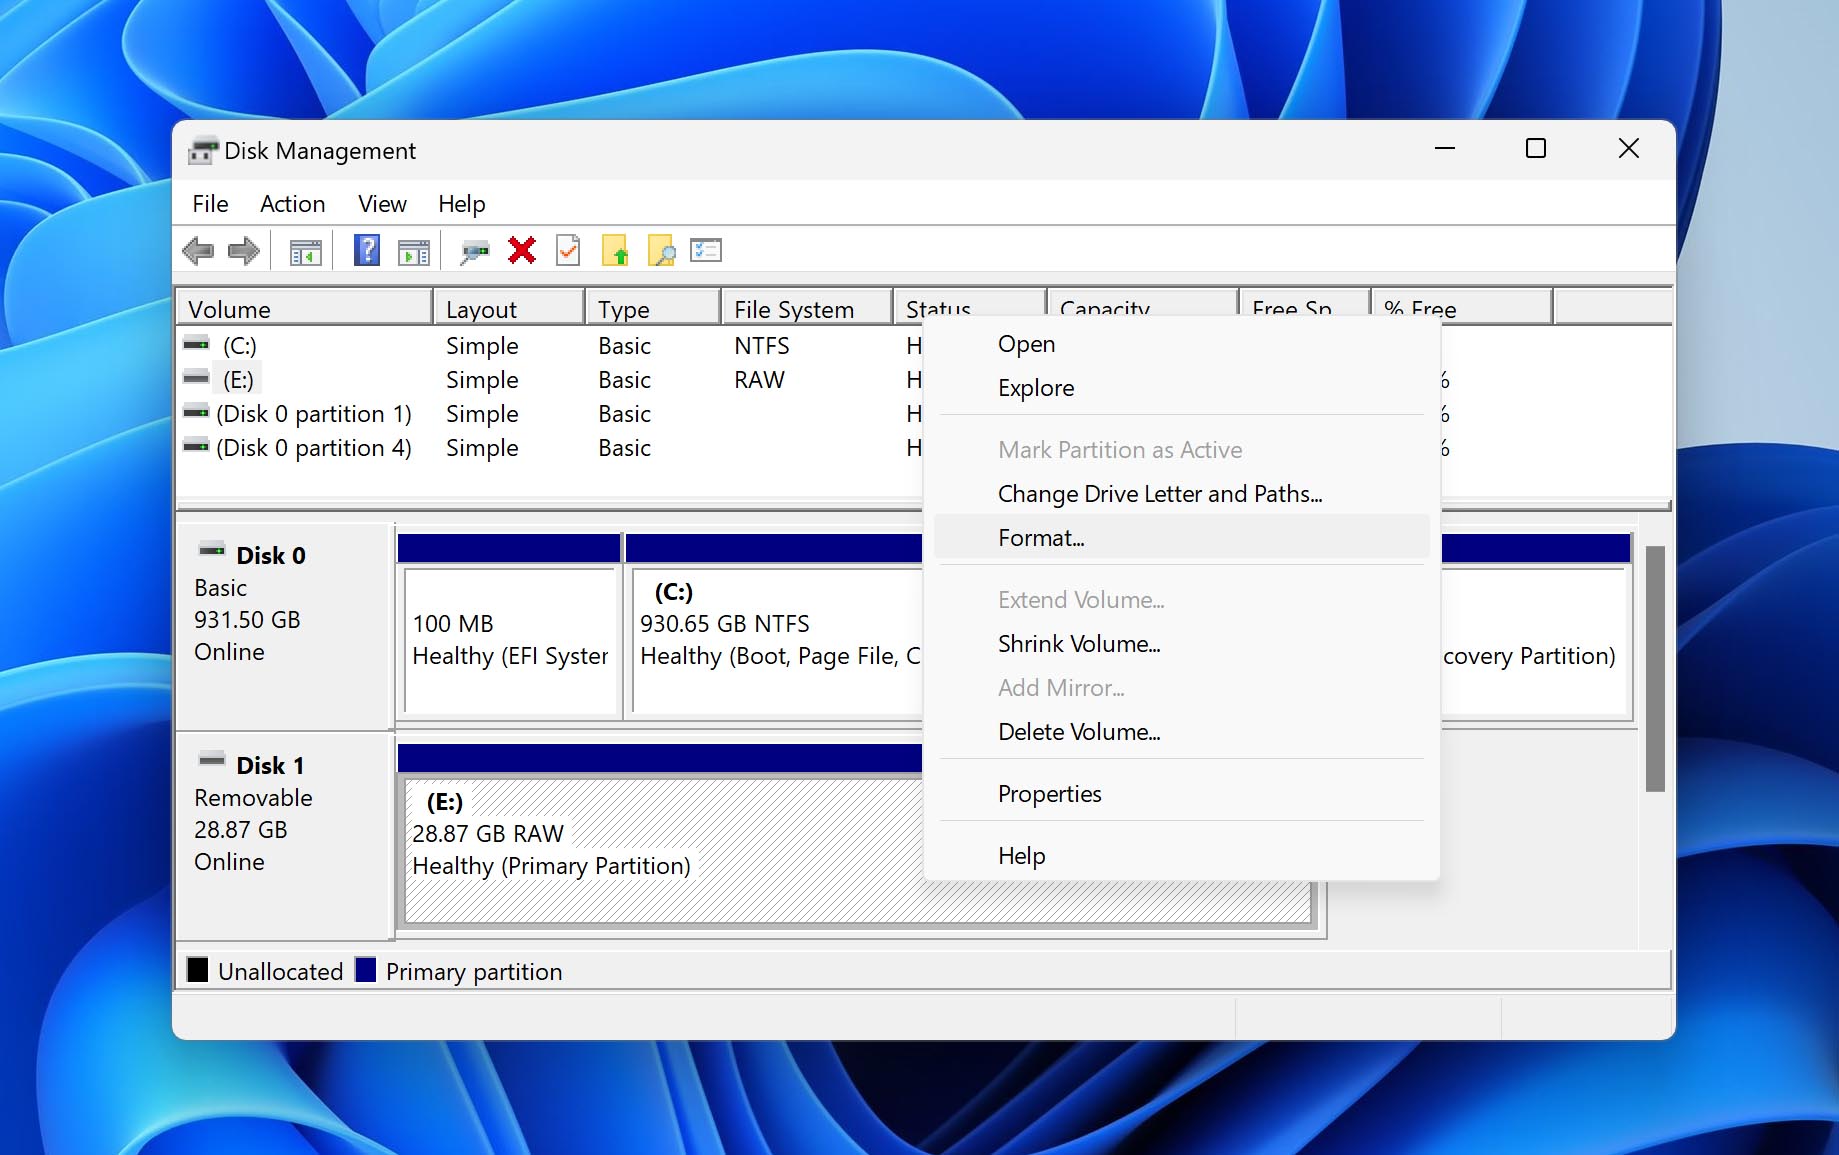
To format a RAW drive:
- Press Windows + X and select Disk Management.
- Right-click the RAW drive and select the Format option.
- Choose your preferred file system and confirm.
Best RAW Hard Drive Prevention Techniques
Knowledge is power when it comes to preventing your hard drive from becoming RAW because most hard drives become RAW due to a user error rather than an unavoidable hardware problem, such as a manufacturing defect or a random failure. Here are some of the most effective RAW hard drive prevention techniques you should remember and practice:
- 🪶 Handle with care: As a professional videographer on Reddit points out, even a small drop can cause catastrophic failure. Keep drives in padded cases, never disconnect them during file transfers, and always use the “Safely Remove Hardware” option before unplugging. A dedicated storage area with proper padding can prevent accidental drops that might corrupt your file system.
- 🔋 Keep the power flowing: According to data recovery expert Zorb750 on Reddit, power fluctuations are a major cause of drive failure. Use a high-quality UPS (uninterruptible power supply) to protect against power surges and sudden shutdowns. For external drives, avoid using USB hubs that might provide unstable power.
- ♨️ Don’t let it overheat: “Heat is the enemy of electronics,” points out one member of a data recovery subreddit, and they’re completely right. That’s why you need to give your hard drives proper airflow, avoid stacking them, and consider adding extra cooling if needed (especially when it comes to internal drives).
- 📊 Monitor drive health: Many advanced recommend S.M.A.R.T. monitoring tools like CrystalDiskInfo or the one included with Disk Drill to detect trends in reallocated sectors or pending sectors count while there’s still enough time to move valuable data to a healthy drive.
- 💽 Back up your data: Follow the 3-2-1 backup rule recommended by multiple data recovery experts: keep at least three copies of your data, store them on two different types of media, and keep one copy off-site. This way, even if a drive becomes RAW, you’ll have multiple backup options.
These five simple tips can greatly reduce the likelihood of your drive becoming RAW and you needing to perform RAW file system recovery.
Conclusion
RAW file system recovery isn’t nearly as difficult to perform as it may seem at first. By following the instructions described in this article, you should be able to regain access to all important files quickly and confidently.
FAQ
You can recover files from a RAW drive using data recovery software like Disk Drill:
- Download and install Disk Drill on your computer.
- Launch it and scan your RAW drive.
- Preview & select the files you want to recover.
- Click the Recover button and specify a suitable recovery directory.
RAW drive recovery is the process of extracting files from a storage device that no longer has a functioning file system.
Converting a RAW drive back to NTFS without data loss requires specialized tools and careful handling to avoid permanent data loss.You can find detailed step-by-step instructions in our comprehensive guide about RAW to NTFS conversion.
In many cases, RAW drives can be fixed using CHKDSK, a built-in Windows tool capable of verifying the file system integrity of a volume and fixing logical file system errors:
- Press Win + X and select Windows PowerShell (Admin).
- Paste the following command inside PowerShell: chkdsk X: /f (replace X with the latter assigned to the RAW drive).
- Hit Enter on your keyboard and wait for CHKDSK to finish.
A RAW drive cannot be accessed through Windows File Explorer or standard file managers since the operating system can’t read its file system structure. Fortunately, you can use specialized data recovery software like Disk Drill to scan and access the drive’s contents directly.
When dealing with a RAW SSD (Solid-State Drive), you can generally follow the same recovery and repair steps as you would for a traditional hard drive. We recommend attempting data recovery as soon as possible using specialized software like Disk Drill.