Solid State Drives (SSDs) have become the standard type of drive in modern desktops and laptops. Why? Because they are faster, cheaper to produce, and (because they have no moving parts) are less likely to fail.
But just because a drive is less likely to fail, it doesn’t mean they are less prone to data loss than standard (platter-driven) drives. Why? User error and software failures—both issues that cannot be blamed on hardware.

So when you lose data on an SSD, are you out of luck? In most situations, probably not. There are plenty of software tools available to help you recover data from an SSD relatively easily. However, there is one issue that could possibly prevent you from using the standard data recovery software to succeed in this task: the so-called TRIM command.
How Does TRIM Affect SSD Recovery?
TRIM is an Advanced Technology Attachment (ATA) command that helps your SSD manage data more efficiently. Unlike HDDs, SSDs do not retain data for a very long time after it is deleted. This is due to TRIM. Once a file is deleted, the SSD immediately marks the space as available for new data, and TRIM speeds up the erasure process.
Now, is this good for SSD data recovery? Not at all. When data is erased (after being issued by a TRIM command), that data is essentially gone for good, whereas if TRIM wasn’t enabled, it would only be erased when new data is ready to take its place.
Regardless of whether TRIM is enabled, you should attempt to recover your data. You’ll likely find yourself in one of the following recovery situations:
| Data recovery scenario | Description |
| Recovery of deleted files or formatted SSDs | Most internal drives come with TRIM enabled. However, your data won’t be lost until a TRIM command is issued. There’s no telling when a TRIM command will be run, so it’s important to scan your SSD as soon as possible. The same is true if you need to recover data from a formatted SSD drive. |
| Data recovery from external SSDs | Generally speaking, most SSDs do not have TRIM, as it’s a SATA/NVMe command and most drives are connected through USB. Therefore, you should have a good chance of recovering your data, provided it hasn’t been overwritten by continued use. |
| Data recovery from SSDs with damaged file systems | When your file system is damaged, your data is inaccessible to both you and your drive. Therefore, it should be safe from the dangers of TRIM. However, with the drive in its current state, data recovery is your first priority and likely only option of accessing the data again. |
SSD Data Recovery Steps
It’s easy to recover deleted files from an SSD drive nowadays because data recovery software is available at your fingertips. However, this is assuming you’ve got an SSD data recovery tool that’s both (a) easy to use, and (b) effective at recovering data in your specific situation.
We’ve split this into a four-step process that’s super simple to follow. This is how you perform SSD hard drive recovery using Disk Drill:
Step 1. Disconnect Drive and Connect Externally
Seeing as the majority of SSDs that use TRIM are modern internal drives, this will primarily apply to them. Start by removing the internal SSD from your system as soon as possible. Then, connect it to the computer you’ll be performing recovery. Ideally, you’ll want to make sure it’s in read-only mode.
To connect an internal drive externally, whether it’s from your desktop or laptop, you will need to get an enclosure for your SSD. These enclosures will house your M.2 or SATA drive and allow you to connect it as a USB storage device. It basically turns it into an external SSD. If your laptop SSD is soldered to the motherboard, removing it is impractical. Instead, proceed to the next step which involved disabling TRIM.
Step 2. Disable TRIM
Now we want to disable TRIM to make sure it doesn’t run while we’re trying to recover the data. Although the likelihood of TRIM being able to run over the USB protocol is unlikely, it’s a good idea to try it anyway.
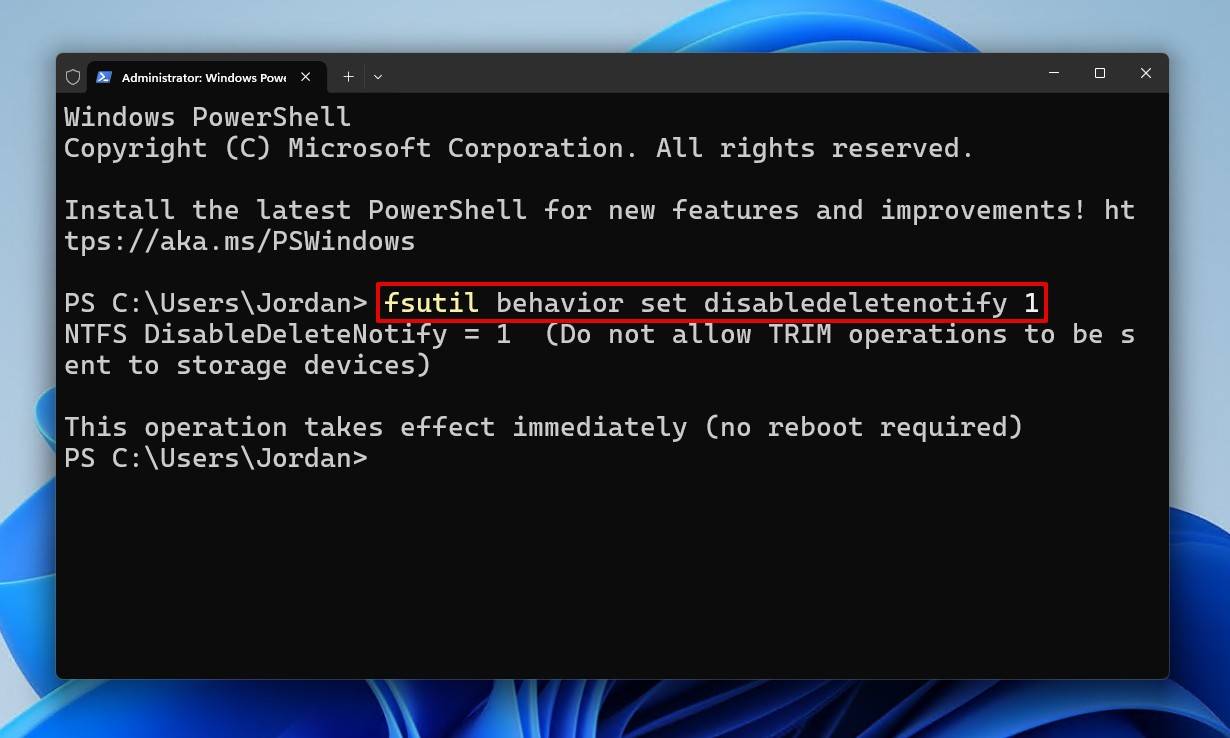
TRIM can be disabled by running just one command:
fsutil behavior set disabledeletenotify 1
You’ll need to use a terminal application for this. Command Prompt, PowerShell, and Terminal are all great options. Here’s how you can disable TRIM:
- Right-click Start and click Terminal (Admin).
- Run the command.
fsutil behavior set disabledeletenotify 1
Step 3. Recover Files from SSD
Now it’s time to get data off the SSD drive. If you need to recover files, even those that were permanently deleted from the solid-state drive, Disk Drill is an excellent option. It works well for both SATA and M.2 SSDs, including those using NVMe. Because it works directly with the drive, it can make use of file system records to locate deleted data. If the file system isn’t usable, it will instead identify data by its unique file signature, giving you a good chance of recovery no matter the case.
I was editing last night and everything was fine. I tried to finish this morning and all my files were corrupted on the SSD. Thank god for Disk Drill. SAVED MY BUTT
— Ian (@ianmahan03) January 29, 2024
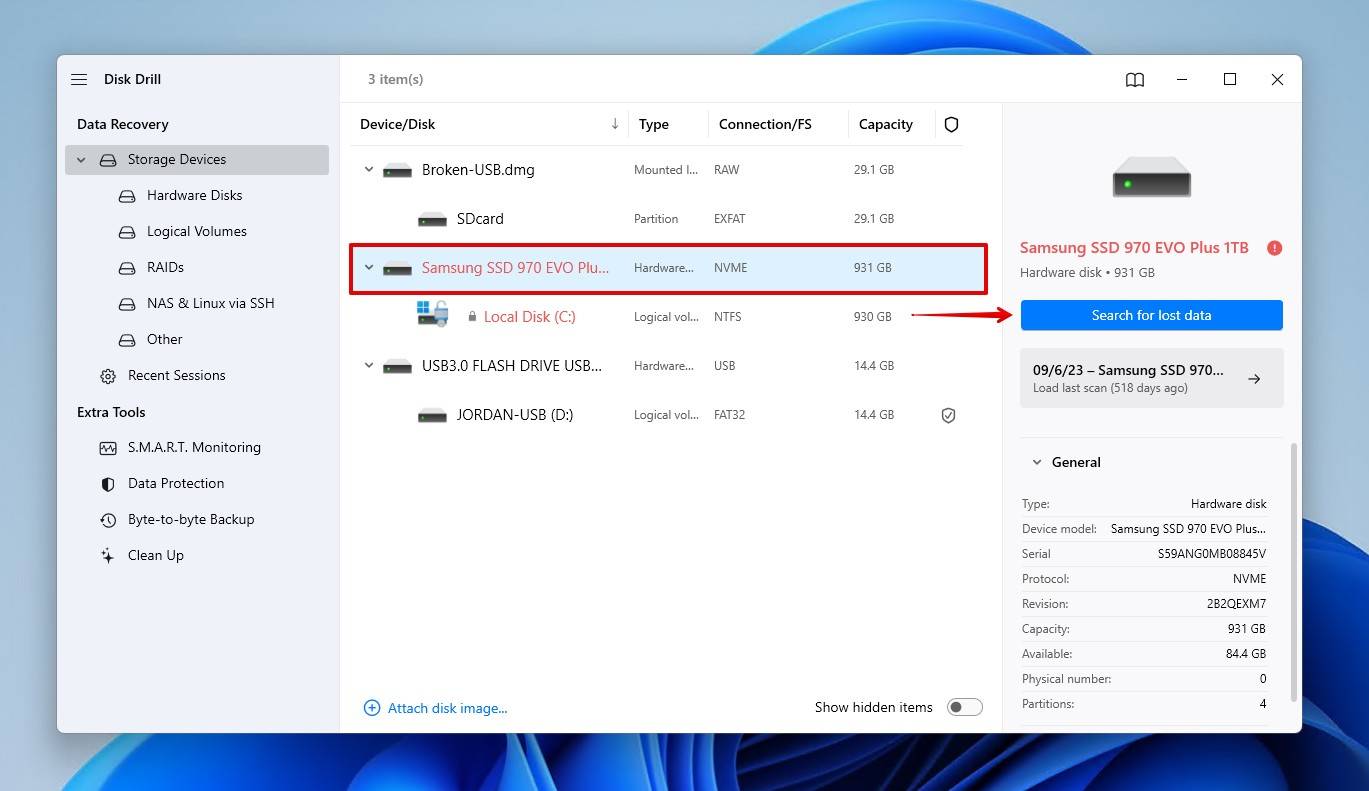
In most cases, Disk Drill is able to recover data from an SSD that’s not detected, so long as it’s visible in Disk Management, reading the correct size, and of course, TRIM hasn’t been run. Data recovery just takes a few clicks. Here’s how to recover data from an SSD using Disk Drill:
- Download and install Disk Drill.
- Select the SSD and click Search for lost data. Disk Drill will automatically utilize all of its scanners.
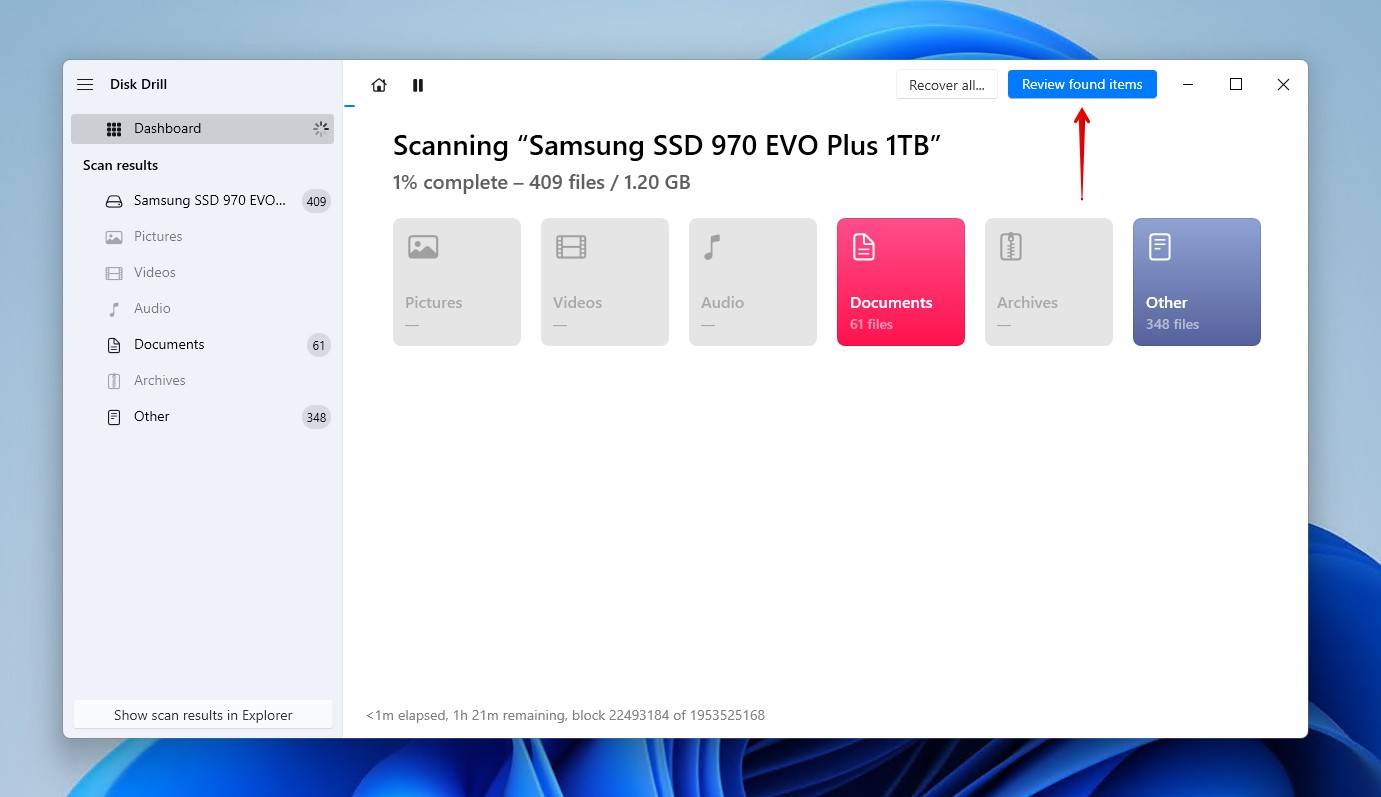
- Click Review found items at any point during the scan. Alternatively, you can click one of the colored file type icons to filter the results, or click Recover all to restore everything at once.
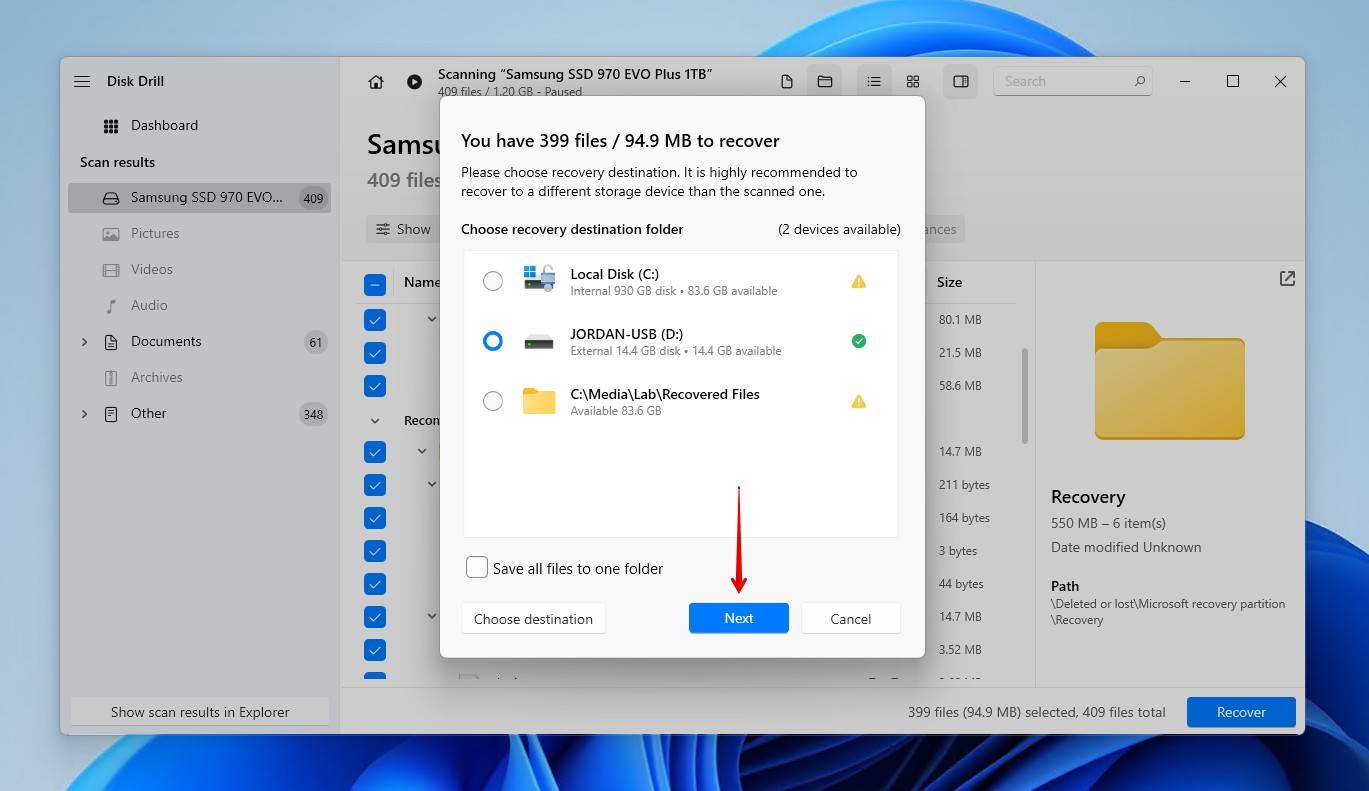
- Preview and select the files you want to recover from the SSD. Previewing the data first is recommended to ensure it’s intact and usable. When you’re ready to proceed, click Recover.
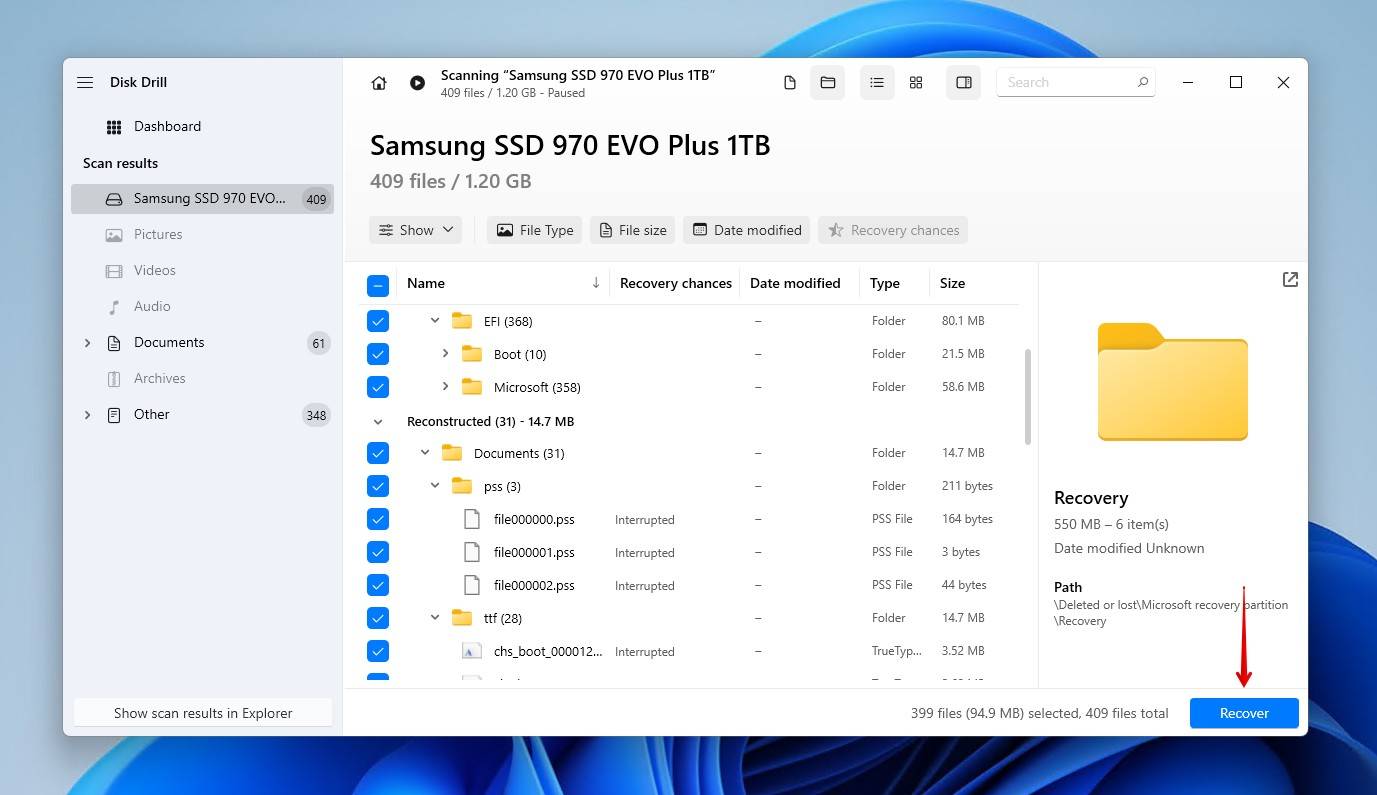
- Select a recovery location on a separate physical drive. Don’t restore the data to the same drive as there’s a good chance it will be corrupted.

Step 4. Contact Recovery Services
Data recovery software has its limits. For instance, while it may be able to recover data from an SSD that’s not initialized, it’s not possible to recover data from an SSD that’s not detected in BIOS if you’re only relying on software. Other cases include physical damage, exposure to extreme temperatures, and age. Instead, you’ll need to rely on something much more effective: an SSD data recovery service.
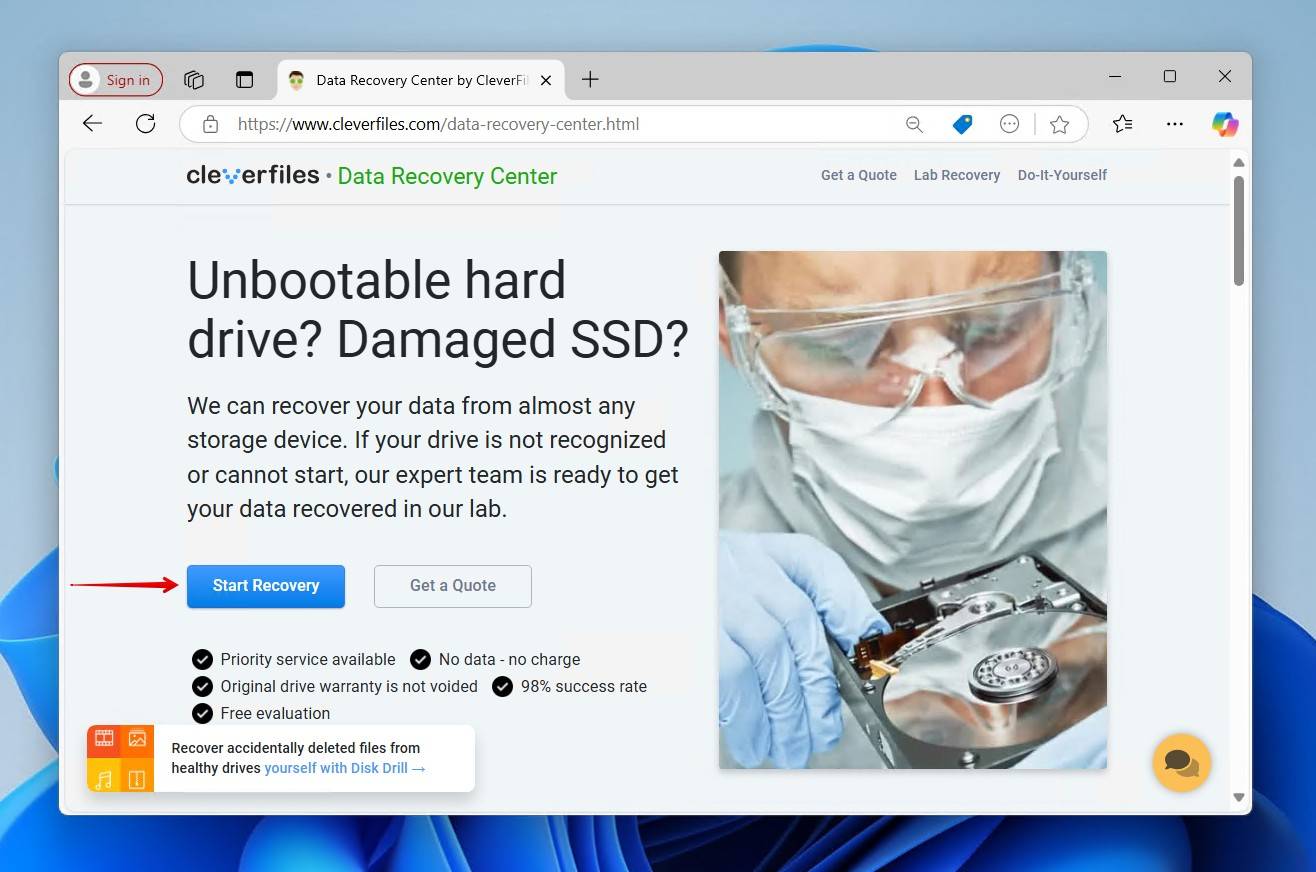
Working with a professional may be the costliest option, but it’s also the most effective. Data recovery professionals have the expertise and equipment necessary to perform high-level data recovery, even capable of recovering data from failed, dead, or crashed SSDs. You can even find some that won’t charge you unless some data can be recovered.
Here’s a quick look at what it looks like to enroll the services of a data recovery professional:
- Visit cleverfiles.com/data-recovery-center.html and click Start Recovery.
- Choose how fast you want your data recovered. Expedited recovery will cost more.
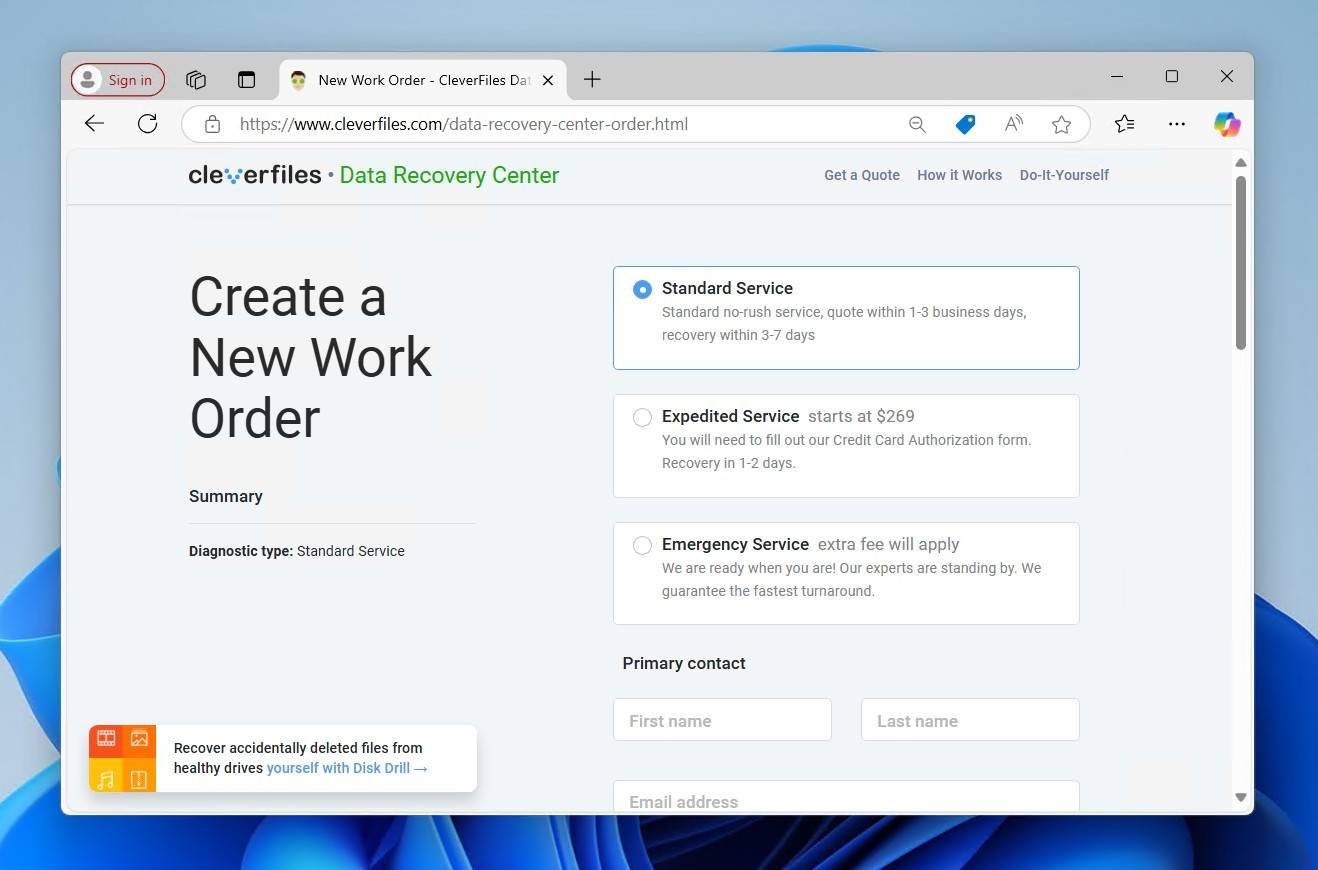
- Fill in the rest of the work order with your personal information and anything useful pertaining to the SSD and your data loss scenario. Click Complete my work order when you’re ready to finish.
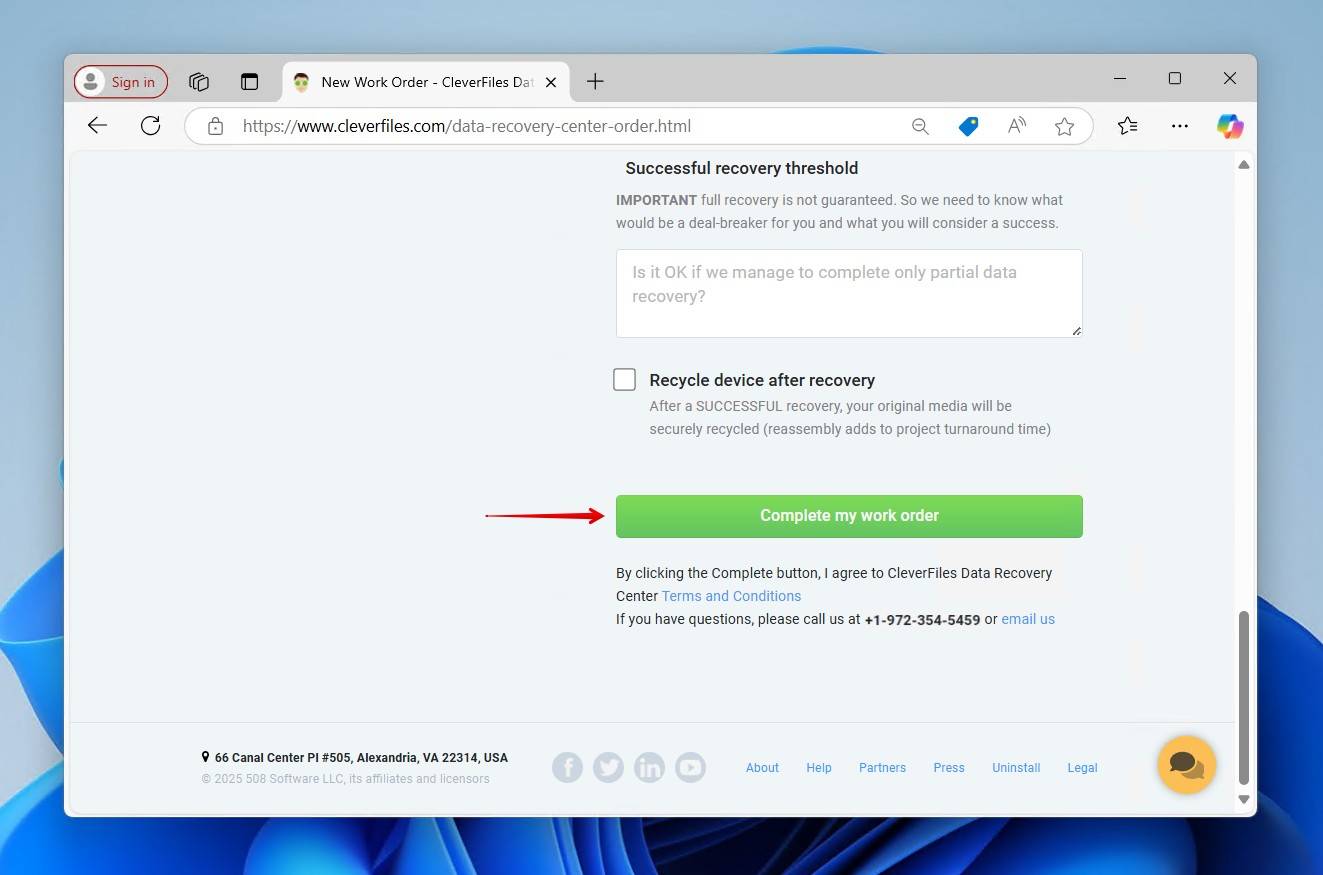
From there, you’ll receive further instructions on packaging your SSD or dead laptop and sending it away for recovery.
Conclusion
While taking good care of your SSD can prolong its life (and reduce your chances of data loss), it does have a finite lifespan. Eventually, it will run out of read/write cycles and the NAND memory, which is used to store your data, will no longer be usable. Even before then, you may run into a problem that results in data loss. Going forward, your best chance of keeping your data safe is to back it up.


FAQ
Yes, you can recover data from an SSD after format. However, some factors, such as TRIM, can impact the recoverability of your data. If TRIM was enabled (which is the case with most internal SSDs nowadays), you must recover your data before a TRIM command is issued. Once TRIM is run, your chances are near zero.
Starting with the 2004 release, Windows 10 will list the type of drive in the task manager. Another method is by way of the Windows Drive Optimizer, which will clearly report whether a drive is HDD or SSD. To open this utility, press the Windows key and search for “optimize.” Select Defragment and optimize your drives. Windows Drive Optimizer will list out the type of drive in the Media Type column.
The most common reason for this is due to driver issues. If you’re using Windows, and you’ve added an SSD drive to the system, you might also have to download and install the necessary device driver from the drive manufacturer in order for the drive to show up in the system.
Another reason why an SSD might not show up is because older PCs do not support the PCI-e connection of NVME drives, even though those drives can be connected to the motherboard. An older BIOS simple will not be able to detect them.
To recover data from an SSD drive on Windows, scan it with Disk Drill for Windows:
- Download the Windows version of Disk Drill from its official website.
- Install Disk Drill on your Windows computer.
- Launch Disk Drill and scan the SSD drive you want to recover.
- Give Disk Drill some time to analyze it and then go through the recovery results and select each file you want to recover.
Click the Recover button and specify a safe recovery destination.