If you often write, edit, or handle Word documents, you probably have first-hand experience with how painful and easy it can be to lose one. For instance, you might have been organizing your working folder and accidentally deleted a newer version of an important file instead of the older one. Or perhaps your computer crashed while you were working on an important document.
In such cases, there’s an array of data recovery methods that can help you restore your Word files.
| Recovery Scenario | Common Situations | Recovery Methods |
| Recover deleted Word document | You’ve accidentally deleted a Word document or the folder where it was located. The document may no longer appear in the Recycle Bin due to permanent deletion or automatic emptying. |
Way 1: Check Recycle Bin Way 2: Use data recovery software ⭐ Way 3: Restore from OneDrive Way 4: Search for files manually |
| Recover unsaved Word document | Your progress in a Word document was lost as an unfortunate result of an application crash, unexpected system shutdown, computer restart, or synchronization issues with OneDrive. In other words, you were working on a document that wasn’t saved properly. |
Way 1: Use AutoRecover feature Way 2: Recover previous versions |
Is it Possible to Recover Deleted Word Files?
Yes, it is possible! If you’re lucky you might just need to open the Recycle Bin, locate your deleted Word file, right-click it, and choose the Restore option. This will recover it to its original location where it was when you deleted it.
If you’re a bit less lucky and the Word file isn’t in the Recycle Bin anymore (maybe you’ve emptied the Recycle Bin, maybe the Recycle Bin maximum size has been exceed, or maybe the Word file was deleted using the Shift + Delete combination), then you’ll need to use one of the recovery methods for Windows 10, Windows 11, Office 365, and other platforms we cover below, and your chances of success will depend on several factors, including:
- ⏪ Availability of backups: If you’ve enabled Windows File History, OneDrive AutoSave, or another backup system, you may have a saved copy waiting to be restored.
- ✂️ TRIM on SSDs: If your Word file was stored on a solid-state drive (SSD), the TRIM command might make recovery harder because it marks deleted data as free space to help the SSD with performance. This command is triggered automatically by the operating system (sometimes almost immediately, and sometimes after a longer while).
- 🕐 Time since deletion: The longer you wait, the higher the risk that new data overwrites your deleted file. That’s why time is everything when you discover a missing Word file on your desktop, from a shared drive, or some other storage location.
For unsaved Word documents (Word crashed or you closed the document without saving), Microsoft provides several built-in recovery options, and we’ll cover them in detail in the sections on unsaved document recovery. While not completely reliable, they provide the best chance of recovery success.
Method 1: Checking the Recycle Bin
The Recycle Bin is often the first and simplest stop for recovering accidentally deleted Word documents. It can help you if:
- You deleted the Word document using the Delete key or right-click delete option.
- The file was deleted recently and the Recycle Bin hasn’t been emptied since then.
- The file size was within the Recycle Bin storage limit (typically 5-10% of your drive space).
- The file was deleted from your internal hard drive or external HDD/SSD.
On the other hand, you won’t find your missing Word documents in the Recycle Bin if the following has happened:
- You deleted the file using Shift+Delete (bypassing the Recycle Bin).
- You or someone else emptied the Recycle Bin after deletion.
- The file was deleted from a USB flash drive or SD card.
- The file exceeded the maximum size limit for the Recycle Bin.
- The file was deleted using Command Prompt or a third-party application.
If you believe that the file should be in the Recycle Bin based on the conditions above, then your next steps should revolve around its retrieval.
Here’s how the Word file recovery process from the Recycle Bin looks like:
- Click the Recycle Bin icon on the desktop.
- Find the file you want to recover (you can search for extensions like DOC, DOCX, and DOT).
- Select your file, right-click on it, and choose the Restore option.
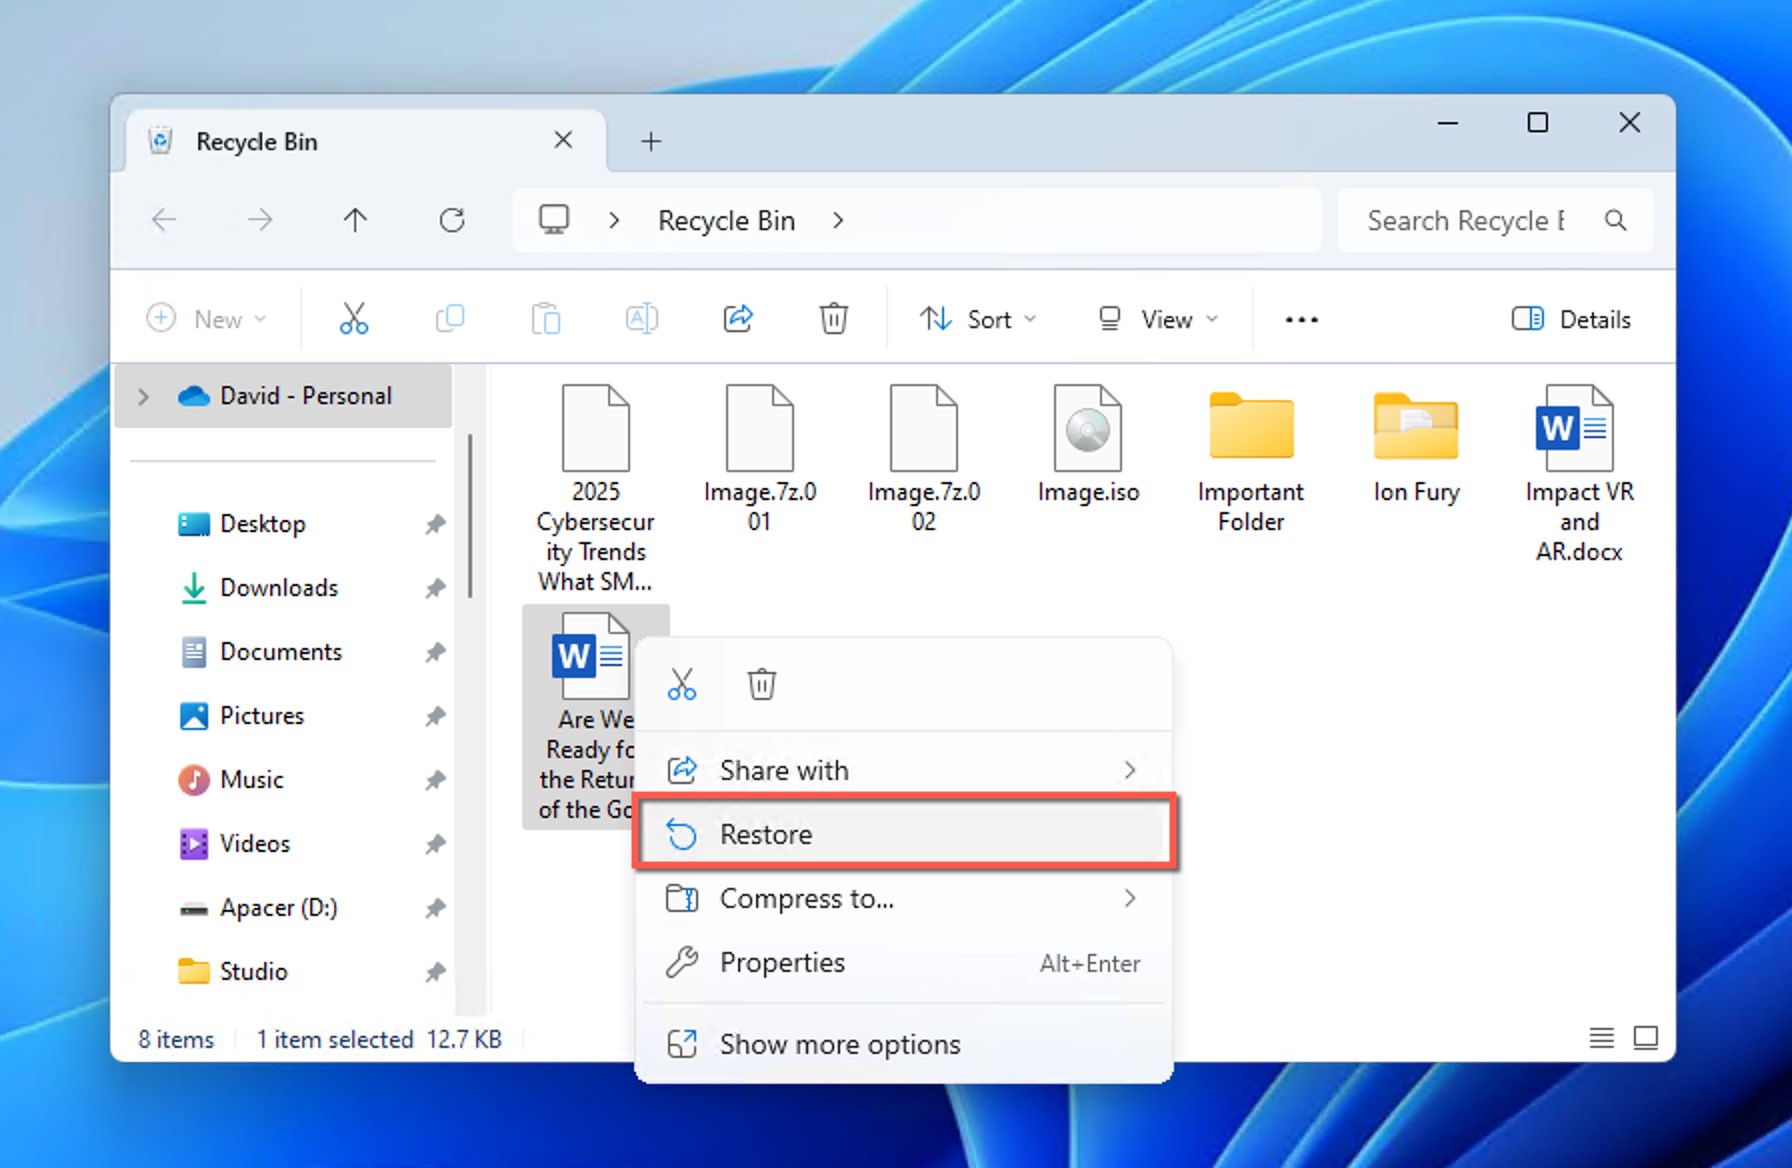
You will then be able to find the file in its original location. Alternatively, you can also drag and drop any file you want from the Recycle Bin folder to a different folder, such as your desktop.
Method 2: Recover Permanently Deleted Word Documents Using Recovery Software
If your important Word documents aren’t in the Recycle Bin anymore, they’re considered permanently deleted, but that doesn’t mean they’re gone forever. When files are deleted from your Windows system, the data remains on your storage device until it’s overwritten by new files or cleared by the TRIM command, and you can recover this Word data using specialized Word file recovery tools.
Disk Drill is a data recovery tool that delivers professional results even though it was developed with the average user in mind.
In particular is an excellent choice for anyone who is learning how to recover deleted Word documents because it supports all major Word document formats, including:
- DOC (Microsoft Word)
- DOCX (Microsoft Word)
- DOCM (Word document with macros)
- DOTX (Word template files)
- DOTM (Word template files with macros)
- ASD (Word AutoSave files)
To make the process as convenient as possible for users, Disk Drill makes it possible to preview documents before recovery, which allows you to verify their integrity and content. With the free version of Disk Drill, you can recover up to 500 MB of data—enough for hundreds of Word documents from your laptop or desktop.
How to retrieve deleted Word documents on Windows using Disk Drill:
- Download and install Disk Drill from the official website.Make sure to install it on a different storage device than the one where your Word documents were deleted to avoid the overwriting of their data.

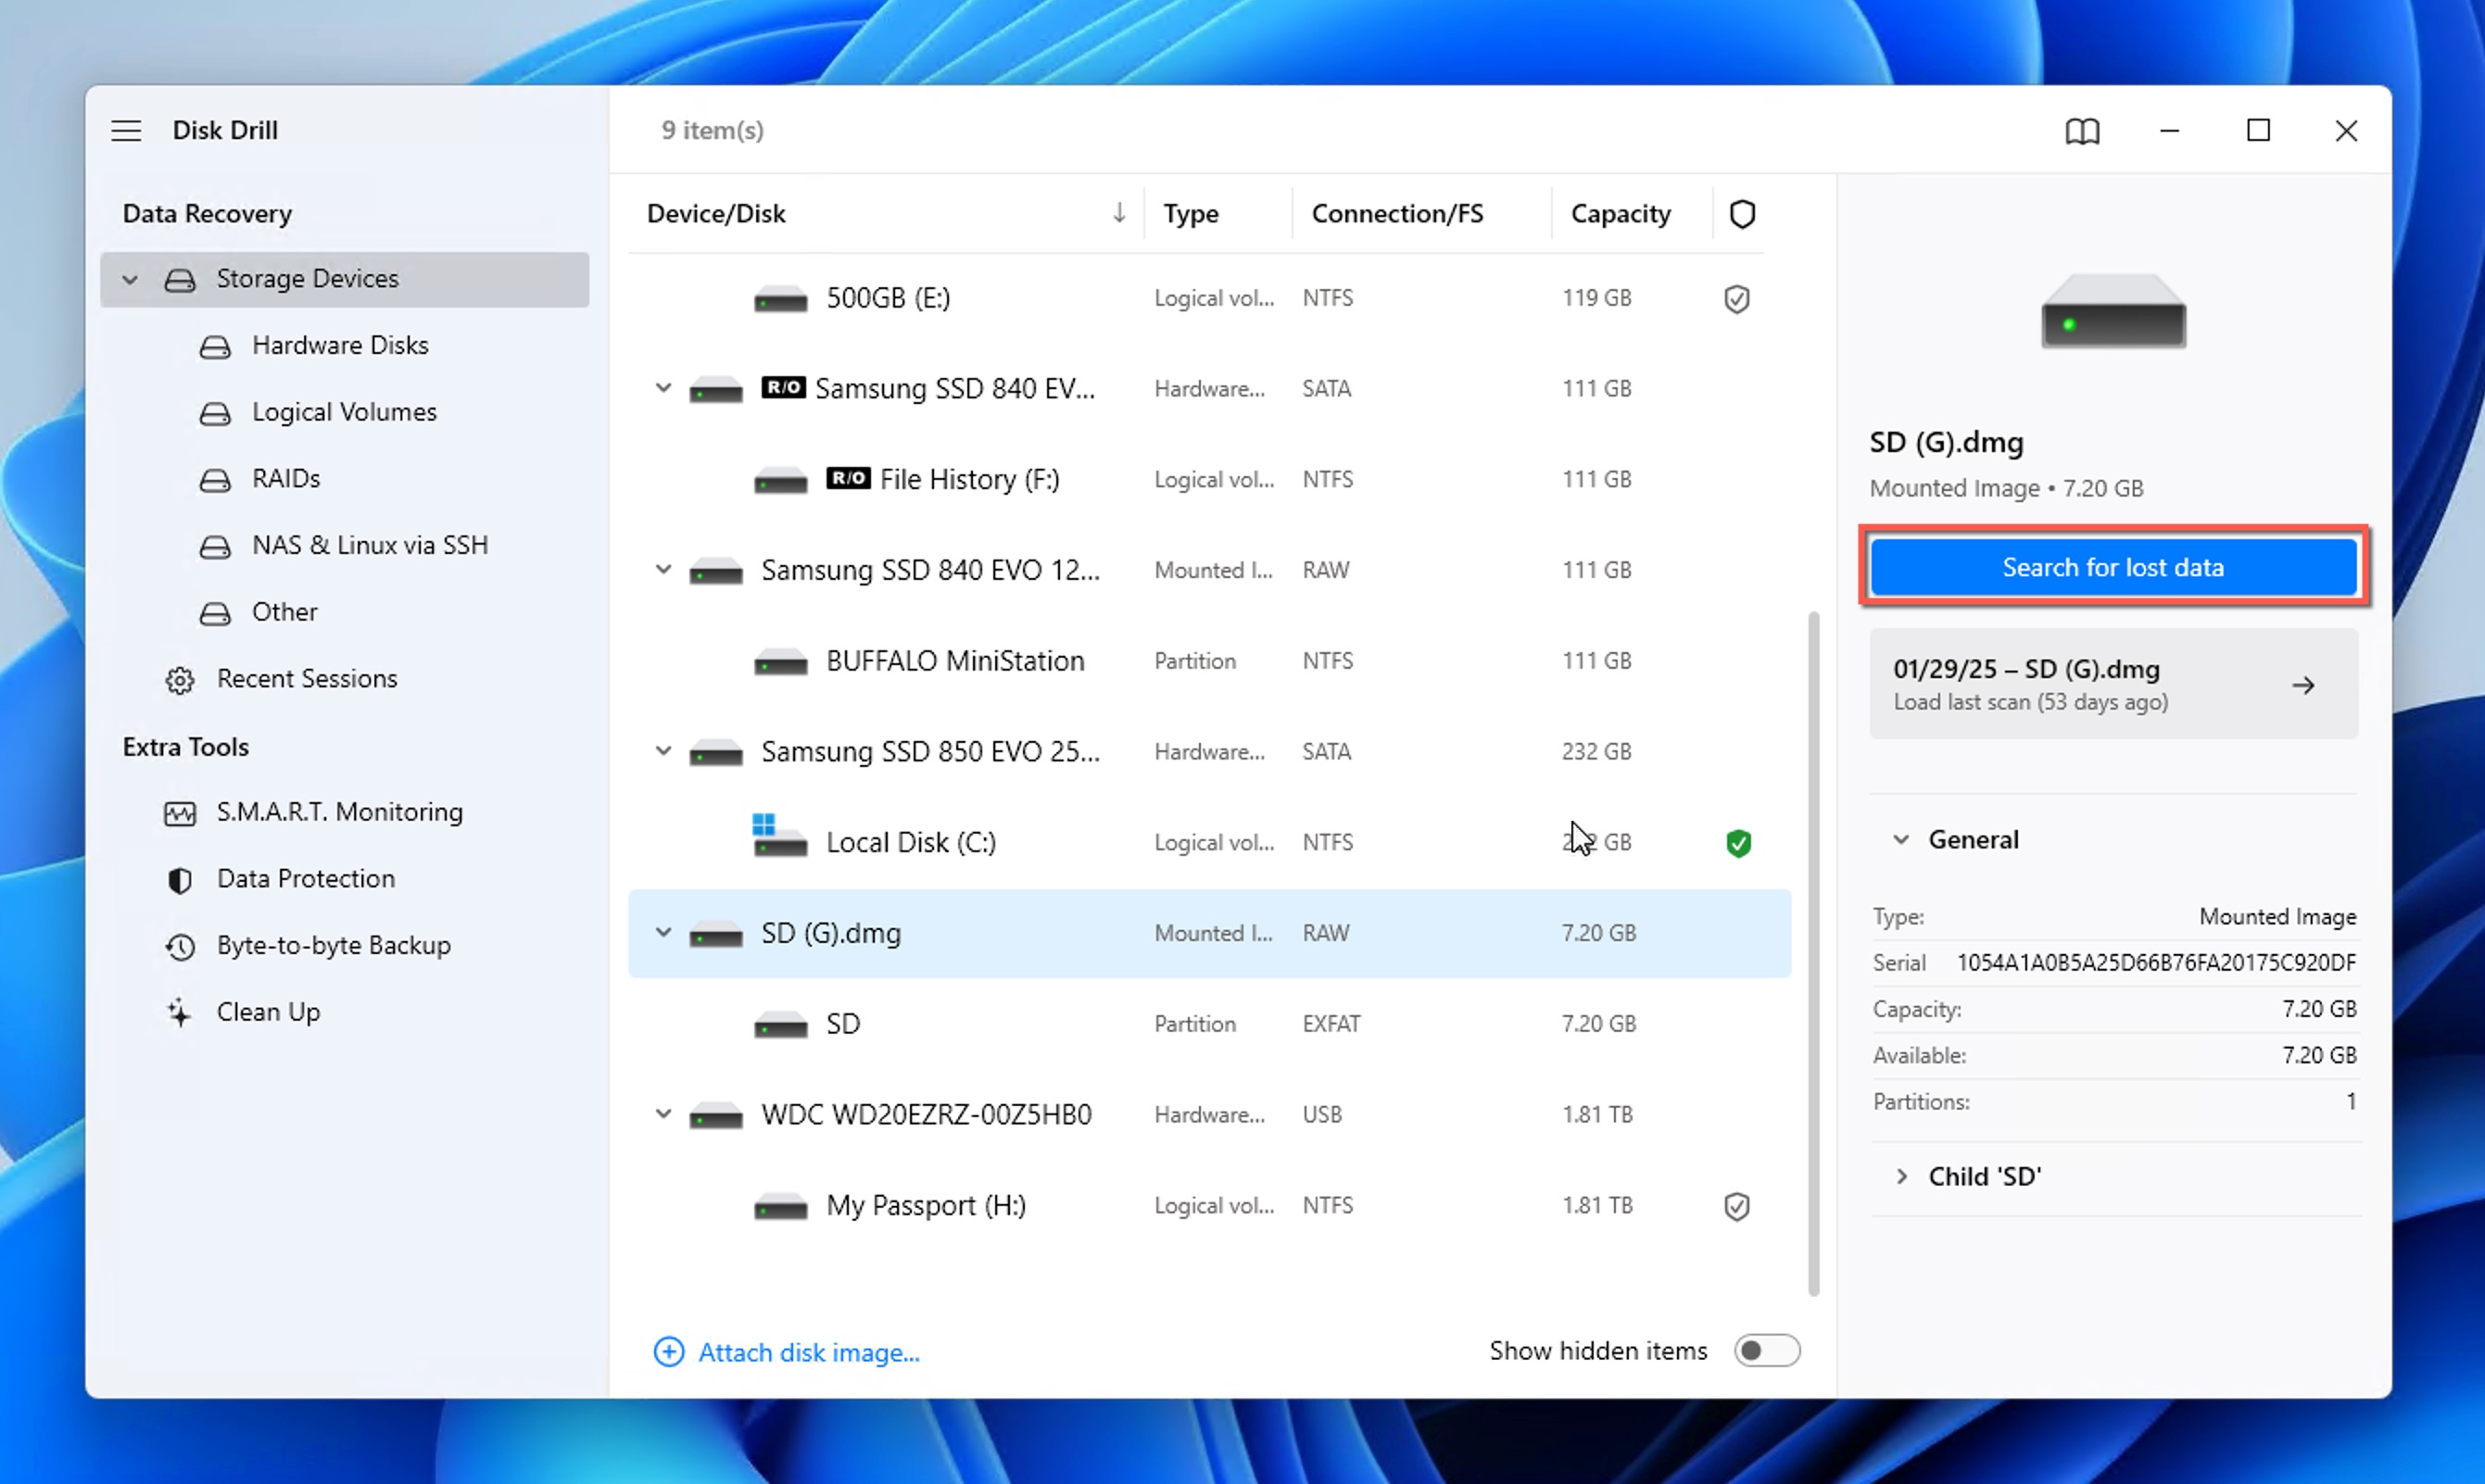
- Launch Disk Drill on your Windows computer and select the drive where your deleted Word document was stored (this could be your main hard drive, a shared drive, or an external storage device).
- Click the Search for lost data button to begin scanning and wait for the scan to finish or choose to see recovery results in real time by clicking the Review found items button.
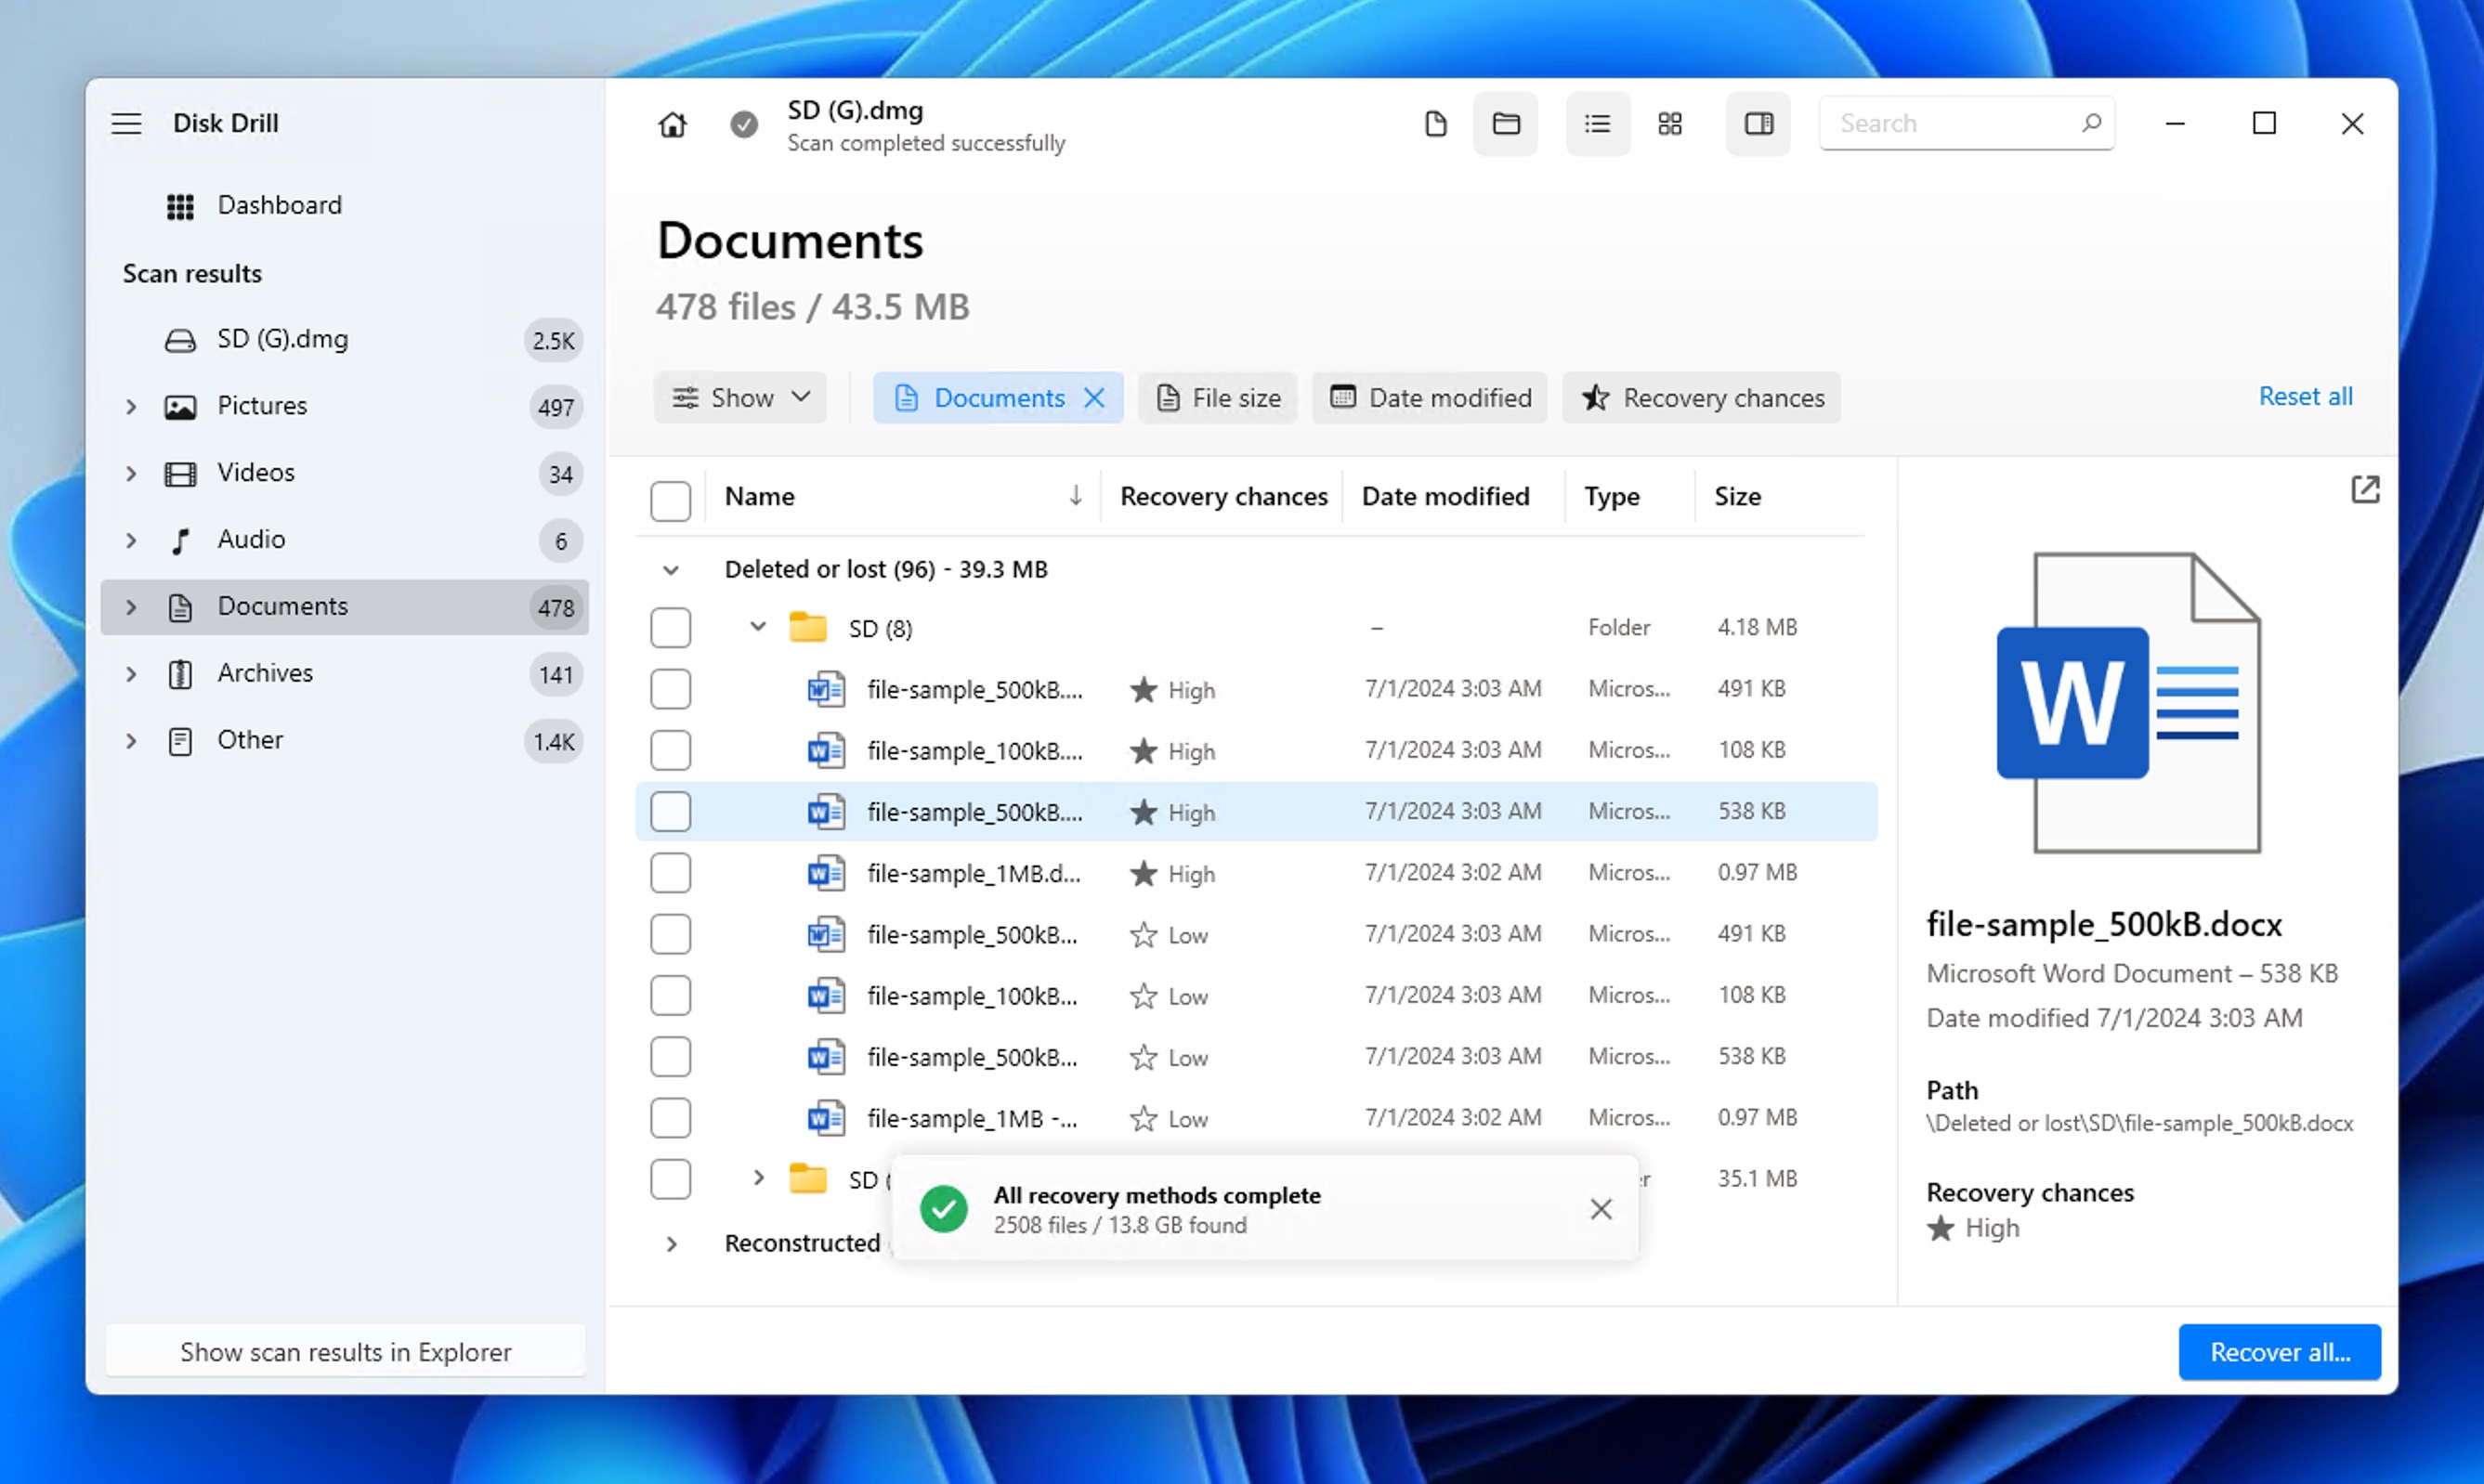
- Once the scan completes, click on Documents in the left sidebar to filter results. You can filter them even further (down to individual file formats, sizes, or dates) using the filters above the list of found files. Preview the documents by clicking the eye icon to make sure they’re the correct files and contain your data.
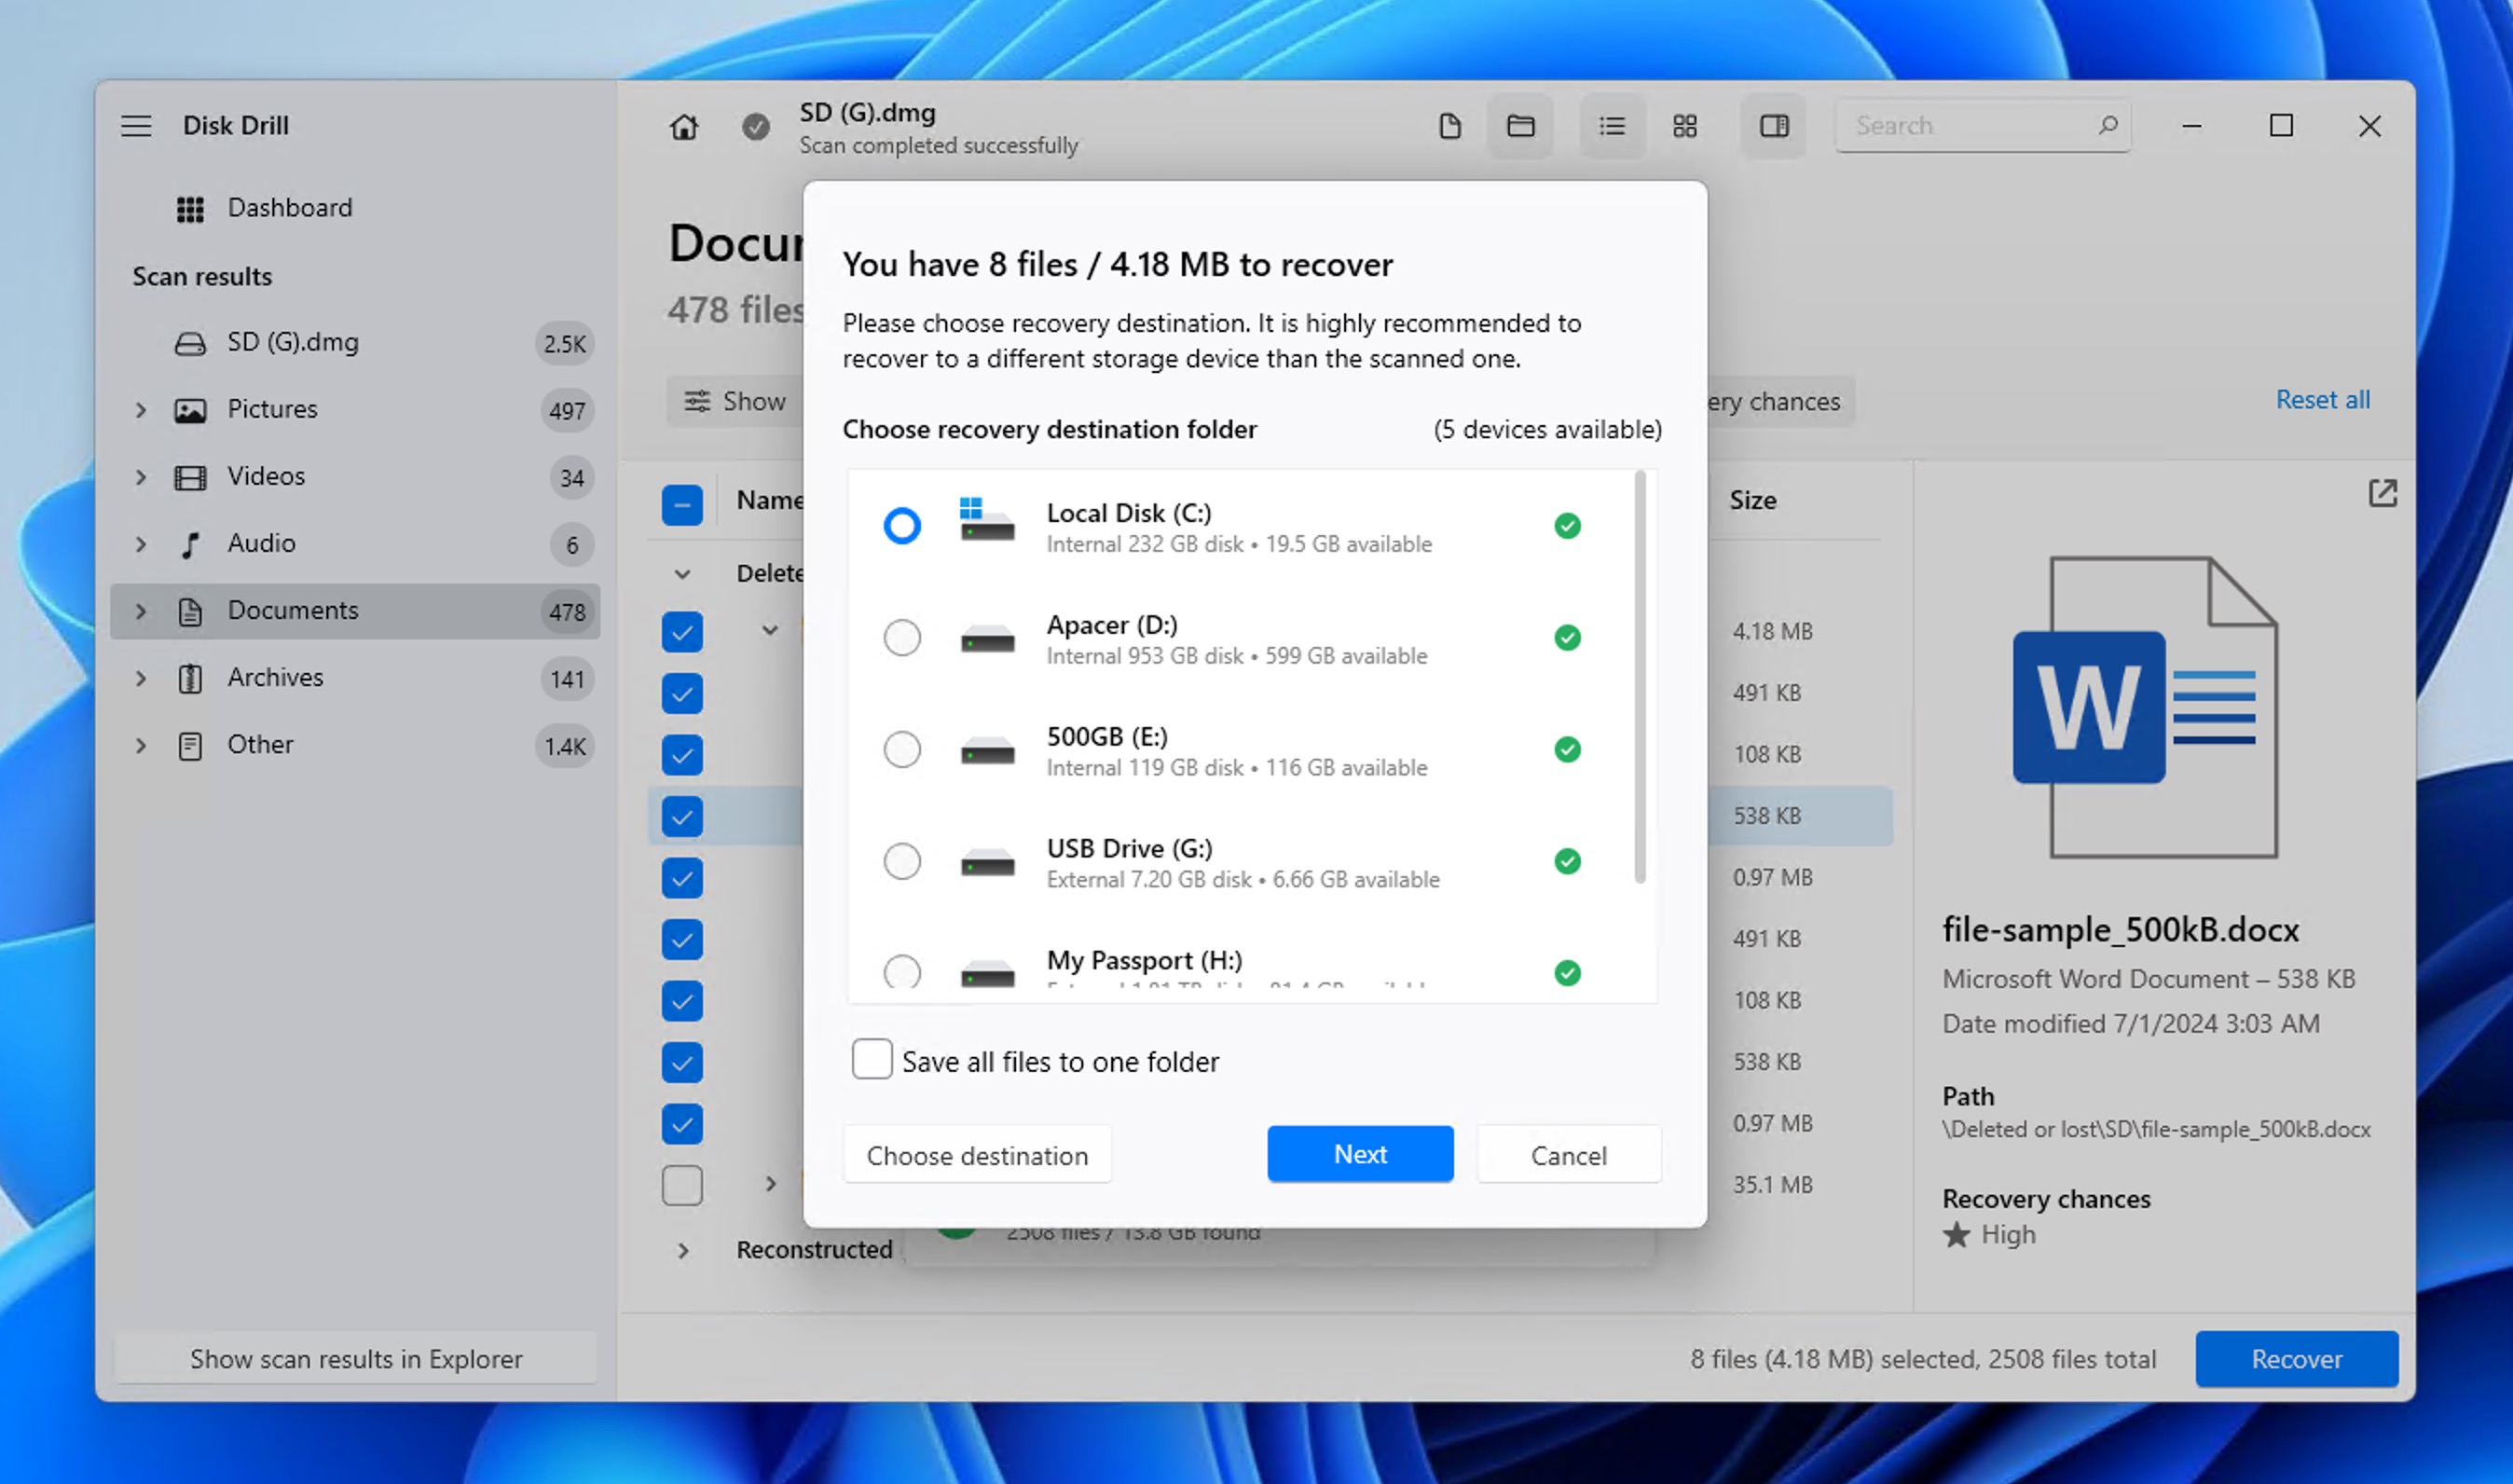
- Select the Word documents for recovery and click the Recover button. Choose a recovery destination (ideally on a different drive) and confirm.

Beyond Word documents, Disk Drill can also recover PowerPoint presentations, Excel spreadsheets, and PDF files, so it’s a comprehensive solution for all your Office 365 document recovery needs.
Method 3: Restore Deleted Word Documents From OneDrive
Microsoft 365 users benefit from tight integration with OneDrive, Microsoft’s cloud storage service that automatically syncs your files across devices. This integration creates two powerful ways to recover Word documents: from OneDrive’s Recycle Bin and through the version history feature.
Recovery from the OneDrive Recycle Bin
OneDrive has its own Recycle Bin separate from your Windows system, which means you can recover Word documents that were deleted from your laptop or desktop computer even if you used the Shift + Delete shortcut.
- Access the OneDrive website and sign in with your Microsoft account.
- Navigate to the Recycle bin in the left pane.
- Locate the Word document, select it, and click the Restore button. The document will return to its original location in OneDrive.

Recovering previous versions of Word documents in OneDrive
If you deleted your Word document by accidentally overwriting it with a different one of the same one (or if you simply need to access an earlier version), OneDrive’s version history feature can help:
- Go to OneDrive and sign in with your Microsoft account.
- Navigate to the folder containing your Word document.
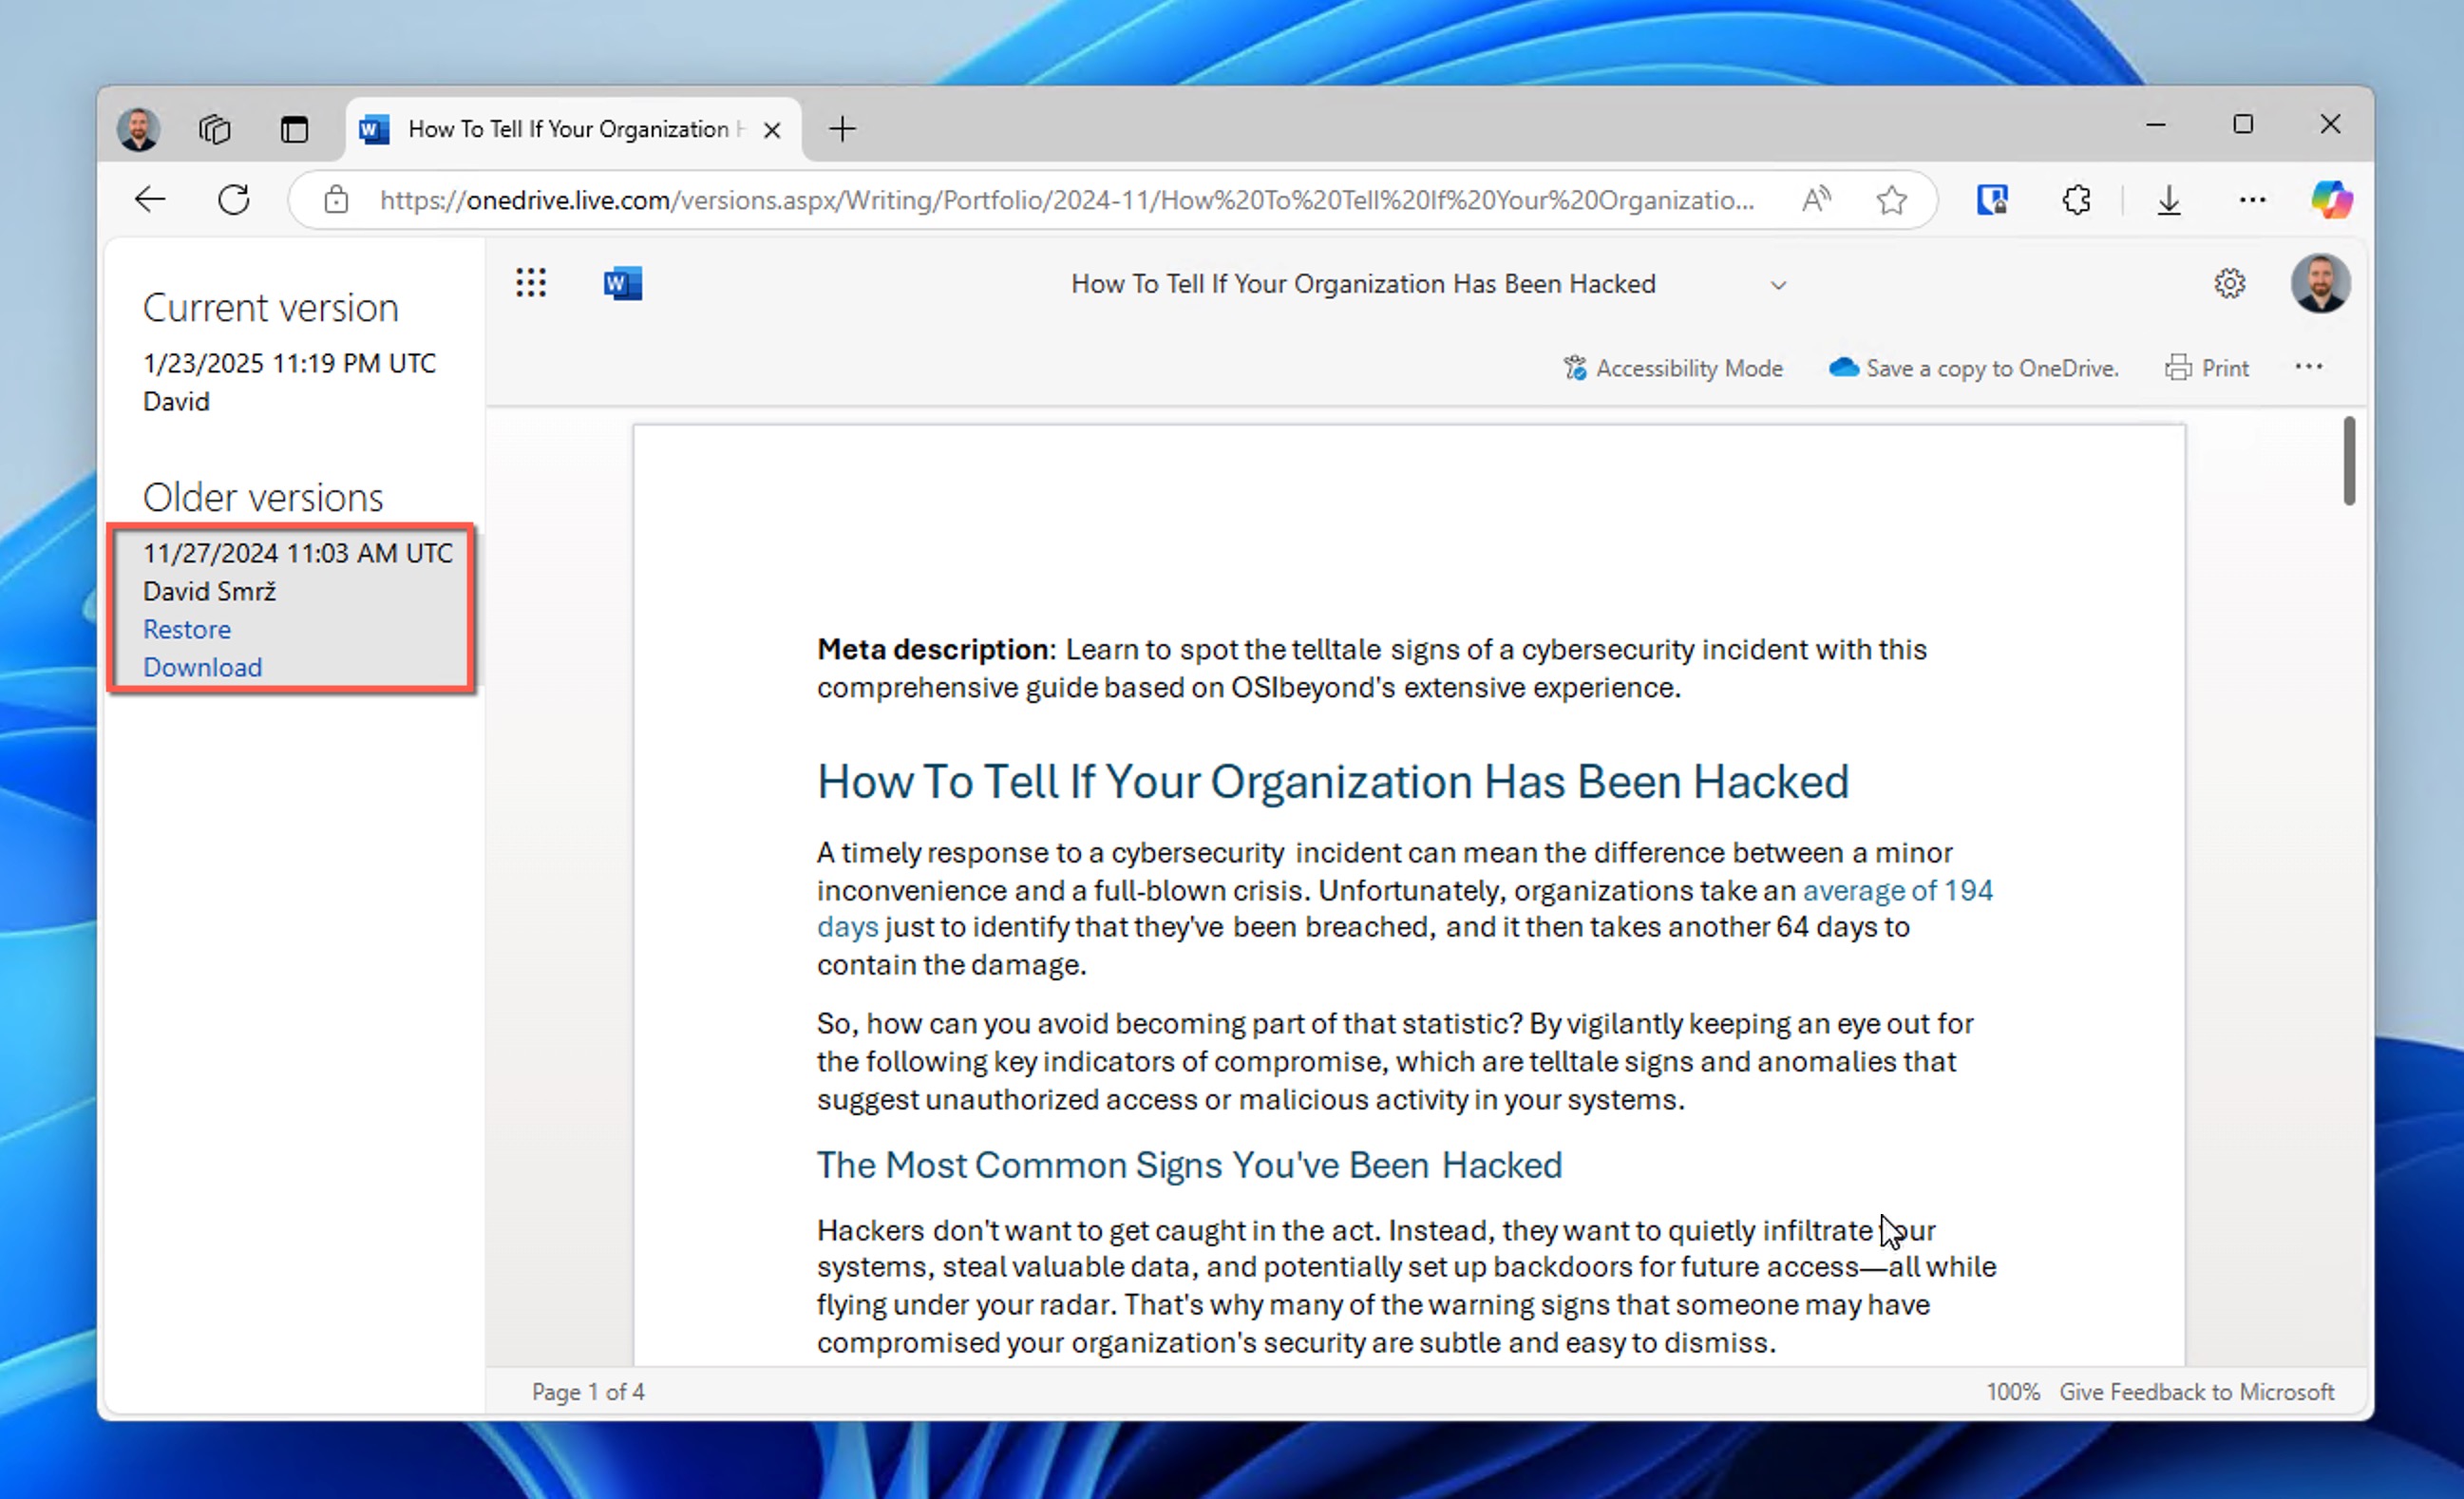
- Right-click on the document and select Version history from the dropdown menu. A new window will open, allowing you to browse all previous versions.
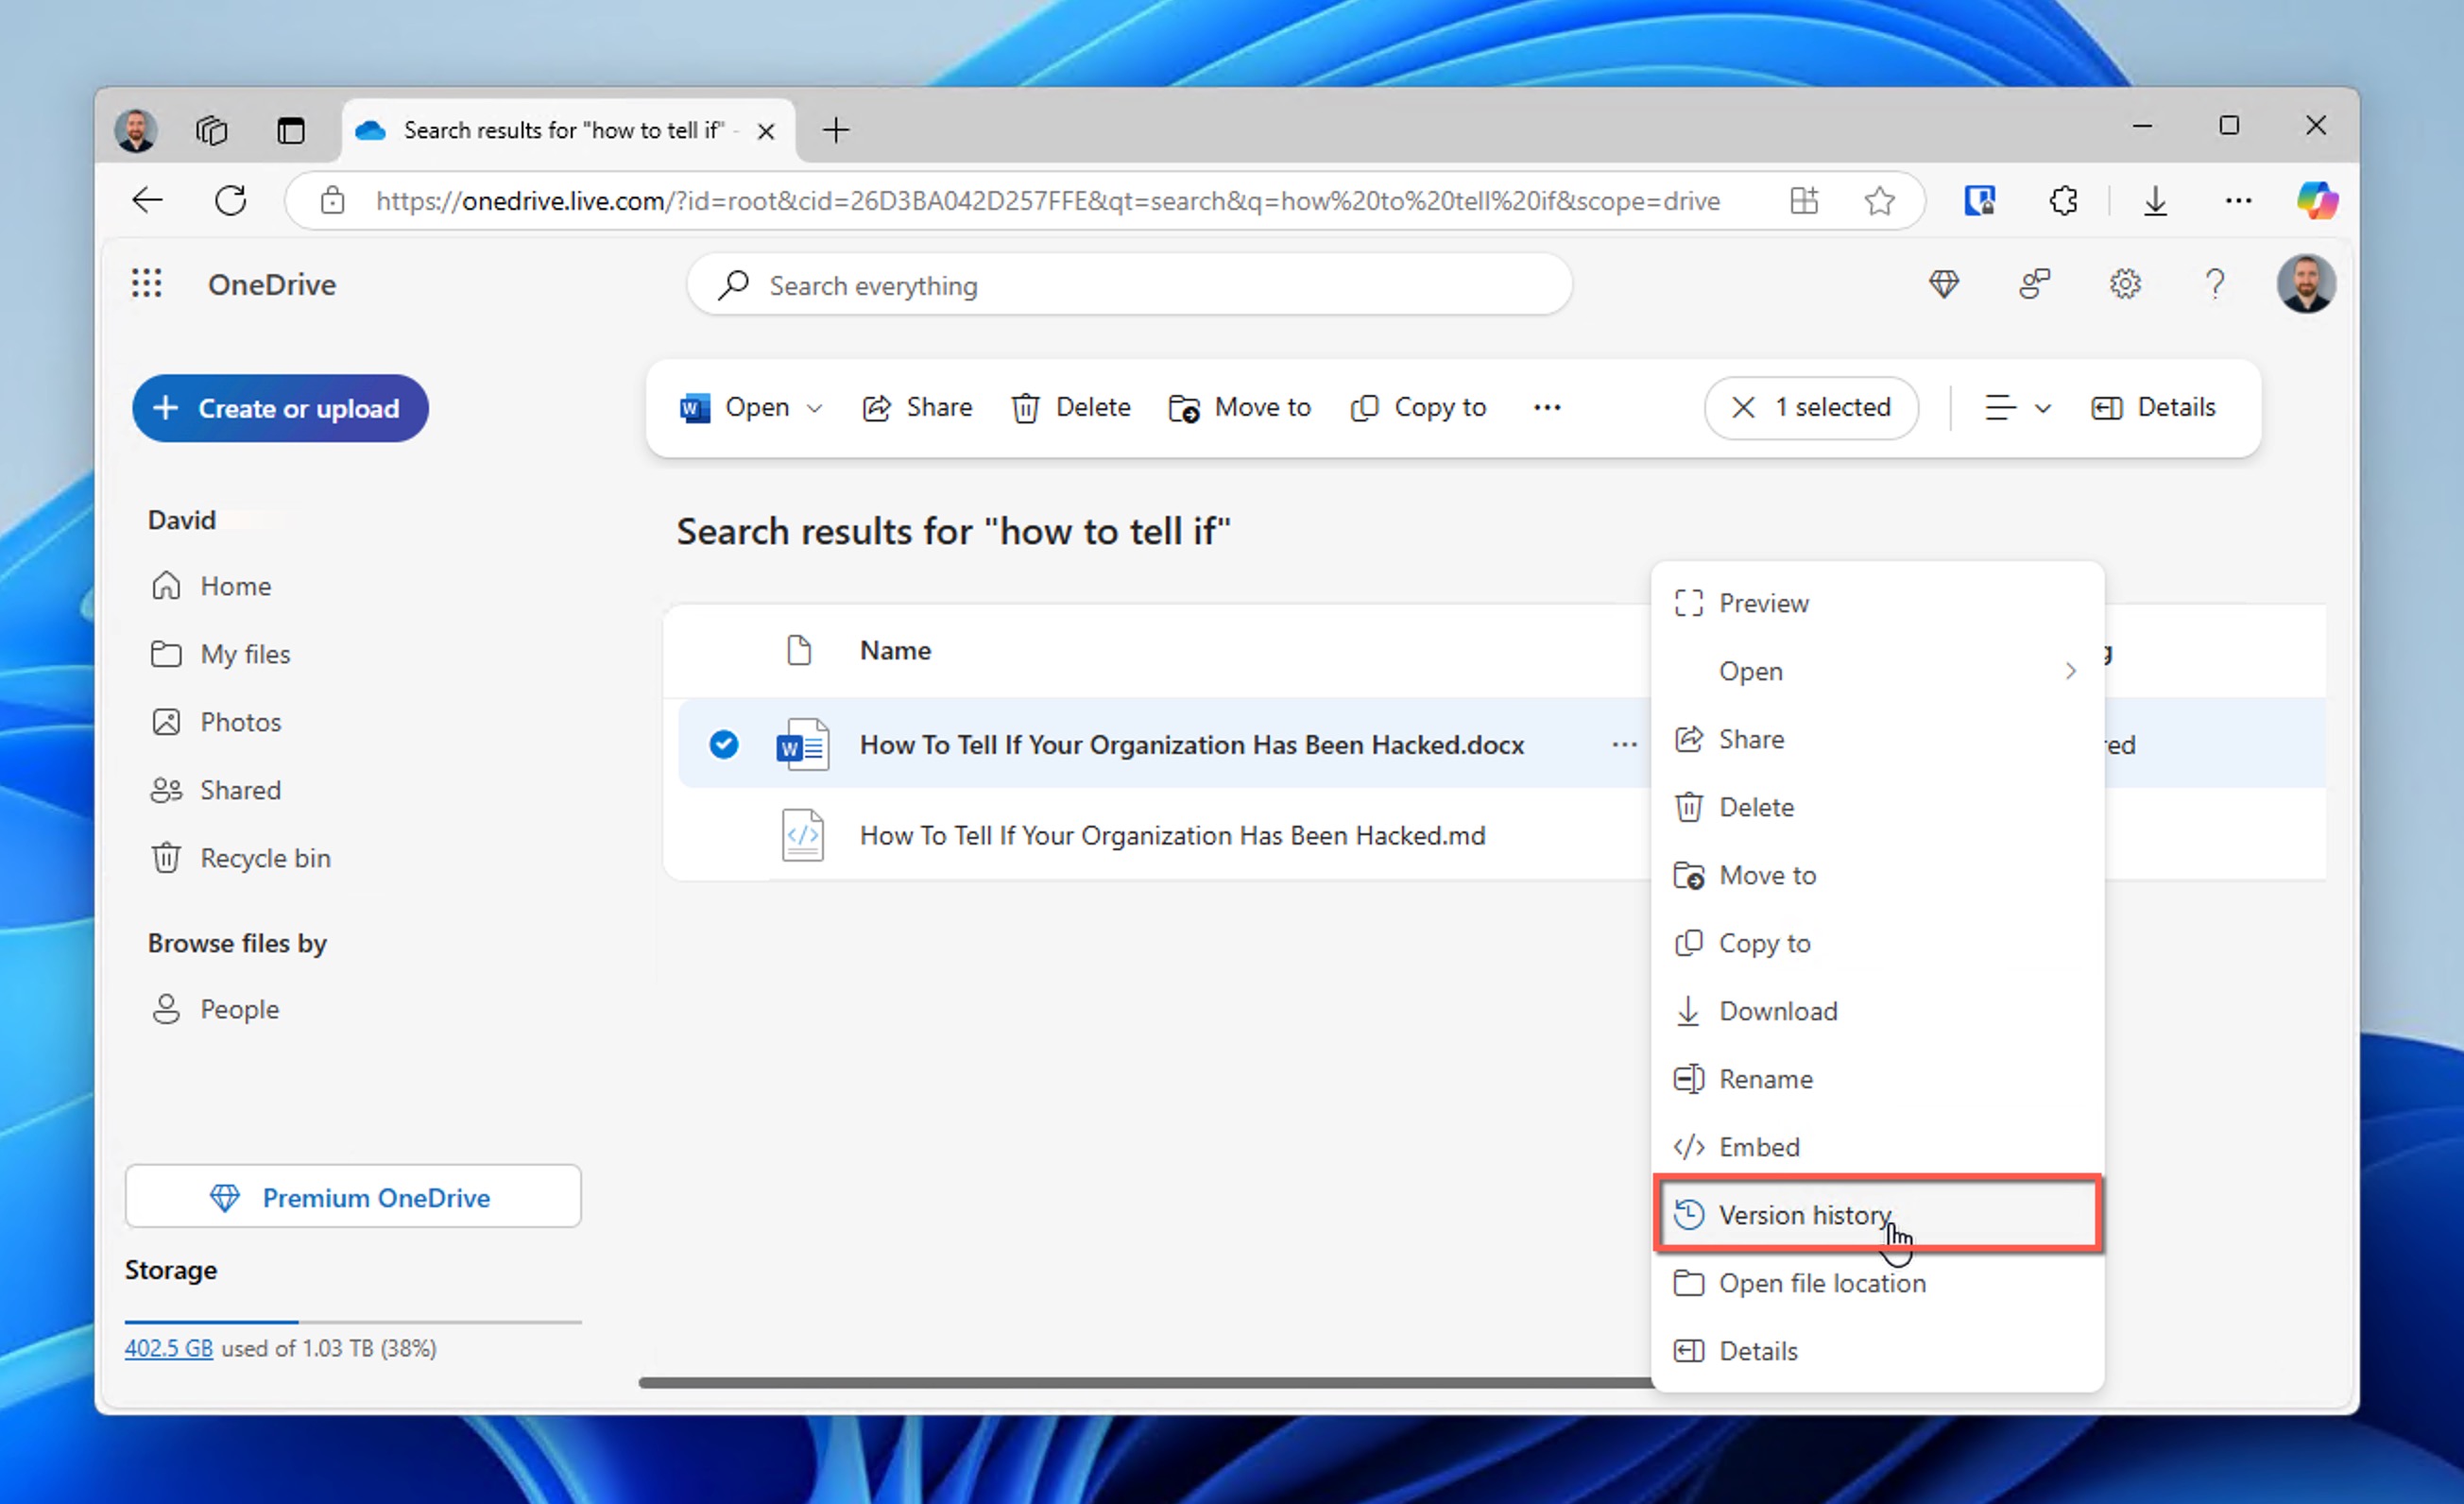
- Click on any version to preview it.
- Once you’ve found a version you want to keep, you can either download it to your device or save a copy to OneDrive.
💡 Remember that OneDrive keeps deleted files in the Recycle Bin for 30 days (or 93 days for business accounts), and version history is typically available for 30 days as well.
Method 4: Restore Unsaved Word Documents with AutoRecover
Microsoft Word includes a feature called AutoRecover that can save your business and personal documents after an application crash, system shutdown, or an unexpected restart caused by the infamous Blue Screen of Death (BSOD) or some other issue.
The AutoRecover feature works by automatically saving temporary versions of your document at regular intervals while you work on it. If Word crashes or closes unexpectedly, AutoRecover should prompt you to open your unsaved documents when you restart the application. If this does not happen automatically, you can locate AutoRecover files manually:
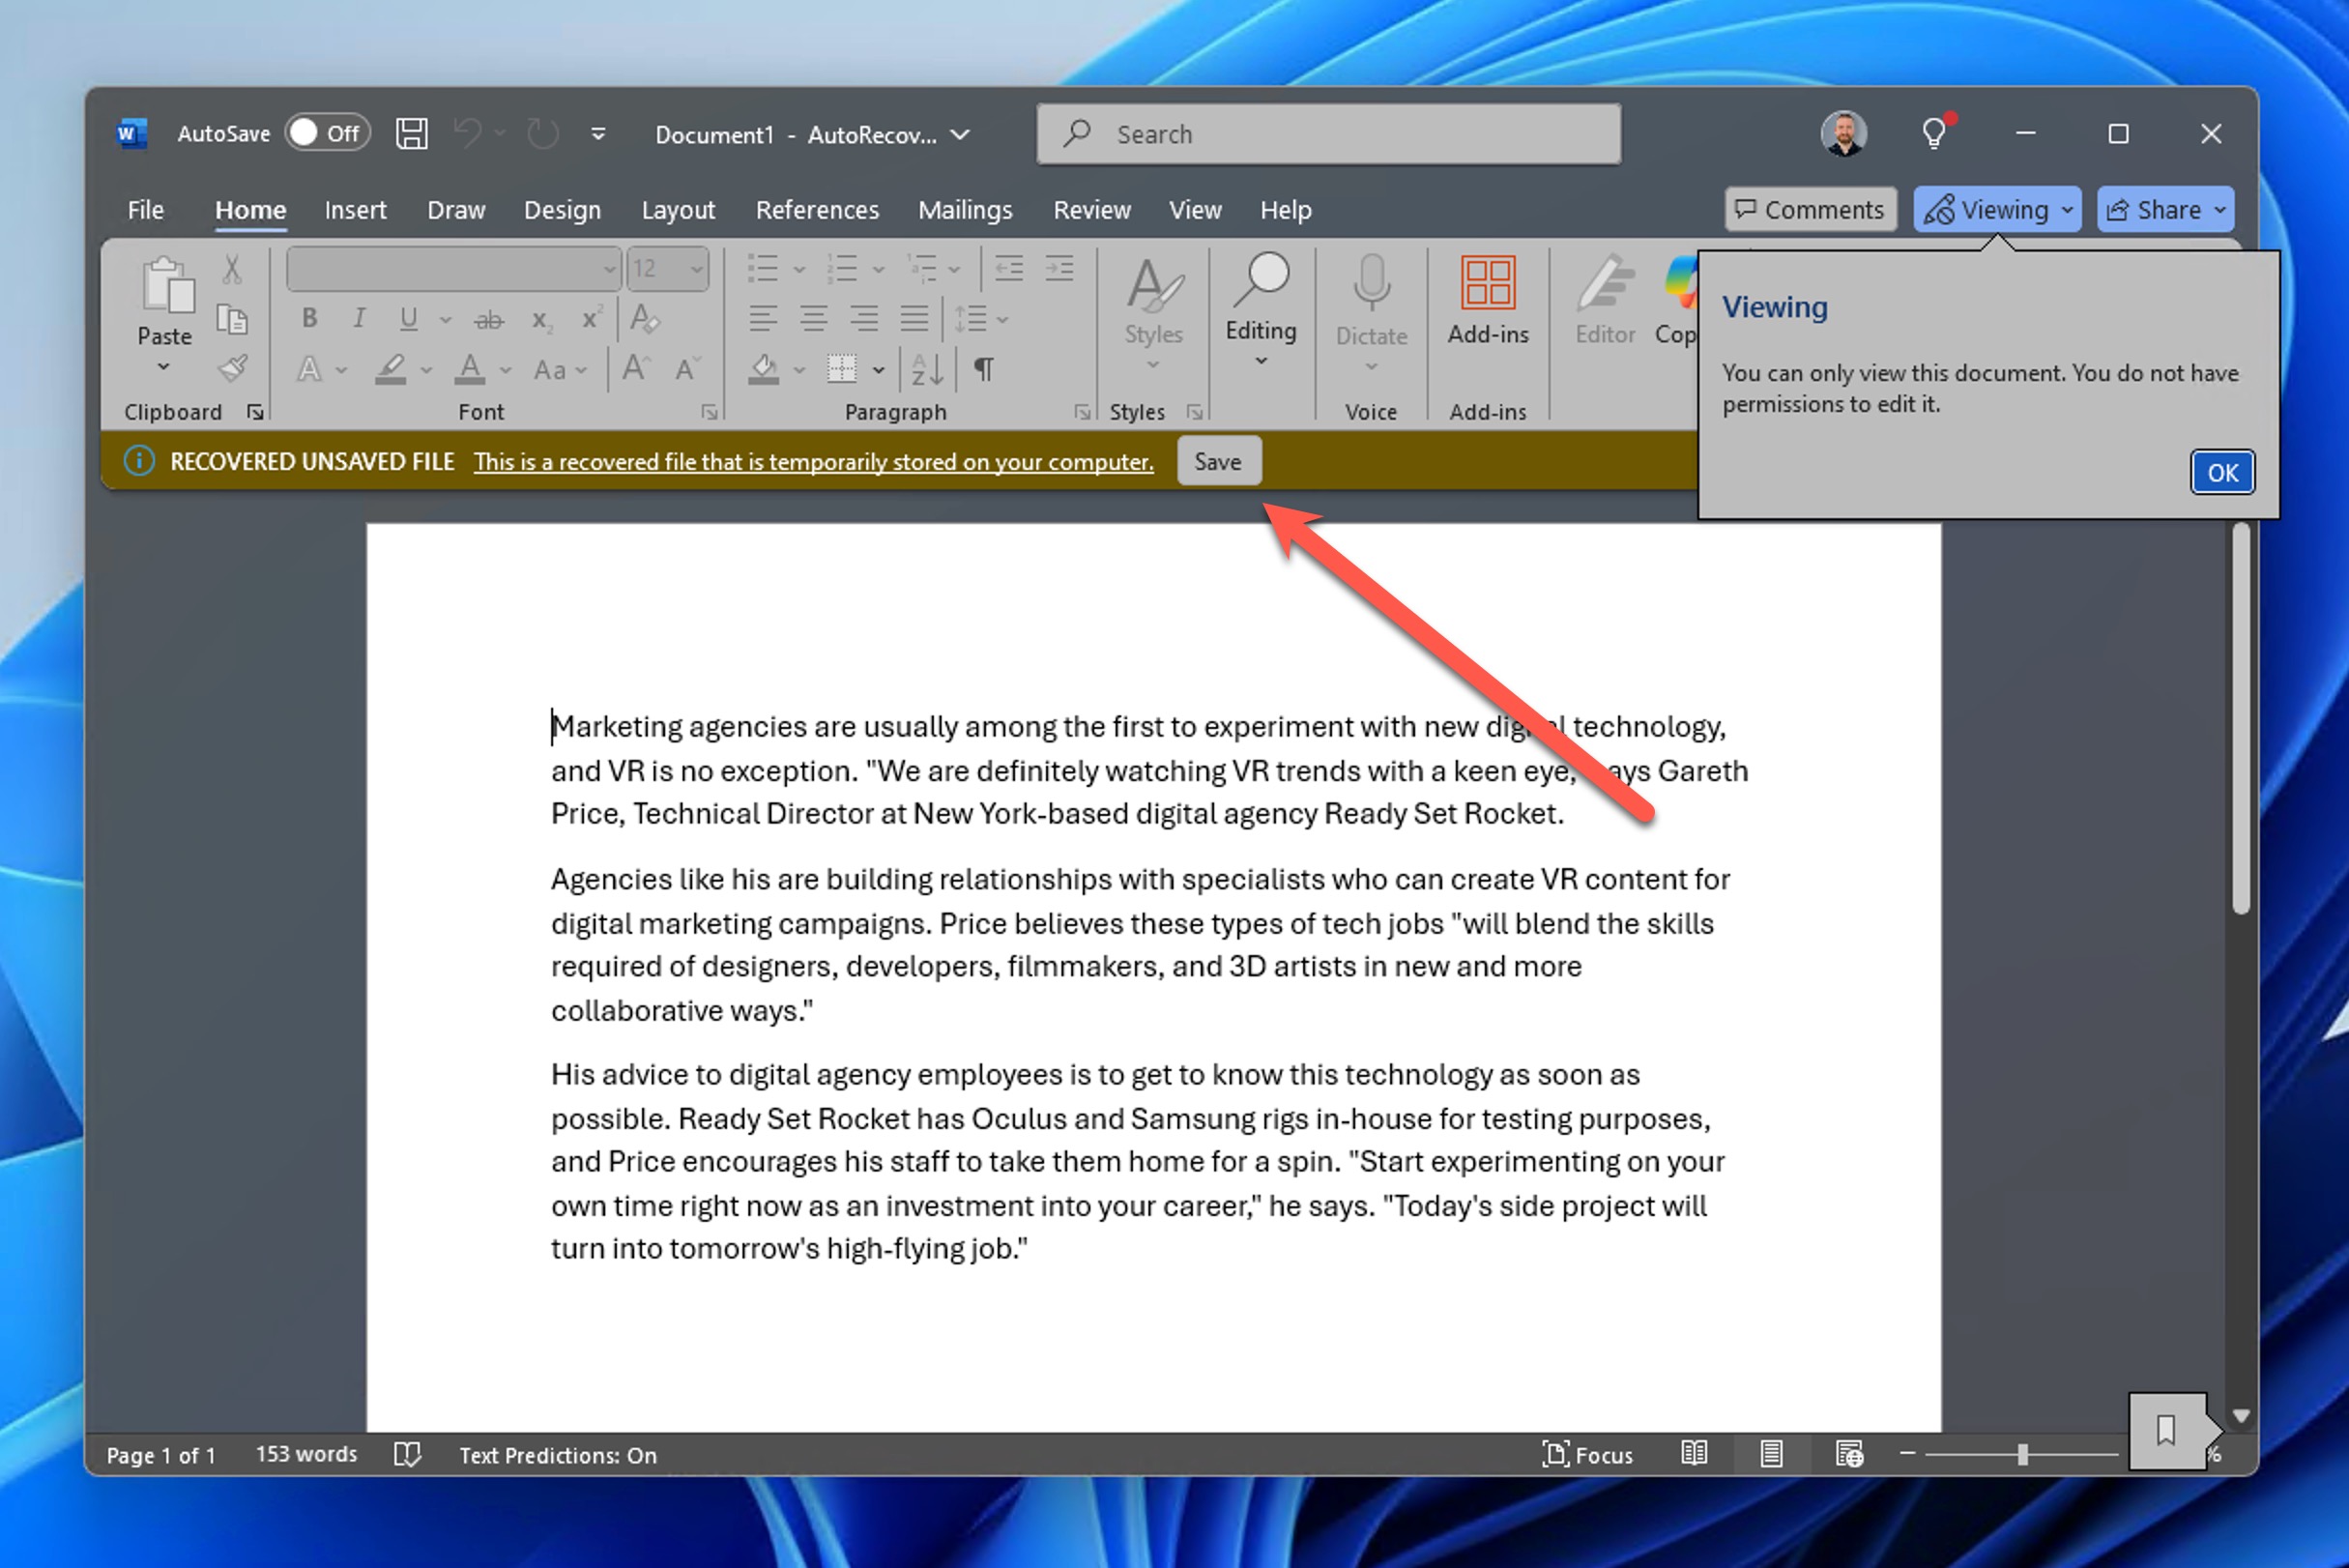
- Restart Word.
- Save the automatically recovered document.
Don’t see the Document Recovery pane? Then try manually locating AutoRecover files:
- Open the File menu and navigate to Options and Save.
- Copy the AutoRecover file location path.
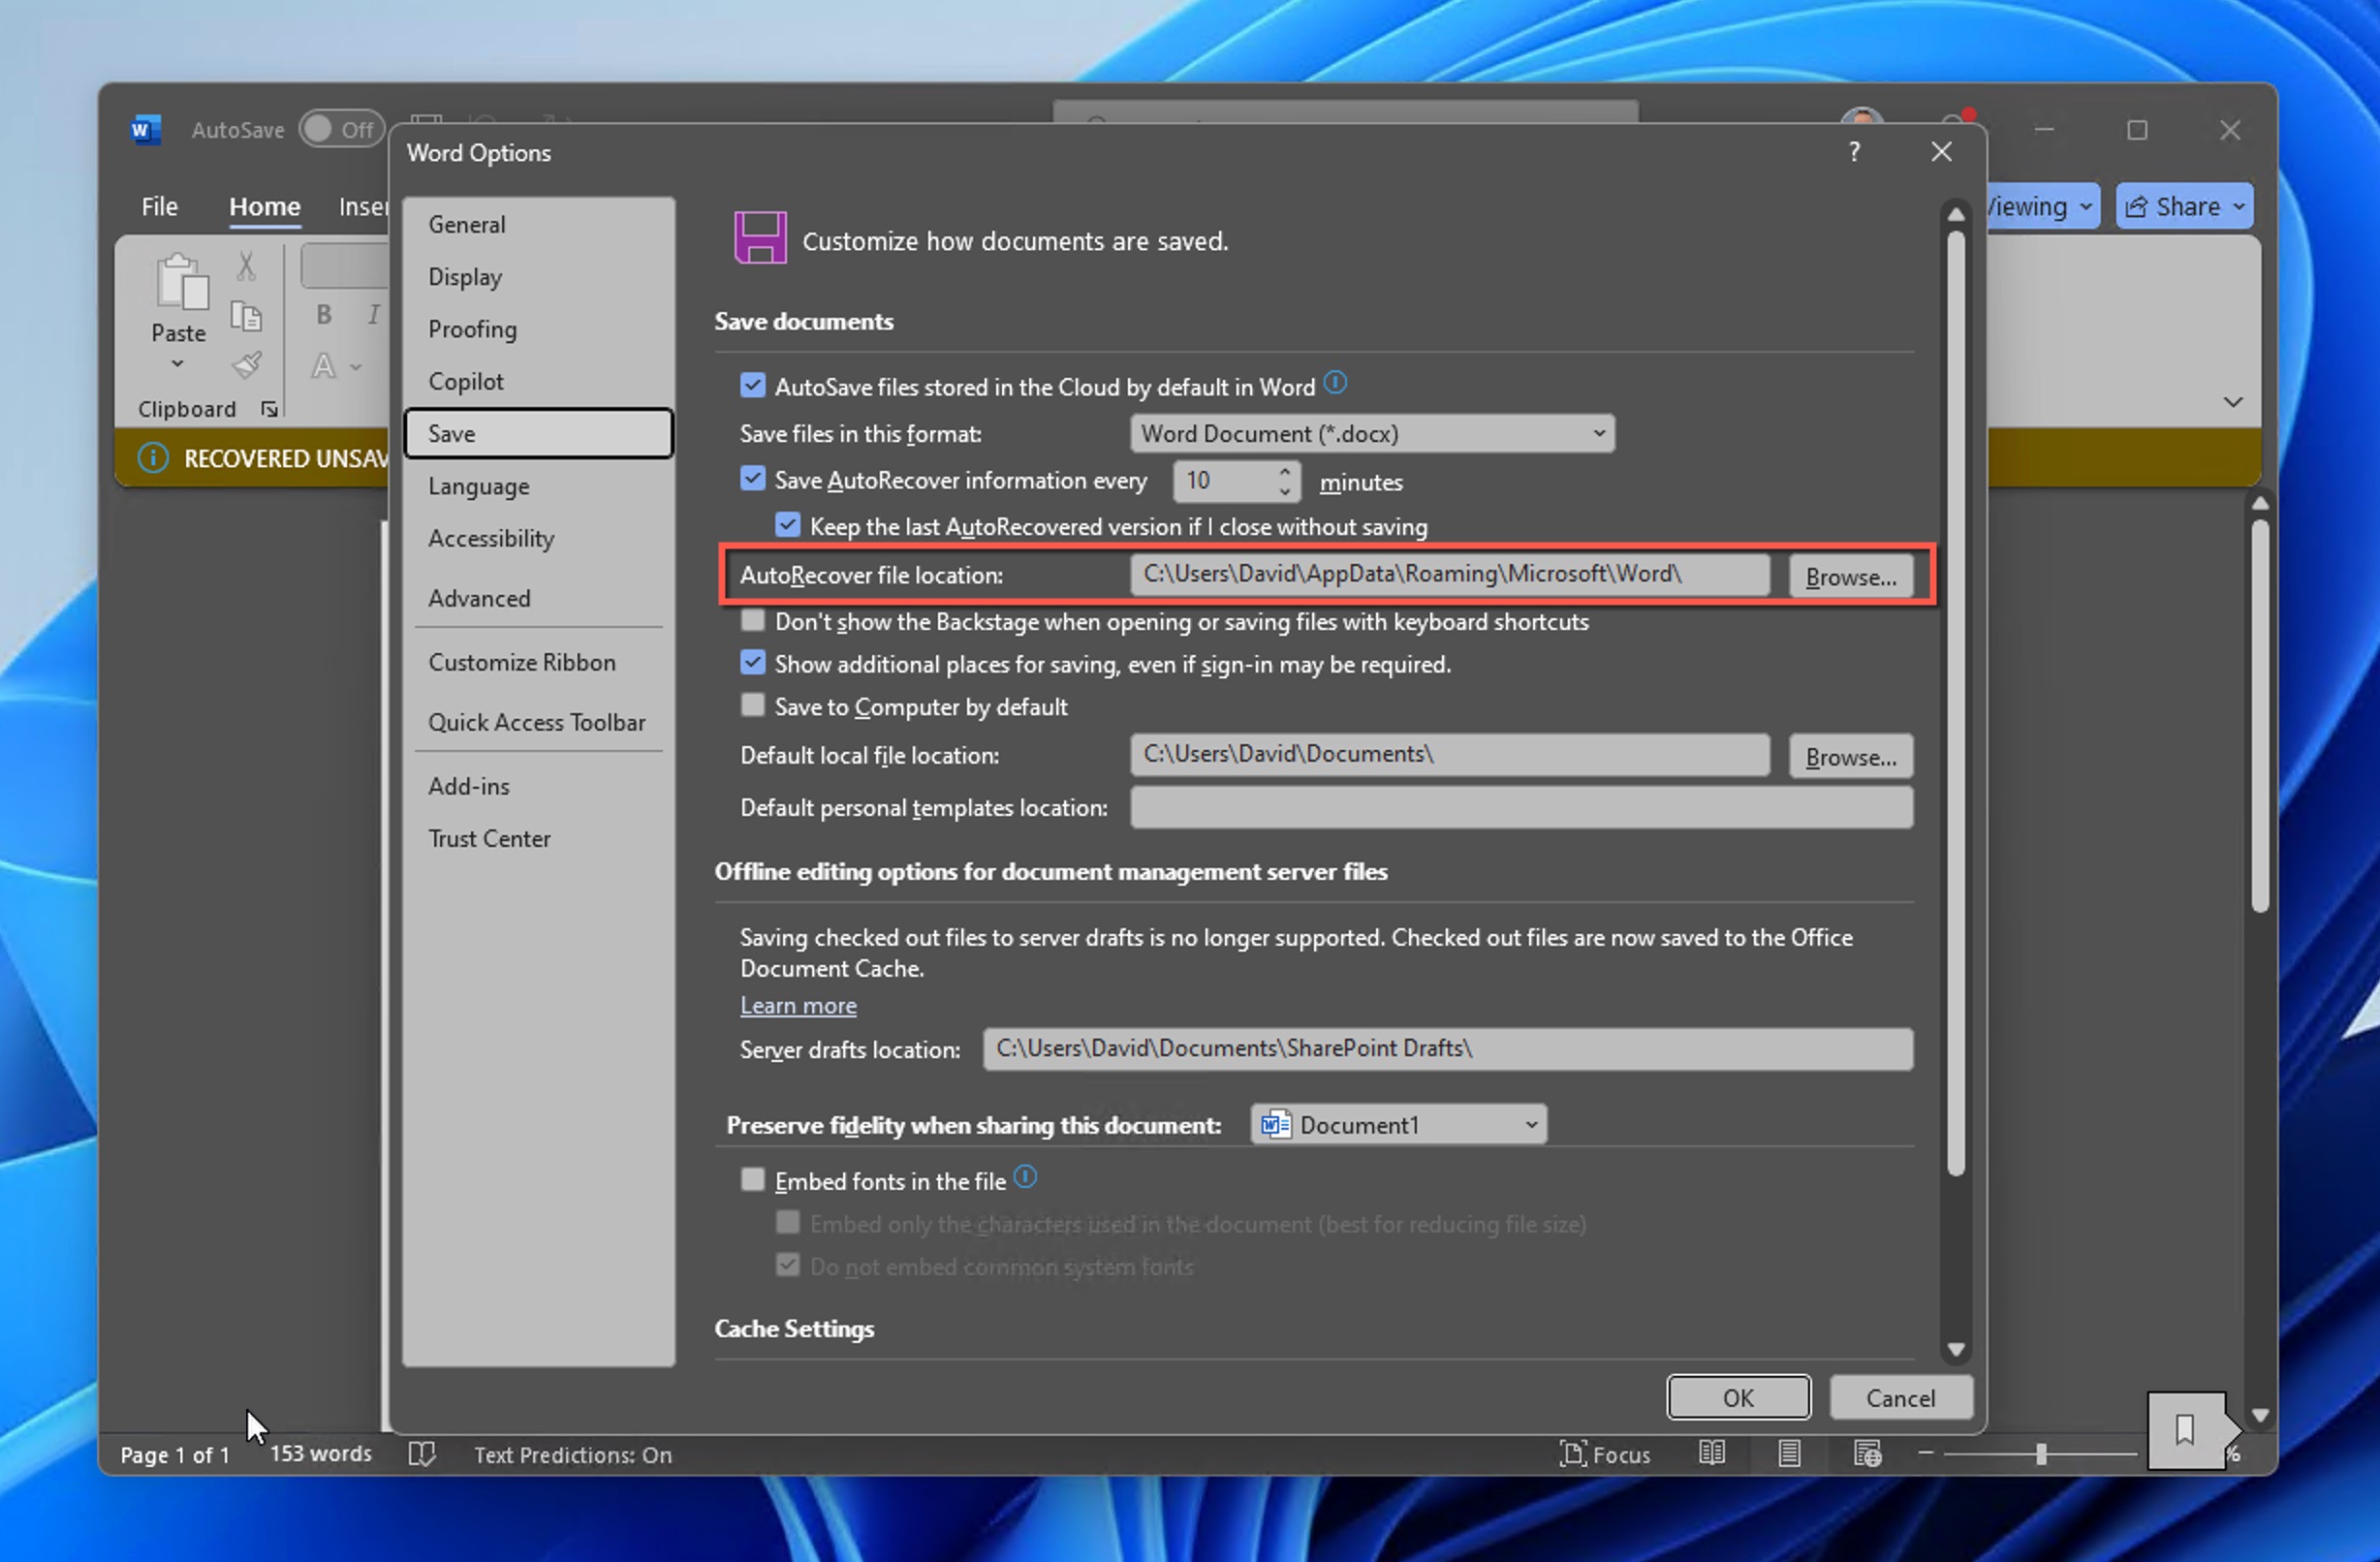
- Open File Explorer, paste the path into the address bar, and press Enter.
- Look for .ASD files and open them in Word.
If you had already saved your document previously but lost recent unsaved changes, then you can do the following instead:
- Open the file you were working on.
- Open the File menu and then go to Info.
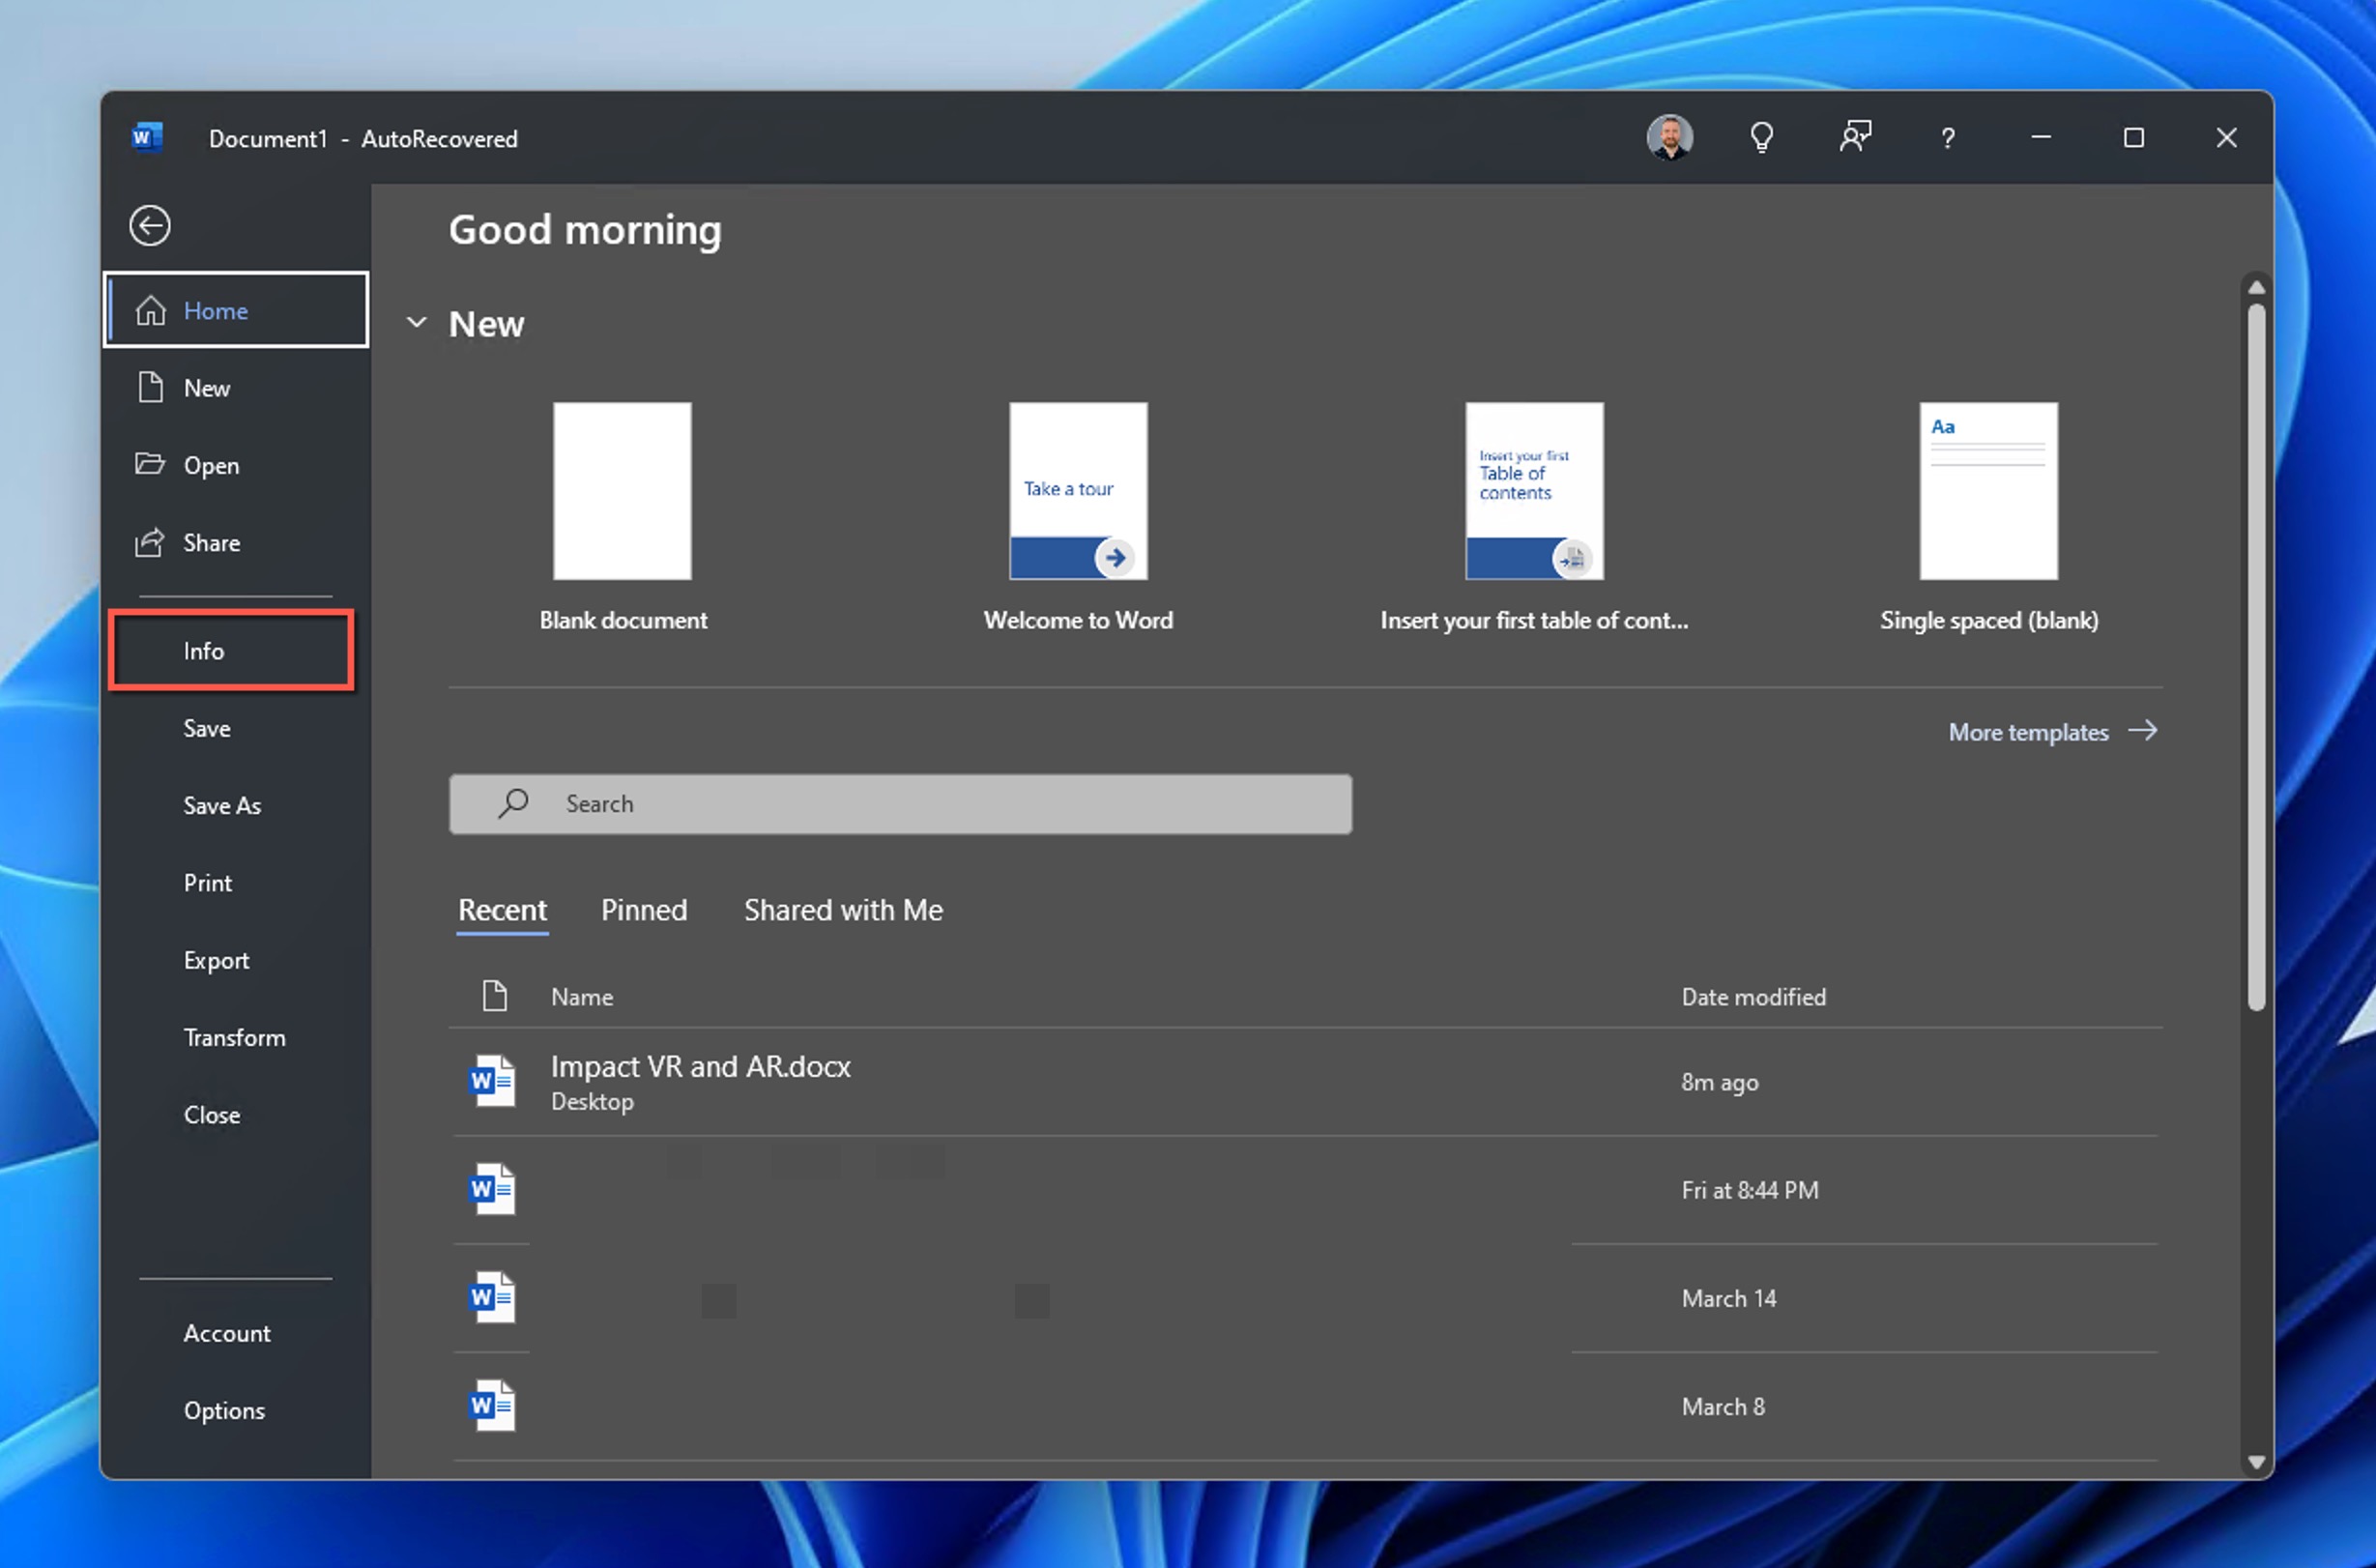
- Click the dropdown under Manage Document and select Recover Unsaved Documents.

- Look for versions labeled with “(when I closed without saving)”.
- Select the file and click Open.
- Select Restore to overwrite the previously saved version, or select Compare to see the differences between versions before deciding.
The last way to find previous versions of your Word documents we want you to know about involves checking your system’s temporary files:
- Open File Explorer.
- Navigate to C:\Users\[YourUsername]\AppData\Local\Microsoft\Office\UnsavedFiles.
- Look for .asd or .wbk backup files.
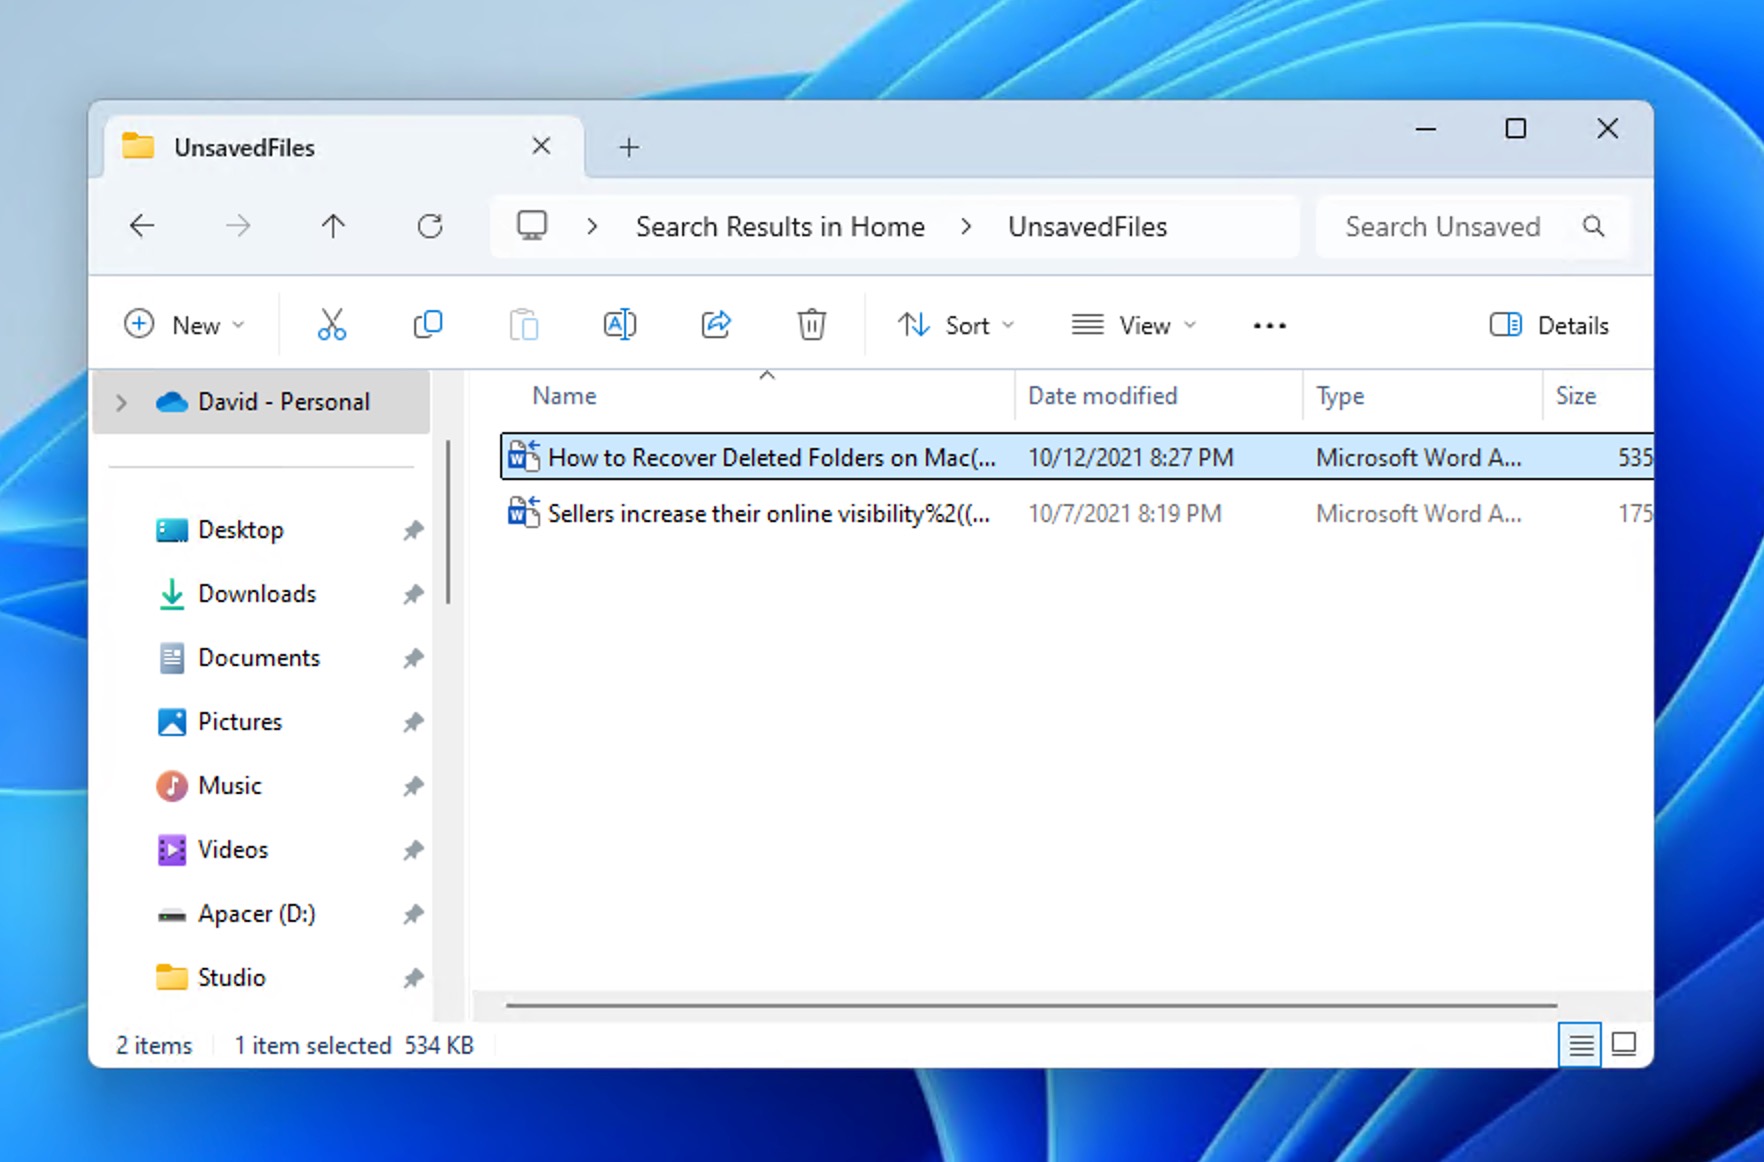
- Double-click the file to open it in Word.
- Save the document immediately.
When combined, the above-described native methods give you a pretty good chance of success when attempting to restore unsaved Word documents.
Method 5: Search for the Lost Word Files Manually
We know that you’ve been trying to recover your deleted or unsaved Word documents using the methods described above and probably haven’t succeeded if you’ve made it this far.
But before you give up, there’s one last approach that’s worth trying: a comprehensive search across your entire digital environment that covers your system drive, external storage devices, and backup locations:
- Open File Explorer by pressing the Windows key + E.
- Click on the search bar in the top-right corner.
- To narrow your search to Word files only, type one of these file extensions: *.doc (for older Microsoft Word files), *.docx (for newer Word documents), *.asd (for AutoRecover files). If you remember the file name or part of it, add it to the search (e.g., report *.docx).
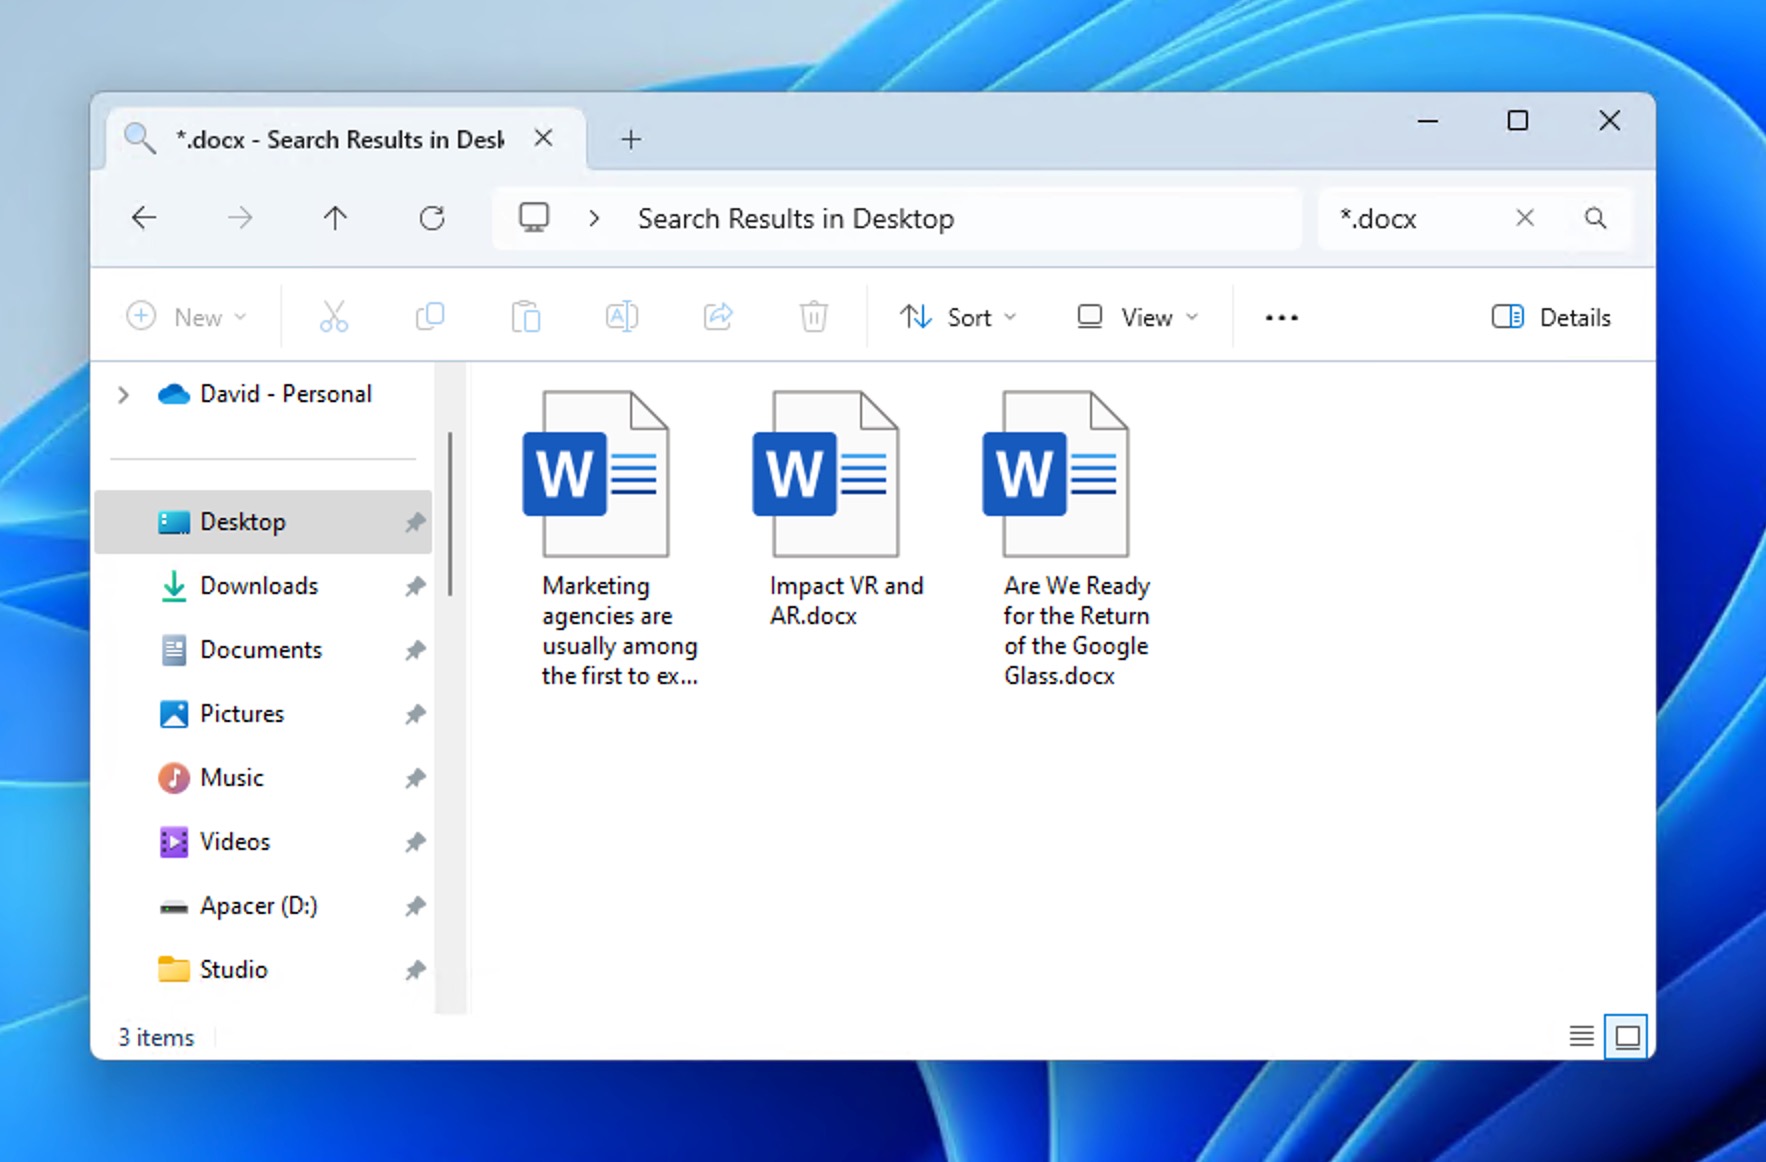
Repeat this search across all storage locations where your lost files could be present. If you find your lost Word document, double-click to open it in Microsoft Word. Immediately save it with Save As to avoid losing it again.
Oh, and don’t forget about cloud storage locations like OneDrive or Google Drive. They also have powerful search features built right into their web interfaces. In OneDrive, you can use the search bar at the top of the page to look for specific file types by typing “type:word” or search for specific content within documents.
How to Prevent Your Word Files from Being Lost or Deleted?
Losing a Word file after pouring hours of work into it is absolutely soul-crushing. While there are several available methods to help recover your lost or deleted files, it might be a good idea to follow a few practices that can help prevent data loss. Let’s go through some of these tips and tricks:
- ↪️ Enable AutoRecover – Configure Word’s built-in protection features by going to File > Options > Save. Set AutoRecover to save every 5 minutes and enable “Keep the last autosaved version if I close without saving.” If you’re a Microsoft 365 subscriber, then you can also enable AutoSave in the upper-left corner and have Word automatically save your work in real time to the OneDrive cloud.
- 🔄 Use Windows File History – Set up Windows File History to automatically back up your documents folder. This built-in Windows feature creates regular snapshots of your files, and you can then recover specific versions of your Word documents when you delete or even overwrite them. When combined with the AutoSave feature (OneDrive backups), the File History feature makes it easy to practice the coveted 3-2-1 backup strategy of maintaining 3 copies of important documents, on 2 different storage types, with 1 copy stored off-site or in the cloud.
- 💻 Separate your documents from system files – Store your documents on a different drive than your operating system. According to data recovery experts at Backblaze, system drives fail more frequently and are more vulnerable to malware attacks, putting your files at greater risk.
- 💾 Regularly save your work – Even with automatic features like AutoRecover and OneDrive, it’s good practice to manually save your work frequently. Initially, you may have to remind yourself to click the Save button or hit CTRL + S on your keyboard, but it will eventually become second nature (I’ve probably pressed the save shortcut at least three times while writing this paragraph alone).
- ❌ Be cautious of user errors – You can use advanced options like versioning features and tracked changes to protect your files and avoid user errors. You can often lose data while editing or deleting certain parts of the documents. These features can help record your changes and allow you to return to a particular version if needed without losing data.
Conclusion
Word documents can be lost for countless reasons despite our best efforts. Fortunately, when you find yourself wondering how to recover your lost or deleted Word file for free, you can turn to the methods described in this article. Each solution we’ve covered is reliable, secure, and designed with user-friendliness in mind. By following the step-by-step instructions provided, you can recover your lost or deleted Word file for free without requiring advanced technical skills or expensive recovery services.


FAQ
If your Word document suddenly disappeared, first check the Recycle Bin and recent files list in Word. Then use AutoRecover by going to File > Info > Manage Document > Recover Unsaved Documents. If that fails, then you can scan the storage device where the document was last located using data recovery software like Disk Drill.
Yes, you can recover a Word document deleted from the Recycle Bin using data recovery software like Disk Drill. For best results, stop using the drive immediately and run the recovery software as soon as possible to prevent overwriting the deleted document data.
Check File > Info > Manage Versions in Word to restore a previous version. If using OneDrive, navigate to the file, right-click, and select Version History. You can also read our detailed article about the recovery of overwritten files.
Try opening it in Google Docs or Word’s Open and Repair tool (File > Open > Browse > Select File > Click the dropdown next to Open > Open and Repair). If that fails, use an online repair service (search Word file recovery online for options).
Follow these steps to recover a deleted Word document that you didn’t save:
- Open Word and click the File Tab in the upper left.
- Click Manage Document and select Recover Unsaved Documents.
- In the dialogue box, look for your missing file.
- Open the recovered Word document and click the Save As button.
Yes, it is possible to recover deleted Word documents on Mac. Here’s how:
- Open Word.
- From the menu, click Preferences.
- Check if Confirm file format conversion at Open is selected, and close the dialogue box.
- Click File and go to Open.
- On the Open menu select Recover Text and open the document.
To recover deleted Word files on Windows 11, check the Recycle Bin first: open it from your desktop, find your Word document (search for .docx), right-click it, and select Restore. If it’s not there, use Windows File History (if enabled) or data recovery software for permanently deleted files.