Professional and amateur content creators alike swear by Macs when it comes to video editing thanks to the excellent video editing software ecosystem. However, most people who’ve been editing video on Mac for some time have lost unsaved video footage or accidentally deleted the wrong project on a MacBook Pro, MacBook Air, or desktop Mac.
If you’ve recently joined their ranks, and are here to learn how to recover deleted videos on Mac, then we have good news: this guide covers everything you need to know to get your lost footage back—even if data corruption is involved.
Factors That Complicate Video Recovery on Macs and MacBooks
When you need to recover deleted videos from Mac or MacBook, there are several factors that can make it more difficult for you to achieve the desired results. Being conscious of these factors can help you choose the most effective recovery strategy:
- ✂️ TRIM technology: Modern Macs and MacBooks use solid-state drives (SSDs) with TRIM technology, which wipes deleted data blocks to maintain drive performance. When this wiping occurs, the recovery of data stored on the particular blocks becomes impossible. If you’ve just deleted important videos from an SSD, the best thing you can do is to create a byte-by-byte clone of your drive immediately. You can then recover your deleted videos from this complete backup even after TRIM has been executed.
- 🔒 System drive encryption: Apple’s T2 security chip and M1-M4 processors implement advanced encryption on system storage. While this provides excellent security, it also makes it harder to recover video files on Mac because only specialized recovery software with proper kernel extensions (kexts) can access and recover videos from encrypted system drives.
- 🖌️ Data overwriting: When you delete a video, the clock starts ticking. As you continue using your Mac, new data might overwrite the space where your deleted videos were stored and make it impossible to recover video files on Mac. To maximize recovery chances, stop using the Mac immediately after you realize a video is missing. Avoid downloading, installing anything on the same drive, or allowing app updates and synchronization, as these actions can overwrite your data.
- 💽 Availability of backups: Many users don’t take full advantage of Mac’s built-in backup options like Time Machine or cloud services like iCloud and Google Drive. When you need to find deleted videos on Mac but don’t have any backups, your only option is video recovery Mac software.
Based on your situation, here are the recommended recovery methods:
| Scenario | Recommended Method |
| Your videos are no longer in Trash or the Recently Deleted album in the Photos app | Use specialized recovery software ✅ |
| You haven’t emptied the Trash since the deletion of your videos | Check Trash first |
| You’ve deleted the videos in the Photos app during the last 30 days | Check the Recently Deleted album |
| You can’t or prefer not to use recovery software | Try native recovery methods or pay professionals to recover your data |
| The store device on which your deleted videos were located is physically damaged | Contact recovery services |
How to Recover Deleted Videos from Mac
Since there are several ways to recover deleted video files on Mac, we’ve organized this guide to make it as simple as possible for you. If you’re not sure where your videos disappeared from, don’t worry – just follow our recovery methods one by one until you find your lost footage.
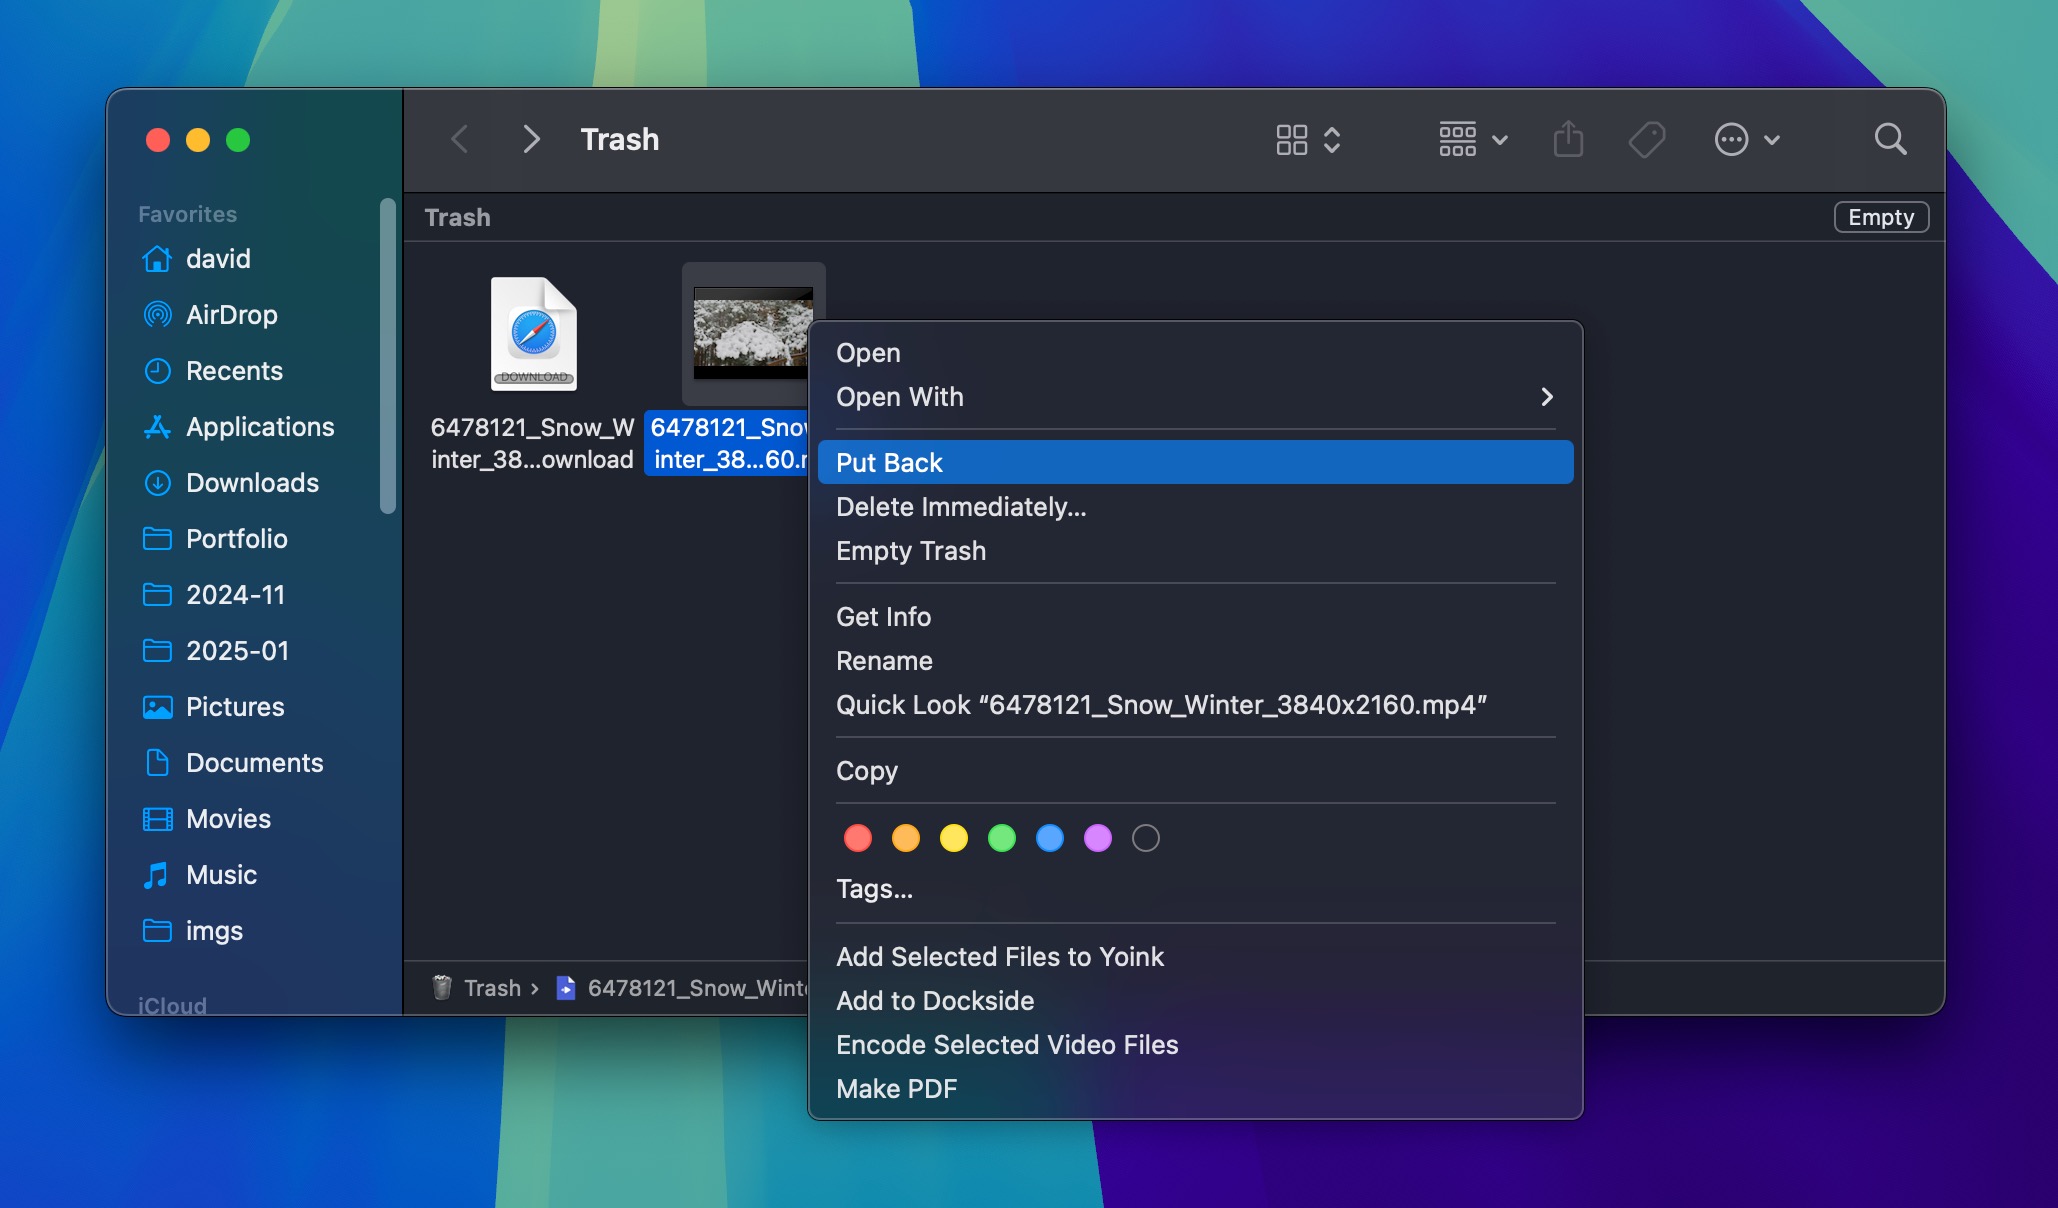
Method 1: Recover Deleted Videos from Trash on the Mac
The simplest way to recover deleted videos from trash Mac users should try first is checking the Trash folder. When you delete a video file on your Mac, it usually stays in the Trash for 30 days before being permanently removed. This is true even when the video is deleted from an external storage device.
To recover deleted videos on Mac from Trash:
- If necessary, connect the USB flash drive, memory card, or external drive where your videos were stored to your Mac.
- Click the Trash icon in Dock.
- Find your deleted video file, right-click it, and select Put Back (or drag it to your desired location).
If your deleted videos aren’t in the Trash, they might have been permanently deleted. In this case, you’ll need to use data recovery software to recover permanently deleted videos on Mac.
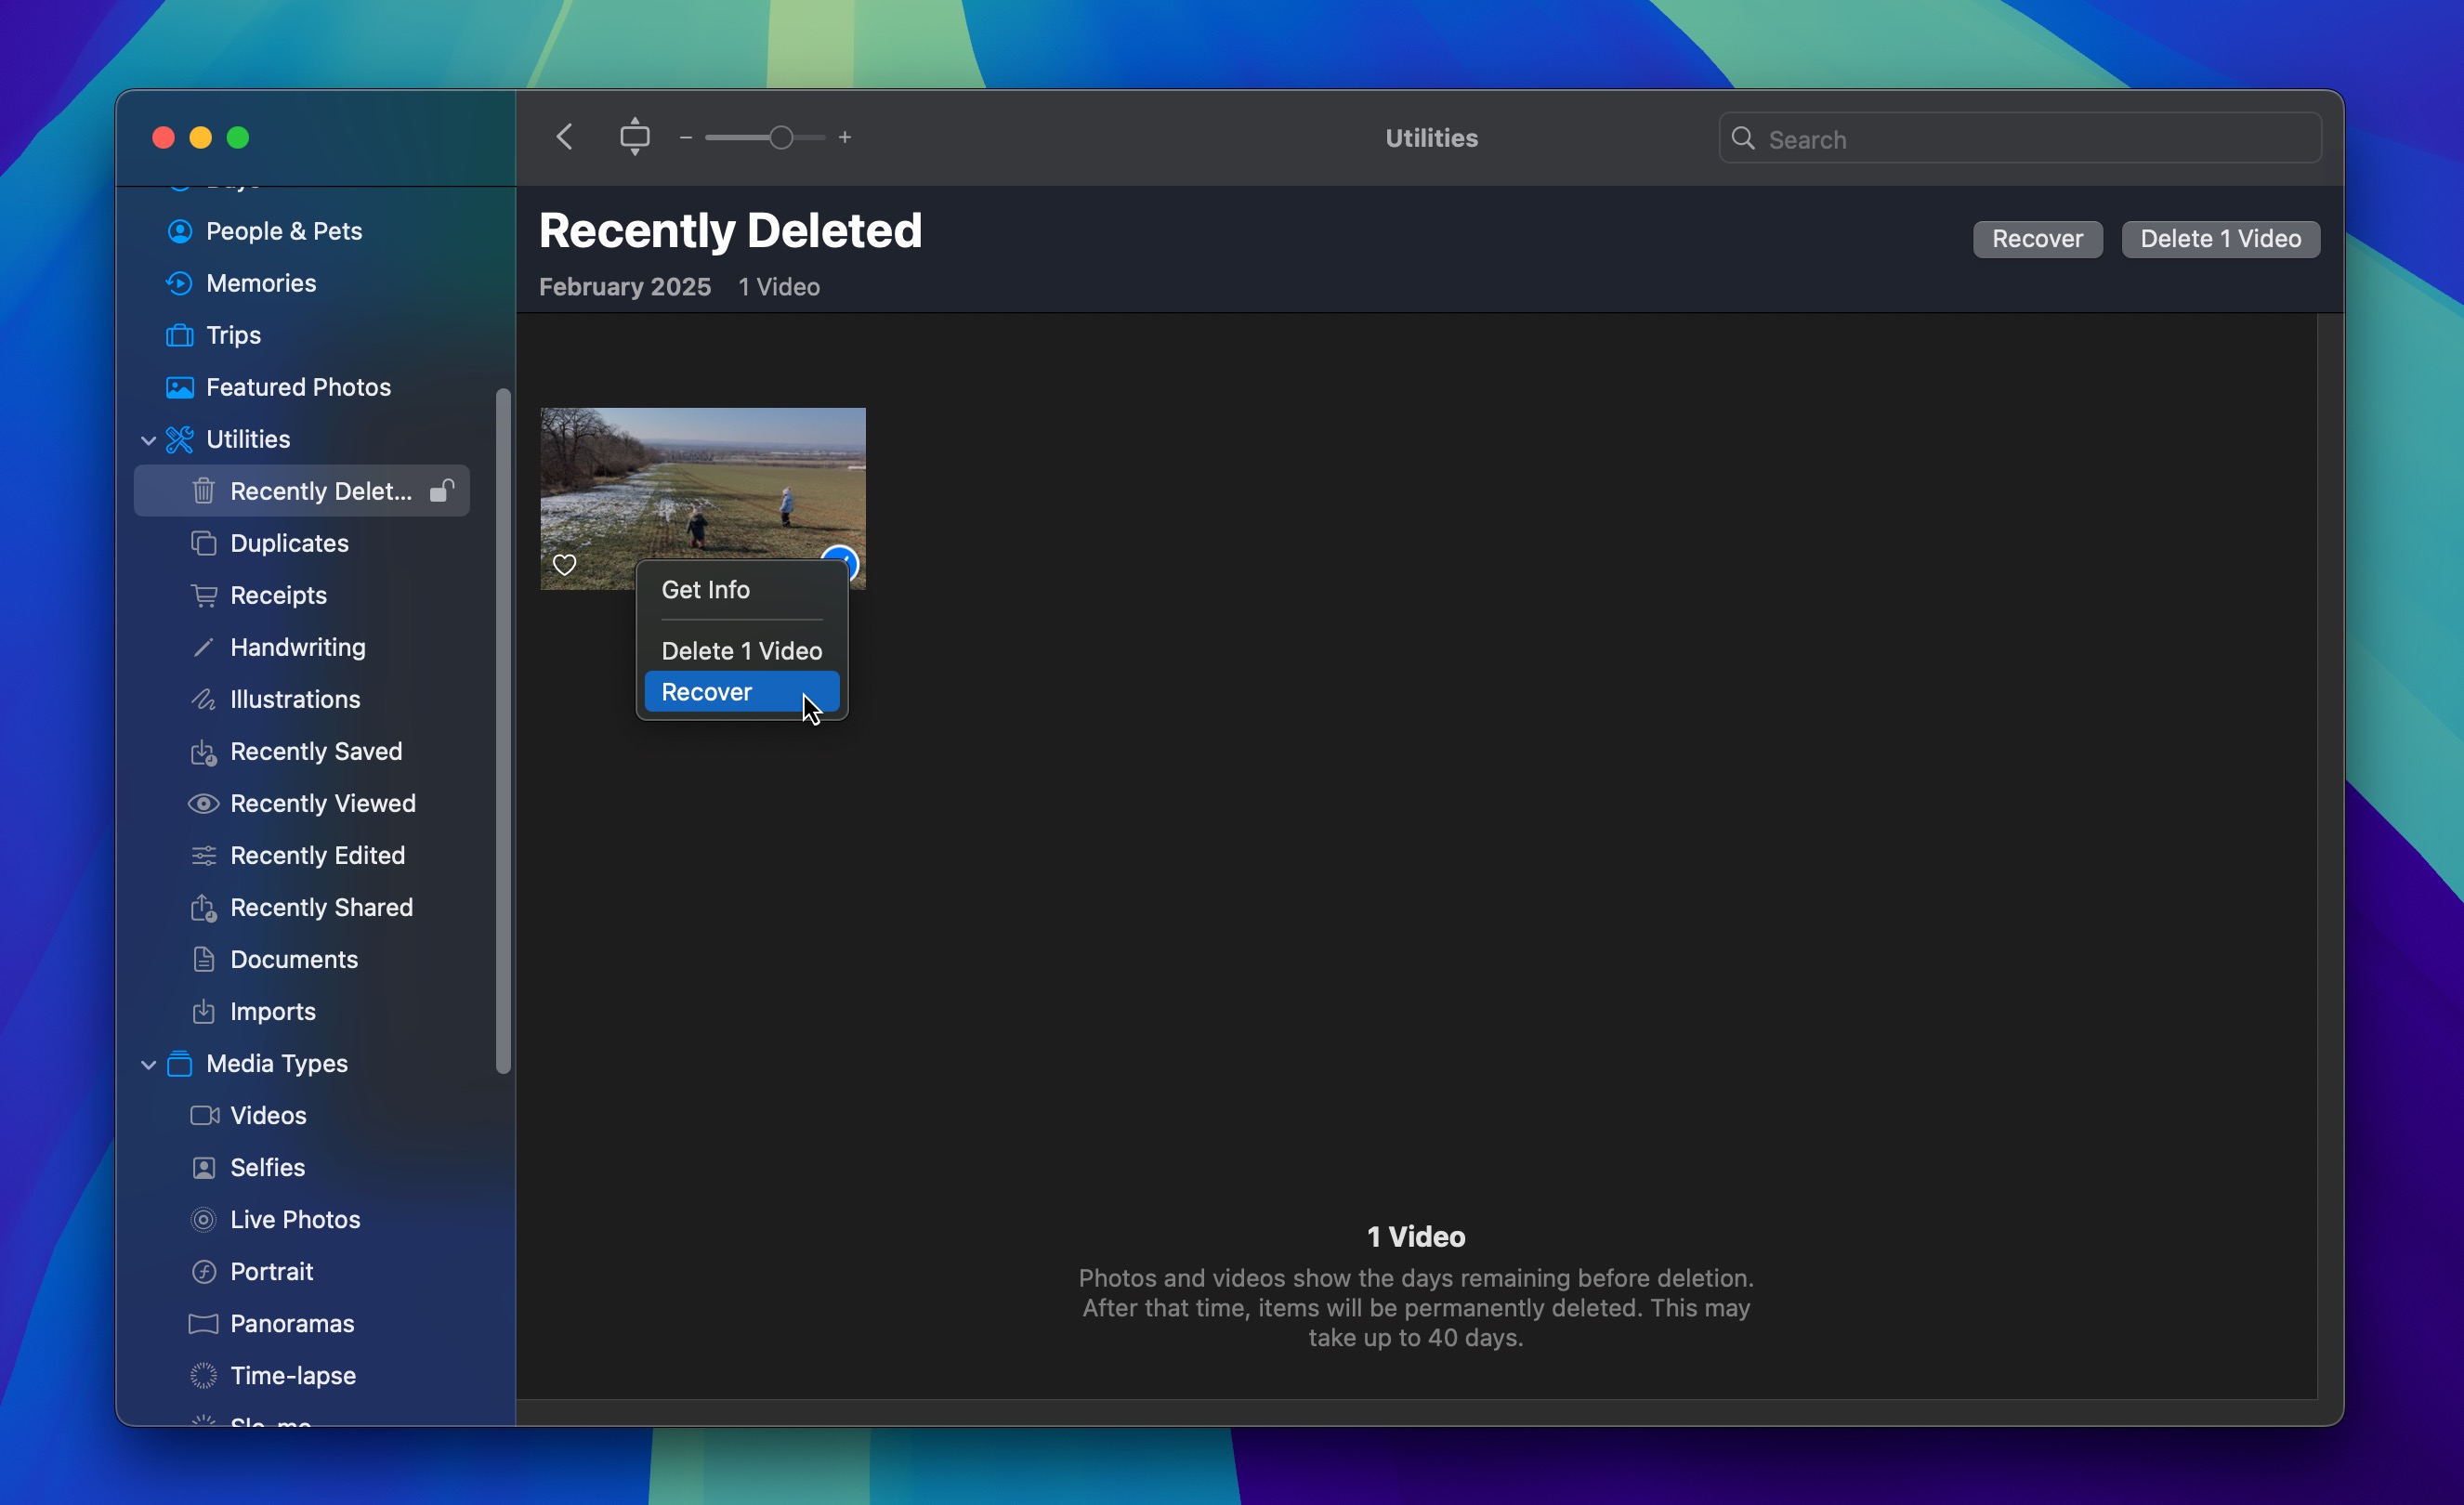
Method 2: Retrieve Deleted Videos from Photos App
Do you use Apple’s Photos app on macOS to manage your photo collection? If so, you’re in luck because you have another chance to recover deleted videos on Mac from the app’s built-in Recently Deleted album, which is where videos that were imported directly into Photos or synced through iCloud and then deleted in the Photos app end up.
To recover deleted video files on Mac from the Photos app:
- Open the Photos app.
- Navigate to the Recently Deleted album in the Utilities section of the sidebar (if it’s not there, it probably means that there are no recently deleted videos to recover).
- Enter your password if prompted to do so.
- Select the videos you want to recover and click the Restore option.
Method 3: Recover Permanently Deleted Videos on Mac
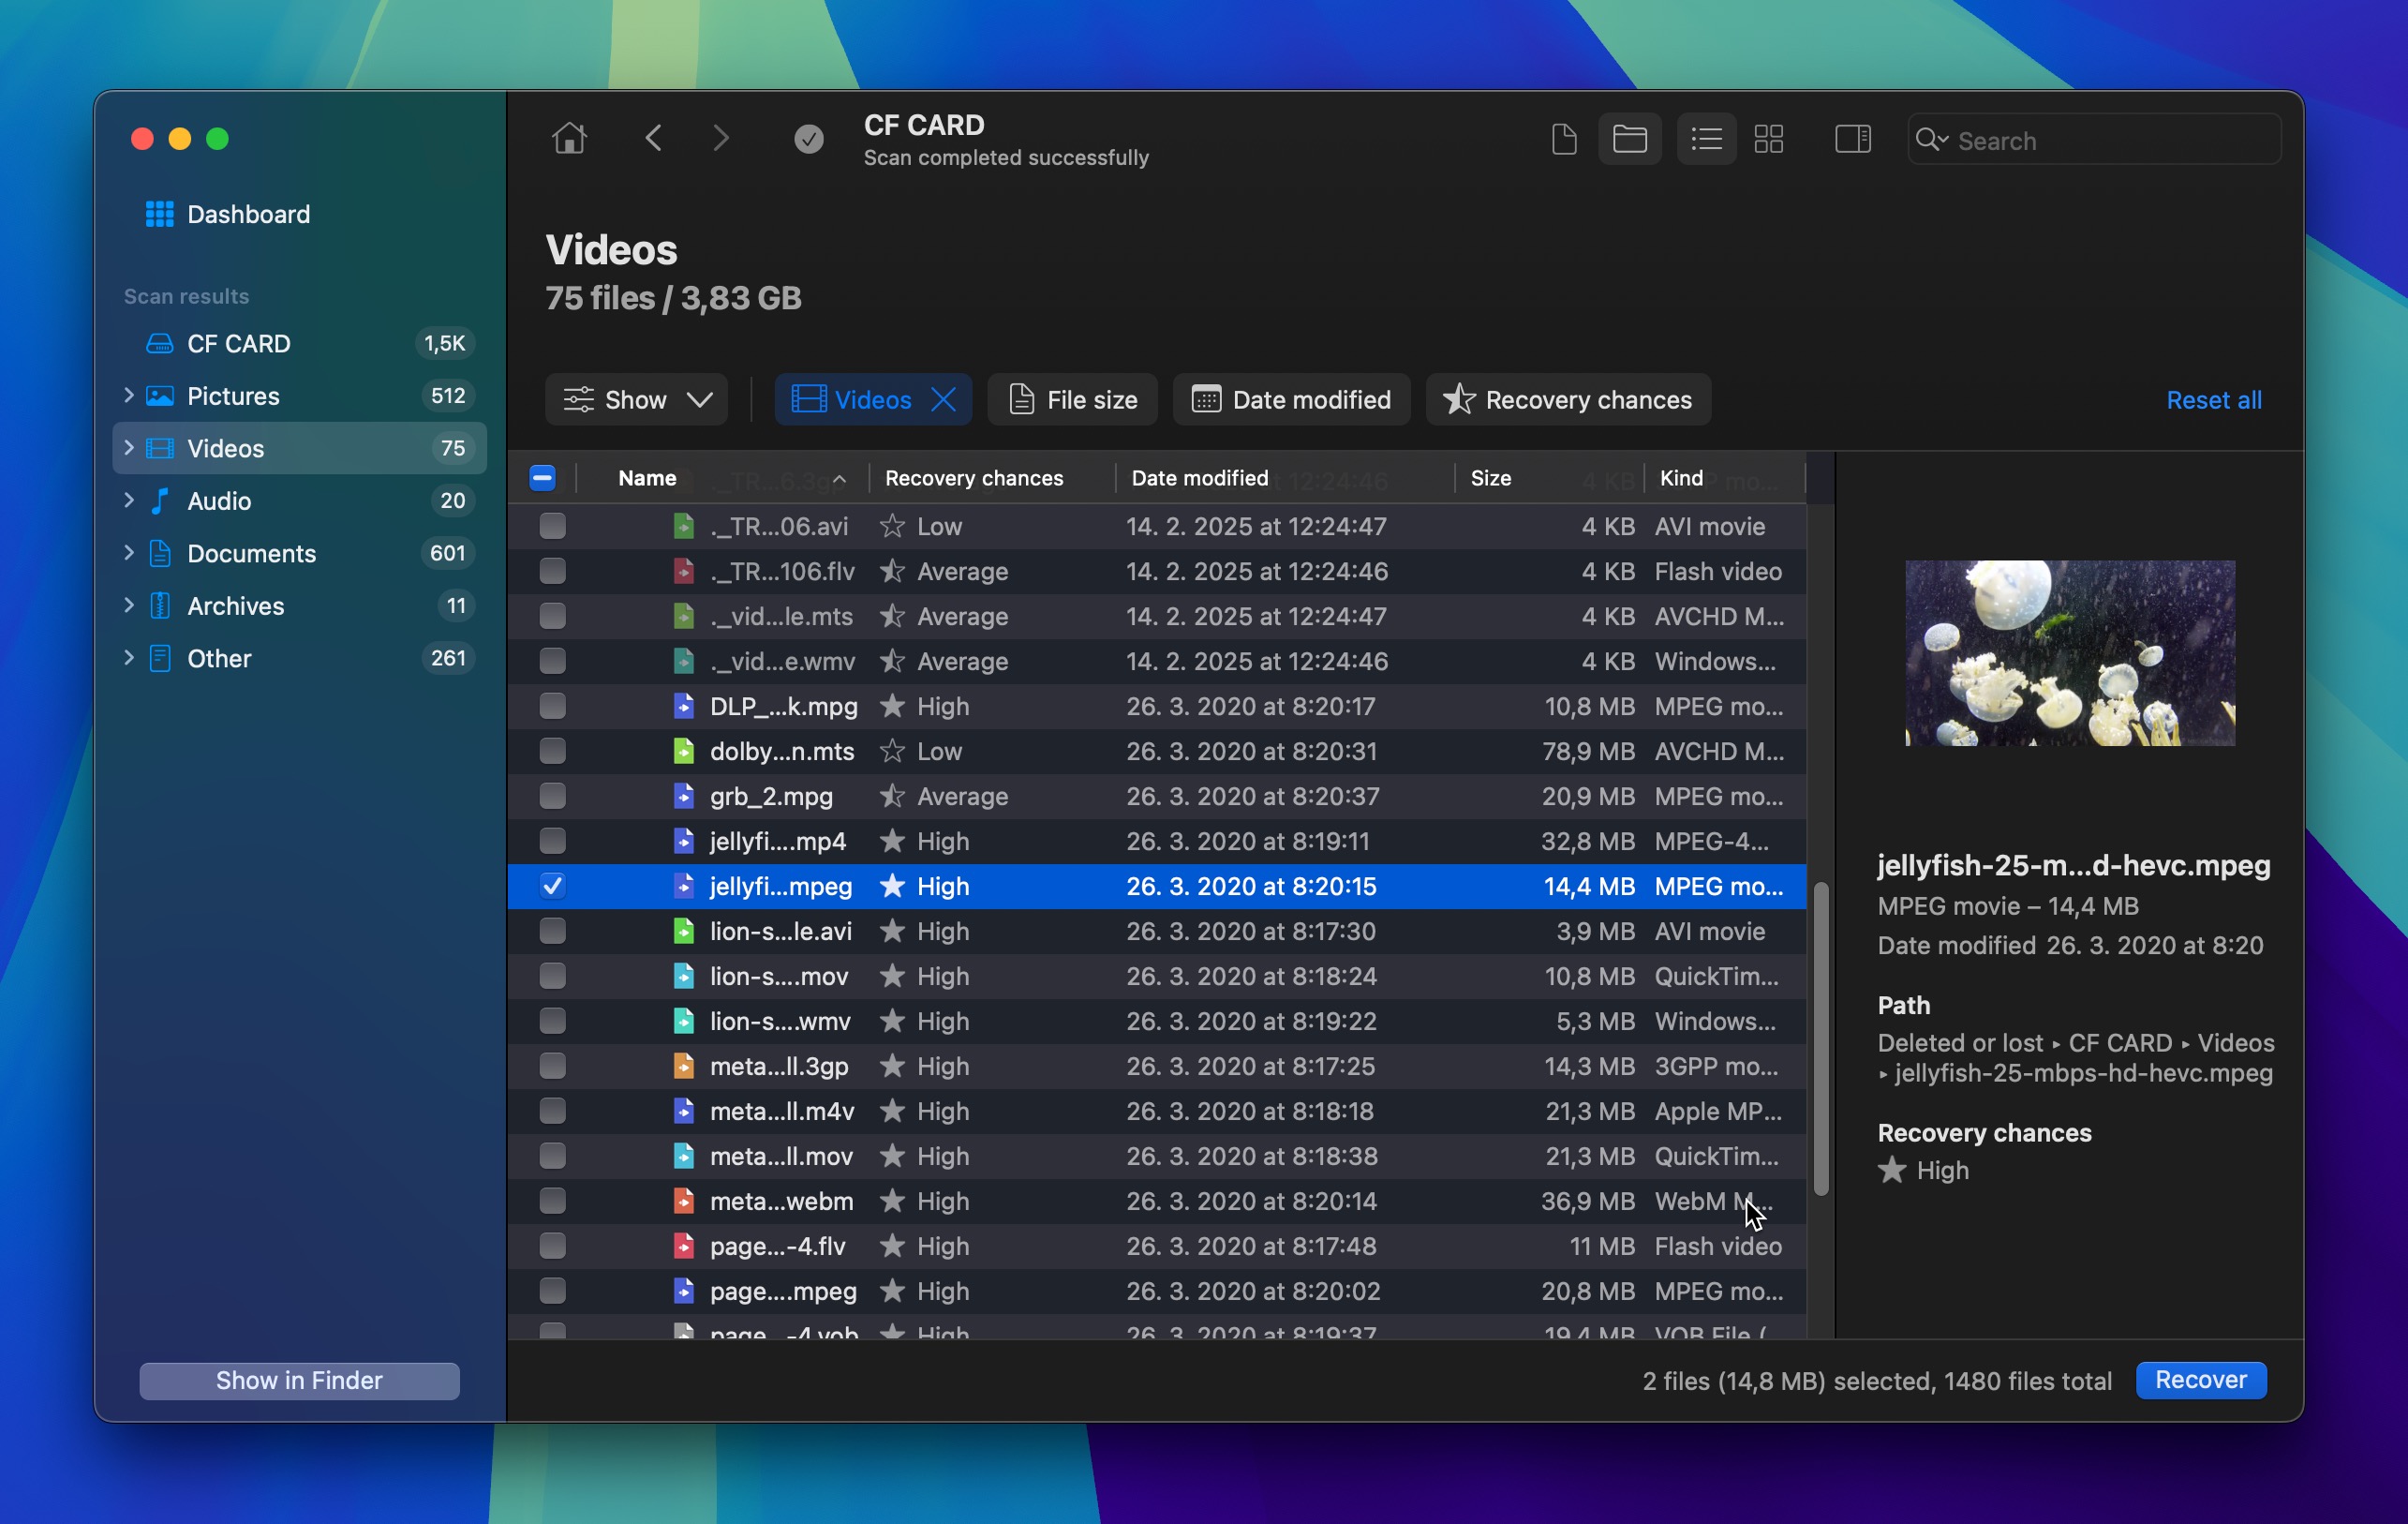
When your videos are no longer in the Trash, you can still recover them using specialized data recovery software. We recommend Disk Drill because it combines power with simplicity.
Recovering deleted videos is not the easiest procedure because of how video files are structured and stored on your disk. When a video file is deleted, two things typically happen: the file system loses information about where the file was stored, and the space it occupied becomes marked as available for new data.
To successfully recover such files, you need software with advanced scanning capabilities that can do two things:
- First, it needs to find any remaining traces of the file in the file system that might tell it where the video was stored.
- Second, it needs to be able to recognize video file signatures—special patterns that identify video files—to piece together your video even when the file system information is completely gone.
Disk Drill does both with its deep scanning algorithms, giving you the best chance of recovery in most data loss situations.
Follow these steps to recover deleted videos with data recovery software:
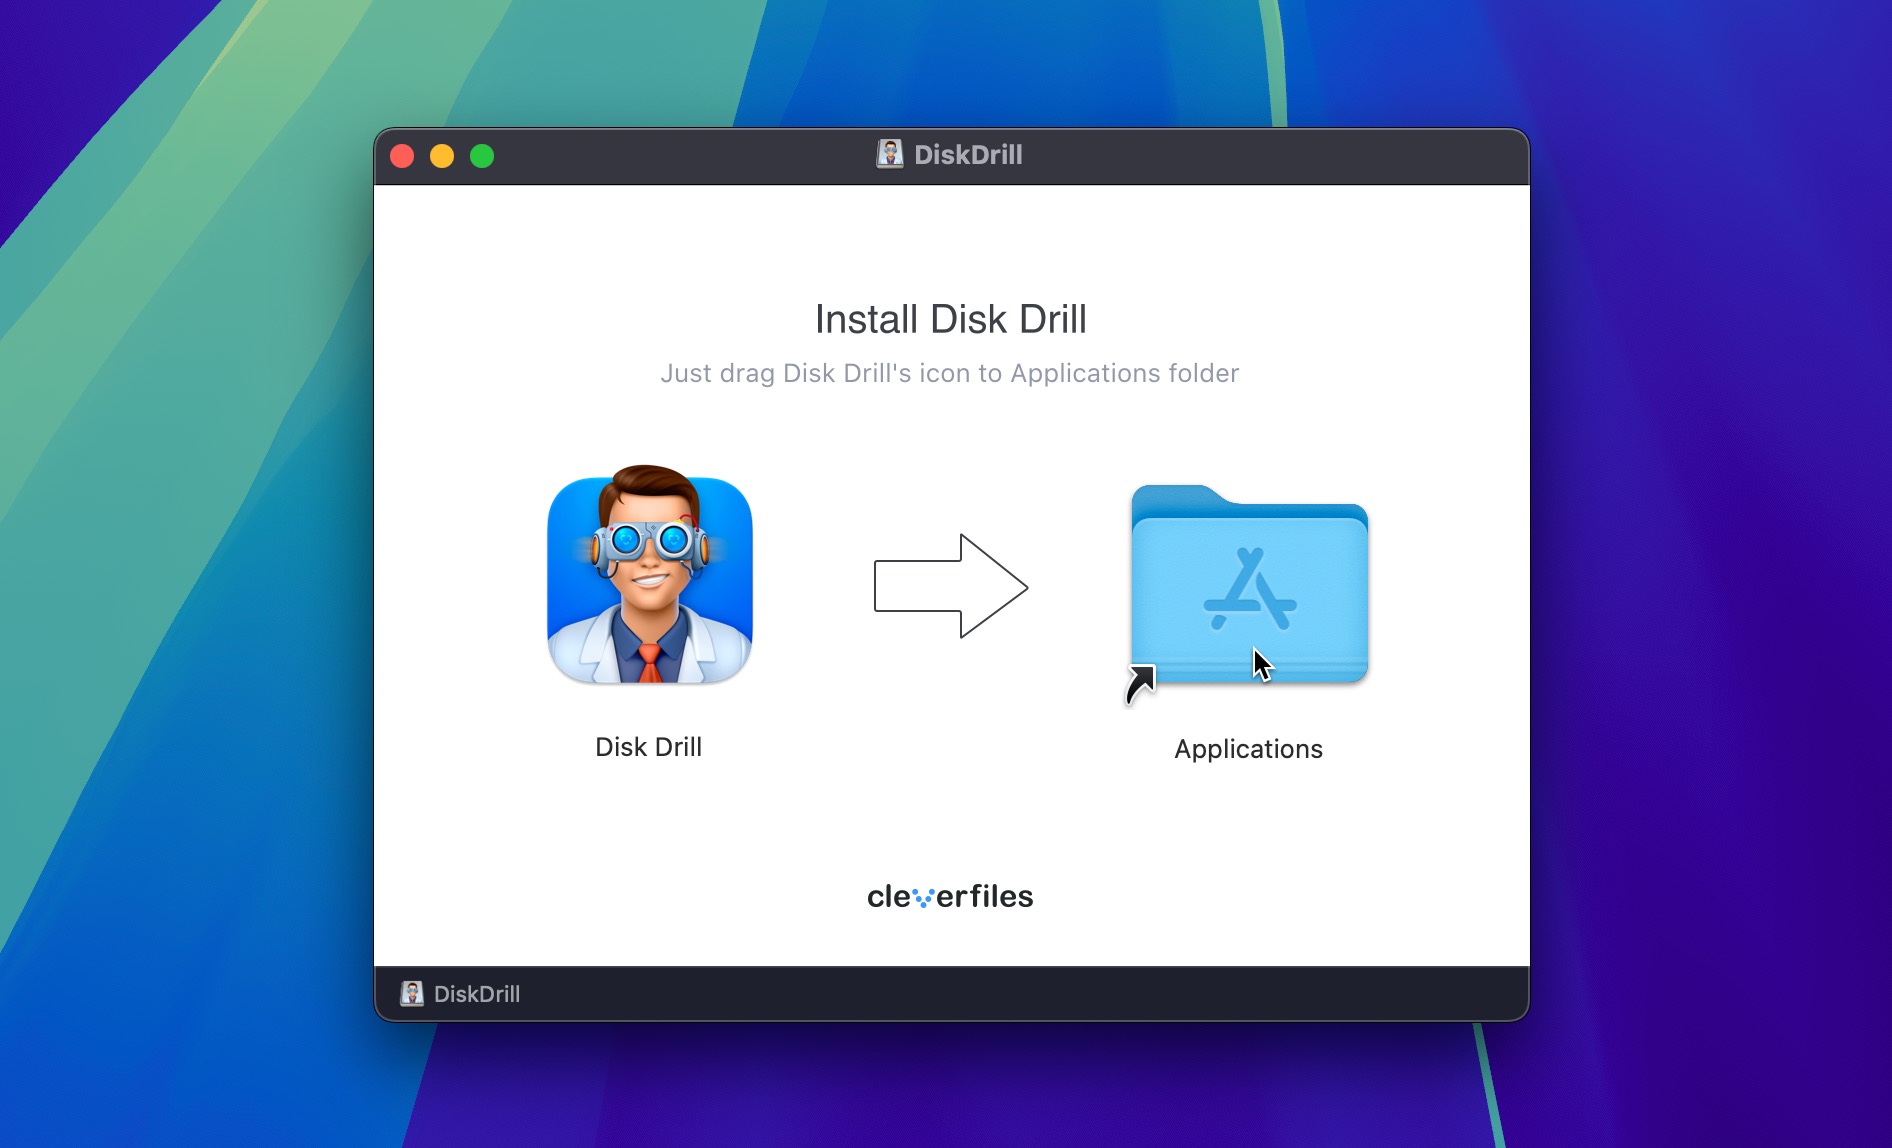
- Download and install Disk Drill for Mac.
- Select the drive on which your videos were stored before deletion and click the Search for lost data button.
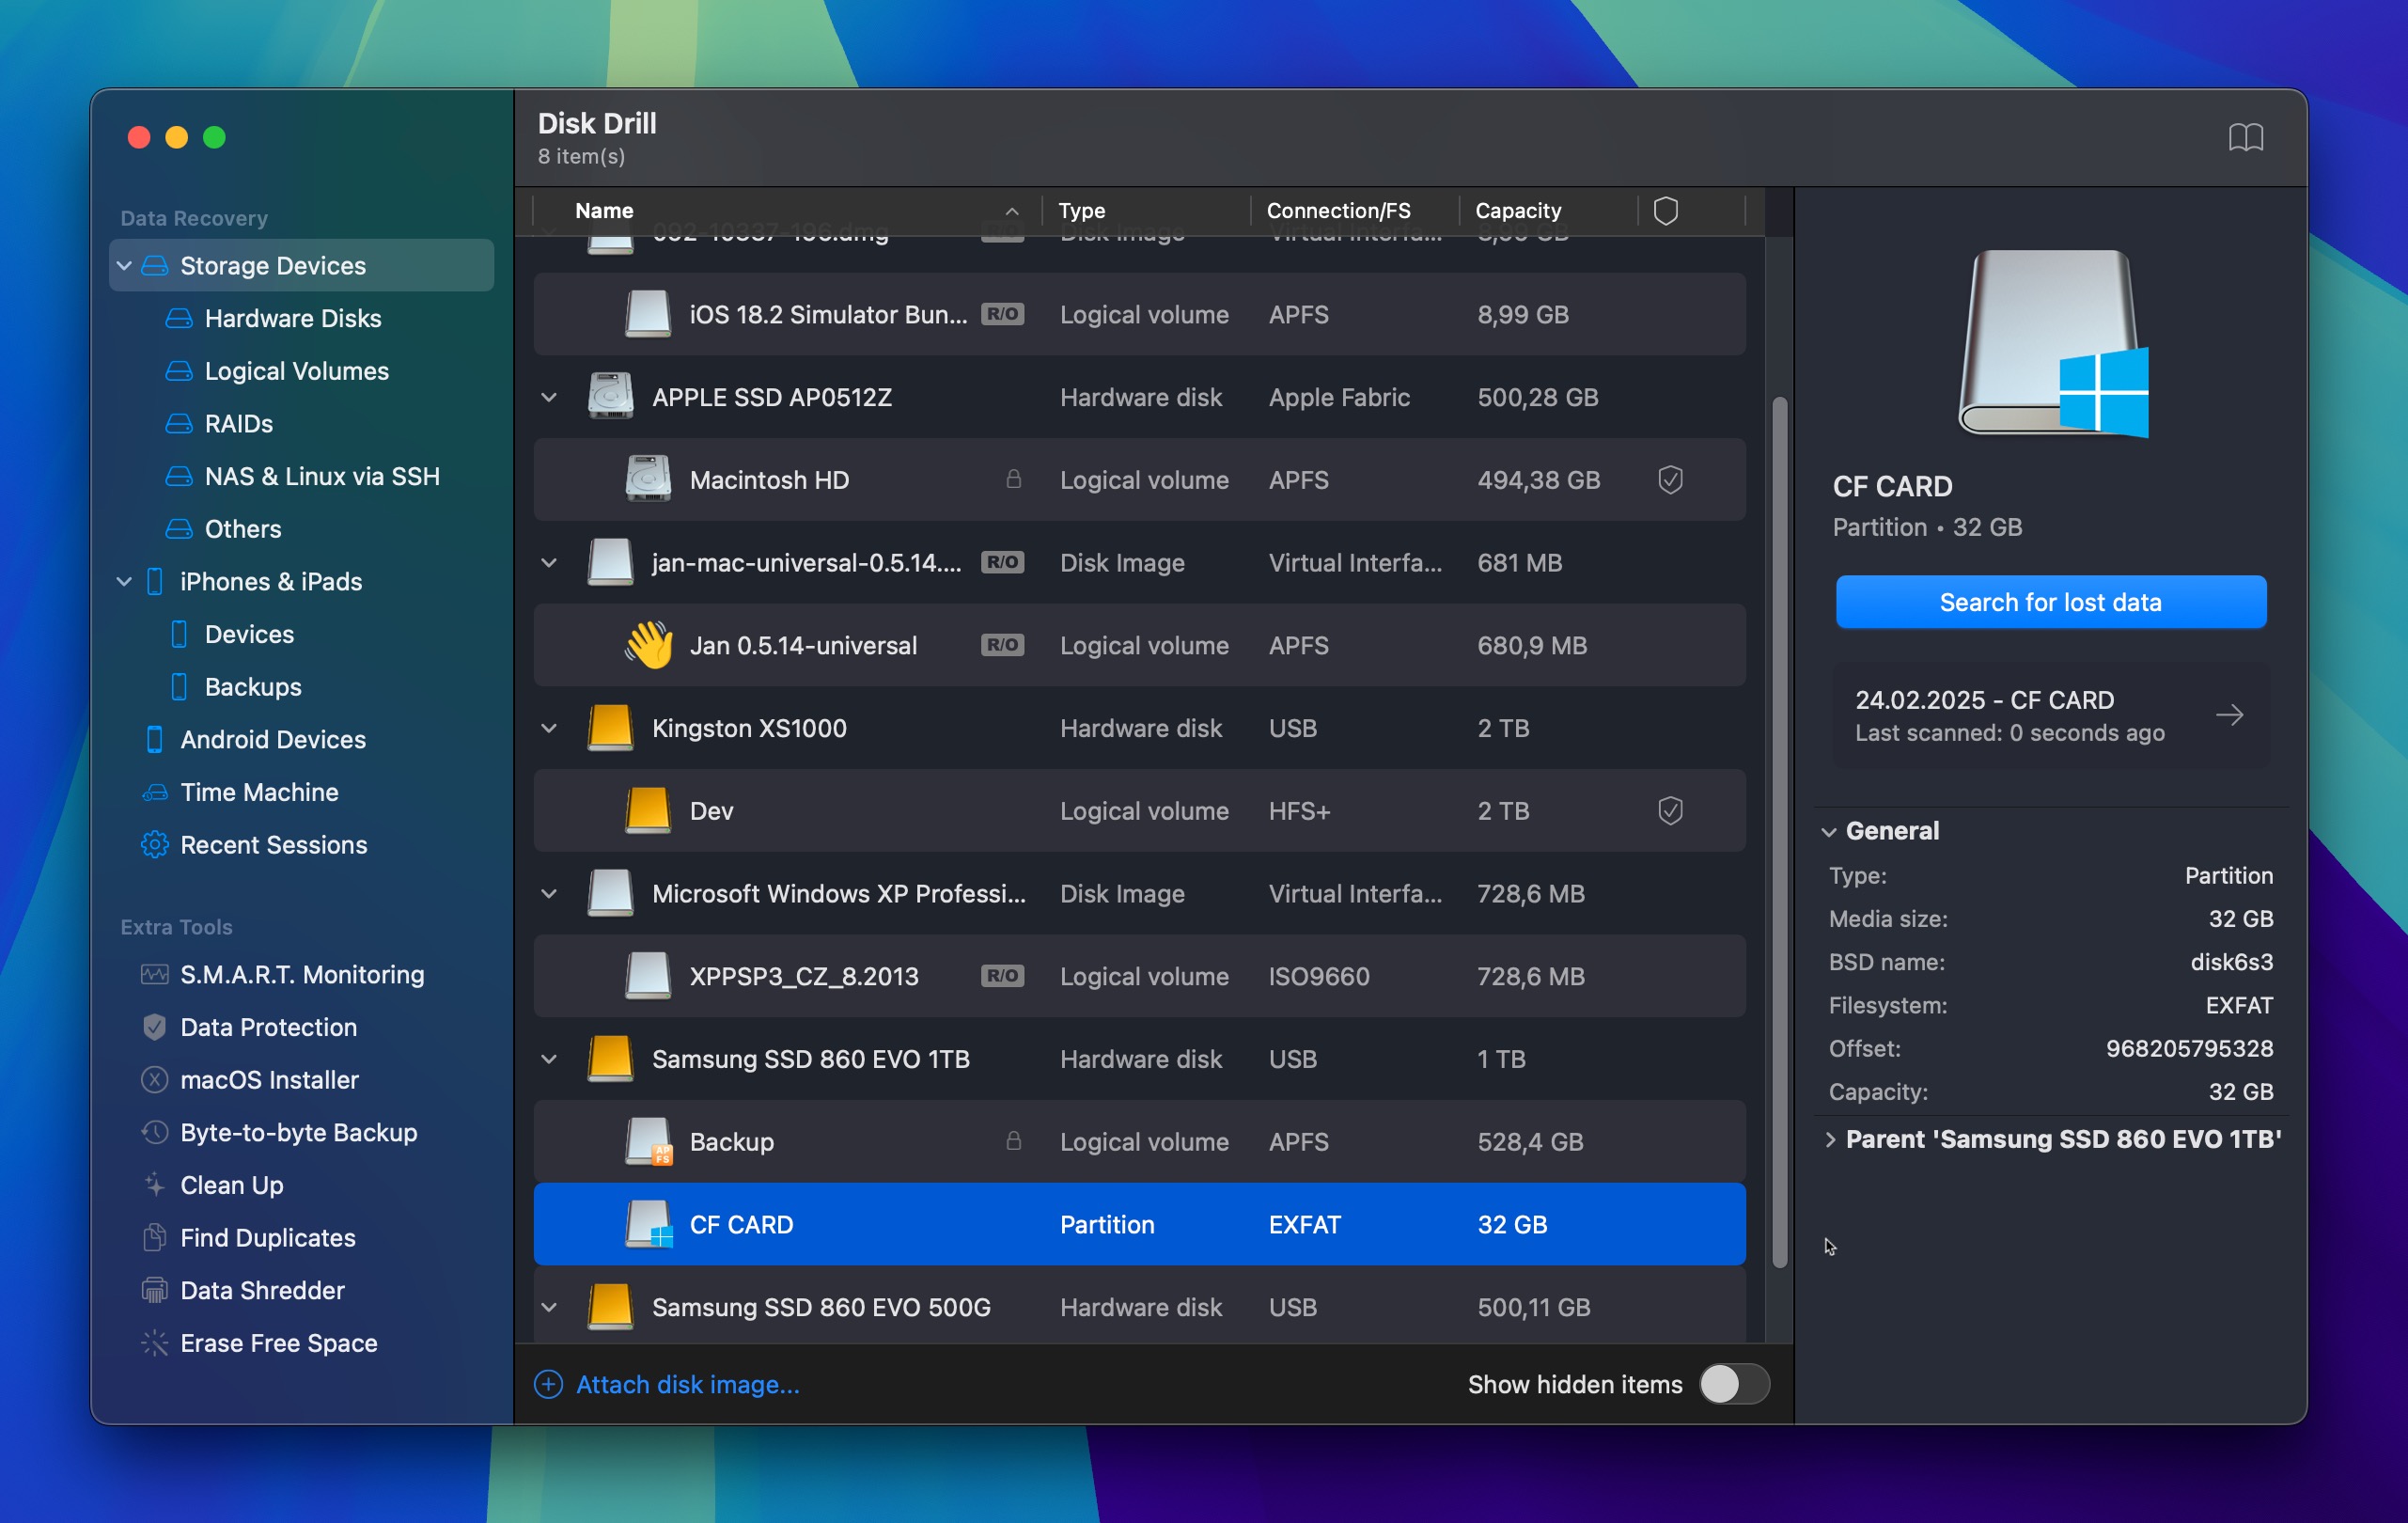
- Wait for Disk Drill to finish analyzing the drive. You can then activate the Video file format filter to narrow down the scan results.
- Select each file you want to recover. Take advantage of the preview feature to verify that you’ve selected the right files.
- Click the Recover button to recover your video files. Always recover files to a different drive than the one you’re recovering from to prevent overwriting.
Additional resources:
- Having trouble with specific devices? Our complete guide to video recovery walks you through recovery steps for cameras, phones, and other storage media.
- If your recovered videos are corrupted or won’t play properly, try the Clever Online Video Repair tool. This free online app can help fix common issues that often accompany data loss, and it does so for free and with respect to your privacy.
- For memory card recovery, we have a detailed guide for Mac users that covers SD cards, microSD cards, CF cards, and more from all major manufacturers.
Method 4: Recover Deleted Videos on Mac without Software
In situations where video recovery software like Disk Drill either doesn’t recover your footage or can’t be used (maybe you’re not allowed to install new apps on your Mac), Time Machine is what you need to recover deleted videos on Mac without using specialized recovery software.
If Time Machine was enabled on your Mac before your videos were deleted, you can use it to restore videos from any point in your backup history, so it can help even if you’ve deleted a part of your video by mistake during editing. Of course, it won’t help at all if it wasn’t enabled on your Mac when the data loss occurred.
To recover deleted videos on Mac from your Time Machine backup:
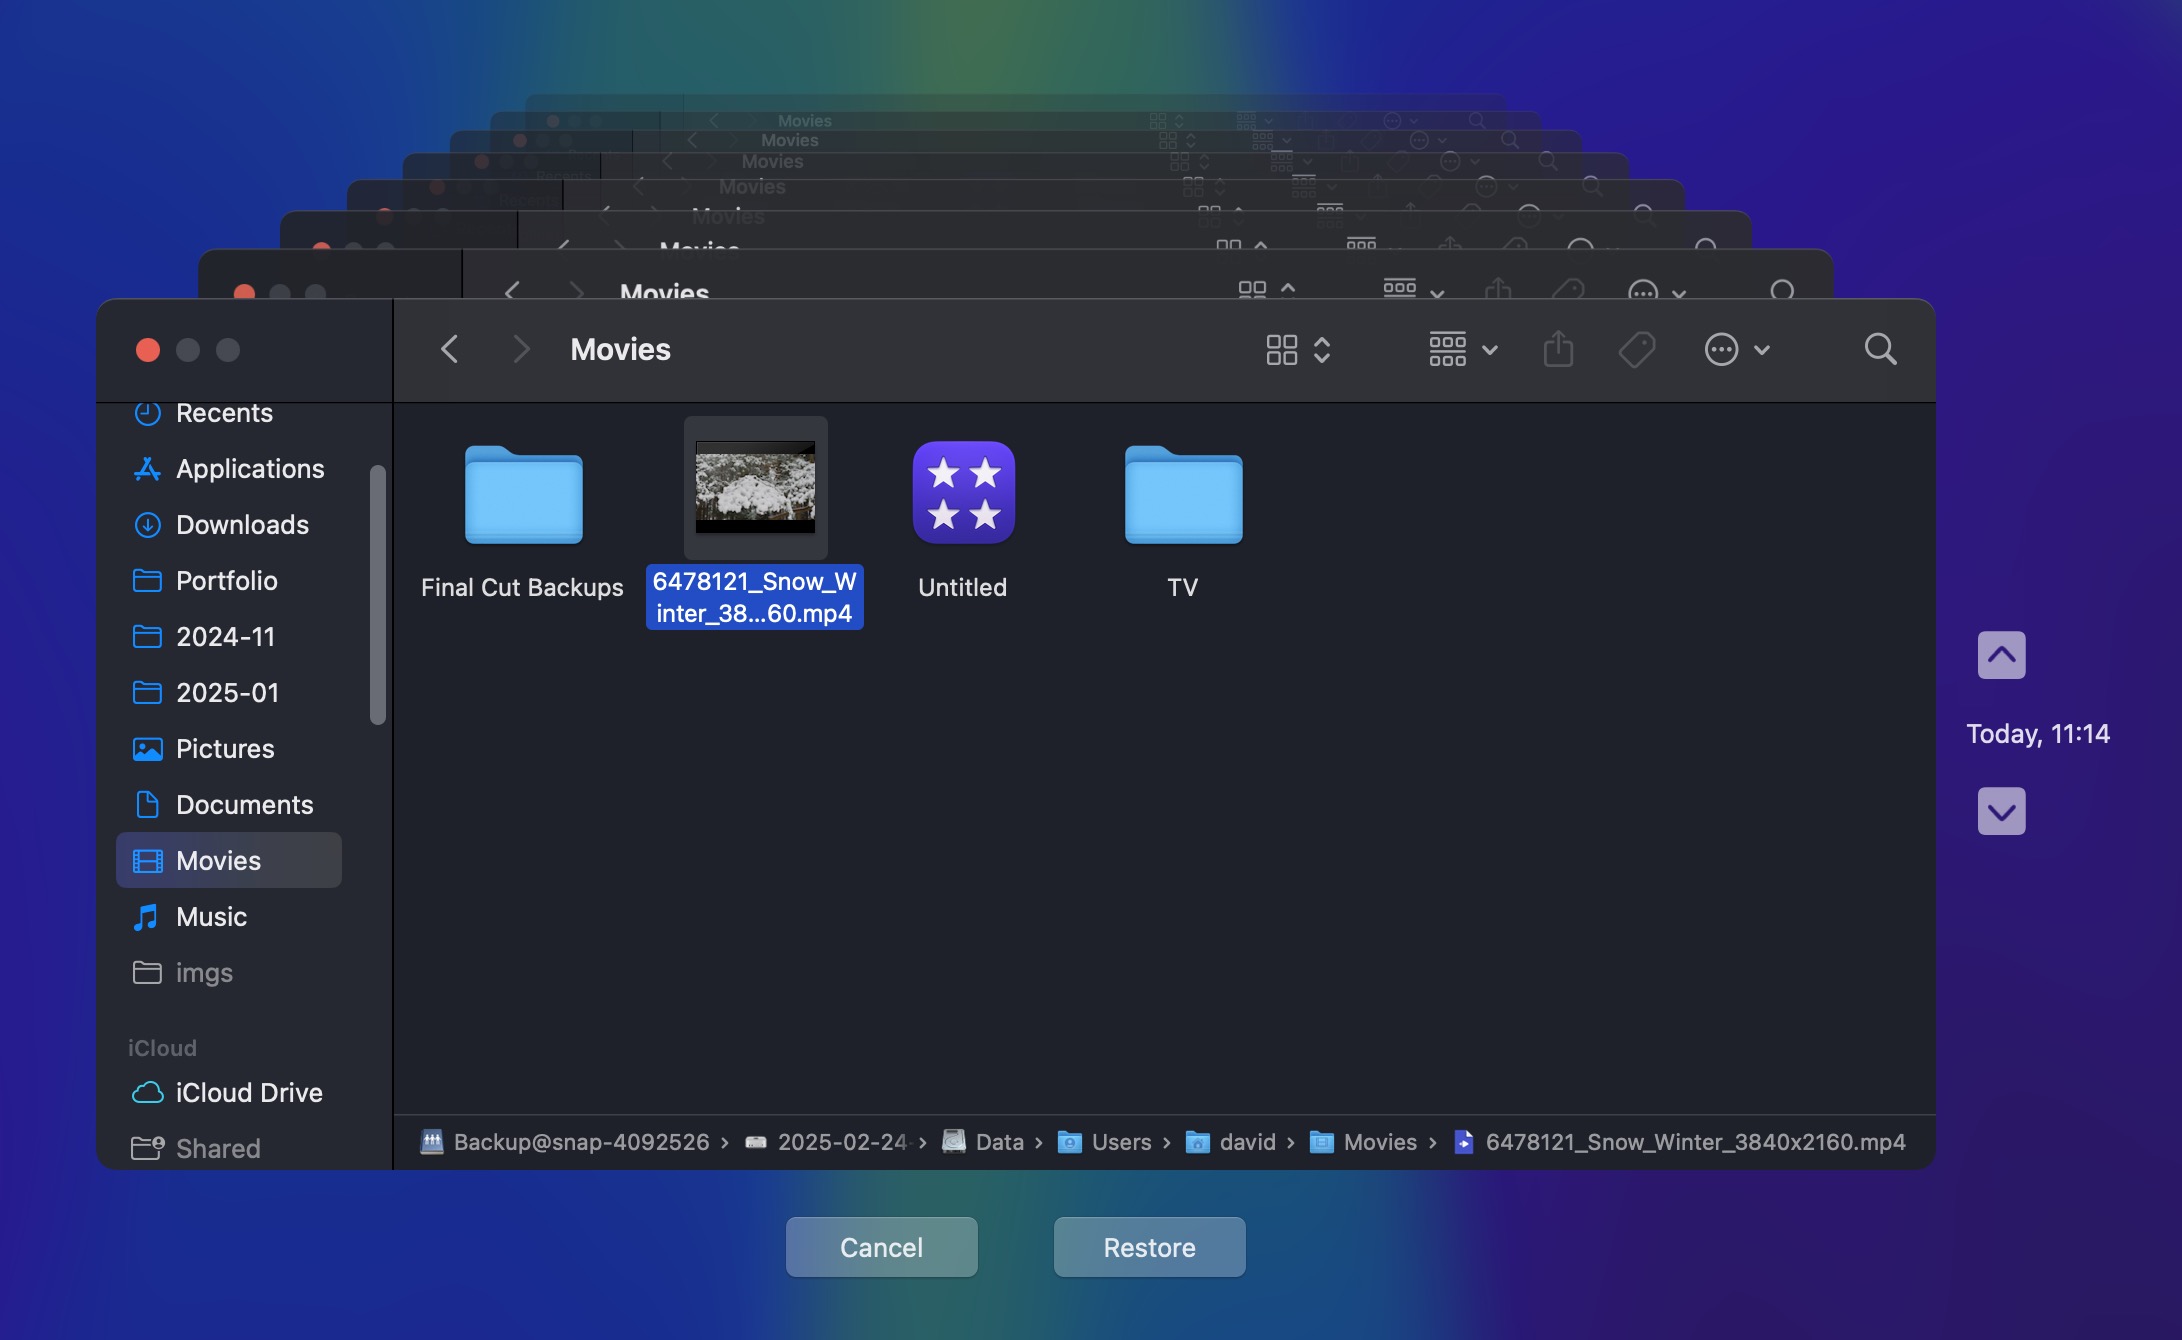
- Connect your Time Machine backup drive to your Mac. If you don’t have it around, then you can launch Time Machine anyway, and it will give you the option to recover lost data from local snapshots, which cover the last 24 hours of use.
- Click the Time Machine icon in the menu bar and select the Browse Time Machine Backups option.
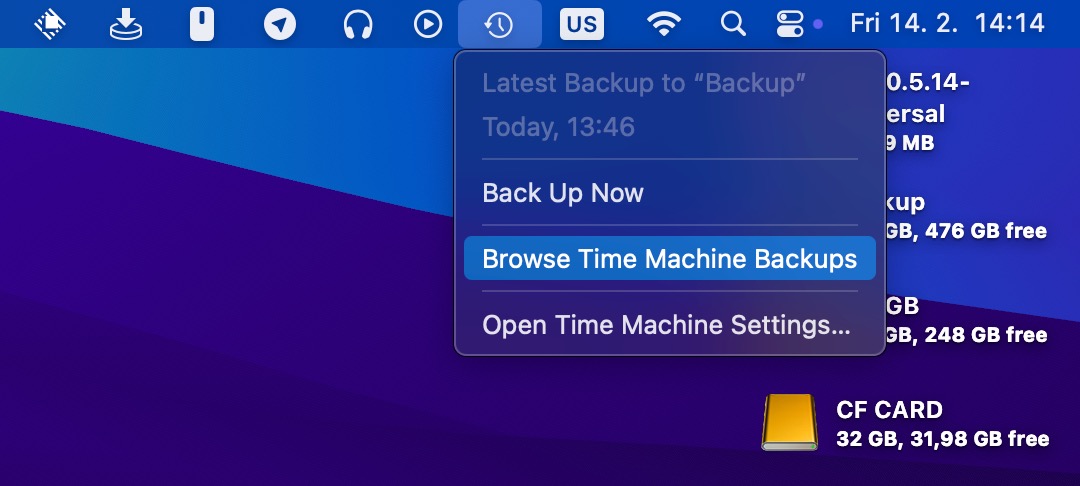
- Navigate to the folder where your video was located and use the timeline on the right to find the date when your video existed.
- Select your video and click the Restore button.
Method 5: Restore Deleted Videos on Mac via Data Recovery Services

Even though video recovery software solutions like Disk Drill make it very easy to recover permanently deleted videos from all kinds of storage devices, including external hard drives and SD cards, there are certain data loss scenarios that call for professional data recovery services.
Such scenarios include physical storage device damage, liquid or fire damage, power failures, and others. In all of these scenarios, it’s necessary to replace or repair the damaged components in a controlled environment in order to make the storage device readable again, which is not something most Mac users can do at home. Fortunately, there are many providers of reasonably priced professional data recovery services Mac users can choose from.
CleverFiles Data Recovery Center, for example, has helped countless customers from around the world recover video files from damaged Mac hard drives and other storage devices. CleverFiles Data Recovery Center boasts an admirable 98% success rate (one of the highest success rates in the industry), and it doesn’t charge customers any money unless it successfully recovers deleted data.
Follow these steps to restore deleted videos with the help of CleverFiles Data Recovery Center:
- Fill out the Data Recovery Work Order form and print it so you can ship it with your storage device.
- Package your storage device for shipping. Use an anti-static bag or bubble wrap if possible.
- Ship your storage device to CleverFiles Data Recovery Center. You can simply print the provided address label and attach it to your package.
Tips to Avoid Losing Videos on Mac
Just because there are many ways how to recover deleted video files on Mac doesn’t mean that you shouldn’t do as much as you can to avoid losing important footage. After all, video recovery is a complicated process, and 100% success is never guaranteed. Here are the most important tips that can help you avoid losing videos on Mac.
1. Back Up Your Videos
The best prevention against data loss is to back up your videos. The 3-2-1 backup rule has become the gold standard in data protection, and it works great for protecting important video content. To follow this strategy, you need to keep at least three copies of your data, with two backup copies on different storage devices and one copy stored offsite. In practice, you can keep one copy of your video files on the main Mac or MacBook internal drive, another copy on an external drive (backup tools can help with this), and yet another copy in the cloud using a service like iCloud, Google Drive, or Dropbox.
2. Invest in Network Attached Storage (NAS)
If you’re a professional videographer or editor, you should seriously consider investing in a Network Attached Storage (NAS) system. As its name suggests, a NAS connects to your network rather than directly to your Mac, so you can access your video files from any computer that has access to your network. What’s more, NAS solutions come with built-in RAID capabilities, ensuring your videos remain safe even if a drive fails. Many NAS devices also feature automatic backup scheduling and even direct integration with cloud storage services.
3. Don’t Use Pirated Software Applications
Using pirated software on your Mac or MacBook is a risky practice that can lead to data loss, malware infections, and legal consequences. Malware creators often hide malicious code capable of hiding, corrupting, and even deleting videos in cracked applications distributed on warez blogs and torrent sites. For example, a Reddit user shared their experience of downloading pirated recovery software, only to find their system compromised. The malware triggered unauthorized activity, including purchases on Steam, attempts to change LinkedIn passwords, and subscriptions to inappropriate subreddits.
4. Organize Your Video Projects
You can significantly reduce the risk of accidentally deleting an important file by keeping your video collection well organized. One approach you can adopt is to separate raw footage from working files and final exports. But regardless of the structure, you should always use descriptive file names that include the date, project name, and version numbers. As a Mac user, you can also organize your video files using tags, which makes can make it even easier to find what you’re looking for.
5. Monitor Drive Health
Unfortunately, storage devices don’t last forever, which is why modern hard drives and solid-state drives support Self-Monitoring, Analysis and Reporting Technology (S.M.A.R.T.) to provide ample data about your drive’s health. You can read and analyze this data using a tool like the S.M.A.R.T. Monitoring feature in Disk Drill. When you notice that one of your drives is anything less than perfectly healthy, you should promptly transfer all data from it to a new drive.
Summary
In this article, we explained how to recover deleted video files on Mac without software as well as using a third-party video file recovery solution called Disk Drill. Because Disk Drill can recover even permanently deleted videos that are no longer in Trash, we highly recommend all Mac users who edit video to keep it installed on their computer and use it as soon as they notice that an important file is missing to maximize their chance of successful recovery.
FAQ
Yes, you can recover deleted videos on Mac, but the success depends on your data backup habits, your use of encryption, the amount of data written since the data loss, and whether your Mac is using an SSD or a traditional spinning HDD.
To recover permanently deleted videos from a Mac:
- Download, install, and launch Disk Drill.
- Select your Mac drive and click Search for lost data.
- Go through the results and select the videos you want to recover.
- Click the Recover button and specify a recovery destination.
In most cases, recovering deleted videos on Mac is easy because they can be found inside Trash. You should see the Trash icon on the right side of the Dock. When you click on it, a Finder window called Trash opens, and you can simply select the deleted video you want to recover and drag it back out. If the videos were deleted in the Photos app, then they can be found in the Recently Deleted folder in the Utilities section.
Yes, storage type significantly affects your ability to recover deleted videos on MacBook. HDDs (Hard Disk Drives) offer better recovery chances because deleted data remains until overwritten. However, modern MacBooks use SSDs with TRIM technology, which automatically wipes deleted data blocks at regular intervals to prepare them for use. Once wiped, no data can be recovered from them.
Yes, you can recover deleted videos from an SD card. Our recommended video recovery solution, Disk Drill, can recover deleted video files from all kinds of storage devices, including external hard drives, USB drives, and SD cards (Full SD, miniSD, and microSD). All you need to do is connect your device to your Mac or use an external card reader if your Mac doesn’t have a built-in SD slot. Once connected, use Disk Drill to scan the device.