Even with Microsoft’s latest, Windows 11, I’ve found myself in a bind more than once because files just disappeared on me. But here’s the good news: this OS has some solid tricks up its sleeve for helping you recover deleted files on Windows 11, getting back what you thought was gone for good. It also works well with a bunch of other tools I’ve tried.
Situations That Commonly Lead to Windows 11 Data Loss
Data loss costs organizations and individual home users a staggering amount of money every year. Why? Because its causes are numerous and sometimes difficult to prepare for ahead of time.
Based on my own experiences with files going missing, here’s a list of the usual problems I’ve run into:
- 😲 Human error – Even though Windows 11 tries to make things easy, it’s still pretty new. I’ve definitely had my moments of clicking around and suddenly, poof, something important vanishes. It’s all too easy to accidentally send a crucial file into oblivion while you’re still getting the hang of things.
- 🖥️ Software issues – Windows is a massively complicated operating system because it maintains backward compatibility with generations and generations of software applications. That’s why it’s relatively common for Windows users to encounter software issues, and some, such as this problem with gradual Windows 11 desktop corruption, are serious enough to cause – either directly or indirectly – the loss of important files.
- ⚠️ Data corruption – A file can become corrupted and impossible to open because of software and hardware issues alike. When that happens, you might be able to repair the damage using dedicated tools, or you can always recover a functioning version of the file from a backup.
- 📛 Hardware malfunction – Modern storage devices can store huge quantities of data and do so without costing too much money, but their reliability still leaves something to be desired. As this Reddit user’s experience with brand-new SSDs shows, malfunction can occur unpredictably – even when everything seems fine on the surface. In their case, large files were disappearing or suddenly turning into unreadable zero-byte data.
- ⚡ Unpredictable disasters – A particularly close lightning strike or a single spilled cup of coffee can render an entire storage device – or even an entire computer – unusable, causing an instant loss of valuable data.
- 👾 Malware– One of the most common malware threats today, ransomware, causes data loss by encrypting files and demanding a ransom payment for their decryption. Unfortunately, ransomware attacks are on the rise, and Windows 11 are prime targets.
- ⚙️ Upgrading gone wrong – I always hear from the tech gurus to do a clean install with new Windows versions. Learned that the hard way when I tried to take the easy route with an upgrade and ended up with data loss.
- 🔄 Insider Program Rollbacks – For those daring enough to test the latest builds from the Windows Insider Program, beware. A known issue with rollback operations can break Dev Drives, leading to a loss of all stored data.
Given the variety of scenarios that lead to data loss on Windows 11, I sorted these issues into three main categories, each matched with solutions that I’ve personally tested and found to work.
| Loss scenarios | Recommended solution |
| Recent data loss (accidental deletion and other human errors) | |
| Permanent data loss (formatting, malware, software issues, upgrading gone wrong, data corruption) | |
| Hardware-related data loss (hardware malfunctions and other unpredictable disasters) |
8 Methods to Recover Deleted Files on Windows 11
In this section, we’re taking a detailed look at the most useful solutions for recovering deleted files on Windows 11. Since each solution is useful in a different data loss situation, we recommend you first consult the table in the previous section to determine which one you should start with.
Method 1: Recover Files using Undo Delete
Whenever you perform an action on your Windows computer, you can use the Undo feature to take the action back. This feature can come in handy when you make a mistake when using your Windows 11 computer and accidentally delete a file you actually wanted to keep.
Let’s imagine that you’ve deleted an important image from organizing your photo collection. To get it back:
- Make sure the folder where your photos are located is in focus.
- Press CTRL + Z on your keyboard.
- Alternatively, you can right-click anywhere in the folder and choose the Undo Delete option.

Method 2: Recover Deleted Files from a Recycle Bin in Windows 11
Windows 11 comes with a slightly redesigned Recycle Bin compared to Windows 10, but it functions exactly the same, allowing you to undelete recently deleted files without software unless:
- You used Shift + Delete to permanently delete them.
- The files exceed the Recycle Bin’s size limit (which you can adjust in Recycle Bin properties).
- The files were deleted from USB flash drives or SD cards (though files from external SSDs and HDDs do go to the Recycle Bin).
If you believe that your deleted files had a chance to end up in the Recycle Bin, here’s how to recover them:
- Double-click the Recycle Bin icon on your Desktop.
- Select the files you want to recover.
- Right-click any of the selected files and choose the Restore option.
- Alternatively, drag and drop the selected files to a location of your choice.

Method 3: Restore Files Using the File History Feature
The File History backup feature has saved countless files from permanent deletion since its introduction in Windows 8, and you can still use it to undelete files in Windows 11 – even those that no longer appear in the Recycle Bin.
Keep in mind that File History can only help recover your files if you enabled it before the data loss occurred. However, even if you haven’t explicitly enabled File History, you might still be able to recover your files from a system restore point.
Here’s how to recover deleted files in Windows 11 not in Recycle Bin using File History:
- Open the Start menu and type in Control panel.

- Launch the Control Panel app.
- Navigate to System and Security > File History.

- Click the Restore personal files option located in the left sidebar.
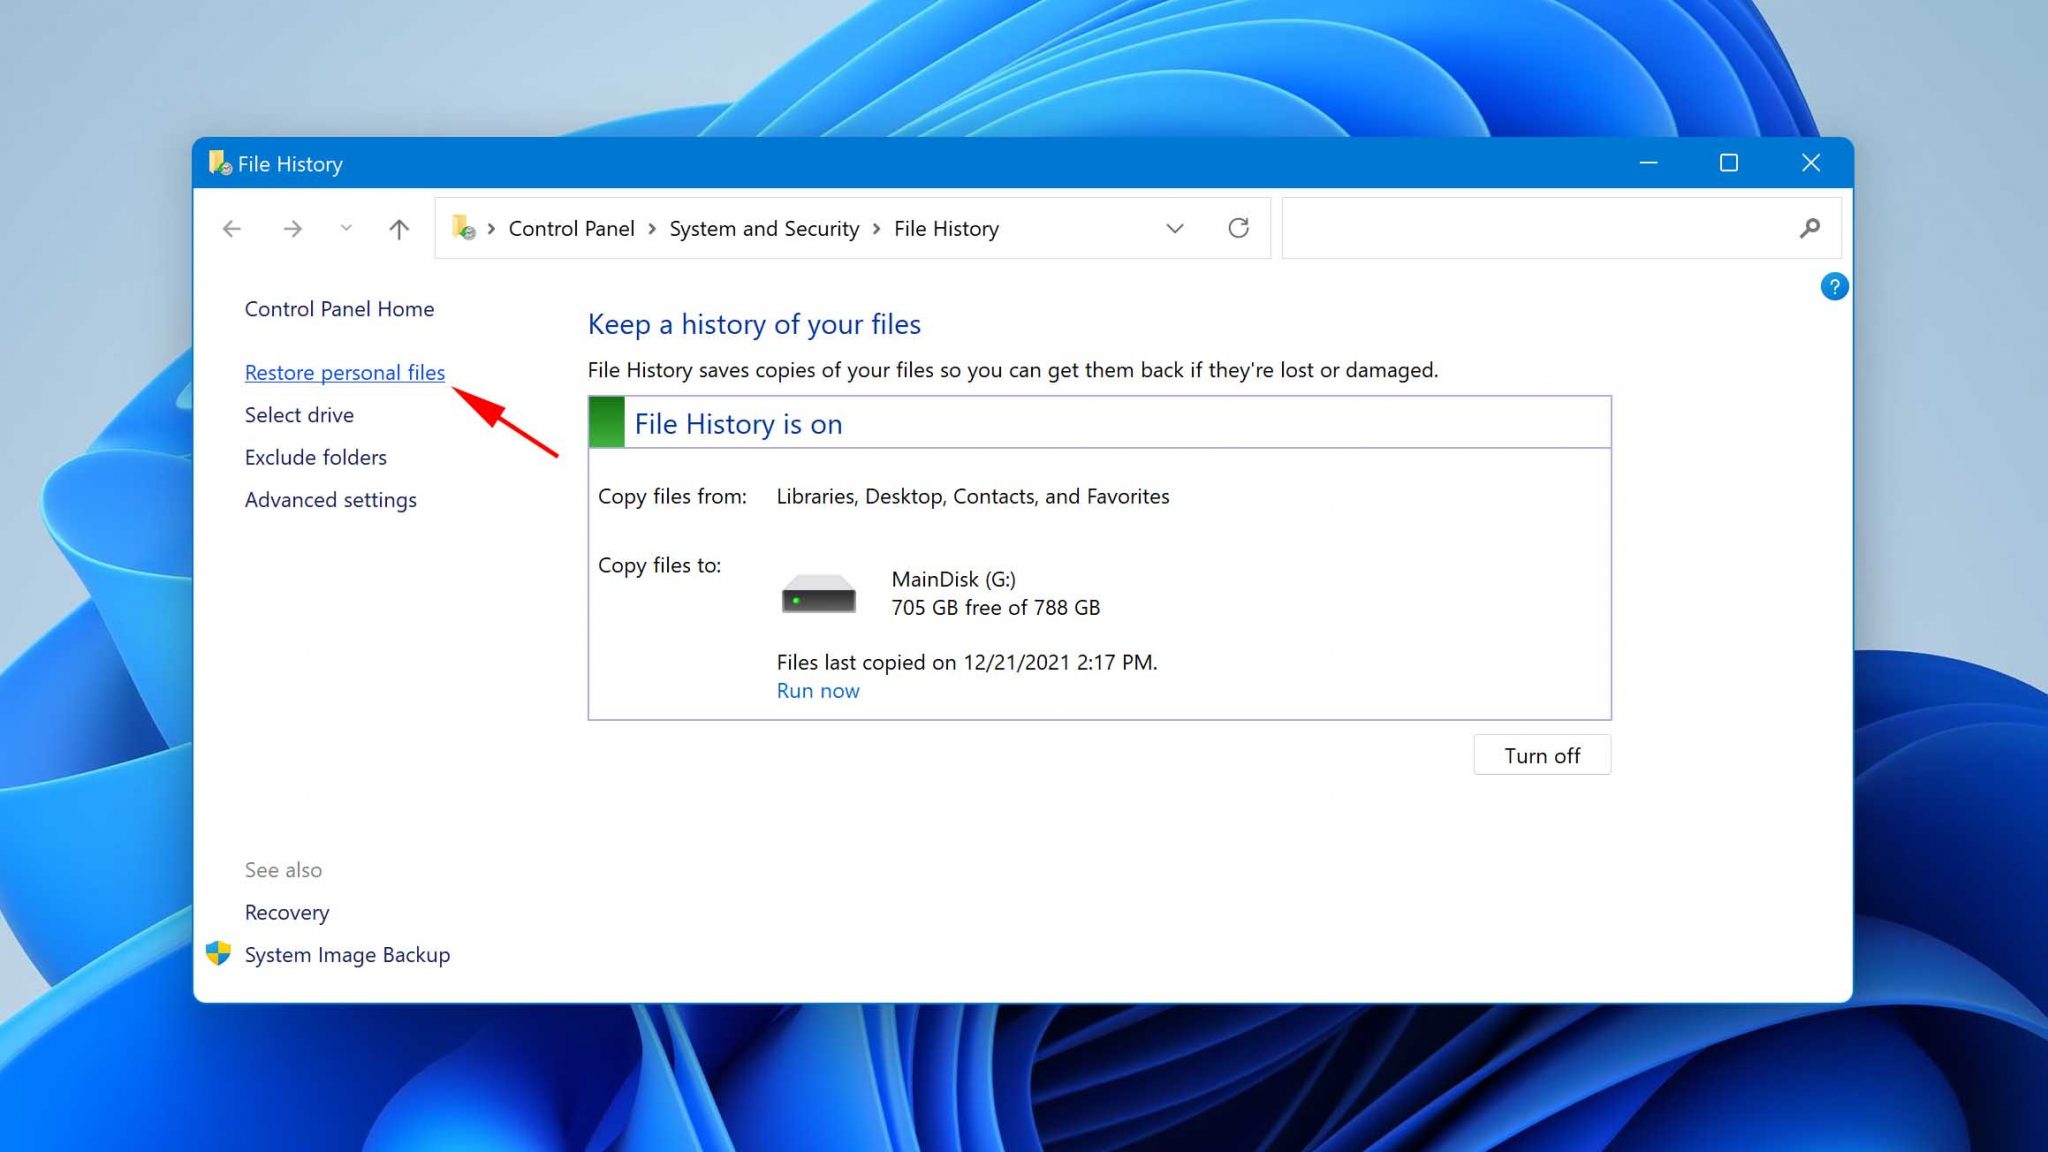
- Go back in time until you find a backup copy that contains the files you want to recover.
- Select your files.
- Click the green recover button.

![]()
If you want to recover files that were present in some other location than those backed up by File History, your best bet is to use a different recovery method.
Method 4: Recover without Third-Party Software using Command Prompt
Included with Windows 11 are several command-line tools that can resolve certain file system issues and, in some cases, help you regain access to files that are seemingly deleted even though that’s not the real issue.
However, keep in mind that these tools only address file system-related problems, so if a file is actually deleted or structurally damaged, then they won’t help.
CHKDSK
The most important command-line tool for repairing corrupted files is CHKDSK. With it, you can repair file system errors that might make previously inaccessible or disappeared files reappear.
You can access CHKDSK either directly from Command Prompt (cmd.exe) or from storage device Properties.
Command Prompt:
- Press Win + X and select the Windows Terminal (Admin) option.

- Type in:
chkdsk volume: /r(make sure to replace “volume” with the letter assigned to your storage device). - Press Enter on your keyboard and wait for CHKDSK to scan and repair your storage device.

Properties:
- Launch File Explorer.
- Select This PC from the list of locations in the left sidebar.
- Right-click the storage device you want to repair and choose Properties.

- Select the Tools tab.
- Click the Check button.

ATTRIB
In addition to CHKDSK, Windows 11 also comes with a tool called ATTRIB. You can use this tool to change various characteristics, or “attributes” of a computer file or directory. For example, you can unhide files that have become hidden by malware. Here’s what you need to do:
- Press Win + X and select the Windows Terminal option.
- Type in:
attrib -h -r -s /s /d volume:\*.*(replace “volume” with the letter assigned to your storage device). - Press Enter on your keyboard.

Method 5: Recover Permanently Deleted Files from an Older Backup
One of the oldest data recovery features present in Windows 11 is the Backup and Restore feature. This feature comes from Windows 7 (and Windows Vista), and it lets you create a complete image of your computer and recover lost data from it.
Assuming you have a backup image to recover from, this is what you need to do:
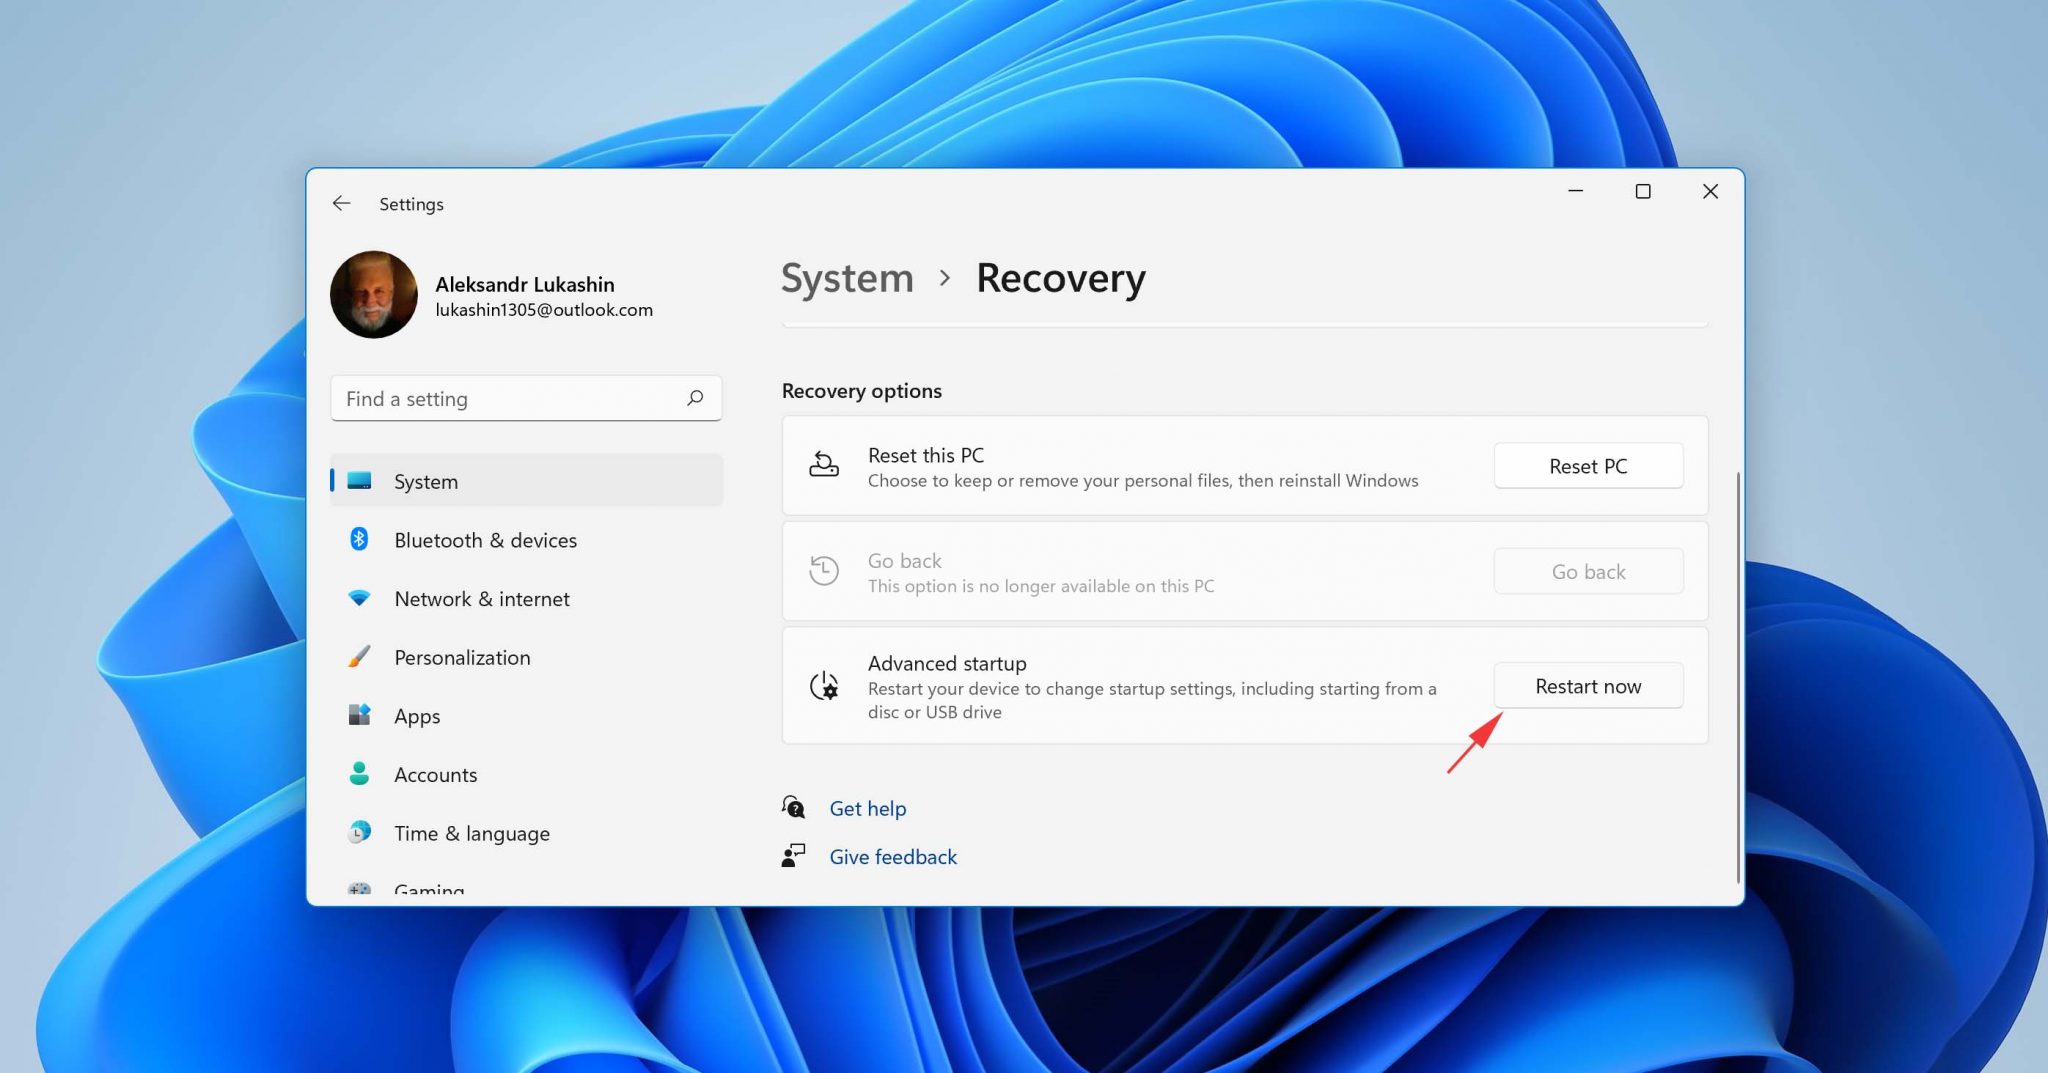
- Launch the Settings app.
- Navigate to System > Recovery.

- Click the Restart now button.
- Go to Troubleshoot > Advanced options > See more recovery options > System Image Recovery.
- Choose your system image backup.

The biggest advantage of the Backup and Restore feature is the fact that the system image created with it contains a full copy of all drives required for Windows to run, so you can use it to address even the most desperate cases of data loss. In Windows 11, you can also recover your Microsoft Store apps and OneDrive folders.
Method 6: Recover Permanently Deleted Files Using Third-Party Data Recovery Software
What if you need to recover permanently deleted files on Windows 11, but don’t have a backup from which you could recover them? In a situation like that, your best option is to use a third-party data recovery software application like Disk Drill.
Disk Drill is fully compatible with Windows 11. You can preview an unlimited number of files to verify recoverability and recover up to 100 MB of deleted files on Windows 11 for free. And honestly, often it can be enough to cover essentials if you are targeting a bunch of documents or a set of photos. The application supports all commonly used (and many not-so-common) file formats and is compatible with standard Windows file systems, including:
- NTFS (the default Windows file system)
- FAT32 (commonly used on external drives)
- exFAT (for larger external storage devices)
- ReFS (Resilient File System, Windows’ newest file system optimized for data integrity and RAID configurations)
Here’s how to find deleted files on Windows 11 using Disk Drill:
- Download and install Disk Drill for Windows.

- Select your storage device and click Search for lost data.

- Wait until your storage device is scanned or click the Review found items button to view scan results in real time.
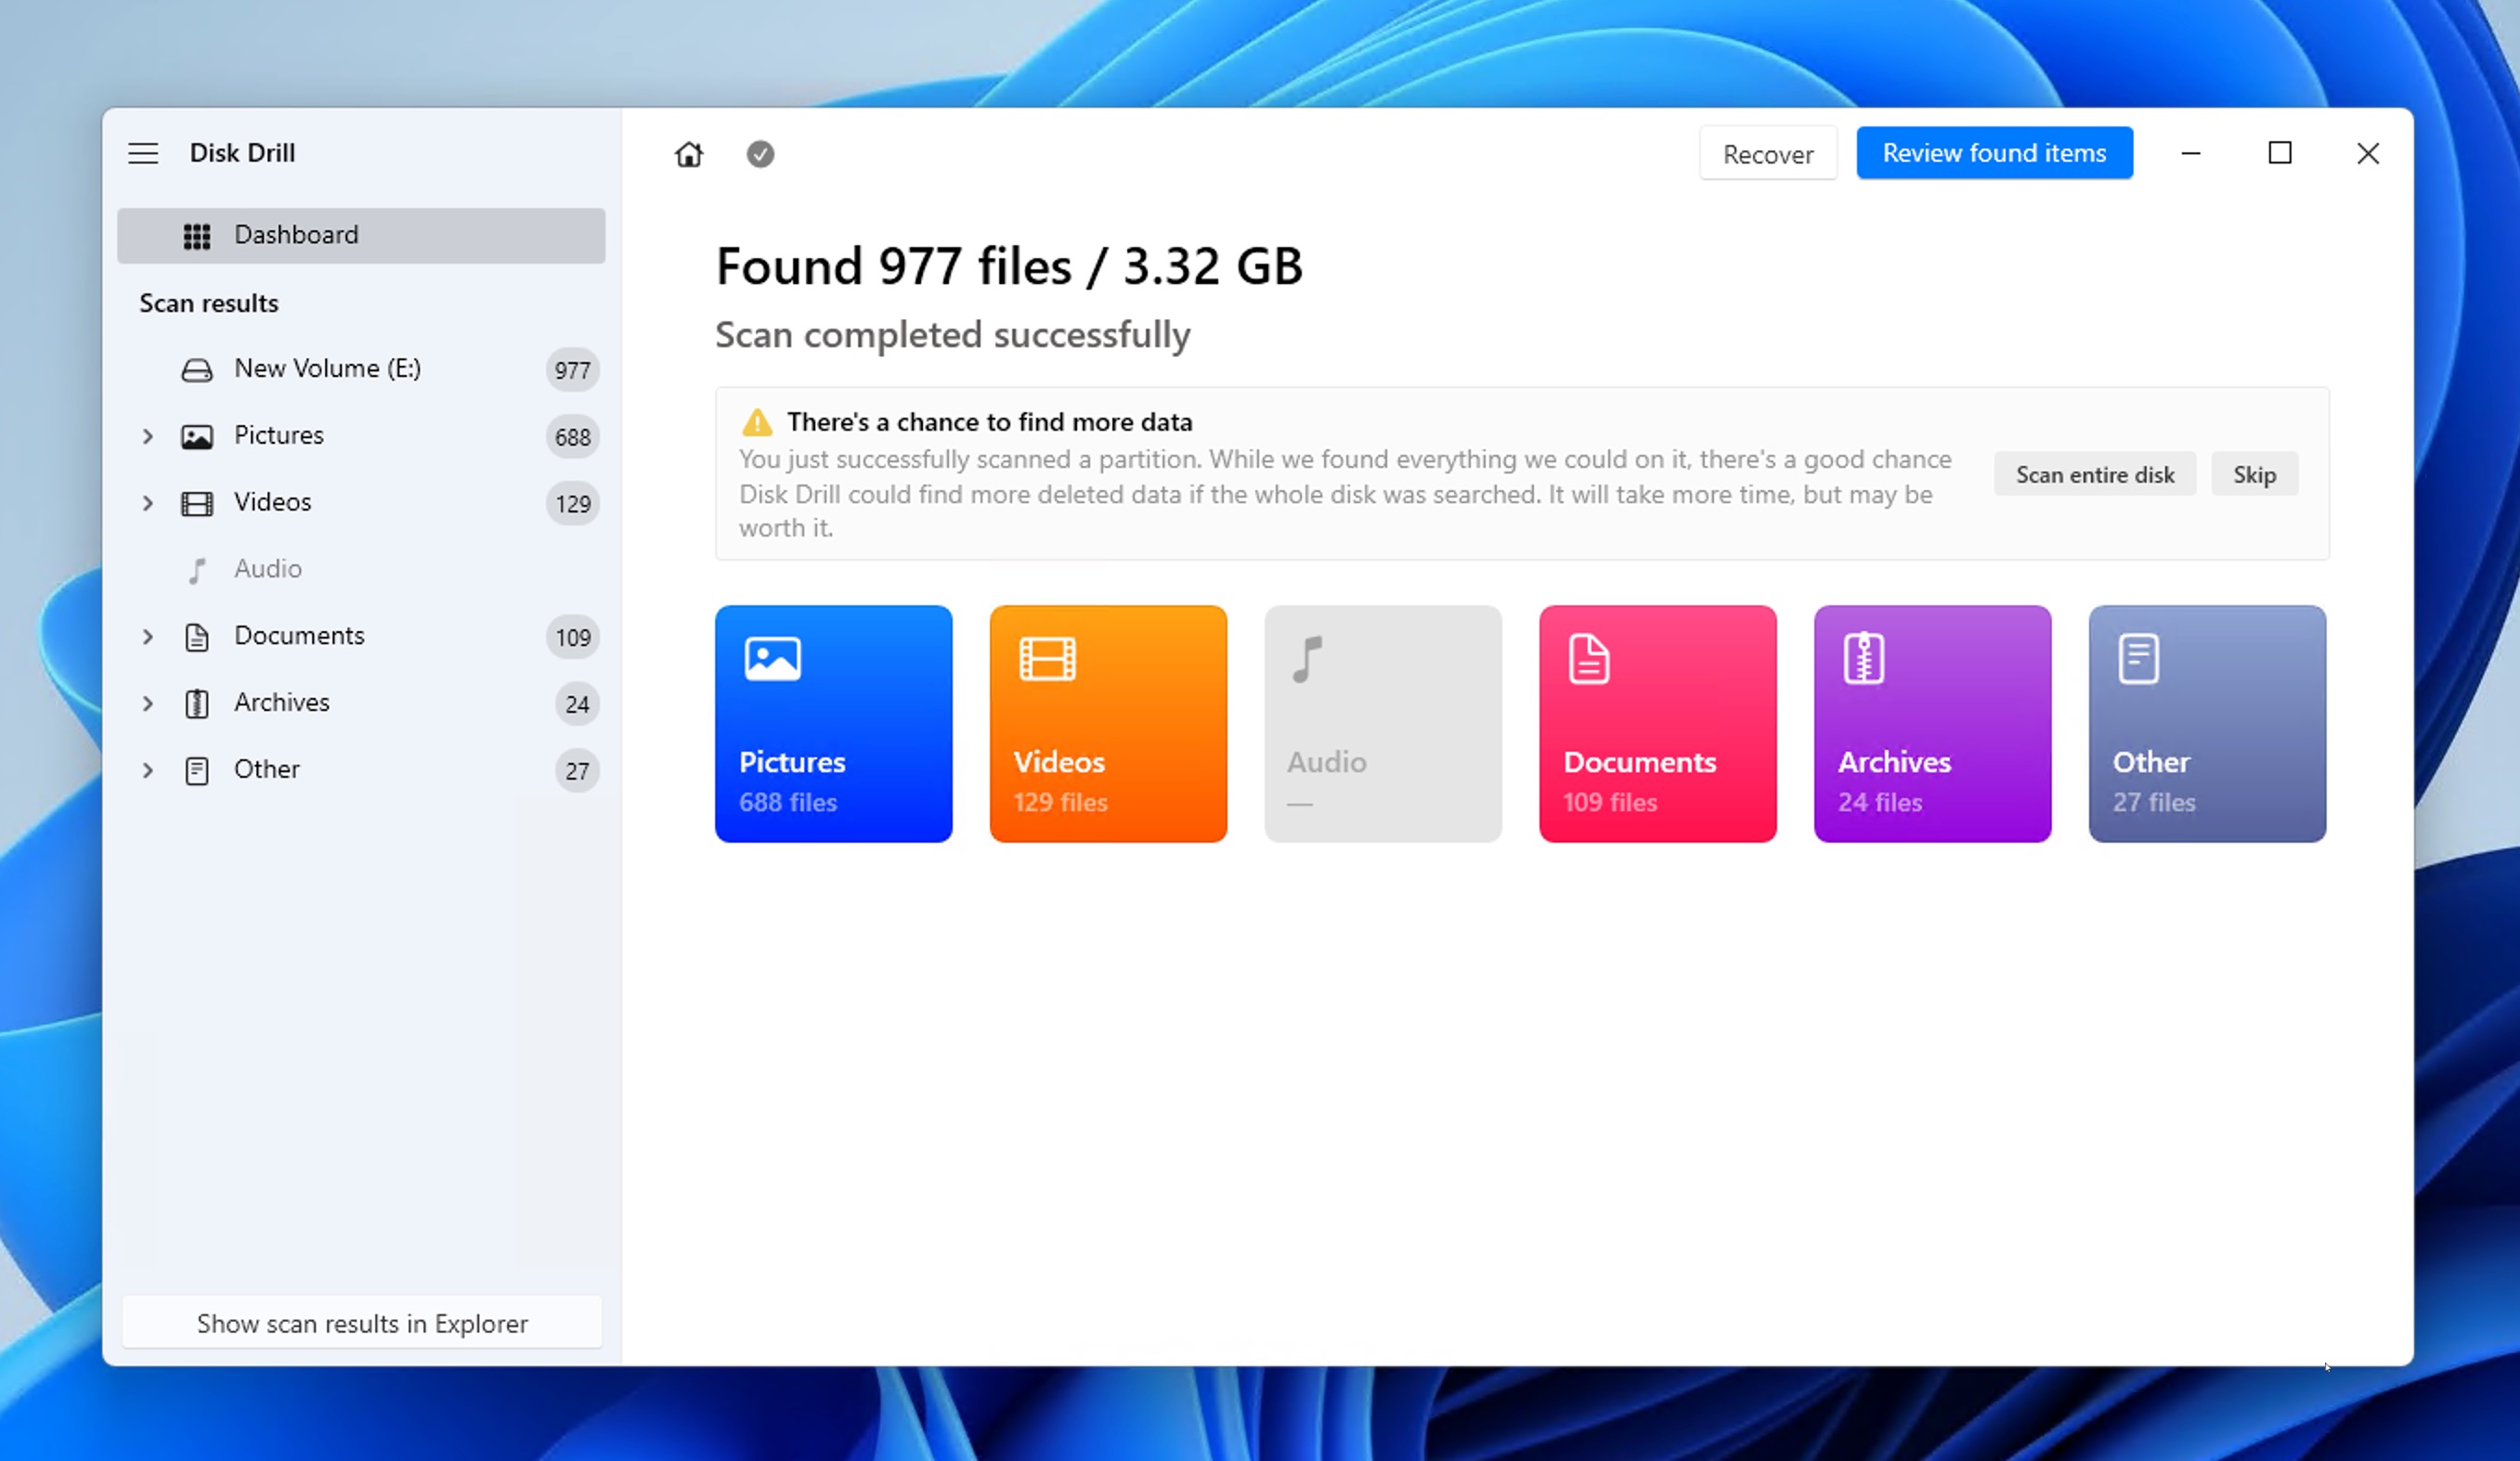
- Preview & select your files. If the number of found files is overwhelming, then you can narrow the list down using file type, file size, and other filters.
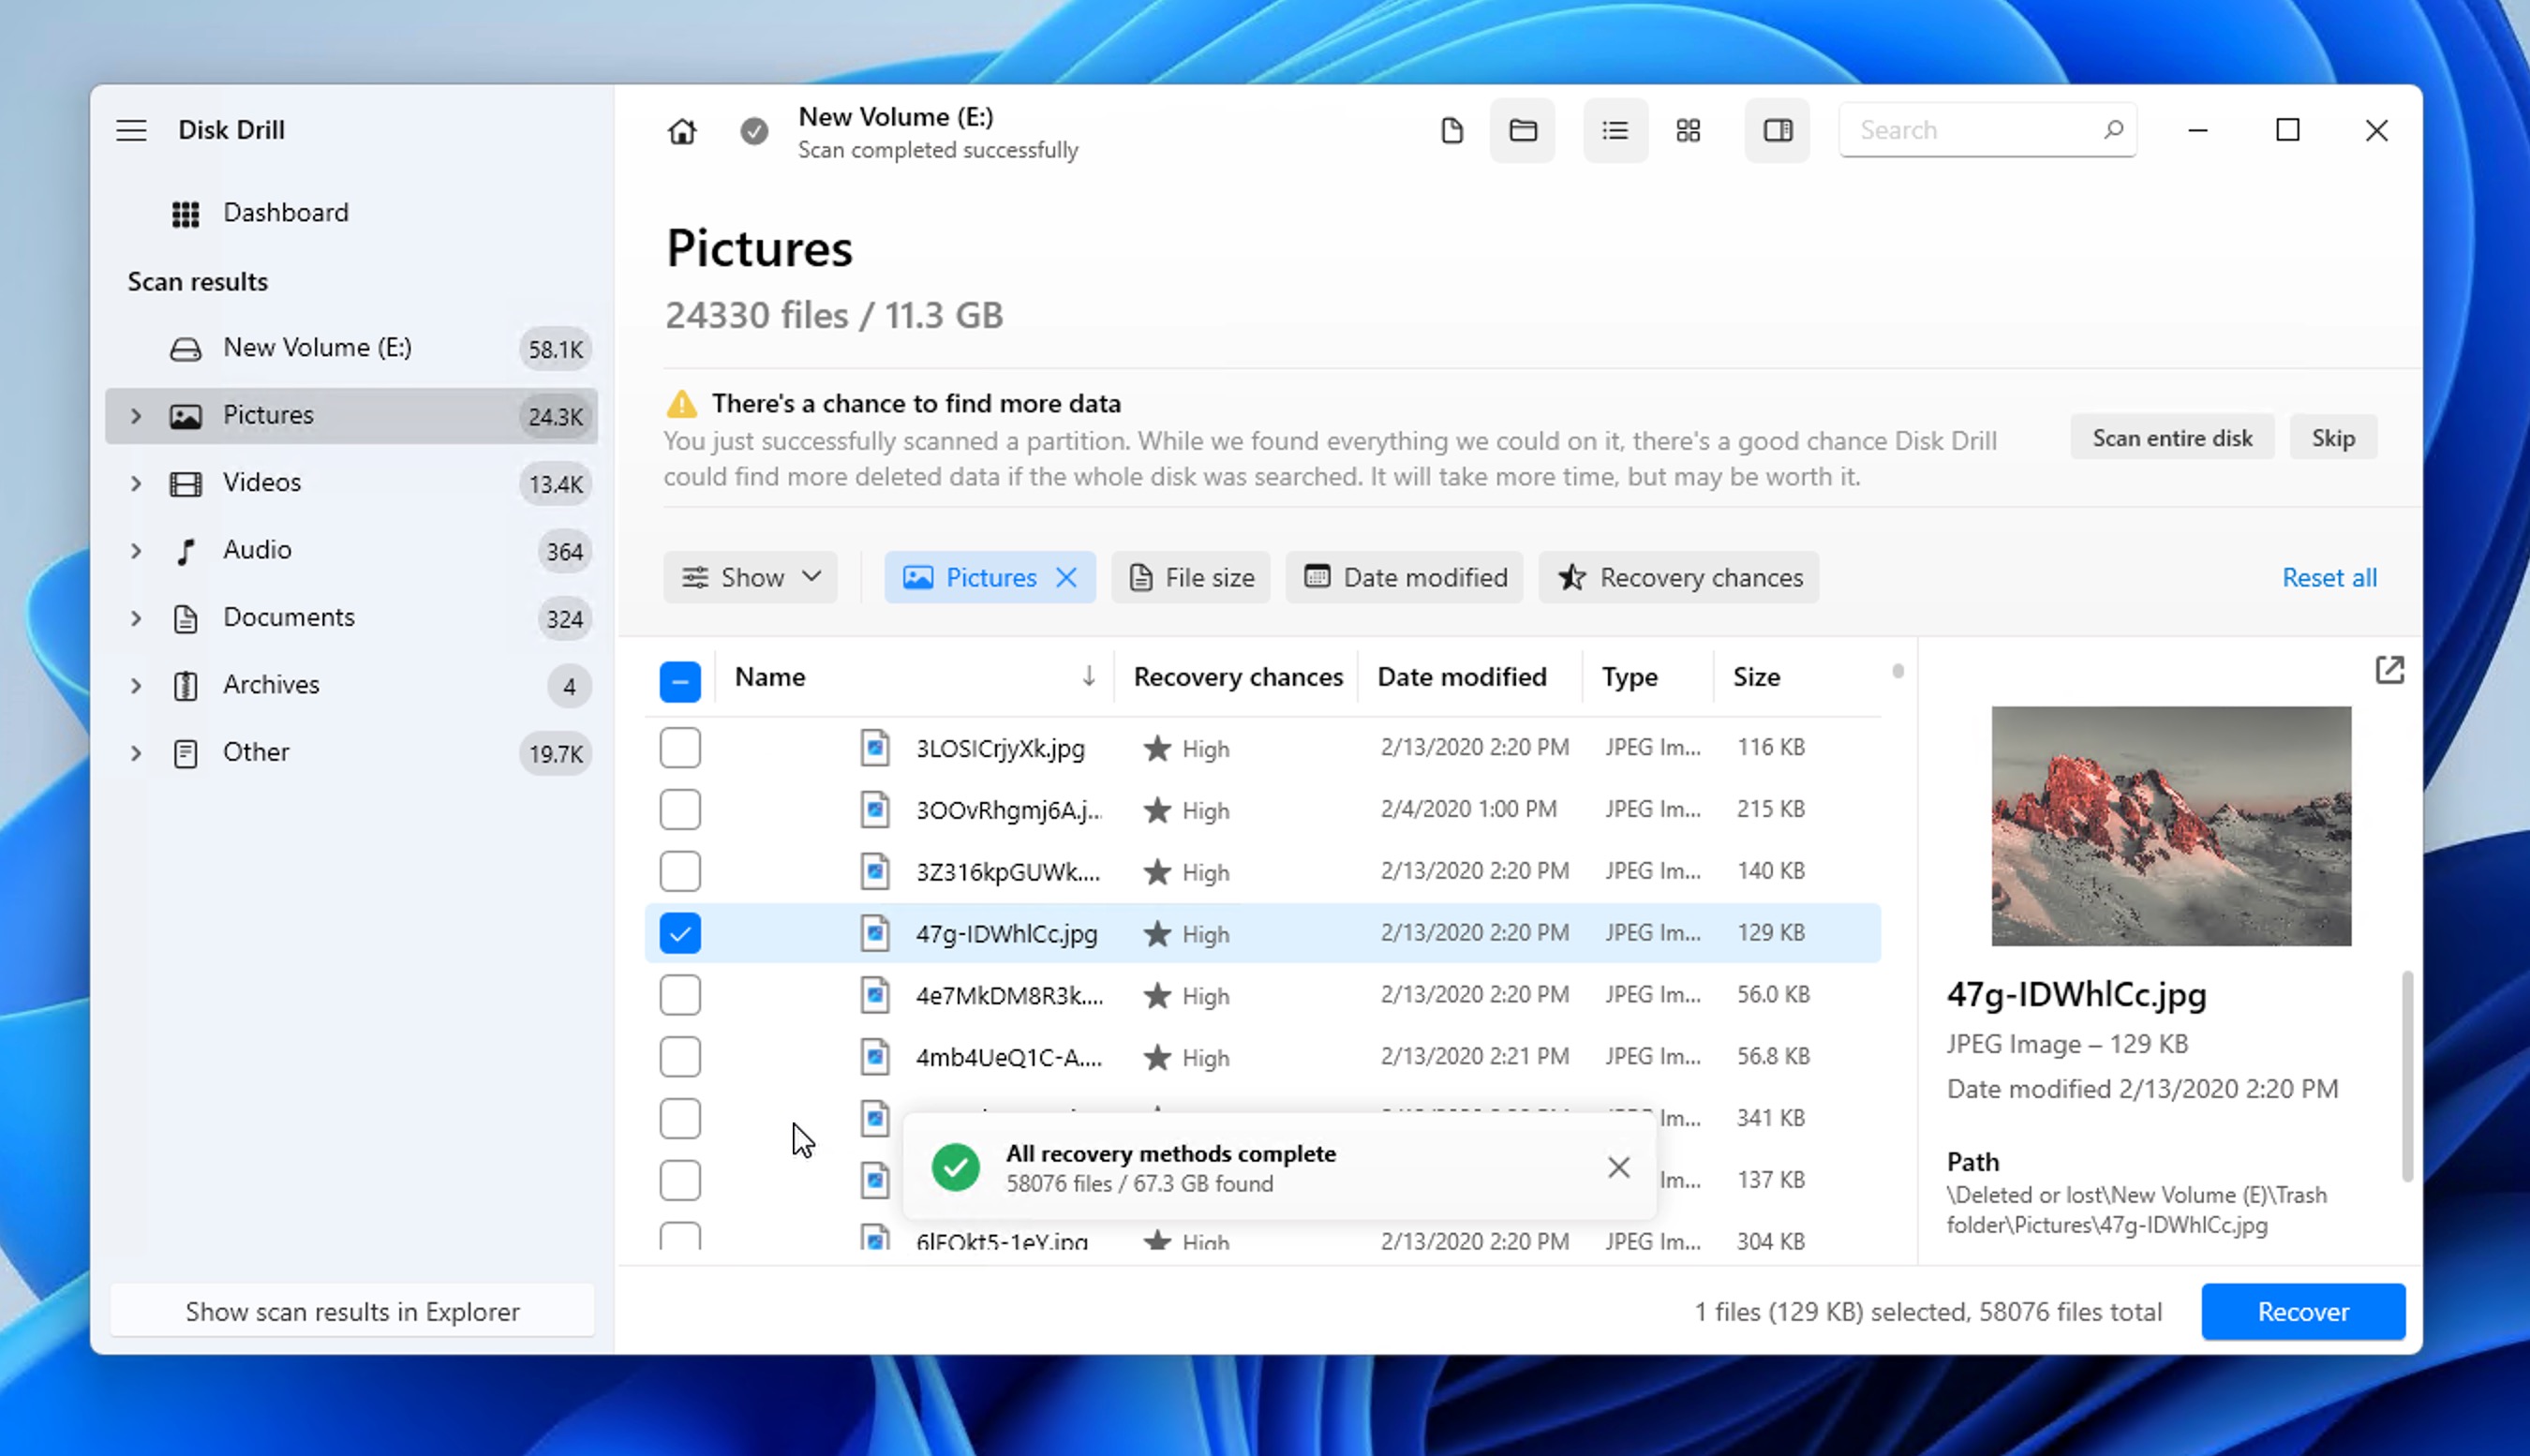
- Click the Recover button and tell Disk Drill where it should recover the selected files.
You can use Disk Drill to recover permanently deleted files such as Shift deleted from most types of storage devices supported by Windows 11, but it works best with traditional spinning drives and flash-based storage devices that don’t take advantage of the TRIM command to improve performance by reclaiming data blocks that are no longer in use.
In other words, Disk Drill and other similar data recovery software solutions struggle to deliver good data recovery results when recovering data from a TRIM-enabled SSD. You can check if TRIM is enabled on your SSD in Windows 11 by entering the following command in Windows Terminal:
fsutil behavior query DisableDeleteNotify
![]()
Method 7: Use Microsoft’s Windows File Recovery Tool
Microsoft developed its own data recovery software application, called Windows File Recovery, and you can download it from the Microsoft Store. Windows File Recovery runs on Windows 11, and it can be used to recover many commonly used file formats from local storage devices. It supports NTFS, ReFS, FAT, and exFAT file systems.
![]()
Unlike Disk Drill and other feature-packed data recovery solutions, Windows File Recovery doesn’t have a graphical user interface. Instead, the tool is controlled from Command Prompt. This is what its syntax looks like:
winfr source-drive: destination-drive: [/mode] [/switches]
You can find a detailed explanation of the syntax and available modes and switches on Microsoft’s website. For the purposes of this article, we’re focusing only on how to recover a deleted folder in Windows 11 using Windows File Recovery:
- Press Win + X and select the Windows Terminal option.
- Type in the following command to recover the Documents folder on drive C to drive E:
winfr C: E: /regular /n \Users\<username>\Documents\
![]()
Of course, you can replace the path to the Documents folder with any path you want, and you can also pick a different source and destination drive. Check out the full Windows File Recovery Tool review here.
Method 8: Retrieve Lost Data from a Cloud Backup Using OneDrive
Integrated into Windows 11 is Microsoft’s cloud backup service, OneDrive. Using OneDrive, you can back up your files to the cloud and retrieve them from any device with a connection to the internet:
- Go to the OneDrive website (or open OneDrive in your browser).
- Log in with your Microsoft email address and password.
- Select the files you want to retrieve and click the Download button.

If you haven’t done so already, we recommend you take advantage of the OneDrive application that’s included with Windows 11 so that you can access your cloud files directly from File History and enjoy automatic data backups:
- Click the OneDrive icon in the system tray.
- Click Sign in.
- Log in with your Microsoft email address and password.

- Select the location of the OneDrive folder.
- Complete the initial setup process.
Remember that OneDrive can back up your files only if you have a working connection to the internet. If you’re often on a laptop with no internet access, you might be better off relying primarily on a local backup solution. What’s more, OneDrive’s free tier is limited to 5 GB, so be sure to upgrade if you need more storage space.
How to Protect Your Files on Windows 11
As a Windows 11 user, you should take certain steps to protect your files against data loss:
- 🤔 Think before you click: Human error is a leading cause of data loss, so the easiest and most effective step you can take to avoid losing important files is to be more careful, especially when deleting files, downloading stuff from the internet, and reading email messages containing suspicious attachments and links.
- 💽 Store local backups on a dedicated backup drive: Keeping backup copies of important files on the same storage device where the original files are located is a big no-no. Instead, you should have a dedicated backup drive, such as an external hard drive. You can then configure a backup tool like File History to automatically back up files to this drive at a regular interval. Additionally, you should consider using the ReFS file system for your backup drive, as it’s even more reliable than NTFS.
- ☁️ Enable OneDrive cloud backups: As described in the previous section of this article, Windows 11 makes it easy to backup files to the cloud using OneDrive, Microsoft’s file hosting service and synchronization service. Free users get 5 GB of free personal cloud storage, and you can choose from multiple subscription plans to get a lot more. OneDrive users can further protect their data by enabling the Personal Vault feature, which includes file encryption, malware scanning, and monitoring.
- 🛡️ Keep antivirus software enabled and updated: Windows 11 comes with capable antivirus software, Microsoft Defender, whose purpose is to protect users against viruses and other malware. Microsoft Defender is enabled by default, and it consumes minimal system resources, so you should resist the temptation to turn it off. Additionally, Microsoft Defender SmartScreen helps filter out untrusted apps and suspicious websites before they cause problems.
- 🧰 Equip yourself with reliable data recovery software: To successfully recover permanently deleted files, it’s paramount that you act quickly and don’t waste precious time. That’s why it’s a good idea to have reliable data recovery software like Disk Drill installed on your computer so that you can use it without any delay.
- 🔐 Consider disabling BitLocker: Recently, Windows 11 began enabling BitLocker encryption by default on some devices, which can complicate the file recovery process if you ever need to recover files deleted from the encrypted drive. If you’re not worried about theft of the physical device, you may want to disable BitLocker encryption to maximize your recovery options.
These simple best practices can go a long way in keeping the looming danger of data loss at bay, making it well worth the time necessary to implement them.


Conclusion
Windows 11, with its sharp focus on security and revamped user interface, marks an important step forward for Microsoft and its customers. But despite all the improvements, data loss will continue to be a major issue for all Windows 11 users because many of its causes, such as human error and hardware failure, are impossible for Microsoft to address. Fortunately, there are effective methods you can take advantage of to restore lost data.
FAQ
You can recover permanently deleted files in Windows 11 from an existing backup or using data recovery software, which is available from Microsoft as well as a number of third-party software developers.
Yes. Microsoft offers a free tool called Windows File Recovery (command-line). If you’d rather use a graphical app, there are third-party options. For example, Disk Drill, despite having a 100mb limit for free recovery, provides you with higher odds on tricky cases (older deletions, RAW/corrupted volumes, unknown partitions) and a simpler flow.
Windows 11 comes with multiple native data recovery capabilities, including the Recycle Bin folder, the Undo feature, and File History.
If you delete files on your Windows 11 computer, they will go directly to the Recycle Bin folder. However, if you use the Shift + Delete shortcut to delete them, you won’t be able to find them there. When you empty the Recycle Bin or use the shortcut to delete files, Windows removes all pointers to them and makes the files invisible for you.
It depends on how much time has passed after deleting the files. When you delete a file on a Windows 11 computer, the file becomes invisible to you but remains present on the hard drive. So if the operating system still hasn’t overwritten the deleted files with new data, it may be possible to recover them.
Even if you haven’t been backing up your files on a Windows 11 computer, you still have some options when it comes to recovering deleted files. Here’s what you should try:
- Check the Recycle Bin folder
- Use the Undo Delete tool
- Use the File History feature
- Use Command Prompt
- Use third-party data recovery software