Most laptops and PCs today have an SSD (solid-state drive) component. They are faster than traditional HDDs, offer more efficient power consumption, and are high in performance. But as they continue to become popular, more users experience data loss from their SSDs for various reasons. If you’ve lost data from a failed or crashed SSD, rest assured that there are ways to recover it.
However, since SSDs are constructed differently from regular hard drives, data recovery from an SSD can seem a little complicated. This article will explore the most effective ways to recover data from a failed, broken, or dead SSD.
Common Reasons Why SSDs Fail
Unlike traditional hard drives, SSDs don’t use moving parts to read data. So, they don’t usually face mechanical problems. However, no technology is perfect. Even SSDs can fail or malfunction after consistent usage, and the type of failure you experience can impact your chances of damaged SSD data recovery.
Here are some of the most common reasons for SSD failure:
- ♨️ Overheating – One of the major reasons for SSD failure is overheating. SSDs can often run extremely hot under heavy load. Inadequate cooling can exacerbate this, leading to the drive overheating. Some modern, high-performance M.2 SSDs actually require heatsinks, which are metal radiators that dissipate the heat generated by your SSD. If the thermal pad that sits between the heatsink and SSD is missing or applied incorrectly, it can cause major issues. One user on r/sffpc experienced this when they used their high-end SSD without a heatsink.
- 🔨 Physical Damage – Another reason for an SSD to fail is physical damage. While SSDs don’t sustain mechanical damage, this doesn’t mean that their components can’t have physical faults. Manufacturing faults can often cause an SSD to become vulnerable to electronic failures. Moreover, external factors such as heavy blows, water submersion, or dropping it can severely damage an SSD and lead to data loss. One user on r/japanlife dropped their SSD, resulting in the loss of all data on the drive.
- ❌ Improper Device Usage – Perhaps the most common reason for a crashed or failed SSD is its misuse. You can wear out your SSDs if you remove it during read and write operations, use it with an unstable power supply, or shut down your computer incorrectly. This Reddit user on r/techsupport noticed their SSD displaying unusual behavior each time a hard shutdown was performed.
- 🆘 Firmware Failure – The firmware of your SSD is the heart of its operations. Sometimes, while trying to upgrade your firmware, the SSD might stop working for one reason or another, interrupting the update. As a result, the new firmware won’t be installed, and your existing firmware might become corrupted. On rare occasions, it can become corrupt unprompted, as seen with this user on r/datarecovery who had it happen overnight.
- 🔧 Hardware Issues – SSDs have their own hardware issues like any other storage device, particularly with short circuits. Typically, a high voltage short is identifiable by a flash of light, with smoke following not long after in some cases. One person sought r/PcBuildHelp for advice on several of their SSDs shorting moments after turning their system on.
- 🗃️ File System Corruption – Your file system keeps record of where all of your data is stored on the SSD. This file system can become corrupted if your system SSD crashes or your external SSD is removed before finishing its operations. A corrupt file system is identifiable by the presence of a RAW partition, which happened to this user over onr/datarecovery.
- 🟥 Bad Blocks – Bad blocks refer to physical parts of your SSD that are no longer capable of storing data. Some bad blocks appear over time naturally, but a sudden influx of bad sectors points towards impending failure. You can scan your SSD for bad blocks, as this user did before posting to r/pcmasterrace.
Is it Possible to Recover Data from a Failed SSD?
Yes, it is possible to recover data from a failed, dead, or broken SSD. While you have the option to perform SSD failure recovery, you must note that it can be a complicated process.
So, why is TRIM so important? The TRIM command allows the operating system to inform the SSD that specific areas contain data that is no longer in use and can thus be erased internally. This information is important to speed up the write operations and enhance the SSD’s performance. But as a result, the TRIM command – if enabled, significantly reduces the probability of data recovery. Therefore, when possible, you need to disable TRIM before you recover data from the dying SSD.
This is how you disable TRIM:
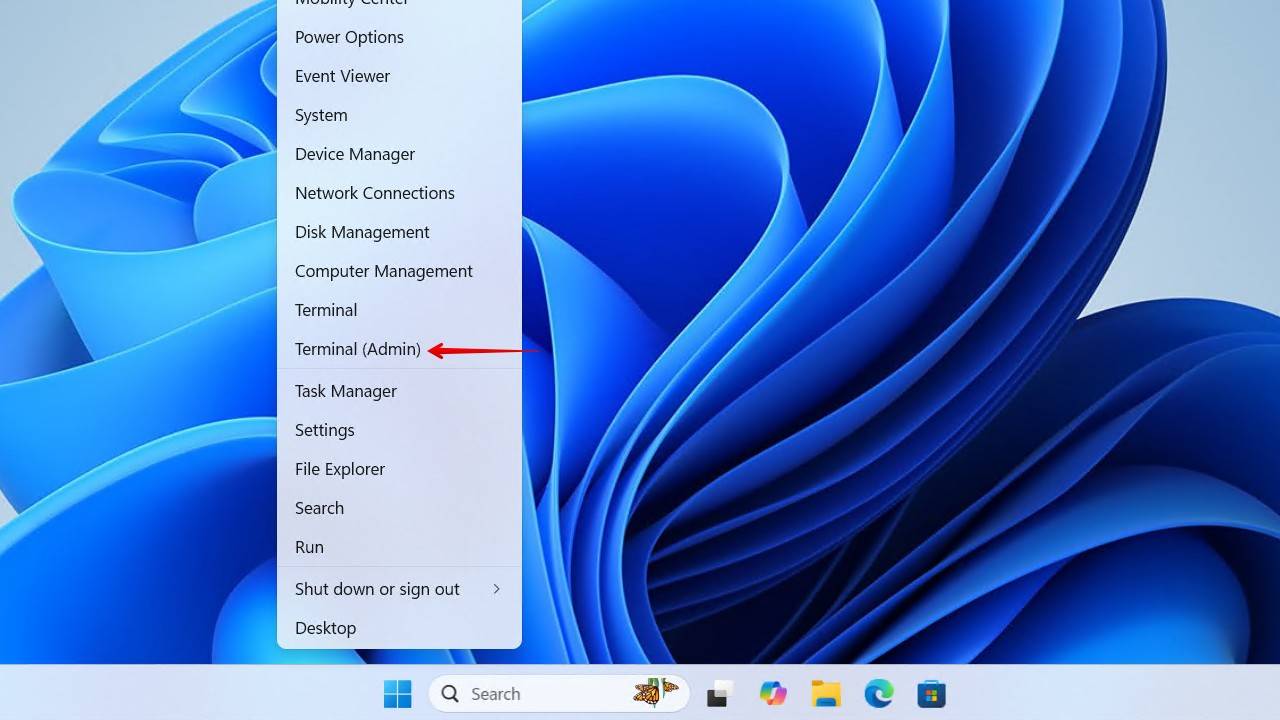
- Right-click Start and click Terminal (Admin).
- Key in the following command and hit Enter.
Fsutil behavior set disabledeletenotify 1
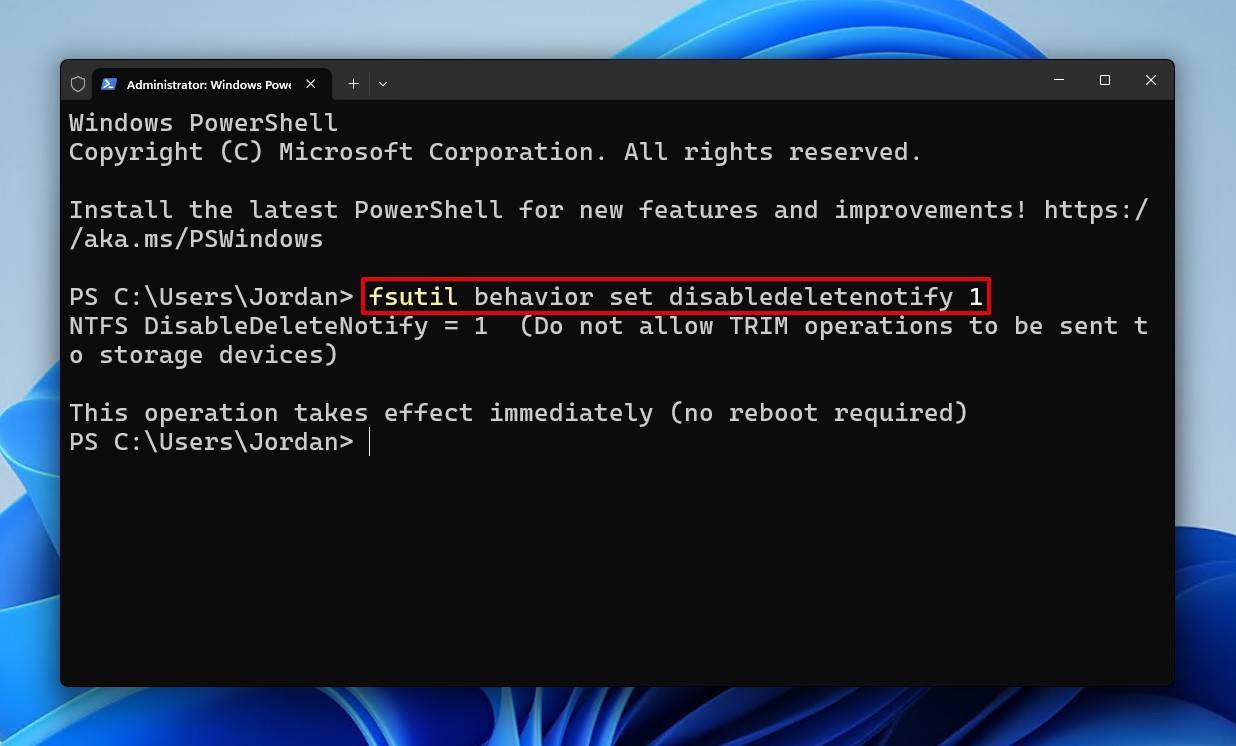
This will prevent TRIM commands from being sent to your SSD.
Moreover, you can increase the chances of successfully recovering data from failed SSD by following these best practices:
- 🔌 Disconnect SSD: As soon as you notice that you’ve suffered data loss on your SSD, disconnect it from the computer. For internal drives, like if you need to recover data from a dead NVMe SSD, take it out of your system and keep it aside for now.
- 📀 Write data to a different drive: If you wish to retrieve data via a data recovery tool, it’s essential that you copy it to another drive on your computer and not the same SSD to prevent data from being overwritten.
- ✅ Use a suitable SSD recovery method: SSD recovery can be complicated and a time-sensitive process. Thus, always try the most suitable data recovery method first to increase the chances of successful data recovery. If nothing seems to be working, contact a data recovery service.
How to Recover Data from Dead, Failed, or Crashed SSD
It can seem tricky to recover data from an SSD not detected or crashed. However, even if the process is more complex than data recovery from a usual hard drive, it isn’t impossible.
Perhaps the best way to recover data from a failed SSD, in terms of convenience, is to use reliable data recovery software. However, there are some important conditions that must be met.
Use Data Recovery Software
Disk Drill is an efficient, industry-leading data recovery software that can help you perform SSD failure recovery. It supports both macOS and Windows operating systems and offers a sophisticated user interface that is also beginner-friendly.
Several scanning methods are utilized to give you the best chance of finding data. It works with internal and external SSDs of any kind, so long as the drive is visible in Disk Management and reading the correct capacity (even if RAW or formatted). Disk Drill interfaces directly with the drive, bypassing any corruption and error messages that may otherwise prevent access. Its additional, free-to-use features like S.M.A.R.T. Disk Monitoring and byte-to-byte level backups are useful for identifying early warning signs and protecting your data going forward. Overall, it’s a trustworthy recovery tool that can assist you in various data-loss scenarios.
Here’s a brief but detailed guide on how to recover data from broken or failed SSDs via Disk Drill:
- Download and install Disk Drill to a separate drive. Use 100 MB of free data recovery to make sure that the files on your SSD are still recoverable!
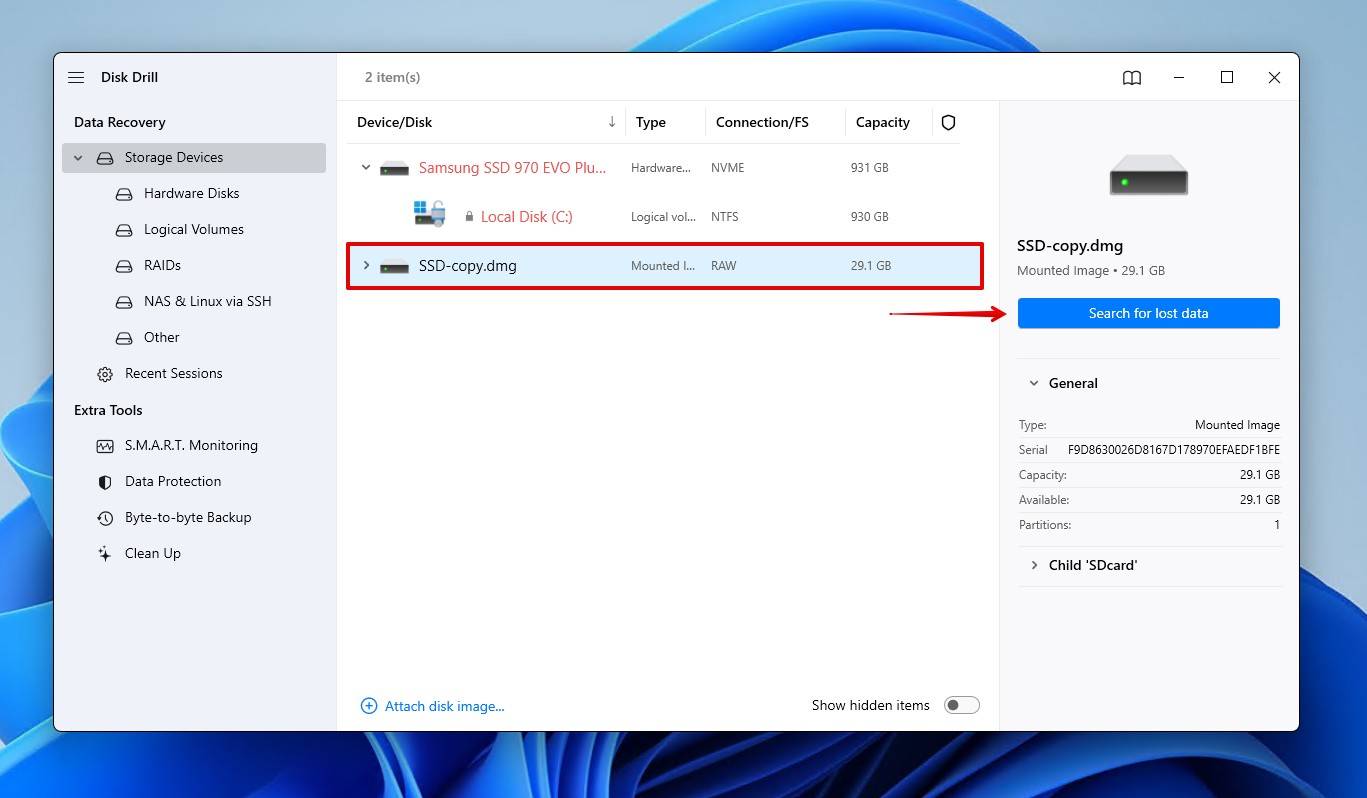
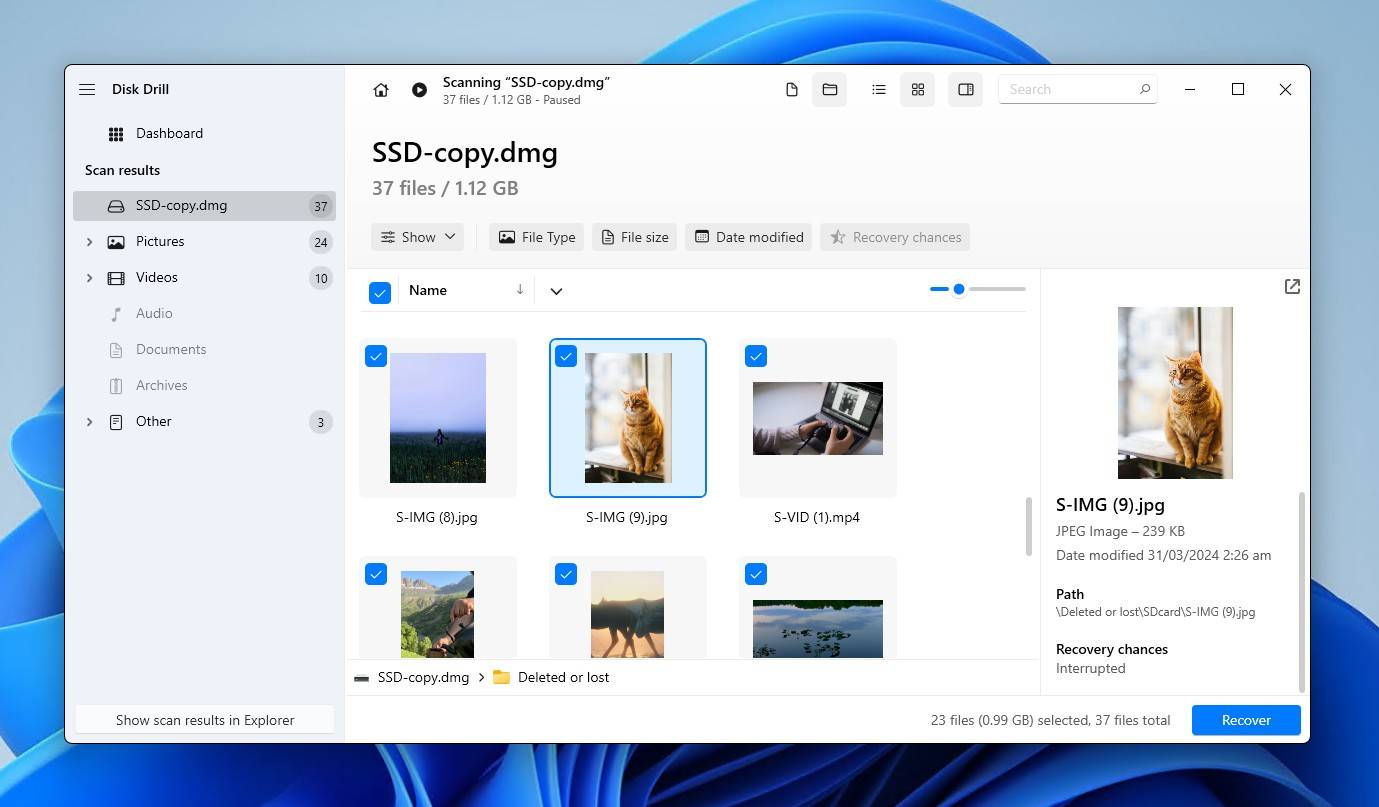
- Once you launch the program, select your SSD from the list of devices. Click Search for lost data to begin the recovery process. Disk Drill will utilize all available scanning algorithms to search the SSD.
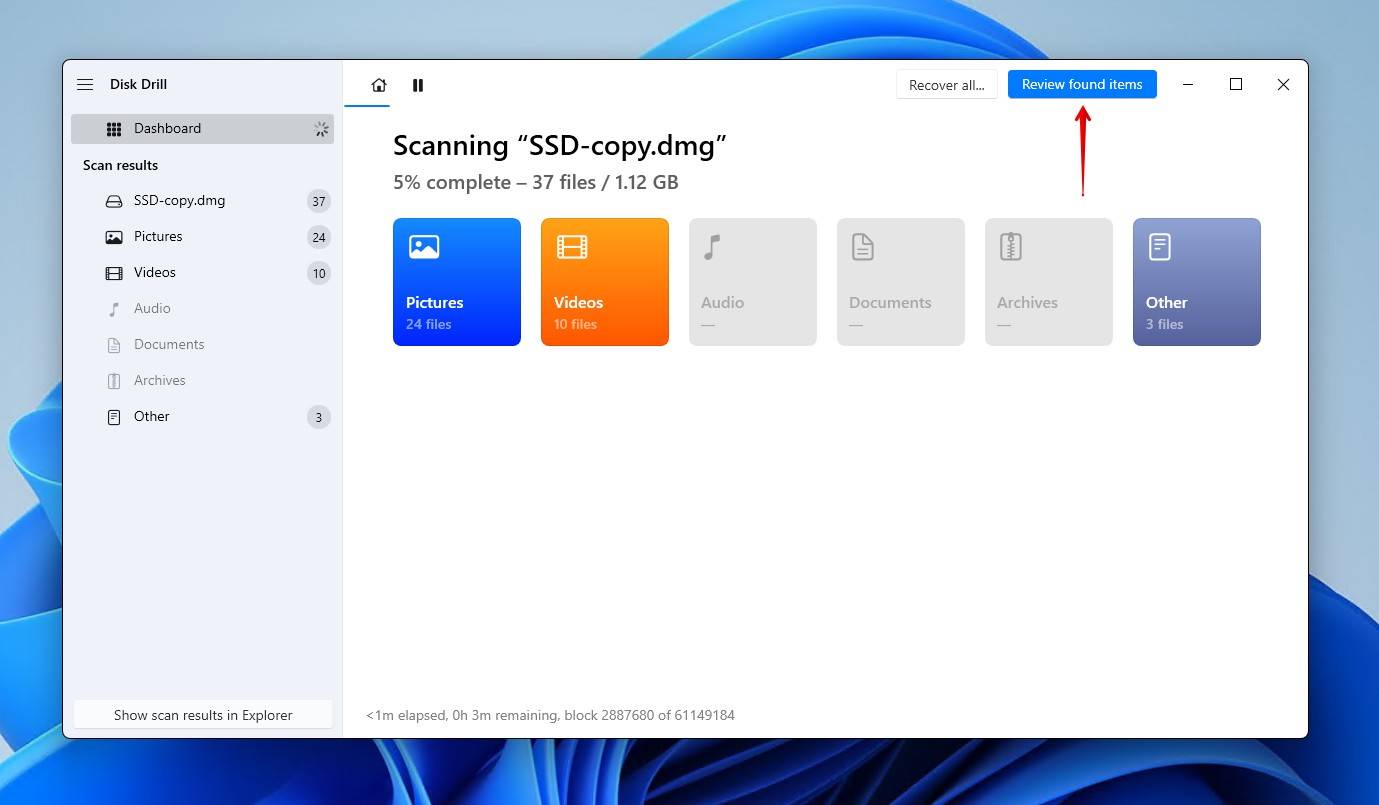
- Click Review found files at any point during the scan to see what has been found. If you’re only interested in certain file formats, click one of the colored icons. Or, click Recover all to restore everything at once.
- Preview and select the files you want to recover. To help manage a mountainous list of recovery results, you can apply filters to sift through the results. When you’re ready, click Recover.
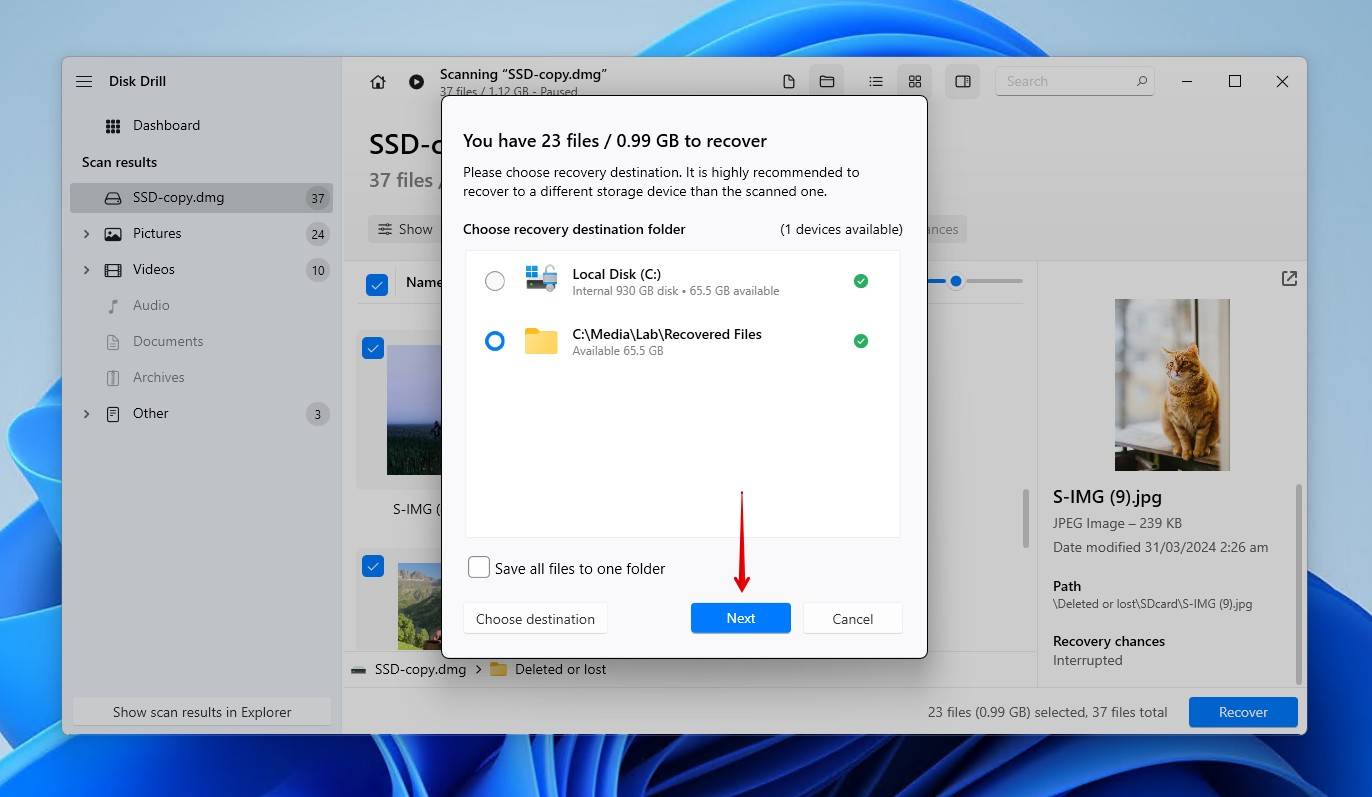
- Choose a recovery location. It’s essential to choose a location on a separate physical drive, as it prevents the data from being corrupted during recovery.

Consult Data Recovery Centers
No matter how much you search online, you won’t find a DIY solution on how to recover data from an SSD that won’t boot at all. Likewise, if it does appear in Disk Management but with the wrong capacity, this indicates corruption so bad that software tools won’t help. For instance, data recovery software knows how to recover data from an SSD that came from a dead laptop, but not if the SSD itself has become dead. Instead, your only option is to consult a professional data recovery service that can inspect the failed, dead, or crashed SSD for you.
While data recovery services can seem expensive, they have the best resources and a skilled team to assist you with data loss. Approaching a reliable data recovery service can significantly increase the chances of data recovery.
When it involves a failed, dead or crashed SSD, the Clever Files Data Recovery Center stands out for a few important reasons:
- It offers a wide range of SSD recovery services and supports all types of SSDs, including SATA and NVMe. The lab is only one in the U.S. that develops in-house proprietary hardware and software that specifically deals with the recovery of data from failed or damaged SSDs.
- You can choose the turnaround time. If you’re in no rush, your data will be back with you within 3 to 7 days. Or, if it’s an emergency, an expert is always on standby to offer the fastest resolution time possible.
- The company has a “no data, no charge” policy, meaning you won’t have to pay anything unless something of value can be recovered from the SSD.
How to Repair a Dead, Failed, or Crashed SSD
After you’ve successfully recovered data from a dead, failed, or crashed SSD, you can attempt to repair it. There are several methods to help you with the process, depending on what has caused your SSD to stop responding. Let’s take a look at these methods.
Way 1. Update SSD Firmware
It’s possible that the SSD’s firmware has become corrupted. This could lead to problems that block access to the drive and affect its read/write abilities. If your SSD is displaying erratic or abnormal behavior that can’t otherwise be explained, check your SSD manufacturer’s website for updated firmware.
You can get the latest version of firmware from your SSD manufacturer’s website. Put your SSD’s make and model into Google and you are likely to find the latest firmware for your specific drive.
Way 2. Update SSD Drivers
Like firmware, faulty or outdated SSD drivers could also cause the SSD to fail or become corrupt. Follow these steps to update your SSD drivers:
- Right-click Start, then select Device Manager.
- Now, expand the Disk drives section.
- Right-click your SSD device and choose the Update driver option.
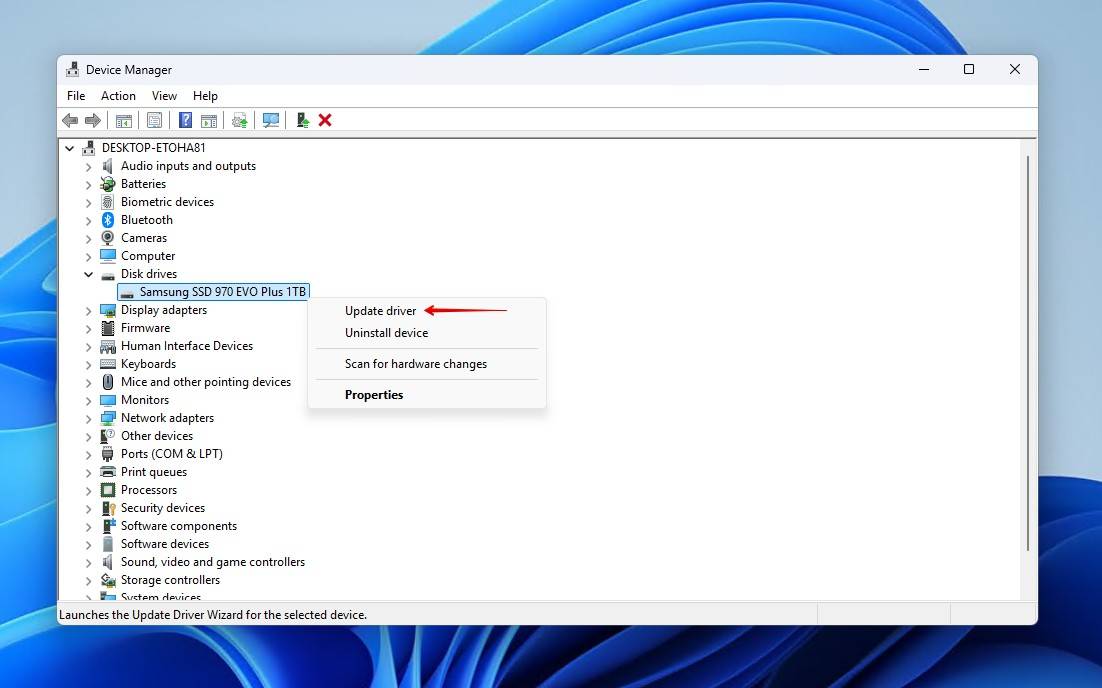
- Finally, reboot your PC to complete the process.
Way 3. Use the Power Cycle Way
If your SSD becomes corrupt or fails due to power failure, the power cycling could help revive it. This is especially useful for fixing an SSD that’s not responding because it essentially acts as a reset for its internal components.
Here’s how to repair an SSD that’s not detected initially:
- First, unplug the SSD’s data cable, but not the power cable.
- Leave the power on for a minimum of half an hour. After this time is up, turn the power down for about 30 seconds.
- Now, turn the power back on for another half hour.
- Then, turn it off for another 30 seconds. Once you turn on the power again, reconnect the data cable.
Way 4. Run CHKDSK
CHKDSK is a file system repair tool. Normally, it wouldn’t have any place in a list of solutions for failed, dead, or crashed SSDs. However, there is one specific scenario you might find yourself in. If your SSD previously used the NTFS file system but has since become RAW and unreadable, CHKDSK has a chance of finding the issue and repairing it. Granted, this issue is quite minor and uncommon, but it’s useful if the first boot sector of the drive is damaged.
Follow these steps to run CHKDSK on the drive:
- Right-click Start and click Terminal (Admin).
- Now, type the following command into the CMD window, replacing C: with your own drive letter, and hit Enter.
chkdsk /f C:
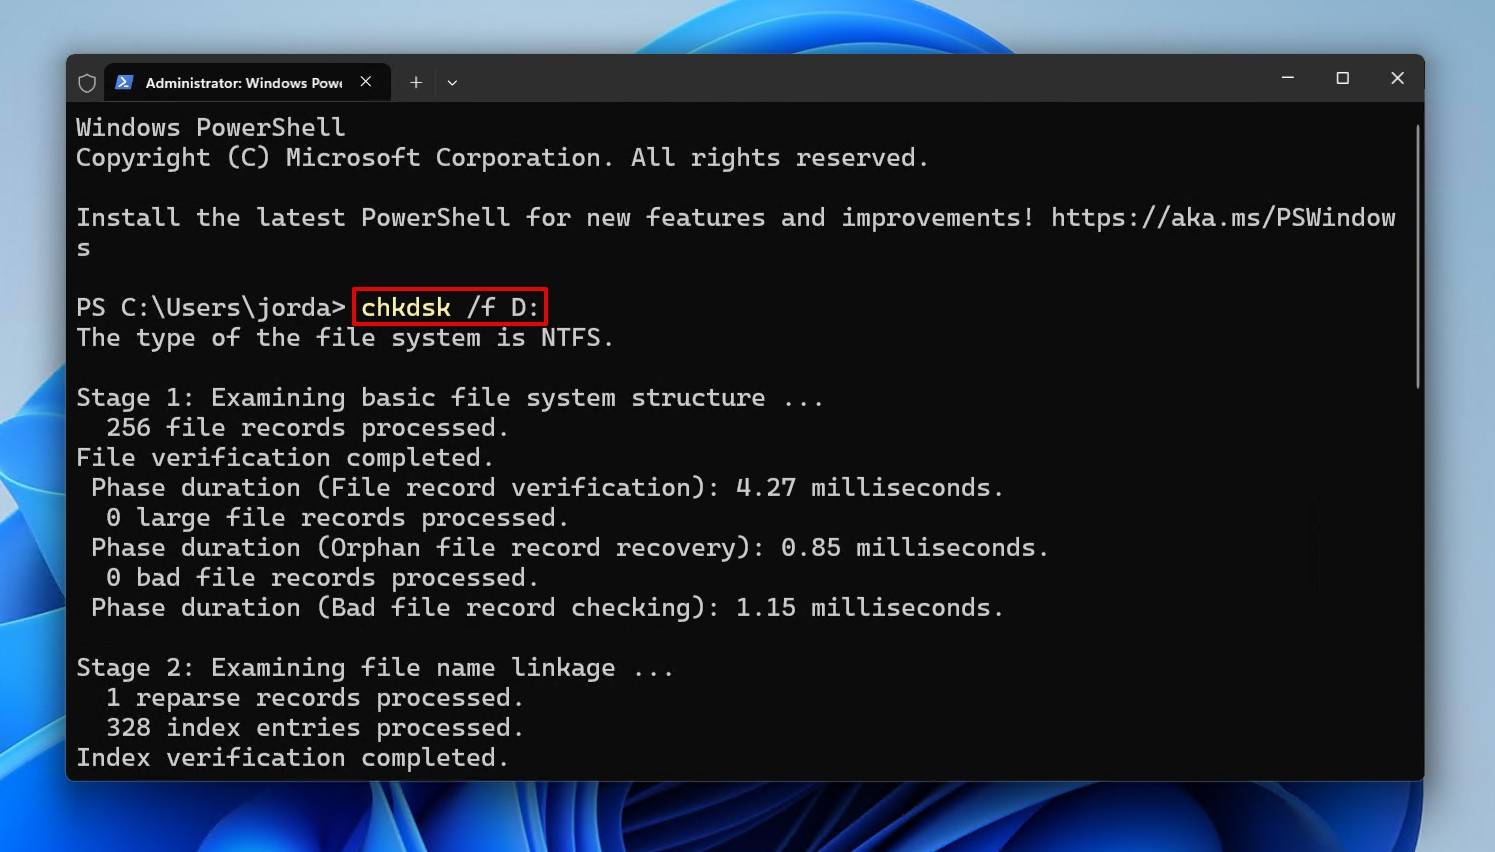
- After the scan is complete, you should be able to access your SSD.
Way 5. Format SSD
If none of the other methods work, you can attempt to repair your SSD by formatting it. Formatting is an inherently data-destructive process, so you should confirm that your data is backed up before proceeding.
Follow these steps to format an SSD:
- Right-click Start and click Disk Management
- Choose the SSD partition you wish to format.
- Now, right-click the SSD partition and select Format.
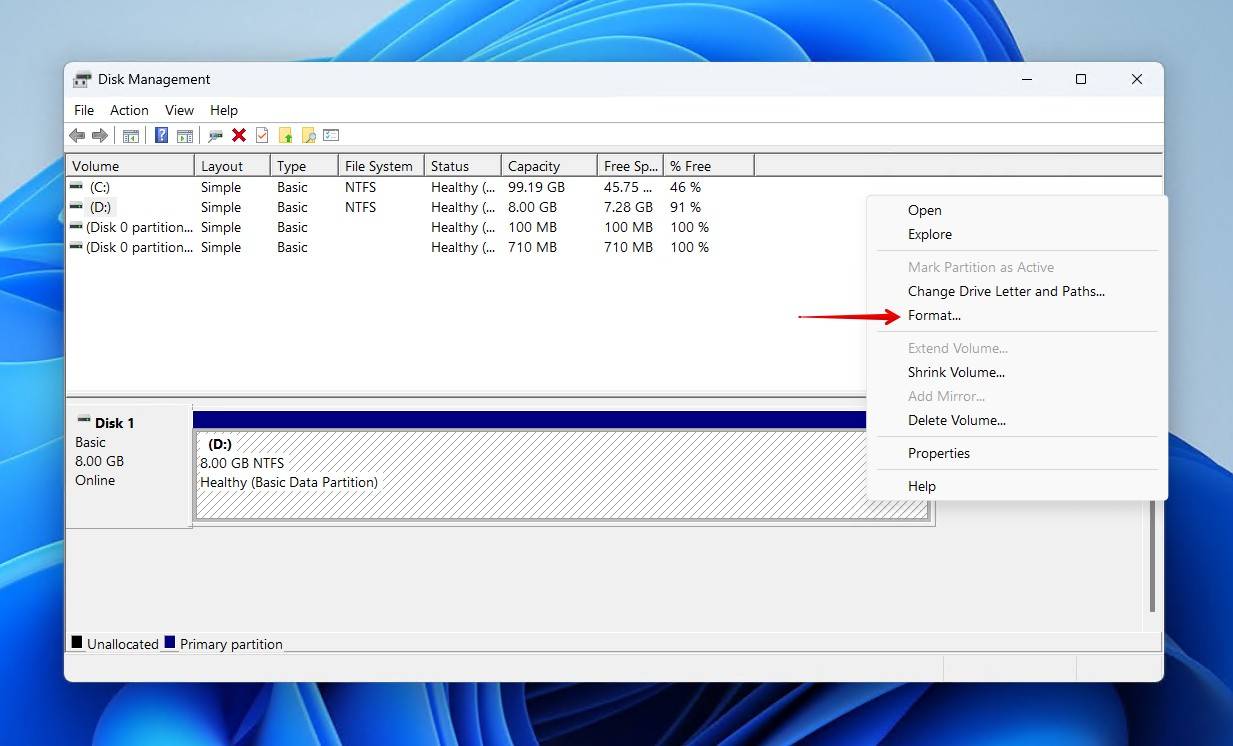
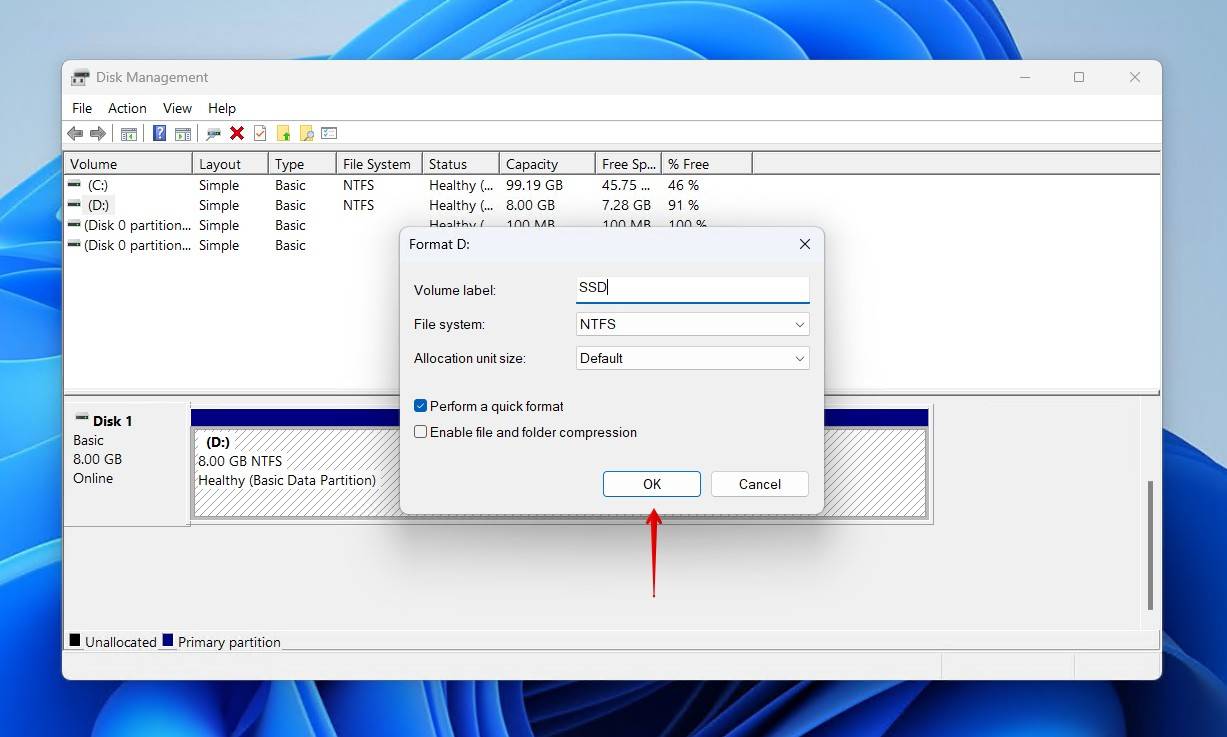
- Check Perform a quick format. Now, click OK to format the drive.
How to Protect Your SSD?
Although no technology can last a lifetime, you can follow a few techniques to get the most out of an SSD. And, you won’t find yourself researching how to fix a dead SSD if you take the extra steps to protect your data. Here are some ways that can help you protect your SSD from failure and even work to extend its life:
- ♨️ Avoid Extreme Temperatures – While SSDs are sturdier than HDDs and can handle hot and cold temperatures better, exposure to extreme temperatures for extended periods can cause problems with your SSD. Corsair recommends keeping your drive within its operable temperature range, and that consistently using it outside those limits can have a negative impact in the long-term.
- 🔌 Invest in a UPS – Sudden power outages can significantly damage your SSD or even cause you to lose your data if the power goes out while you are writing data to the SSD. To avoid such a situation, connect your computer to an uninterruptible power supply (UPS) to assist you in adequately shutting down your computer in case of an unexpected electrical interruption. While Samsung states a UPS is not enough compared to internal mechanisms that guarantee data integrity, it’s acknowledged as a layer of protection.
- ✂️ Enable the TRIM Command – The TRIM command increases your SSD’s performance, generates more free space, and even helps extend the device’s lifespan. Seagate briefly speaks on the importance of using TRIM to maintain SSD performance. However, bear in mind that TRIM often makes it impossible to recover deleted files. Therefore, you should use TRIM in conjunction with a backup strategy that will keep a regular copy of your data.
- 💽 Back Up Regularly – The only way to guarantee the safety of your data is to keep a backup of it. Not only does it provide peace of mind knowing you have a safe copy available, but it reduces the overall time of getting back up and running following a data loss event. Western Digital is an advocate for the 3-2-1 backup strategy, which involves keeping 3 copies of your data across 2 different media types, keeping 1 copy off-site.
Conclusion
SSDs are faster, more efficient storage devices built with superior technology than regular hard drives. However, recovering data from dead, crashed, or failed SSDs can be complicated.
This article provides detailed insight into the methods used to recover data from these SSDs using professional data recovery software like Disk Drill. It’s an economical and reliable way to retrieve lost data from an SSD. But if nothing works, you can always seek the services of a data recovery center and recover your data without any hassles.


FAQs
A dead SSD can be classified as such due to its inability to be recognized anywhere on your system. SSDs that are just experiencing minor errors will show at least some signs of life. Check your SSD in Disk Management and see if it’s being read with the correct capacity. If it’s not, it’s likely dead.
First and foremost, try connecting your SSD to another port if the SSD is not detected in BIOS. You can also try switching out the cable if you’re using a USB or SATA SSD. Be sure to also make sure the appropriate ports are enabled in your BIOS.
Here’s how you can recover files from a faulty SSD:
- Remove the failed, dead, or crashed SSD.
- Connect it to another computer as an external drive.
- Confirm it’s visible and reading the correct size in Disk Management.
- Recover the data with data recovery software.
You can repair a failed SSD by power cycling it. The best way to do it for all types of SSDs is through the following steps:
- Boot into BIOS.
- Let your PC sit for 30 minutes on the BIOS screen.
- After 30 minutes, power down the computer for 30 seconds.
- Repeat this process again.
If this process is unsuccessful, your next best option is to consult a data recovery professional who can restore the data on the drive.
An SSD that has failed will prevent you from accessing any of the data it contains. In many cases, the data on the drive is recoverable using data recovery software. However, if the drive has failed due to physical damage, a data recovery service must be consulted to get the data back.