Dealing with a Mac that won’t recognize your USB drive can be a significant inconvenience. When your USB drive is not showing up on your Mac, you’re effectively cut off from the data you need. But there’s no need to panic; several solutions exist to help you troubleshoot and resolve this issue so that access your files again.
10 Best Ways to Fix a USB Flash Drive That Won’t Show Up on a Mac
Let’s take a look at some of the causes of a flash drive not showing up on a Mac to determine if you can resolve your particular issue. Some of these fixes are very simple while others may involve performing data recovery on a corrupted or damaged drive.
Method 1: Restart Your Mac
A simple restart can fix many issues with a USB flash drive not recognized on Mac. For example, if your computer has been running for days without a break, then a restart can help clear temporary glitches that might prevent USB detection.
A restart also allows software and operating system updates to install, which can be all it takes to eliminate a bug preventing your USB drive from showing up. Last but not least, all connected storage devices are mounted from scratch when you restart your Mac, and that gives your computer a fresh chance to properly recognize your USB drive.
To restart your Mac:
- Click the Apple icon in the top-left corner of your screen.
- Select the Restart option from the dropdown menu.
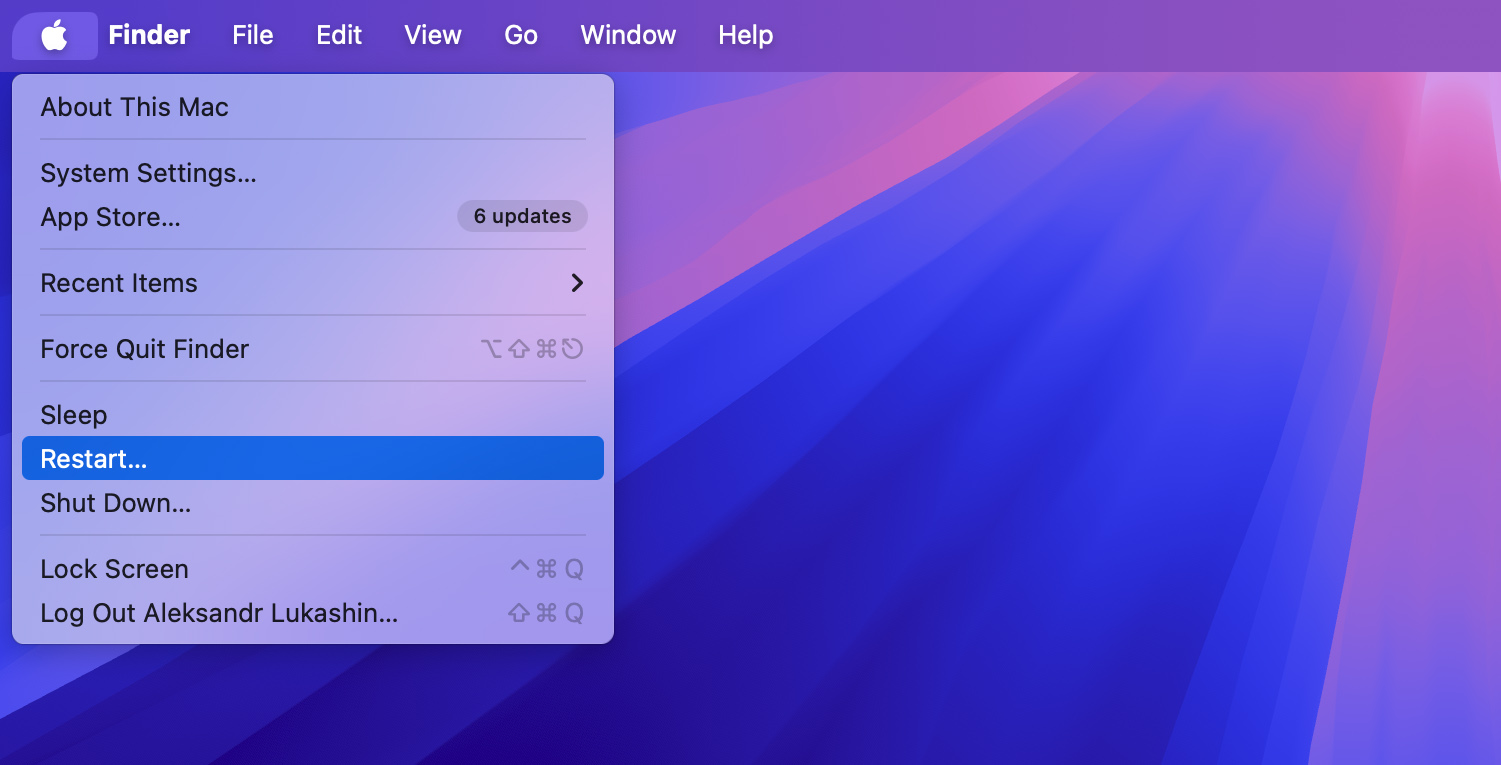
- Uncheck the “Reopen windows when logging back in” checkbox for a clean restart.
- Click the Restart button to confirm.
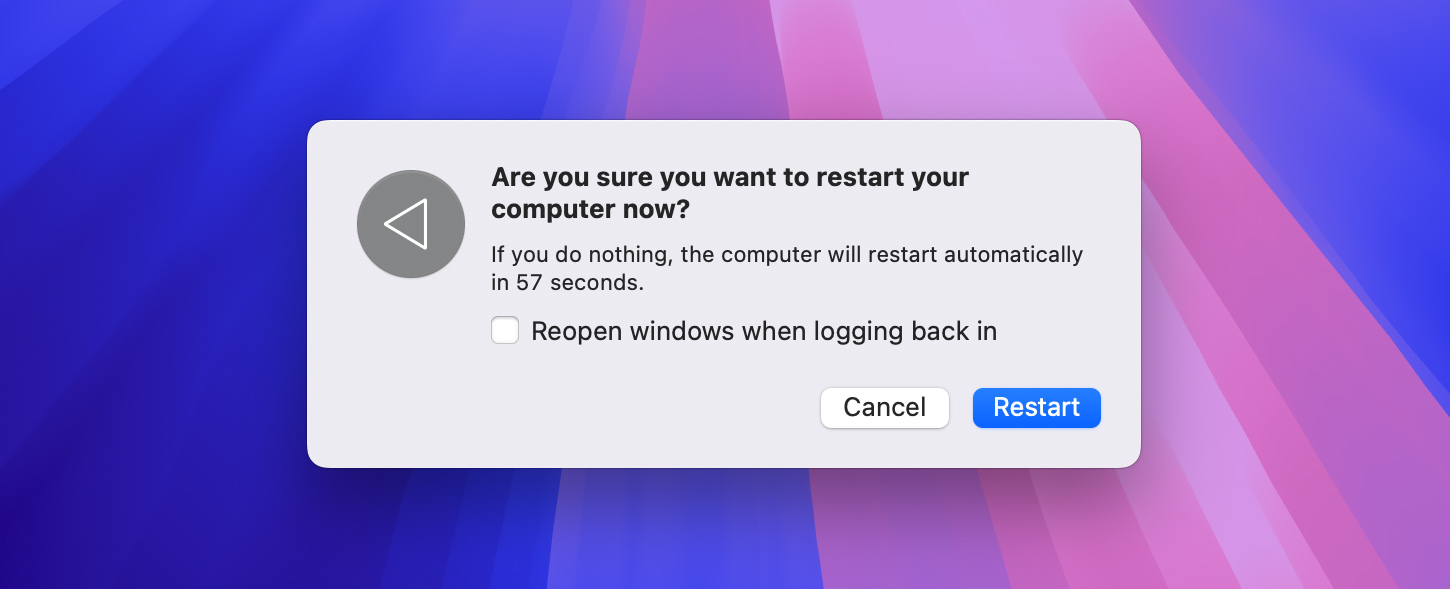
- Wait for your Mac to complete the restart process.
Method 2: Address Physical Connectivity Issues
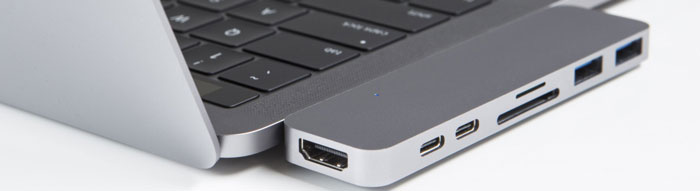
Before you do anything more complicated, you should check if your thumb drive is not showing up on a Mac is if the problem is with the particular USB port that you are using. At the risk of stating the obvious, your first move should be to try the device in an alternate USB port available on your machine.
If the device works in the second port it indicates that the first port may be damaged and may need to be replaced or repaired. However, if the drive doesn’t work in any of your USB interfaces you need to look further to determine the problem.
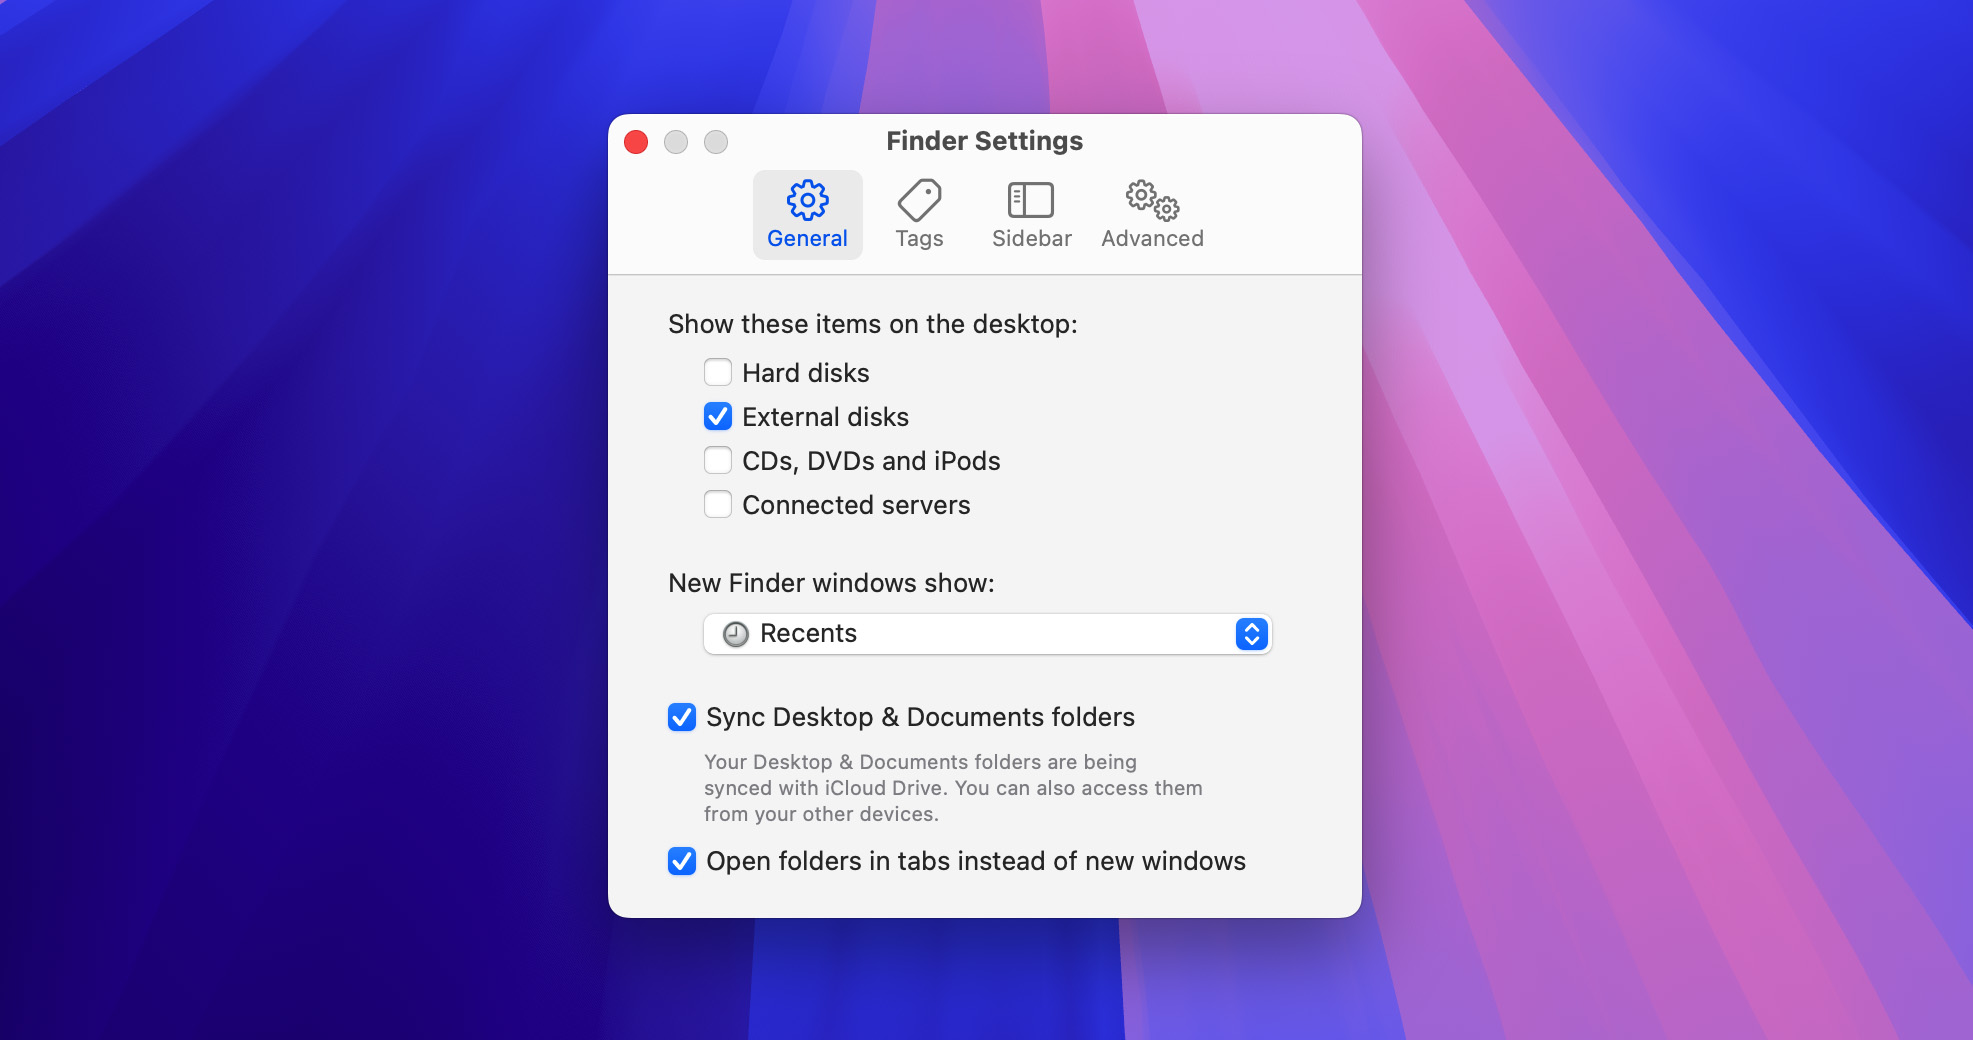
Method 3: Check Finder Settings
It’s possible that your USB flash drive is recognized by your Mac just fine but isn’t showing up in the usual places (your desktop and/or the sidebar in Finder) because certain specific settings have been changed.
To quickly check if this is the case, you can navigate to the Computer section in Finder (Go > Computer). If the USB flash drive is displayed there, then you just need to make a few quick modifications of your Finder preferences to make it accessible the way you’re used to:
- Open Finder and click the Finder menu.
- Select Settings (Command + ,).
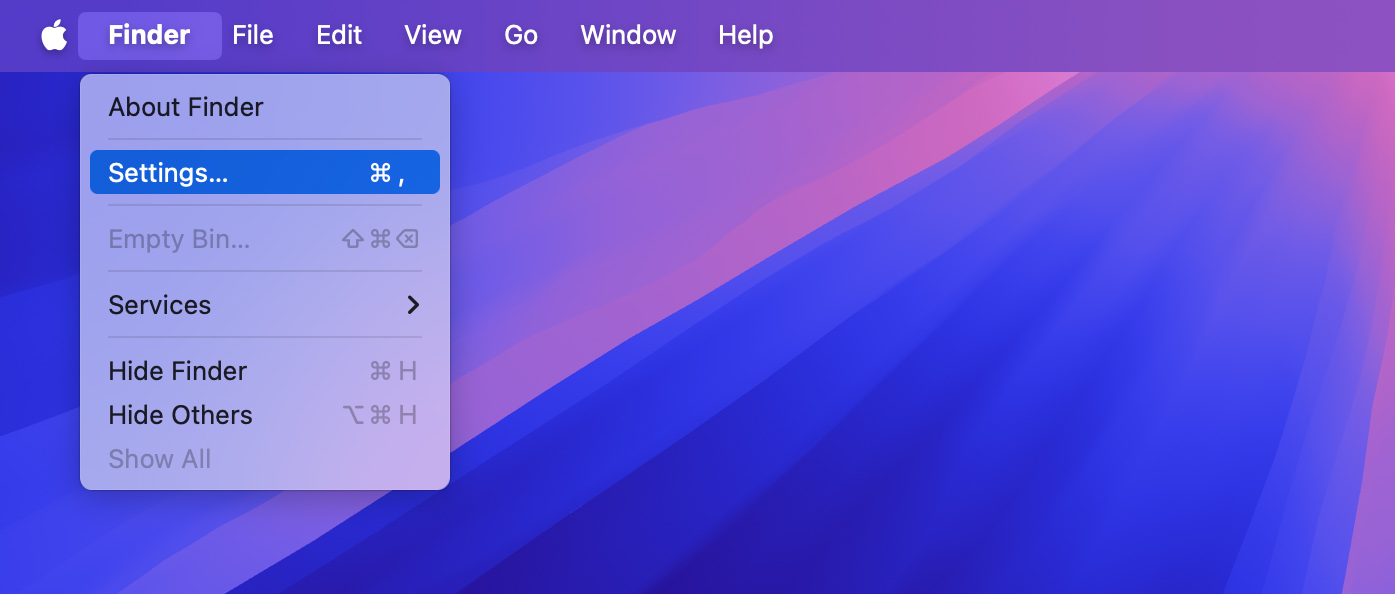
- Go to the General tab (Finder > Settings > General) and make sure the External disks item is selected.
- Go to the Sidebar tab and make sure the External disks location is selected.
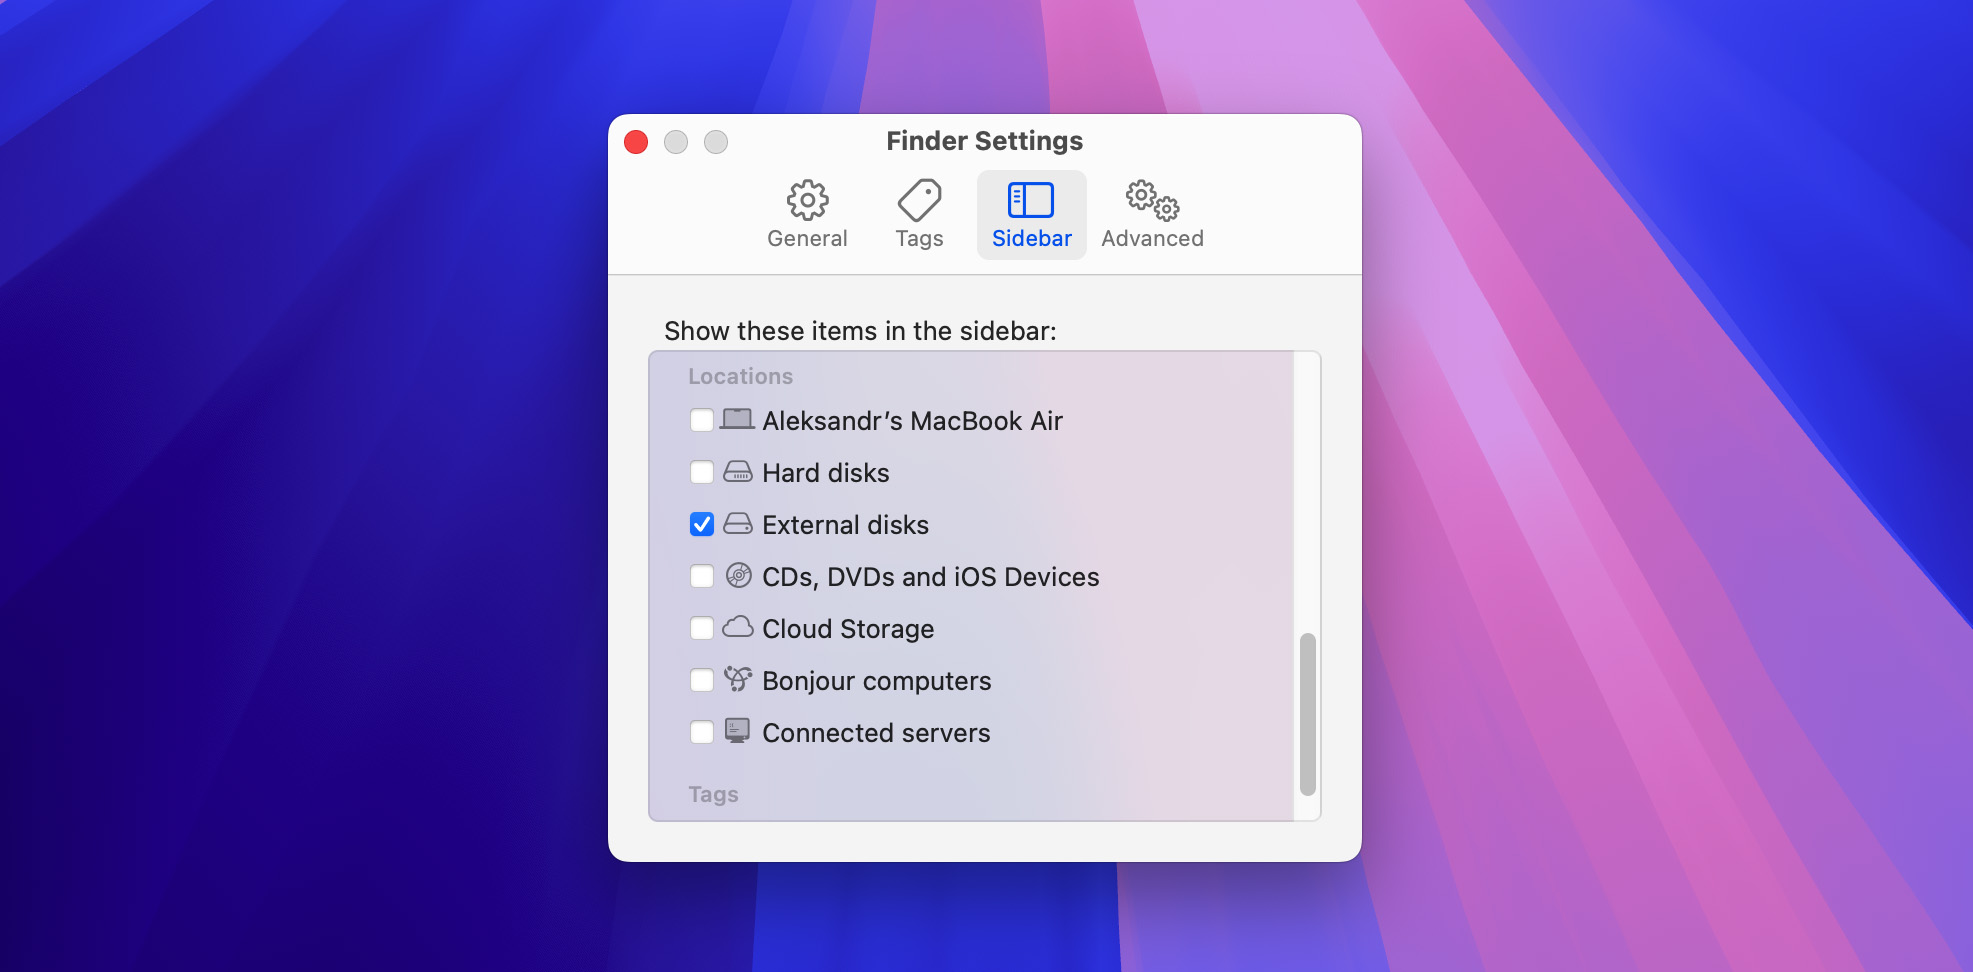
- Close the Settings window.
Method 4: Provide Sufficient Power for Your USB Drive
Your flash drive may not be registering with your Mac due to an issue of insufficient power. This is especially prone to happen if you use a bus-powered USB hub and have multiple devices connected simultaneously.
The solution here is to try connecting the flash drive directly to the computer’s USB port. If you need to use a hub, consider investing in a high-quality powered USB hub that comes with its own power supply. A good powered hub can easily deliver 85 watts of power, which is more than enough to handle multiple devices simultaneously without the power drain issues that plague basic bus-powered hubs.
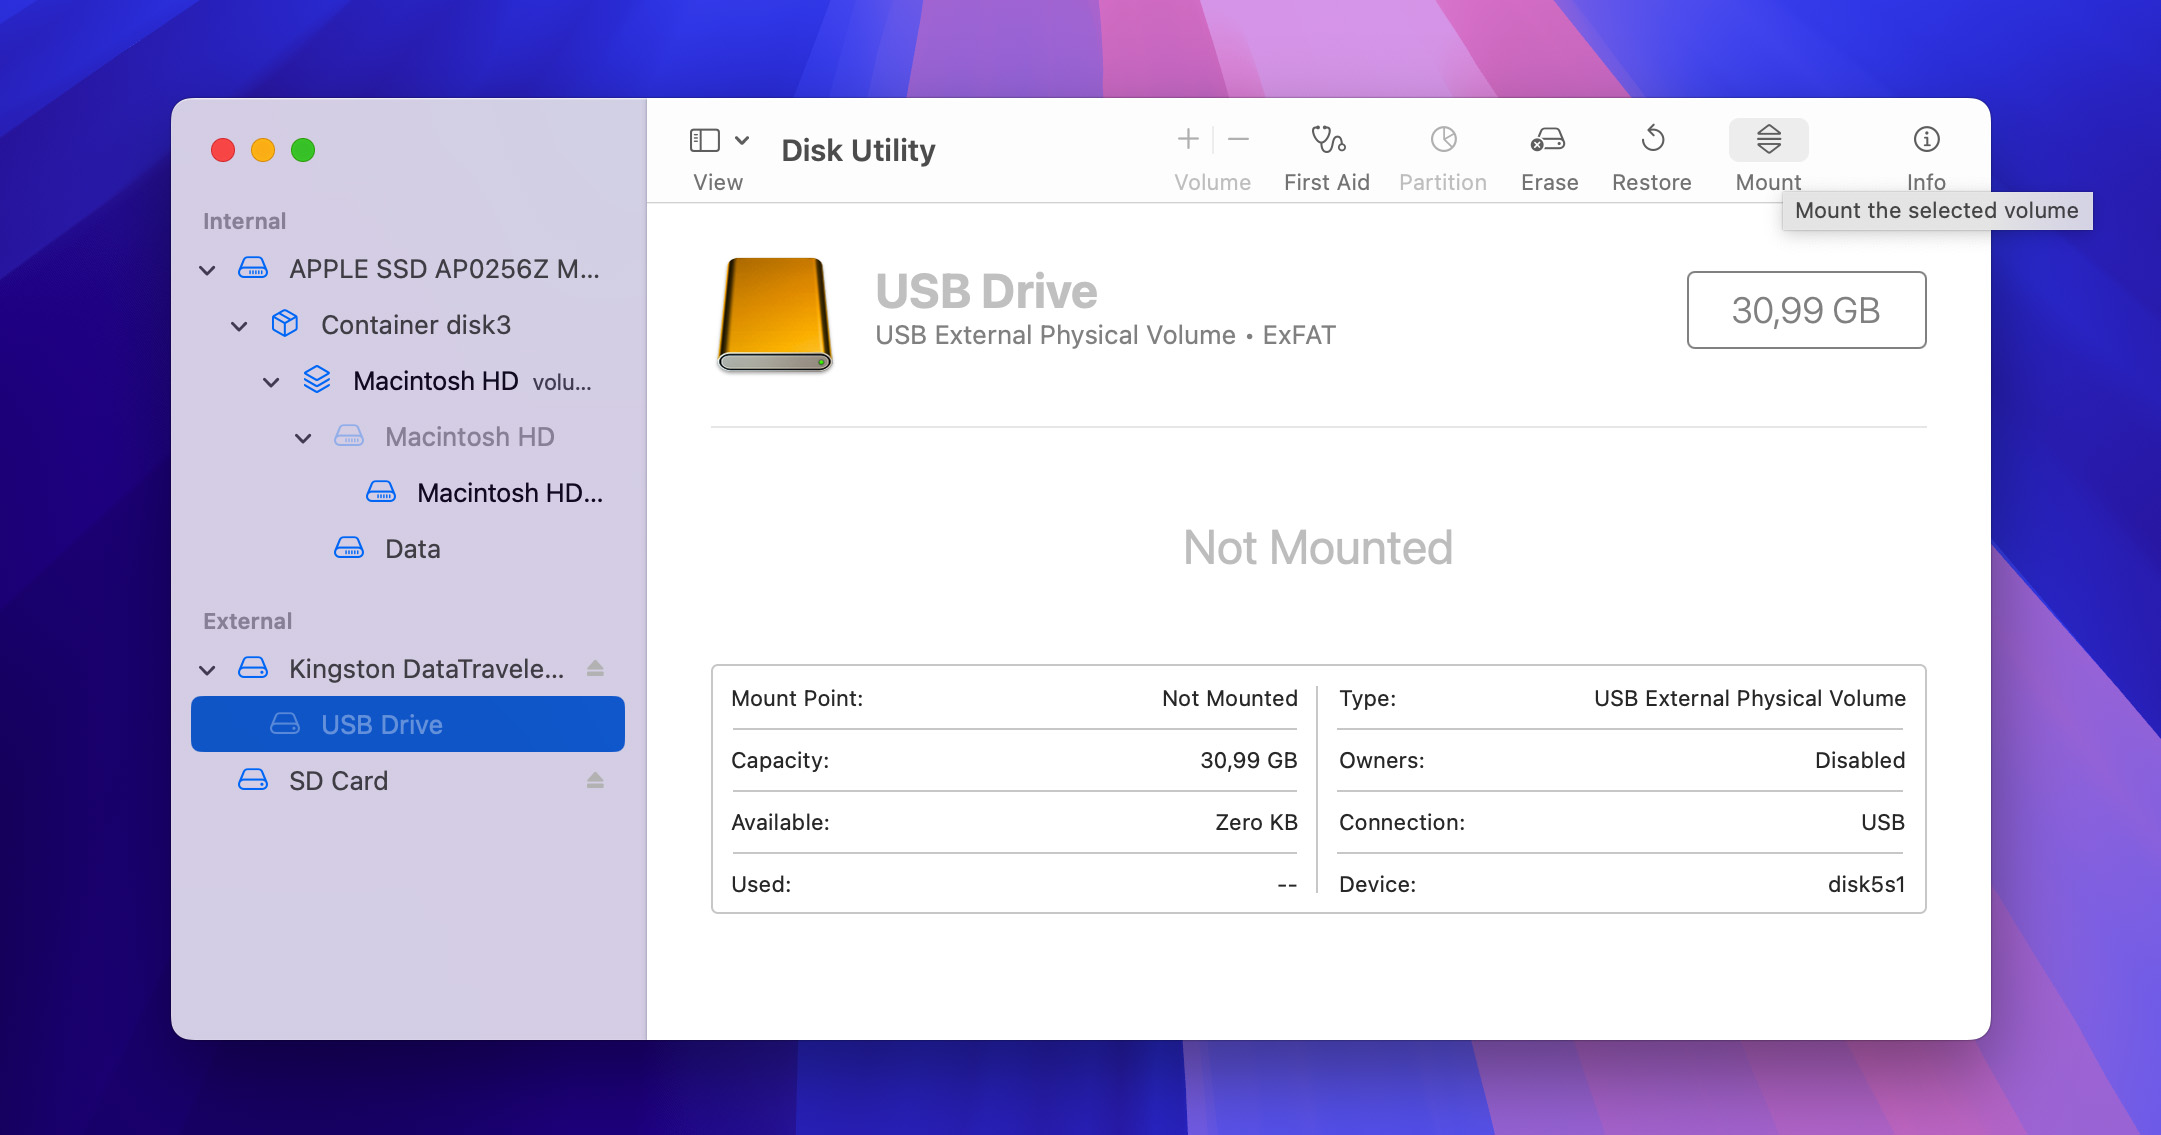
Method 5: Force Mount Your USB Drive
Sometimes a USB drive can be in a peculiar state where your Mac can detect the drive’s presence but is unable to mount it automatically (often because of a software glitch or some background application preventing it). In such situations, you can mount the USB drive manually:
- Connect your USB drive to your Mac.
- Open Disk Utility, which can be found in Applications > Utilities or via Spotlight (Command + Space, type “Disk Utility” and hit Enter).
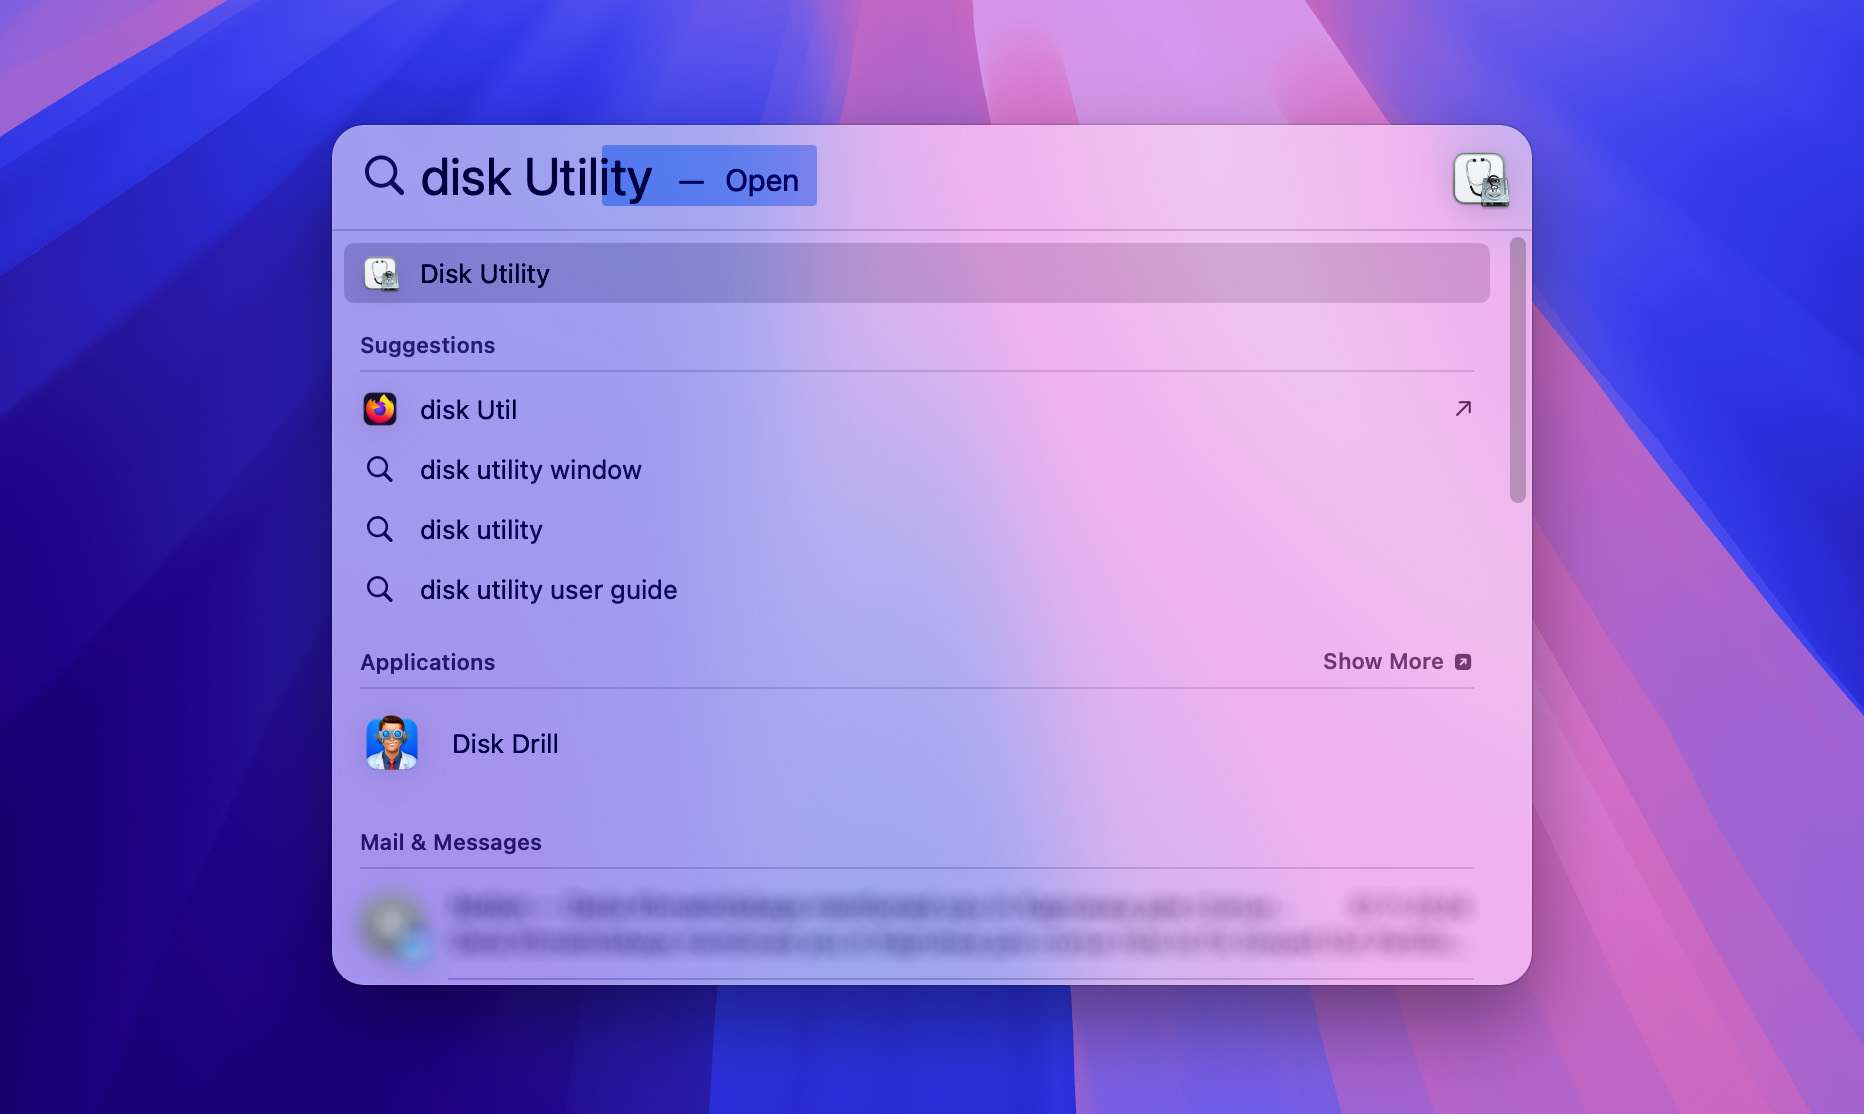
- Select your USB drive from the list on the left side of the Disk Utility window.
- Click the Mount button at the top of the Disk Utility window.
Alternatively, you can force mount the USB drive from Terminal:
- Connect your external drive to your Mac.
- Open Terminal (Finder > Applications > Utilities) or via Spotlight Search (Command + Space, type “Terminal”, and press Enter).
- List all disks by typing
diskutil listand pressing Enter. Look for your USB drive in the list; it might appear as something like “disk1” or similar.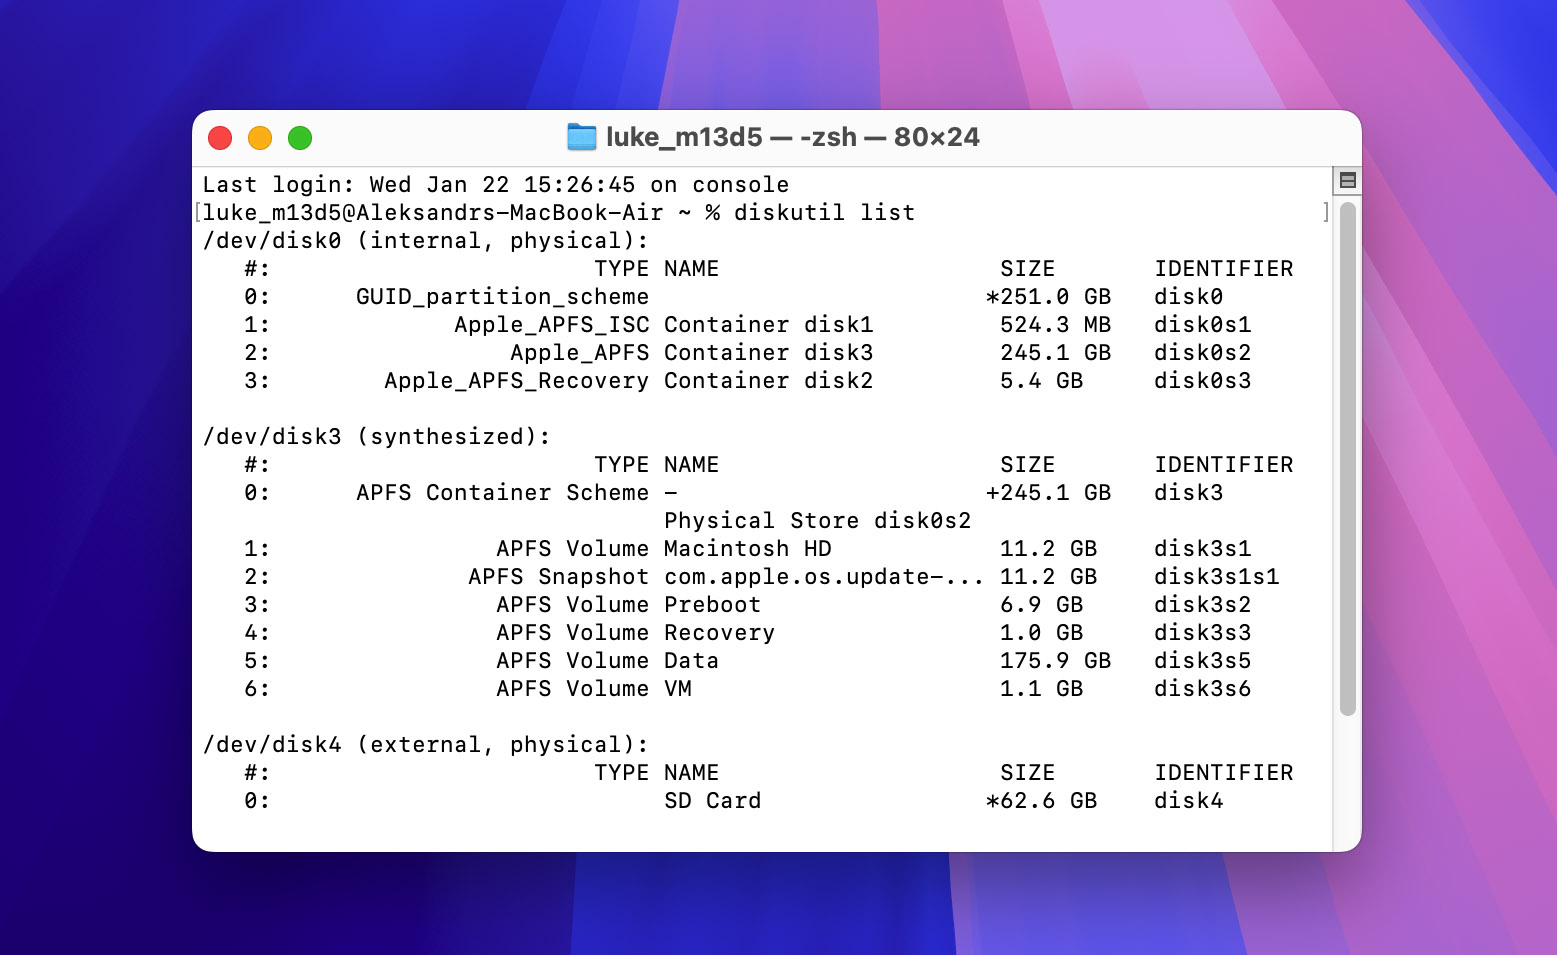
- Create a mount point by entering (replace “usb” with your desired mount point name):
sudo mkdir /Volumes/usb - Mount the disk with this command (Replace “disk1” with the correct disk number from step 3; “hfs” parameter replace with USB drive file system):
sudo mount -t hfs /dev/disk1 /Volumes/usb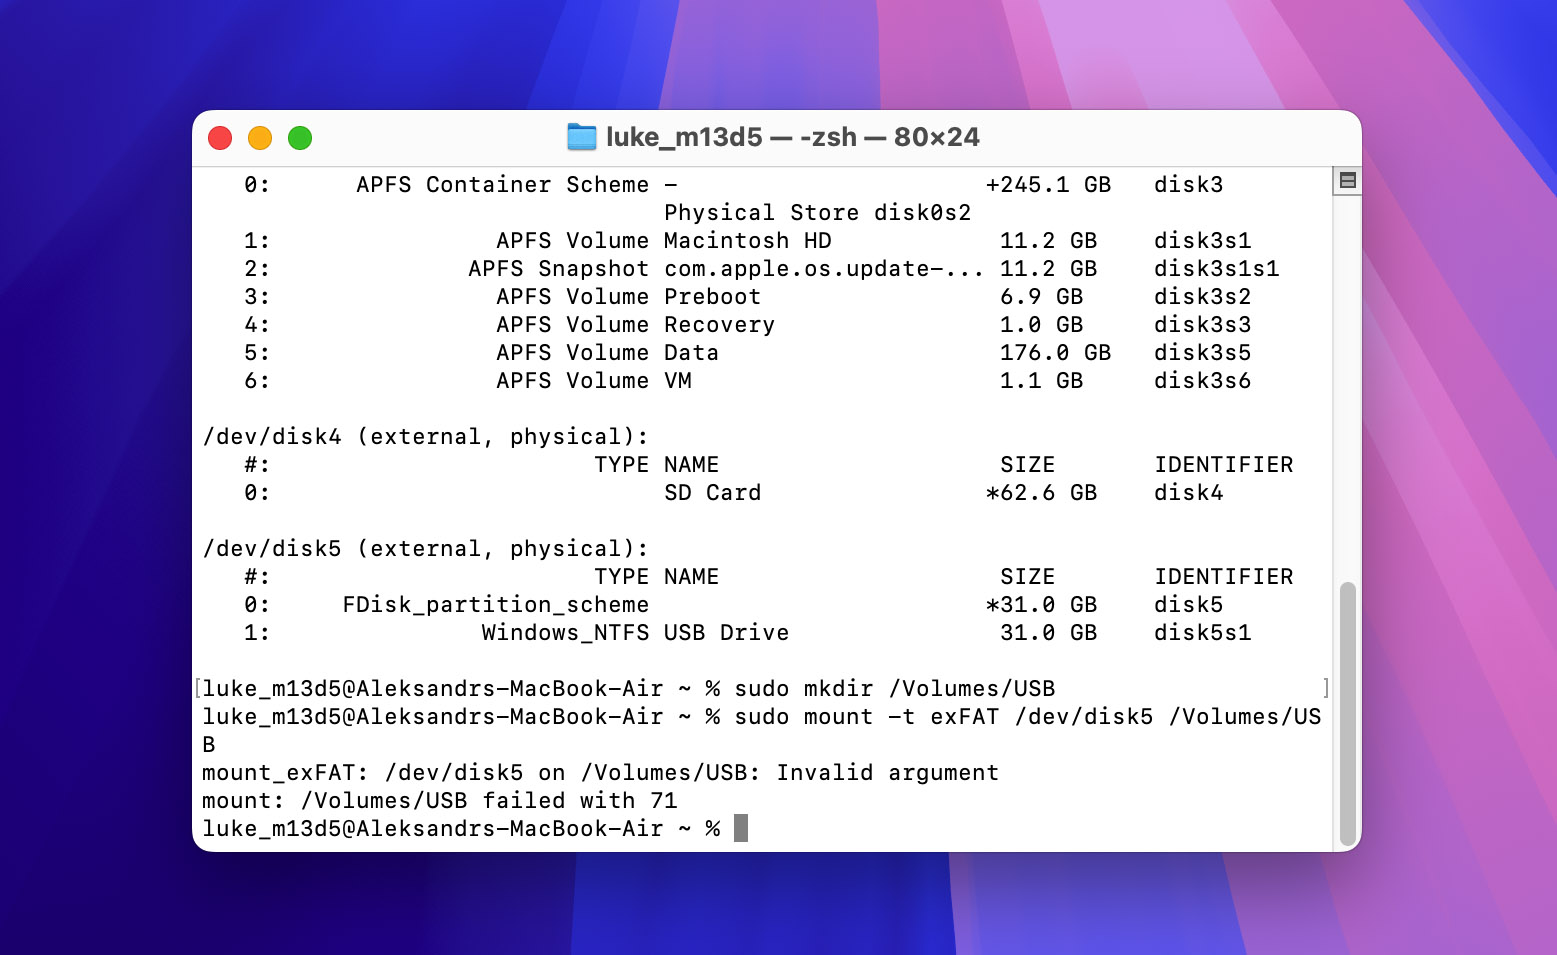
If the drive still doesn’t mount, then move right on to the next method.
Method 6: Check if the System Controller is Failing
It’s possible for a USB flash drive to not be recognized by your Mac because your computer’s System Management Controller (SMC)—a chip in Intel-based Macs that manages various physical components—isn’t working properly.
The good news is that a restart of this important component is usually all it takes to make it behave nicely again.
Macs with Apple Silicon
Apple silicon Macs don’t require traditional SMC or NVRAM resets because the components are part of the main chip. Instead:
- Make sure your Mac is connected to power.
- Choose Apple menu > Shut Down.
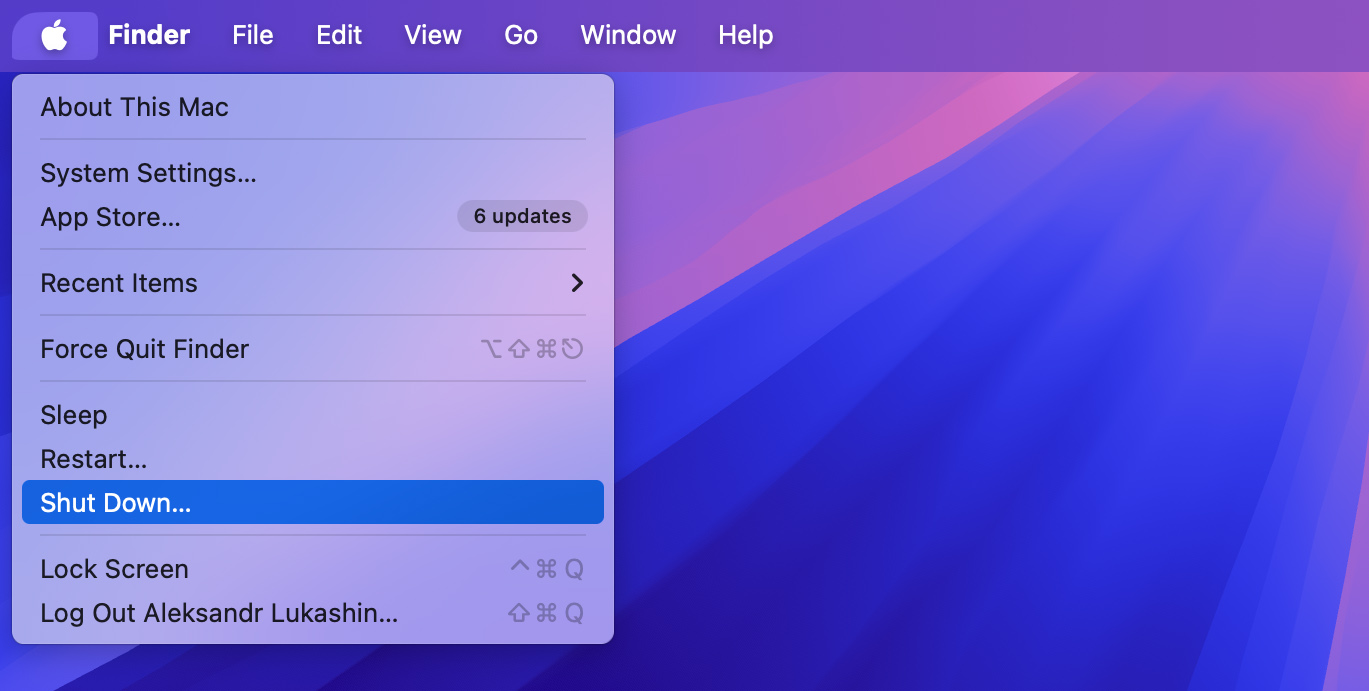
- Wait 30 seconds, then press the power button to turn it on.
Macs with T2 Security Chip
- If you have a desktop Mac, unplug the power cable. For laptops, just shut down your Mac while keeping it plugged in.
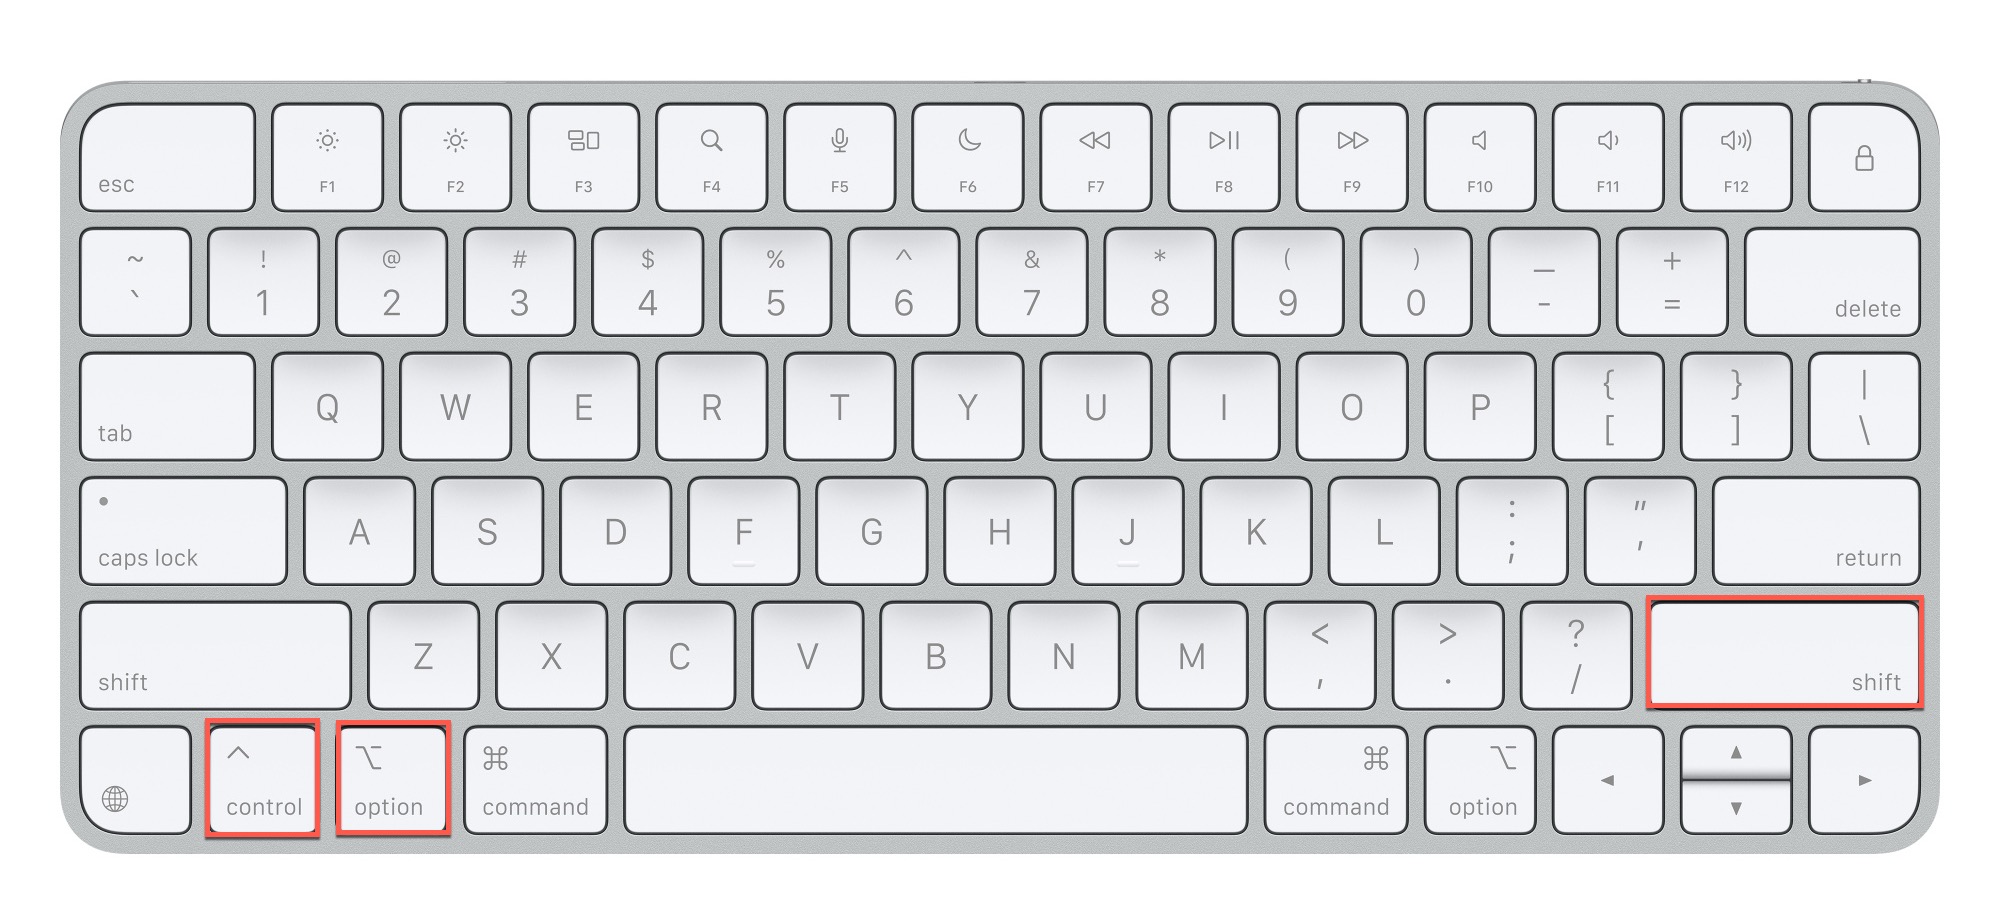
- For desktop Macs, wait 15 seconds, then plug the power cable back in and skip to step 5. For laptops, press and hold left Control + left Option + right Shift for 7 seconds. While holding these keys on your MacBook, also press and hold the Power button for another 7 seconds. Your Mac will turn off if it hasn’t already.
- Release all keys (for MacBooks) or wait 5 seconds (for desktops), then press the power button to turn on your Mac.
Older Intel Macs (without T2 chip)
- If you have a desktop Mac, unplug the power cable. For laptops, just shut down your Mac while keeping it plugged in.
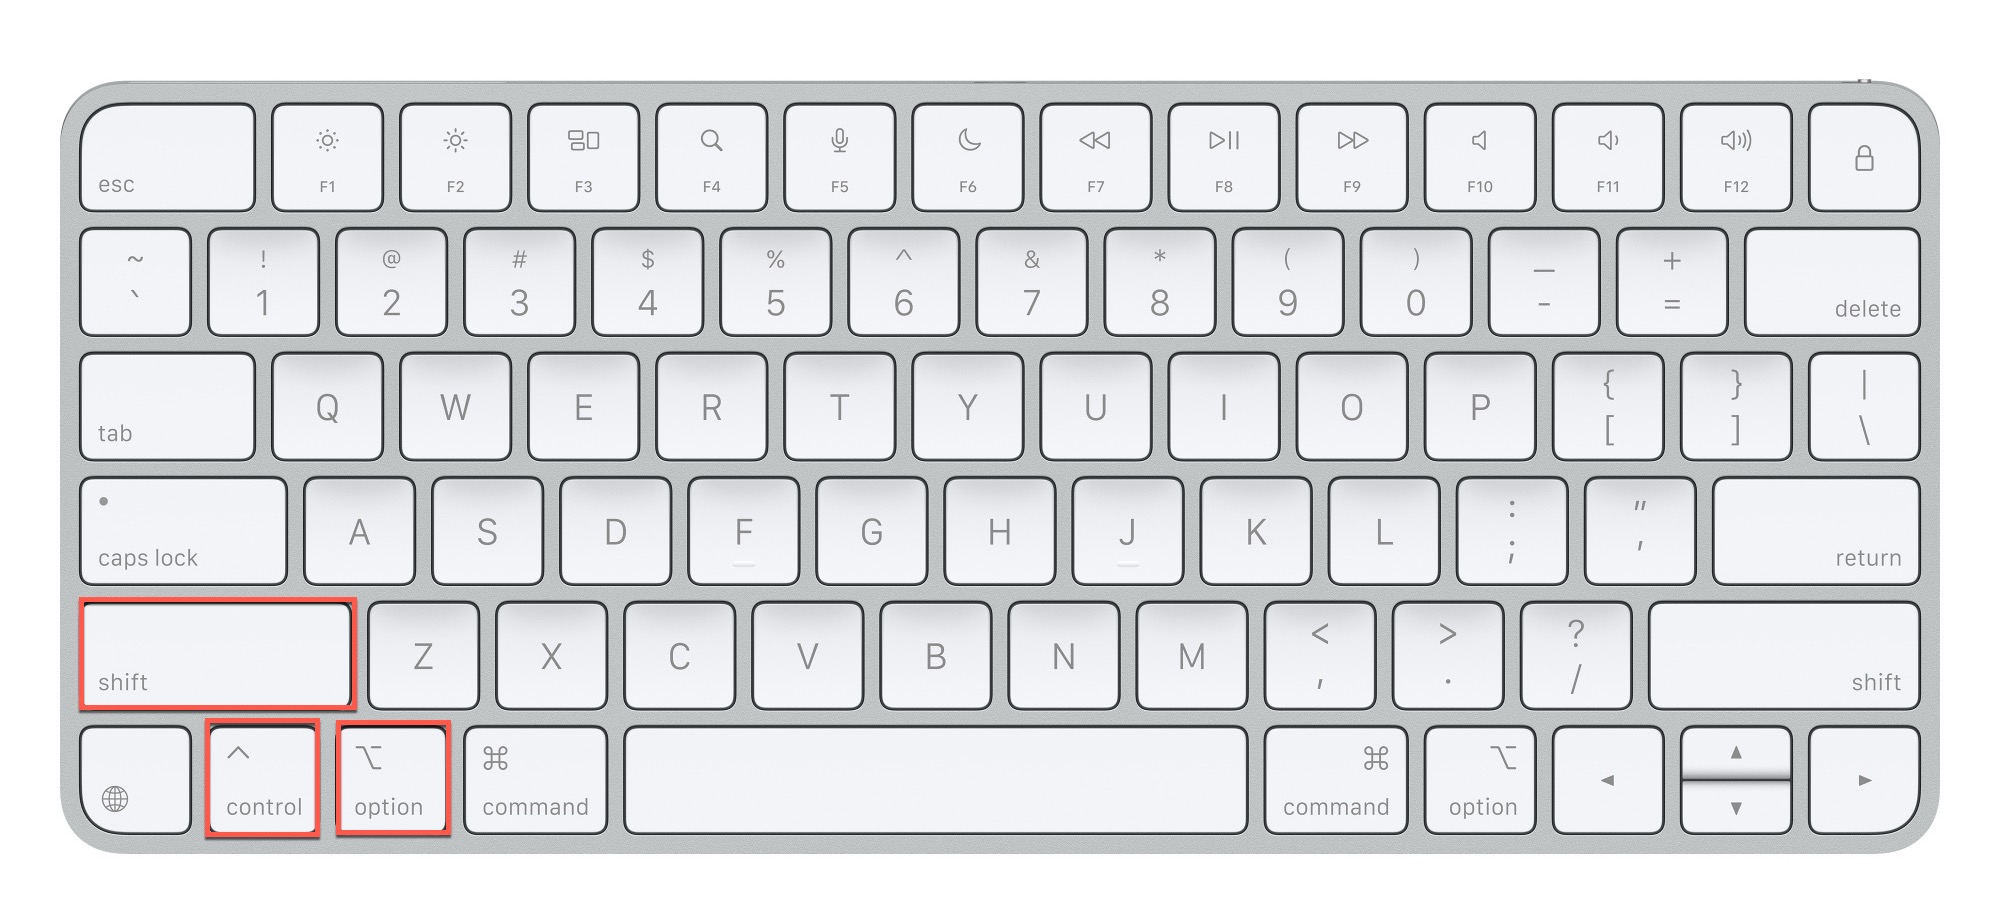
- For desktop Macs, wait 15 seconds, then plug the power cable back in and skip to step 5. For laptops, hold down left Shift + left Control + left Option, then press and hold the Power button while keeping the other keys pressed. Hold all keys for 10 seconds, then release them.
- Wait 5 seconds, then press the power button to turn on your Mac.
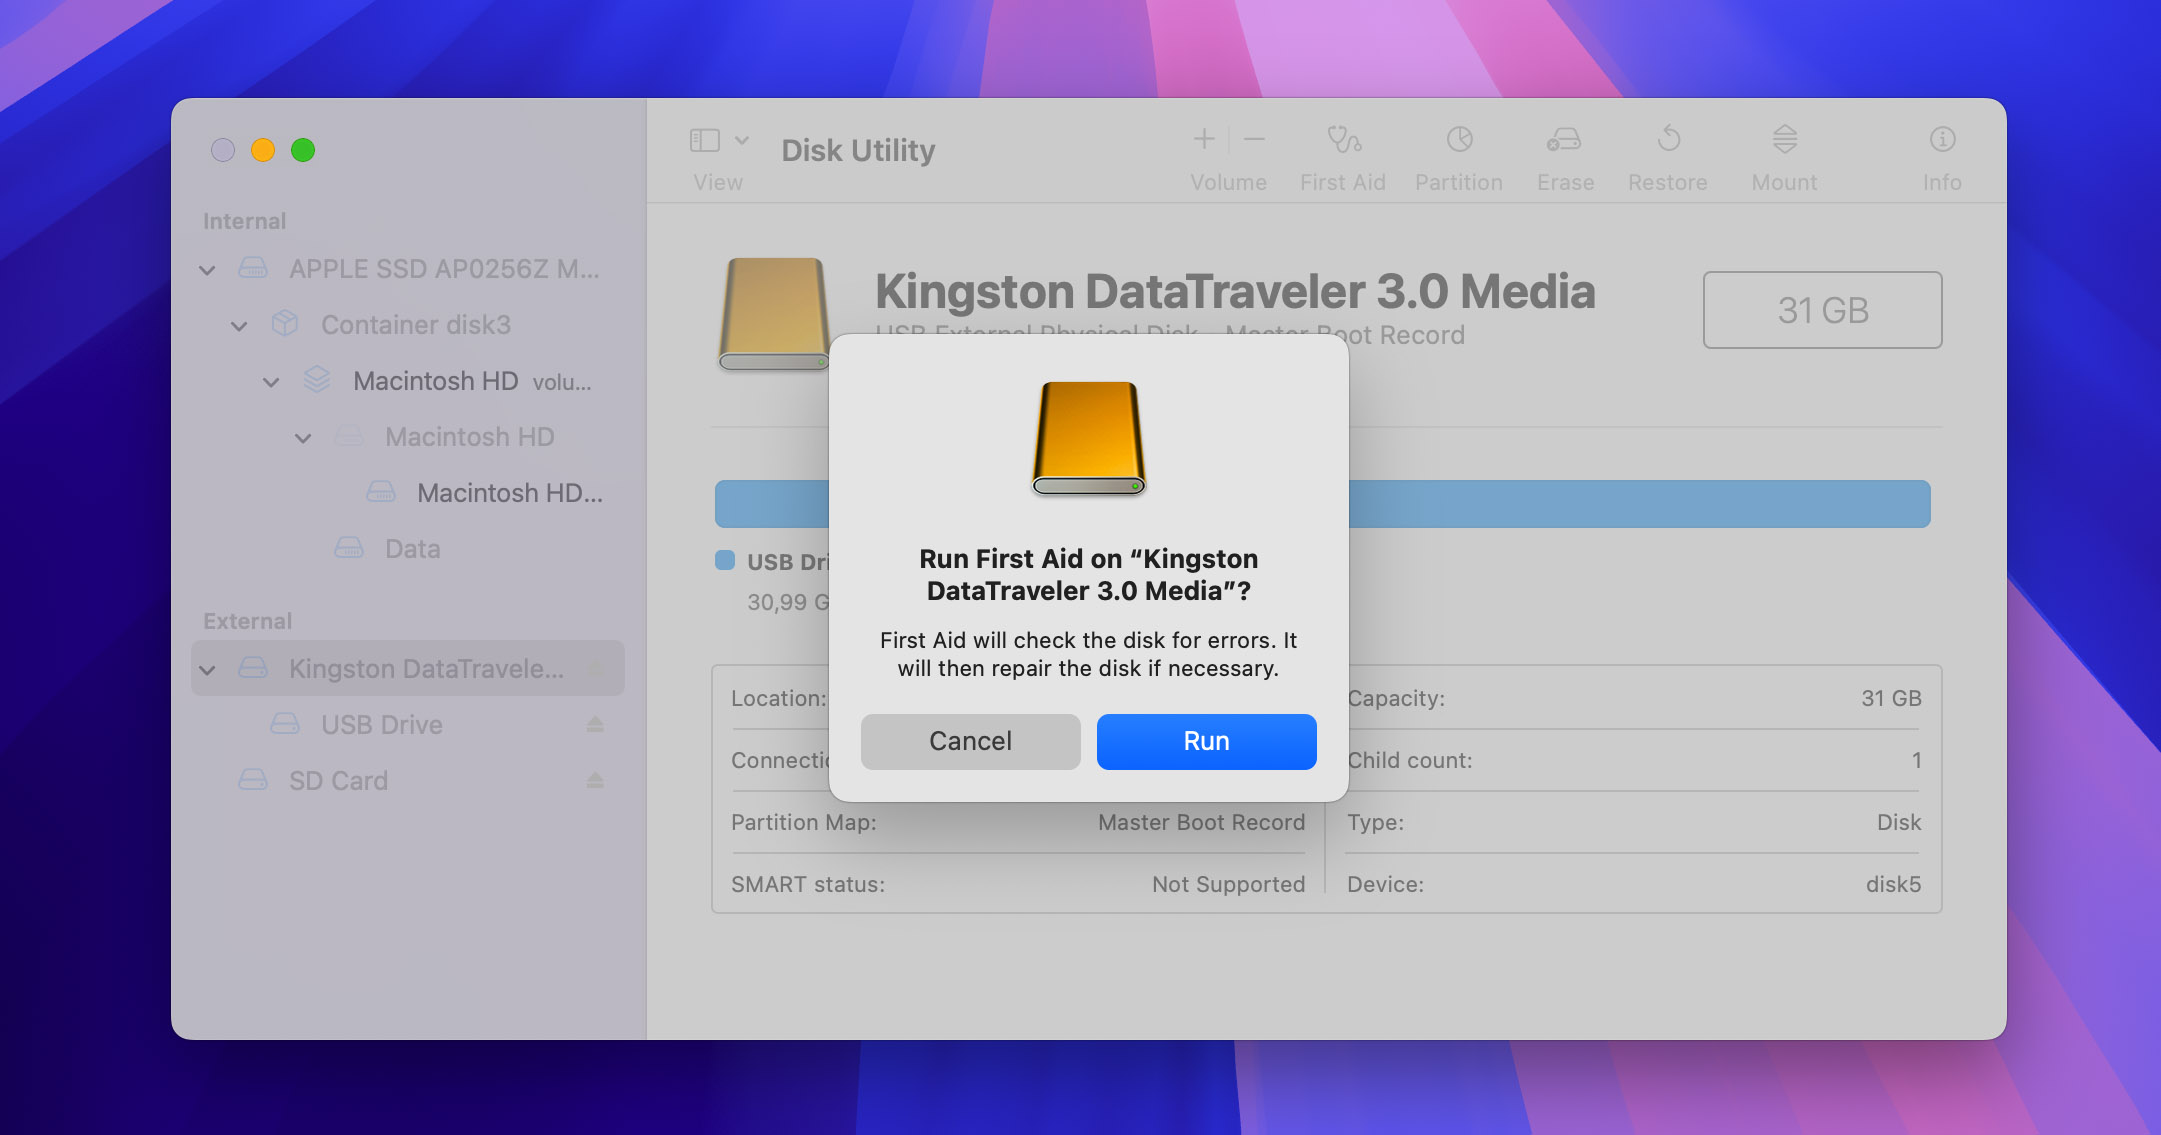
Method 7: Use First Aid to Repair the USB Flash Drive
USB drives can develop file system corruption from improper ejection, power loss, or normal wear and tear. Common signs include files that won’t open, empty folders that should contain data, and drives that randomly disconnect or—you’ve guessed it—are not recognized properly.
Fortunately, macOS includes a built-in repair tool called First Aid that can scan your drive for logical errors and repair common file system issues. First Aid checks the disk’s directory structure, updates corrupted boot data, and repairs broken partition maps, often resolving these issues without data loss.
- Open Finder and go to Applications.
- Open the Utilities folder and launch Disk Utility.
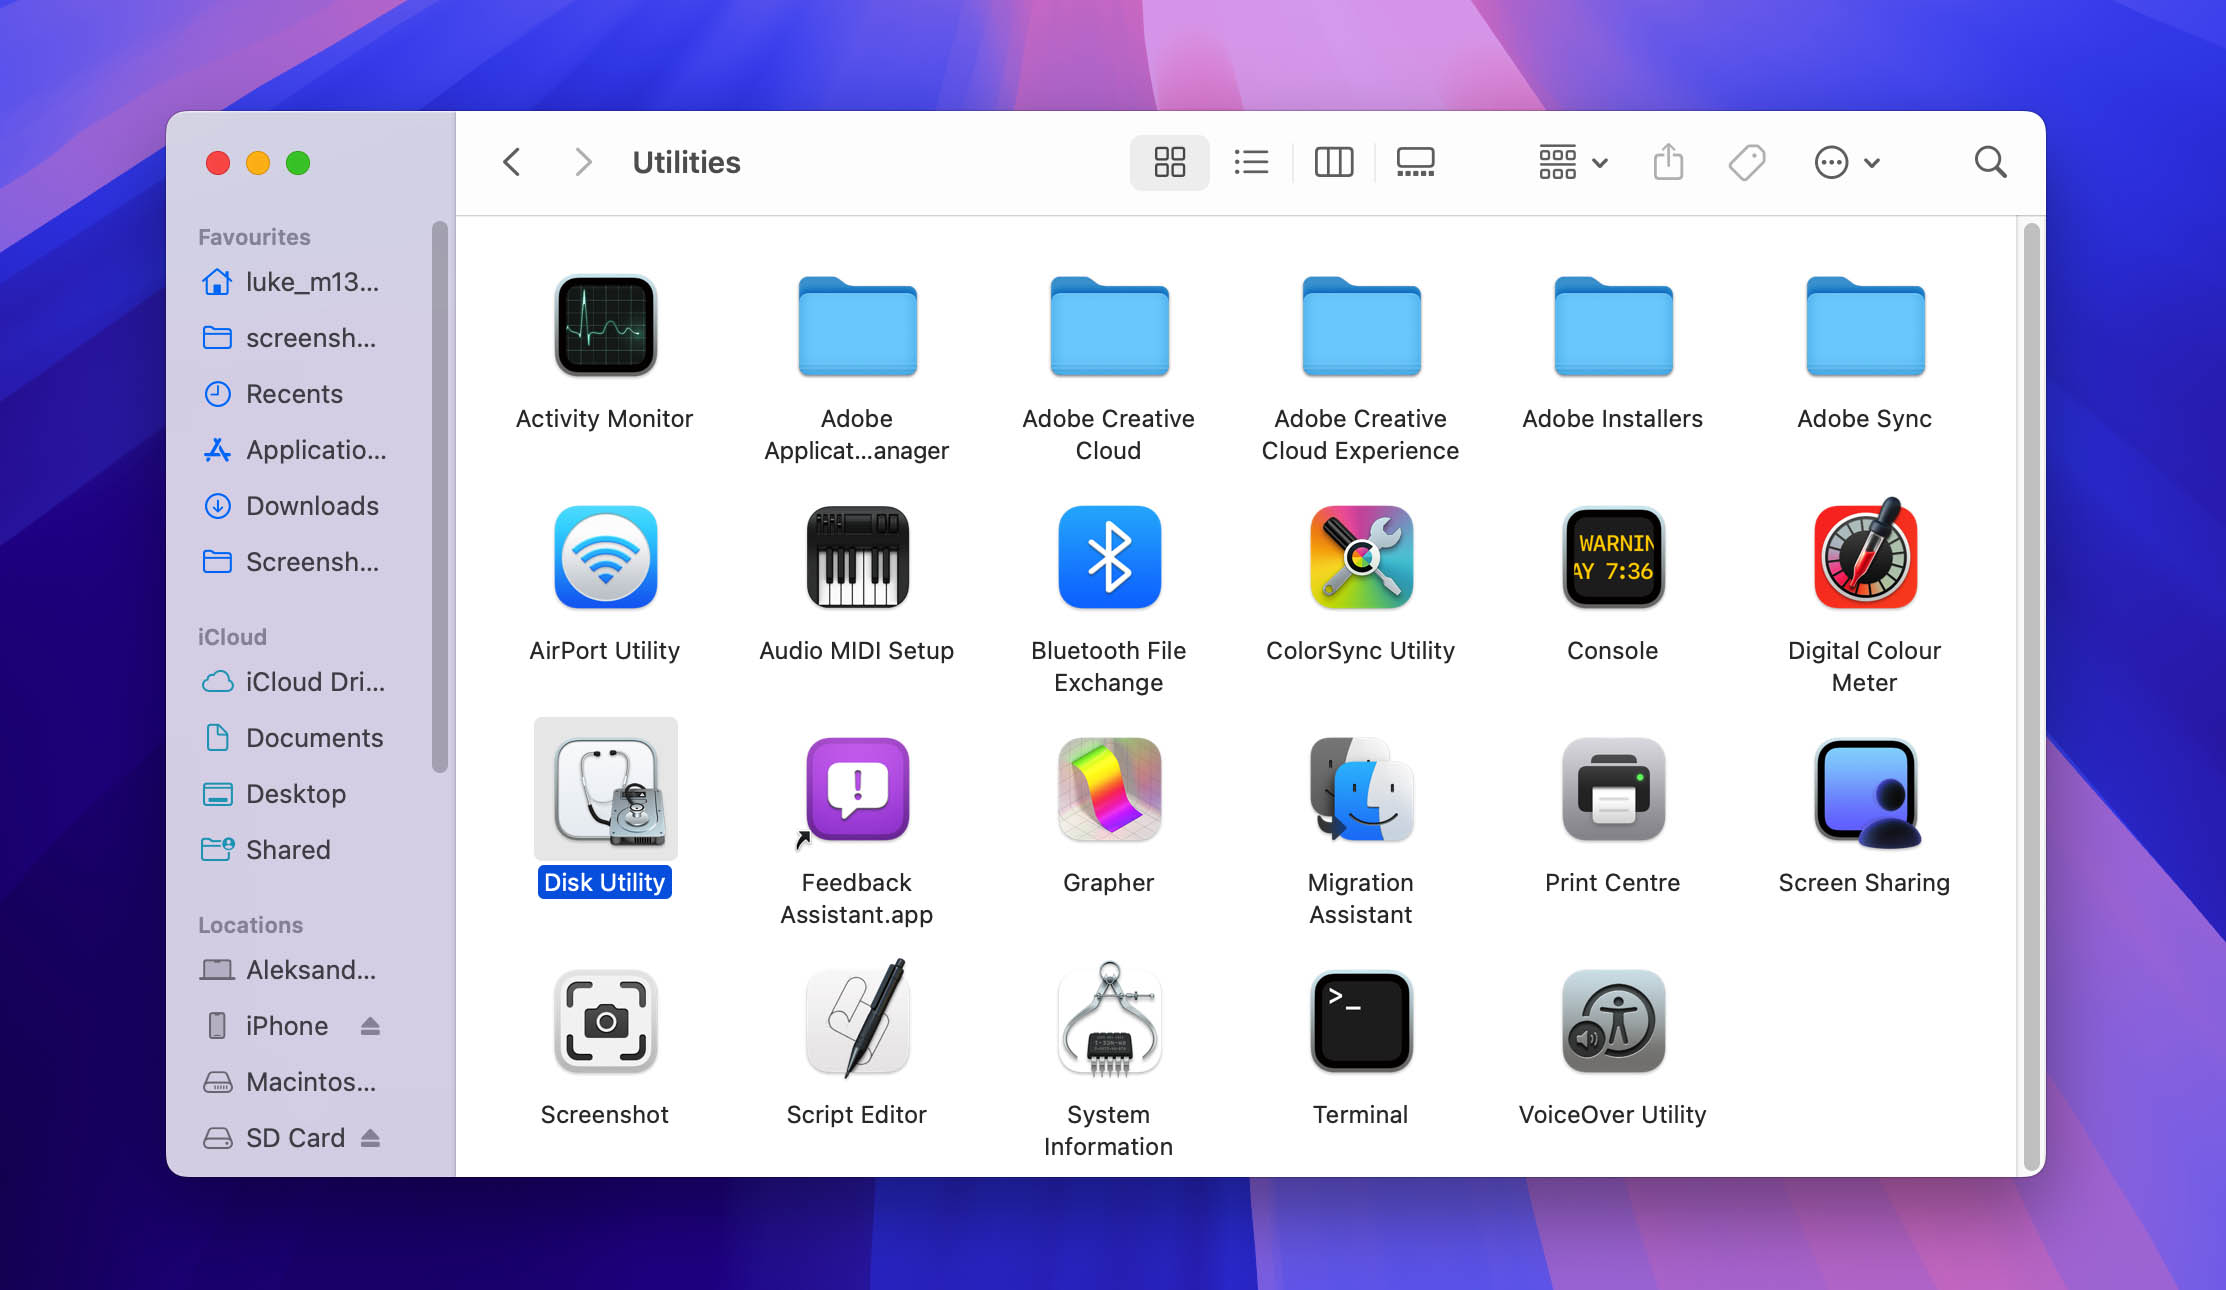
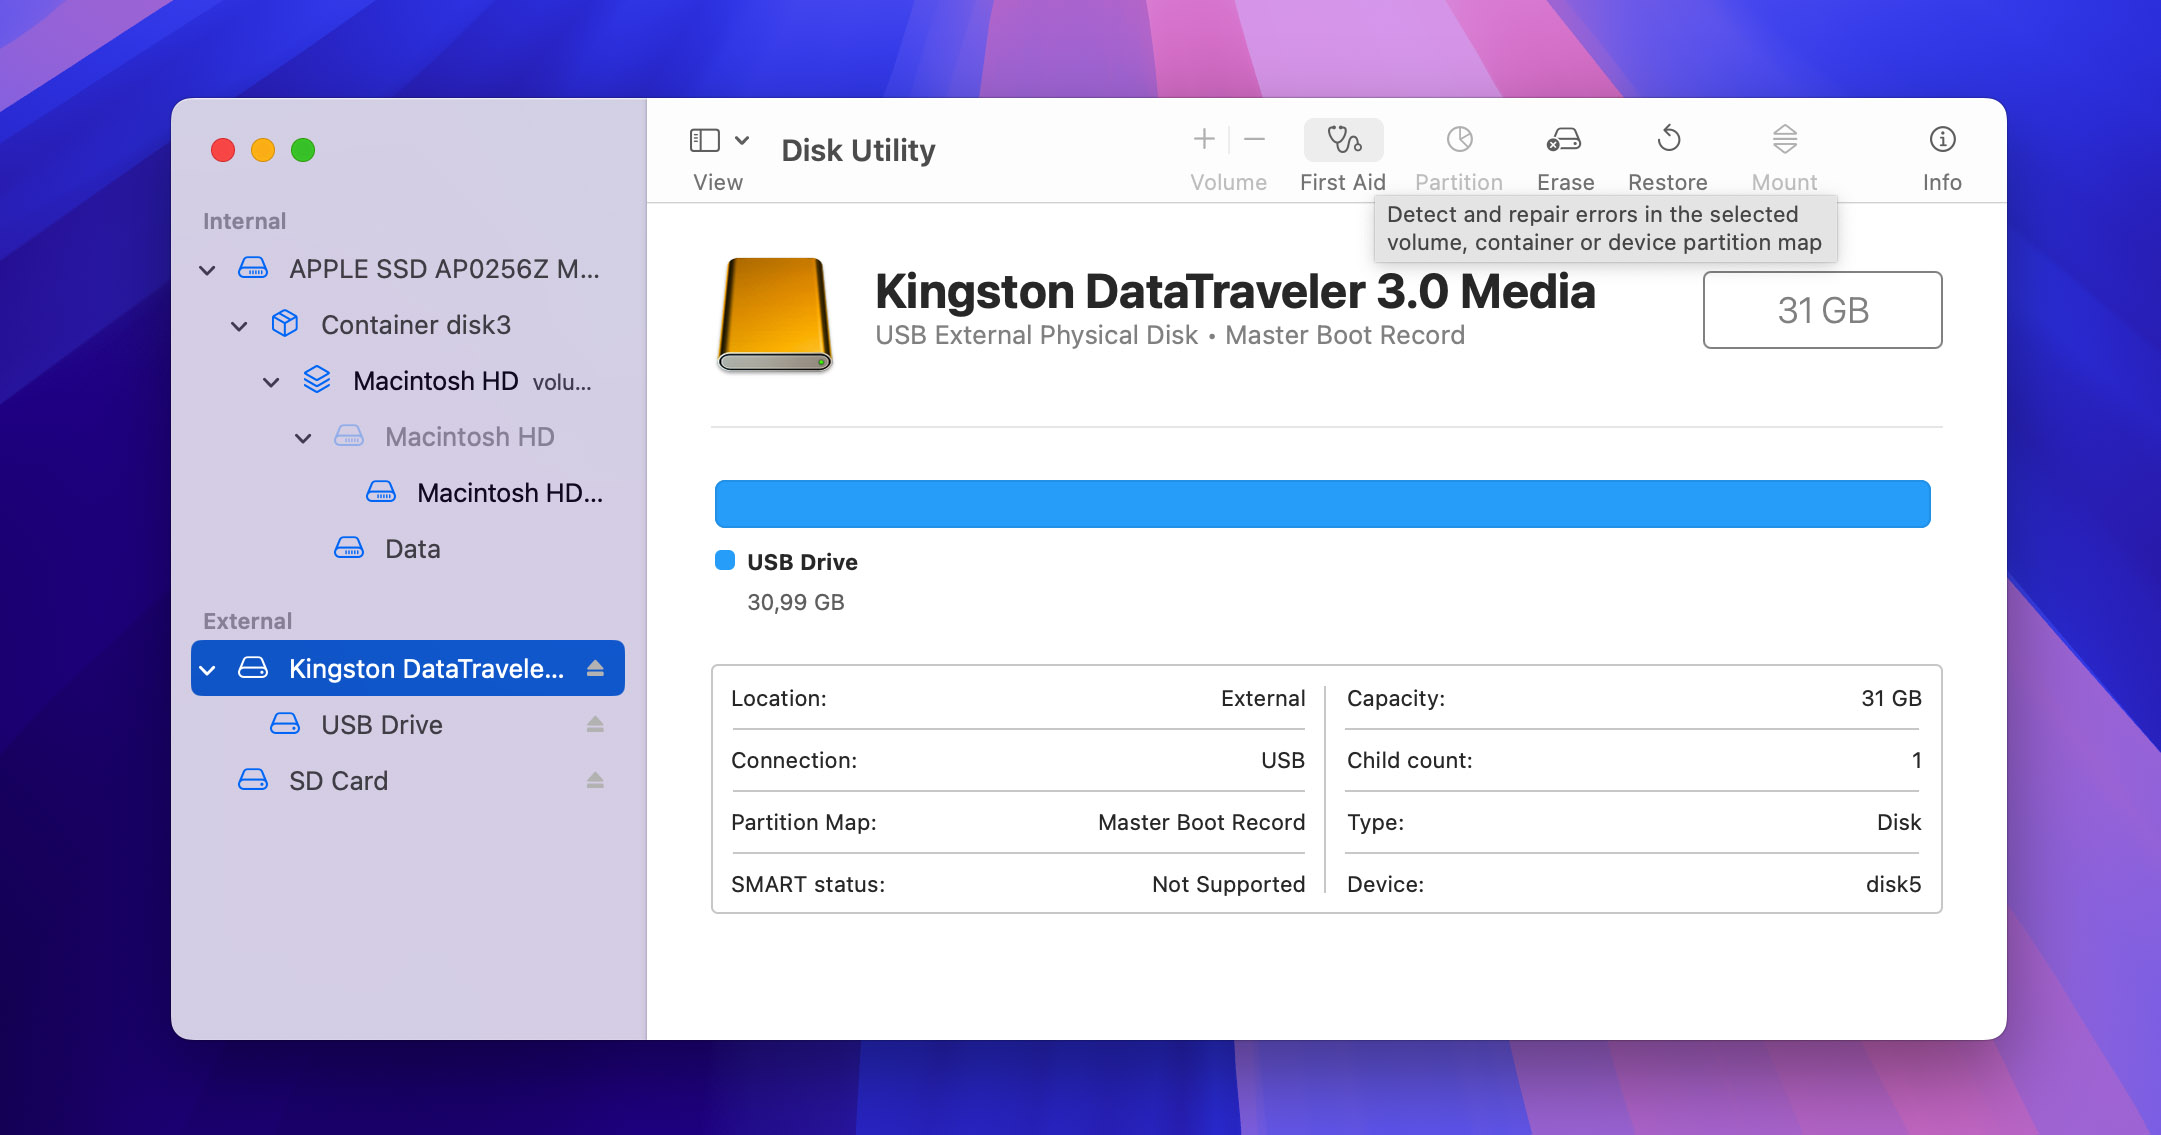
- Select your USB flash drive from the list of available storage devices on the left.
- Click First Aid in the toolbar.
- Confirm that you want to check the USB flash drive for errors by clicking Run. First Aid will automatically repair all errors and, hopefully, make your USB flash drive usable.
Method 8: Recover Lost or Damaged USB Drive Partitions With TestDisk
The cause of your inaccessible USB flash drive could also be that its partition has become damaged or lost. In a situation like that, you can attempt to recover it with TestDisk, a free tool designed for partition repair and recovery:
- Install TestDisk using Homebrew:
brew install testdisk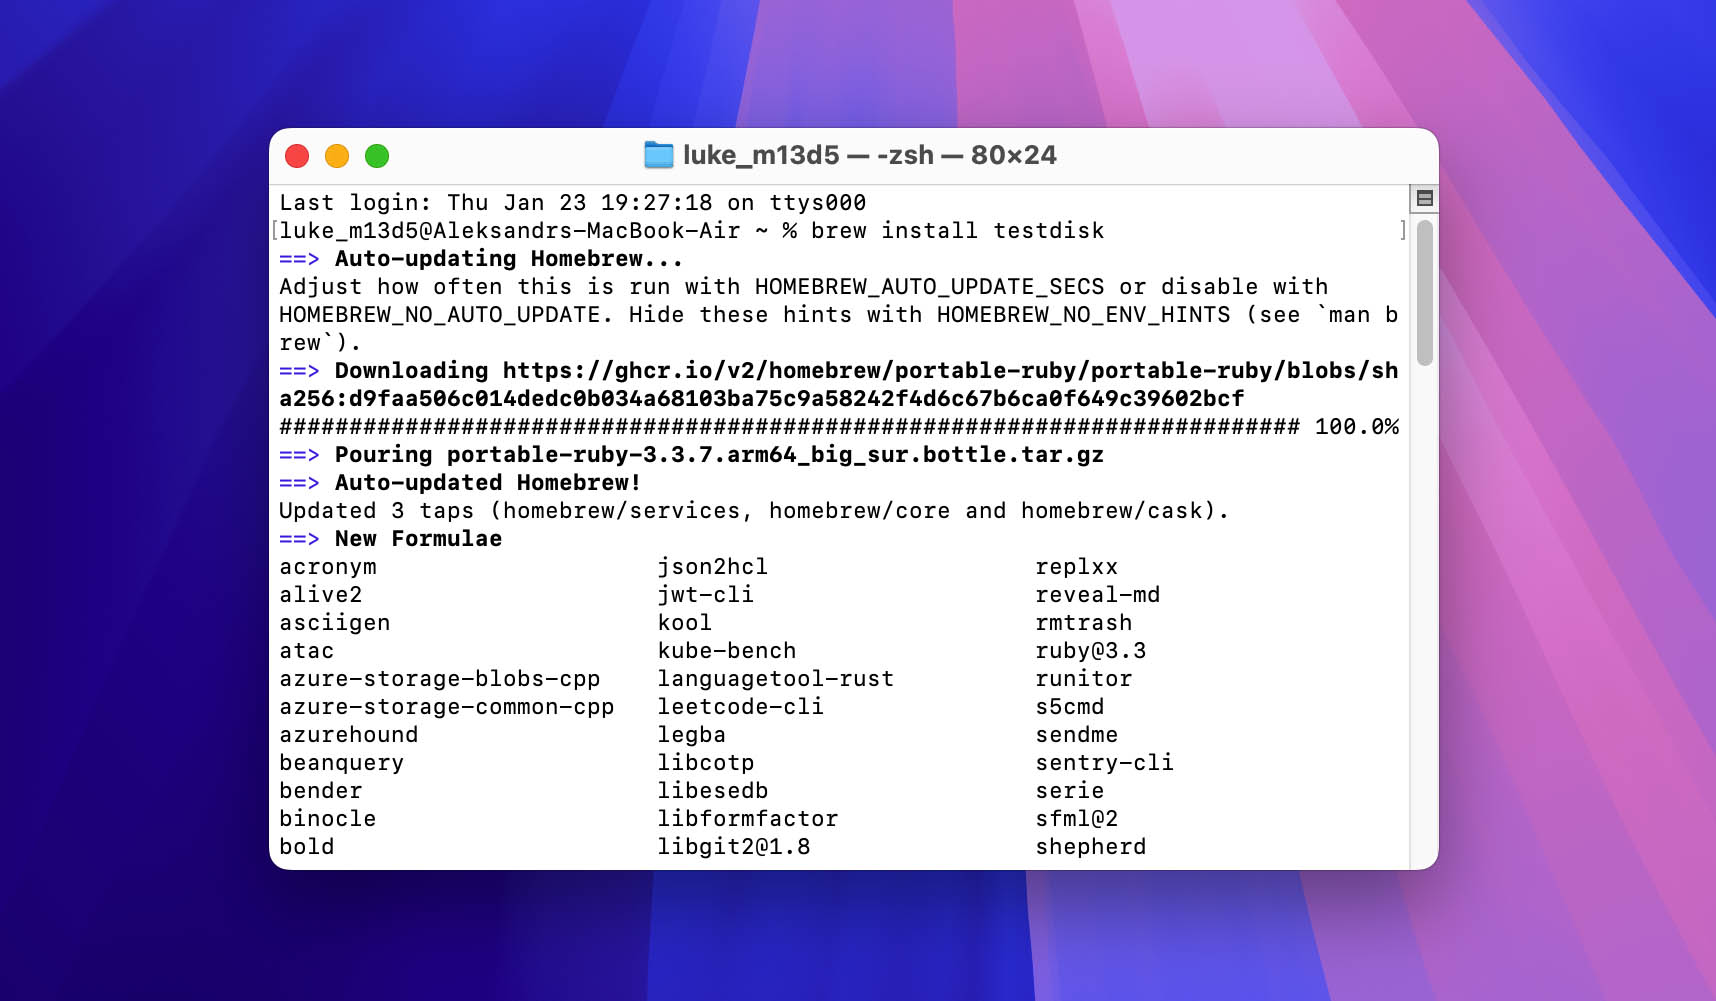
- Launch TestDisk by typing
sudo testdiskin Terminal and enter your administrator password when prompted.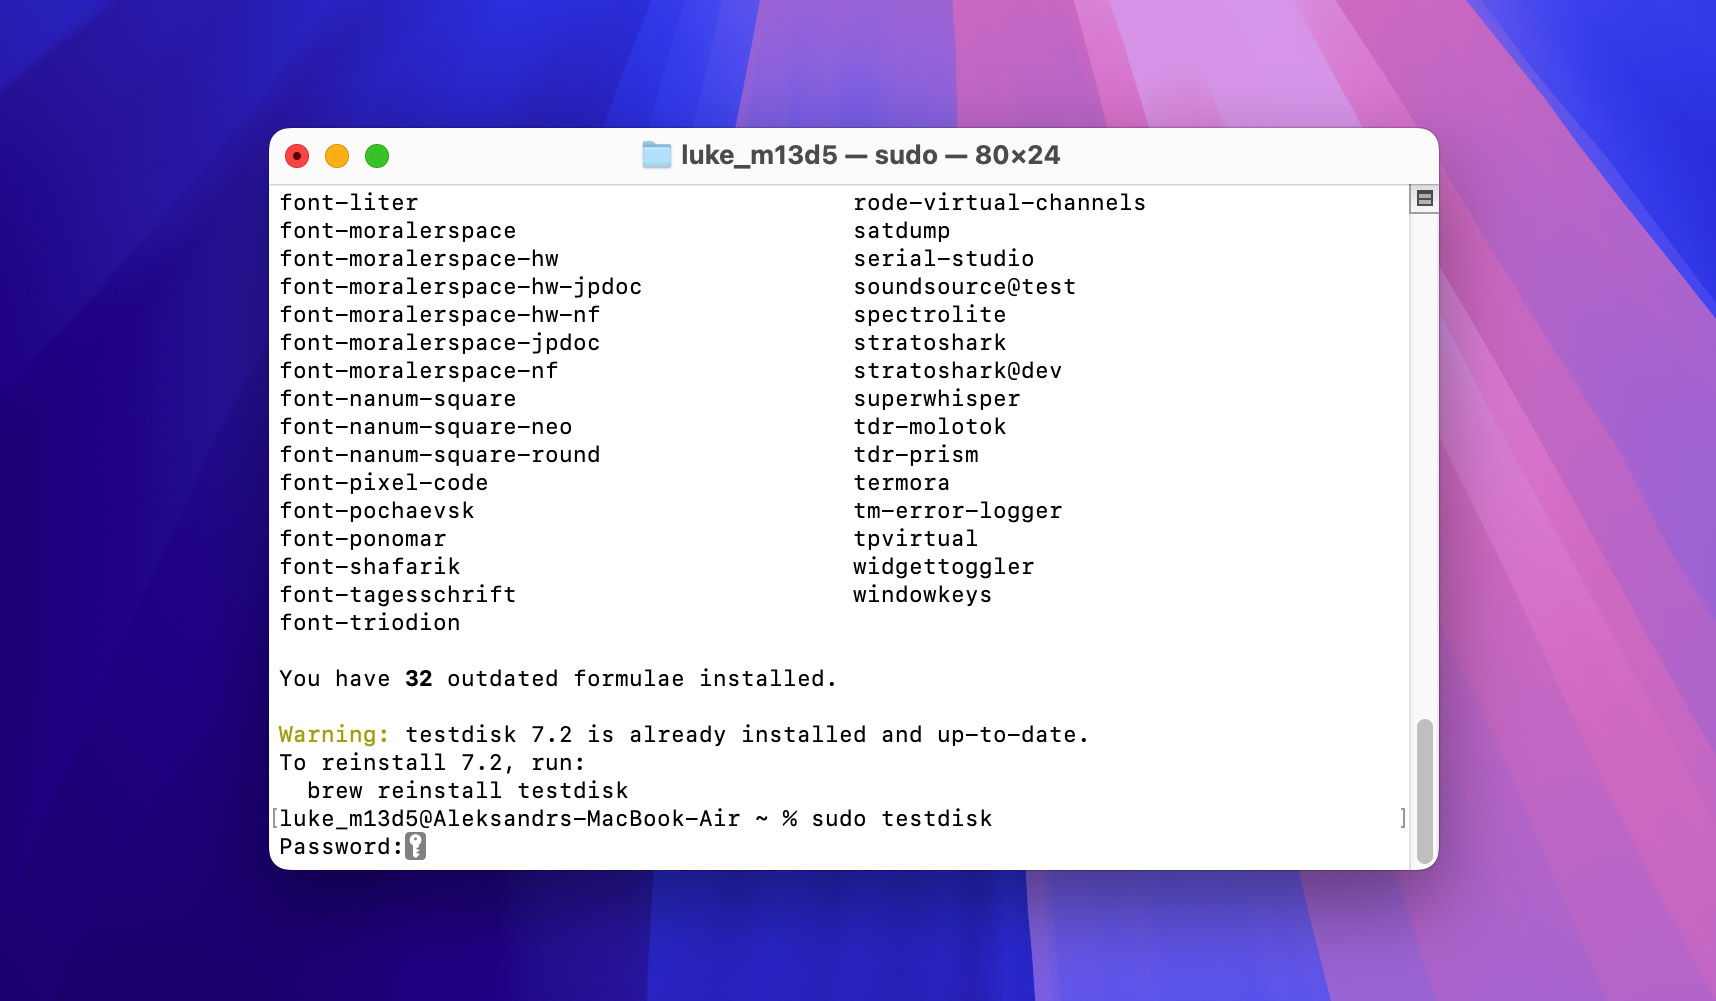
- Select Create when asked about log file creation, then choose your USB drive from the device list.

- Select your partition table type (usually the default option is correct), then choose Analyse from the main menu.

- Use Quick Search first, and if needed, try Deeper Search to find lost partitions.
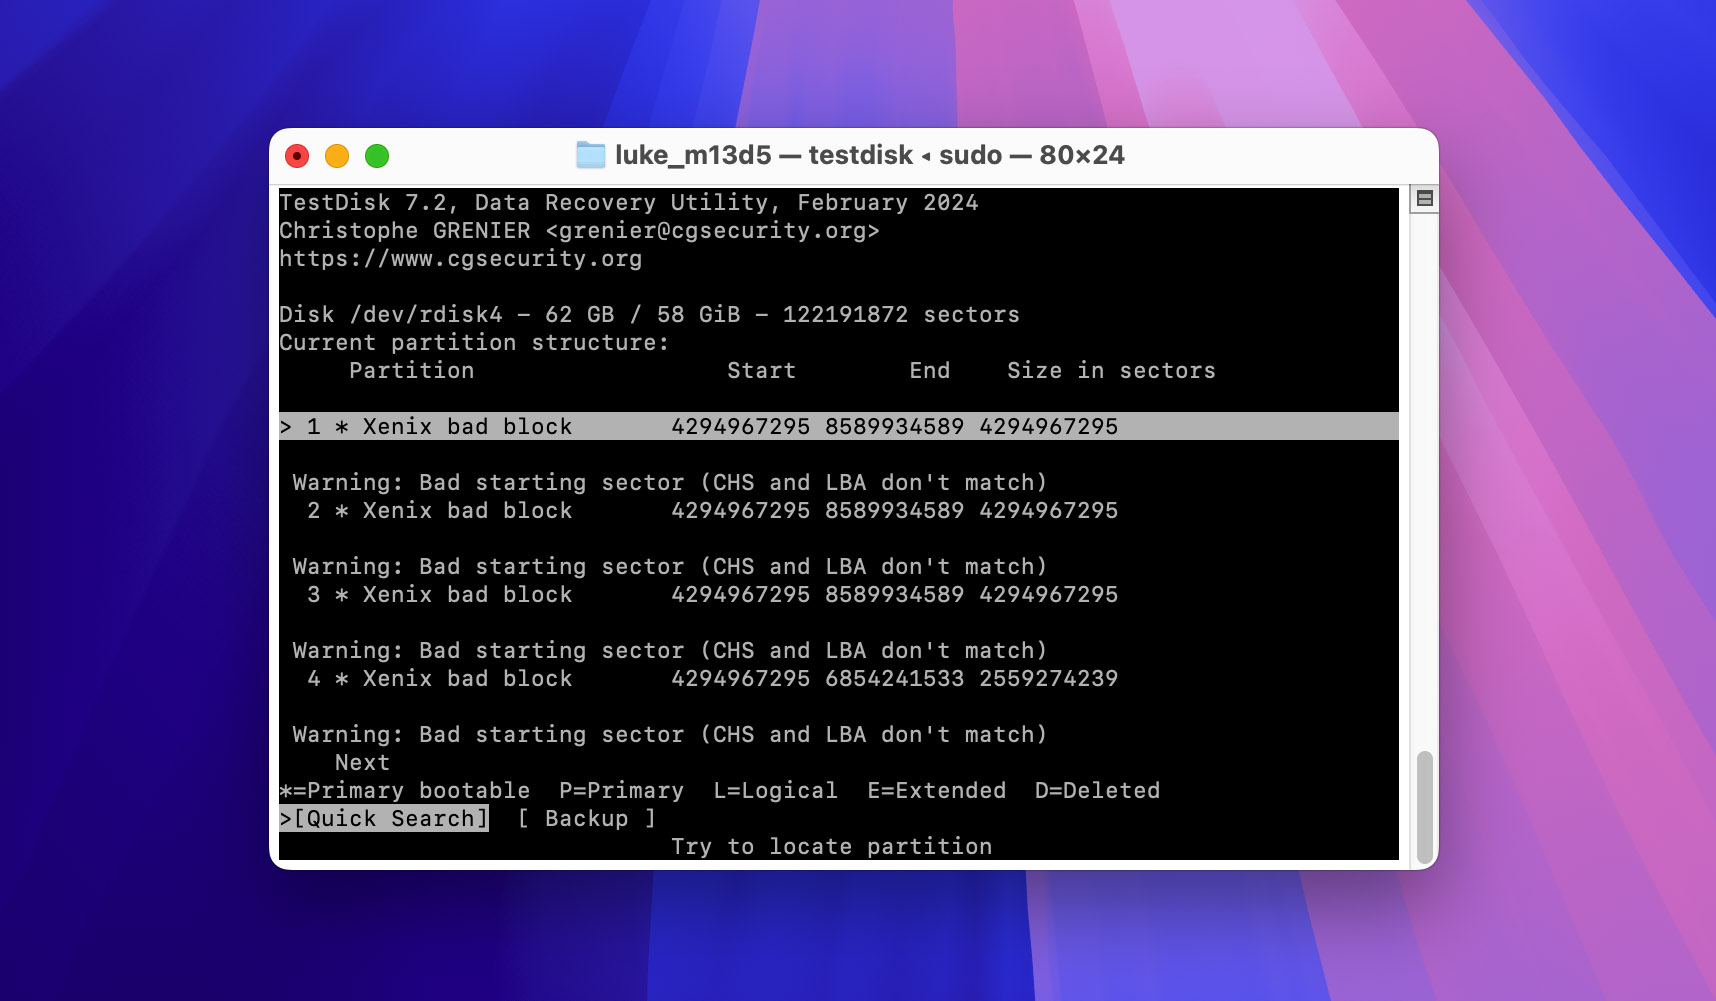
- When TestDisk finds your partition, use the left/right arrow keys to set its status as Primary or Logical, then select Write to save the changes.
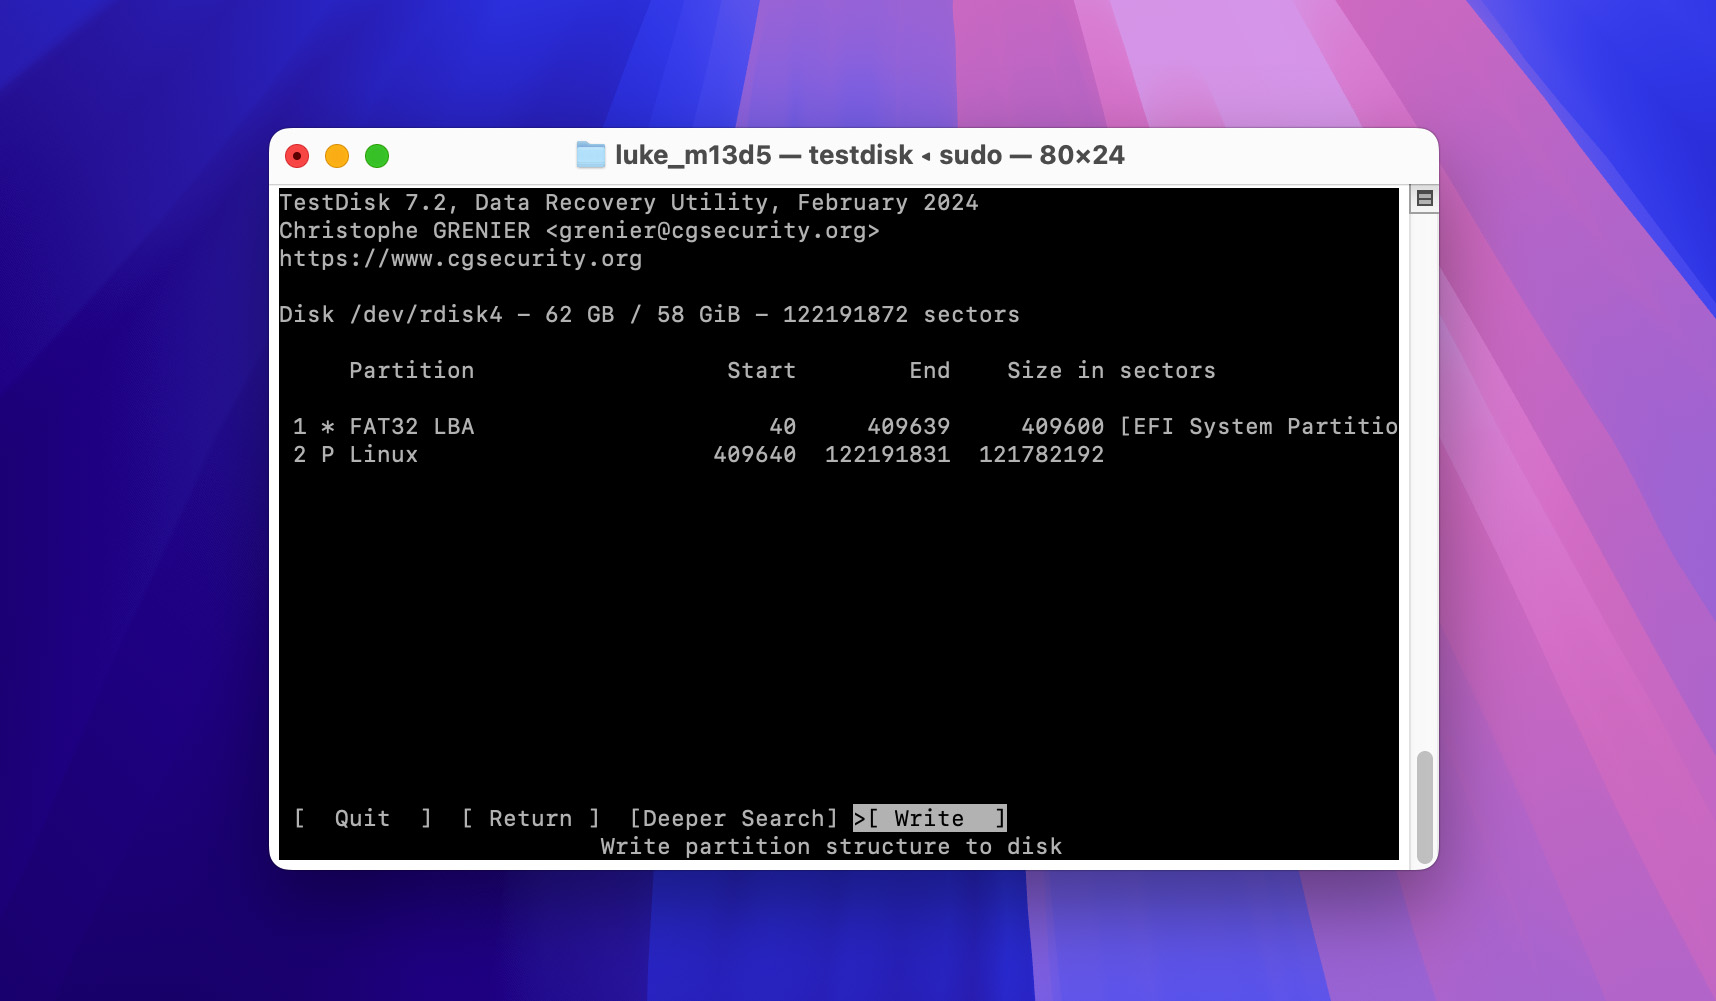
After the partition recovery, your files should be accessible from Finder and displayed with their original names intact.
Method 9: Change the Drive File System
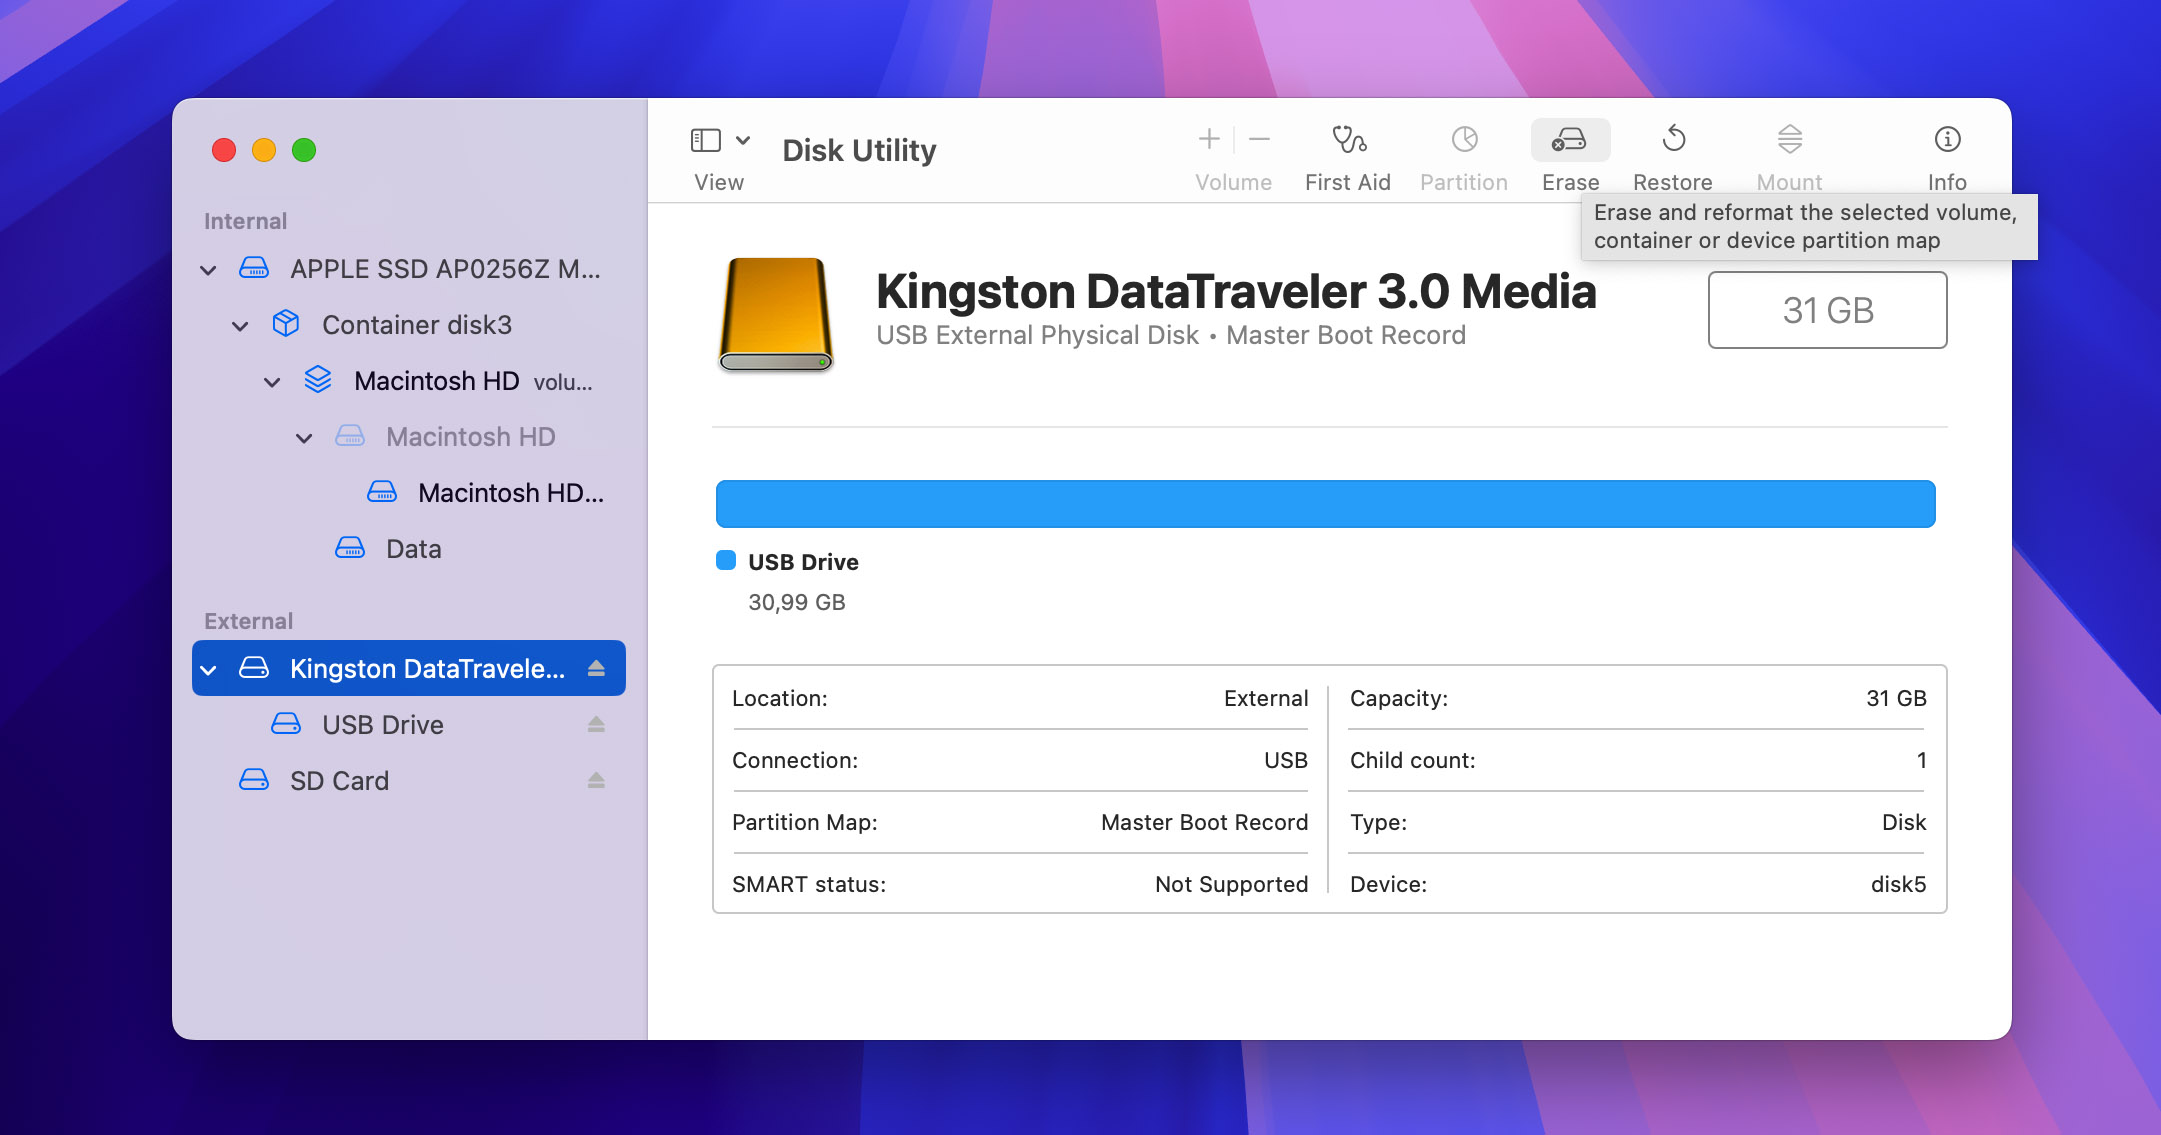
Modern Macs natively support Apple File System (APFS), Mac OS Extended, MS-DOS (FAT), and exFAT file systems. If your USB flash drive is using an unsupported file system like ext3 (Linux), your Mac will detect the drive but display a message saying the disk needs to be initialized. This happens because macOS cannot read the file system format. Fortunately, reformatting the drive to a supported file system is pretty easy:
- Open Finder and go to Applications.
- Open the Utilities folder and launch Disk Utility.
- Select your USB flash drive from the list of available storage devices on the left.
- Click the Erase button.
- Give the USB flash drive a descriptive name and change the format settings if you want to (all available options are compatible with macOS).
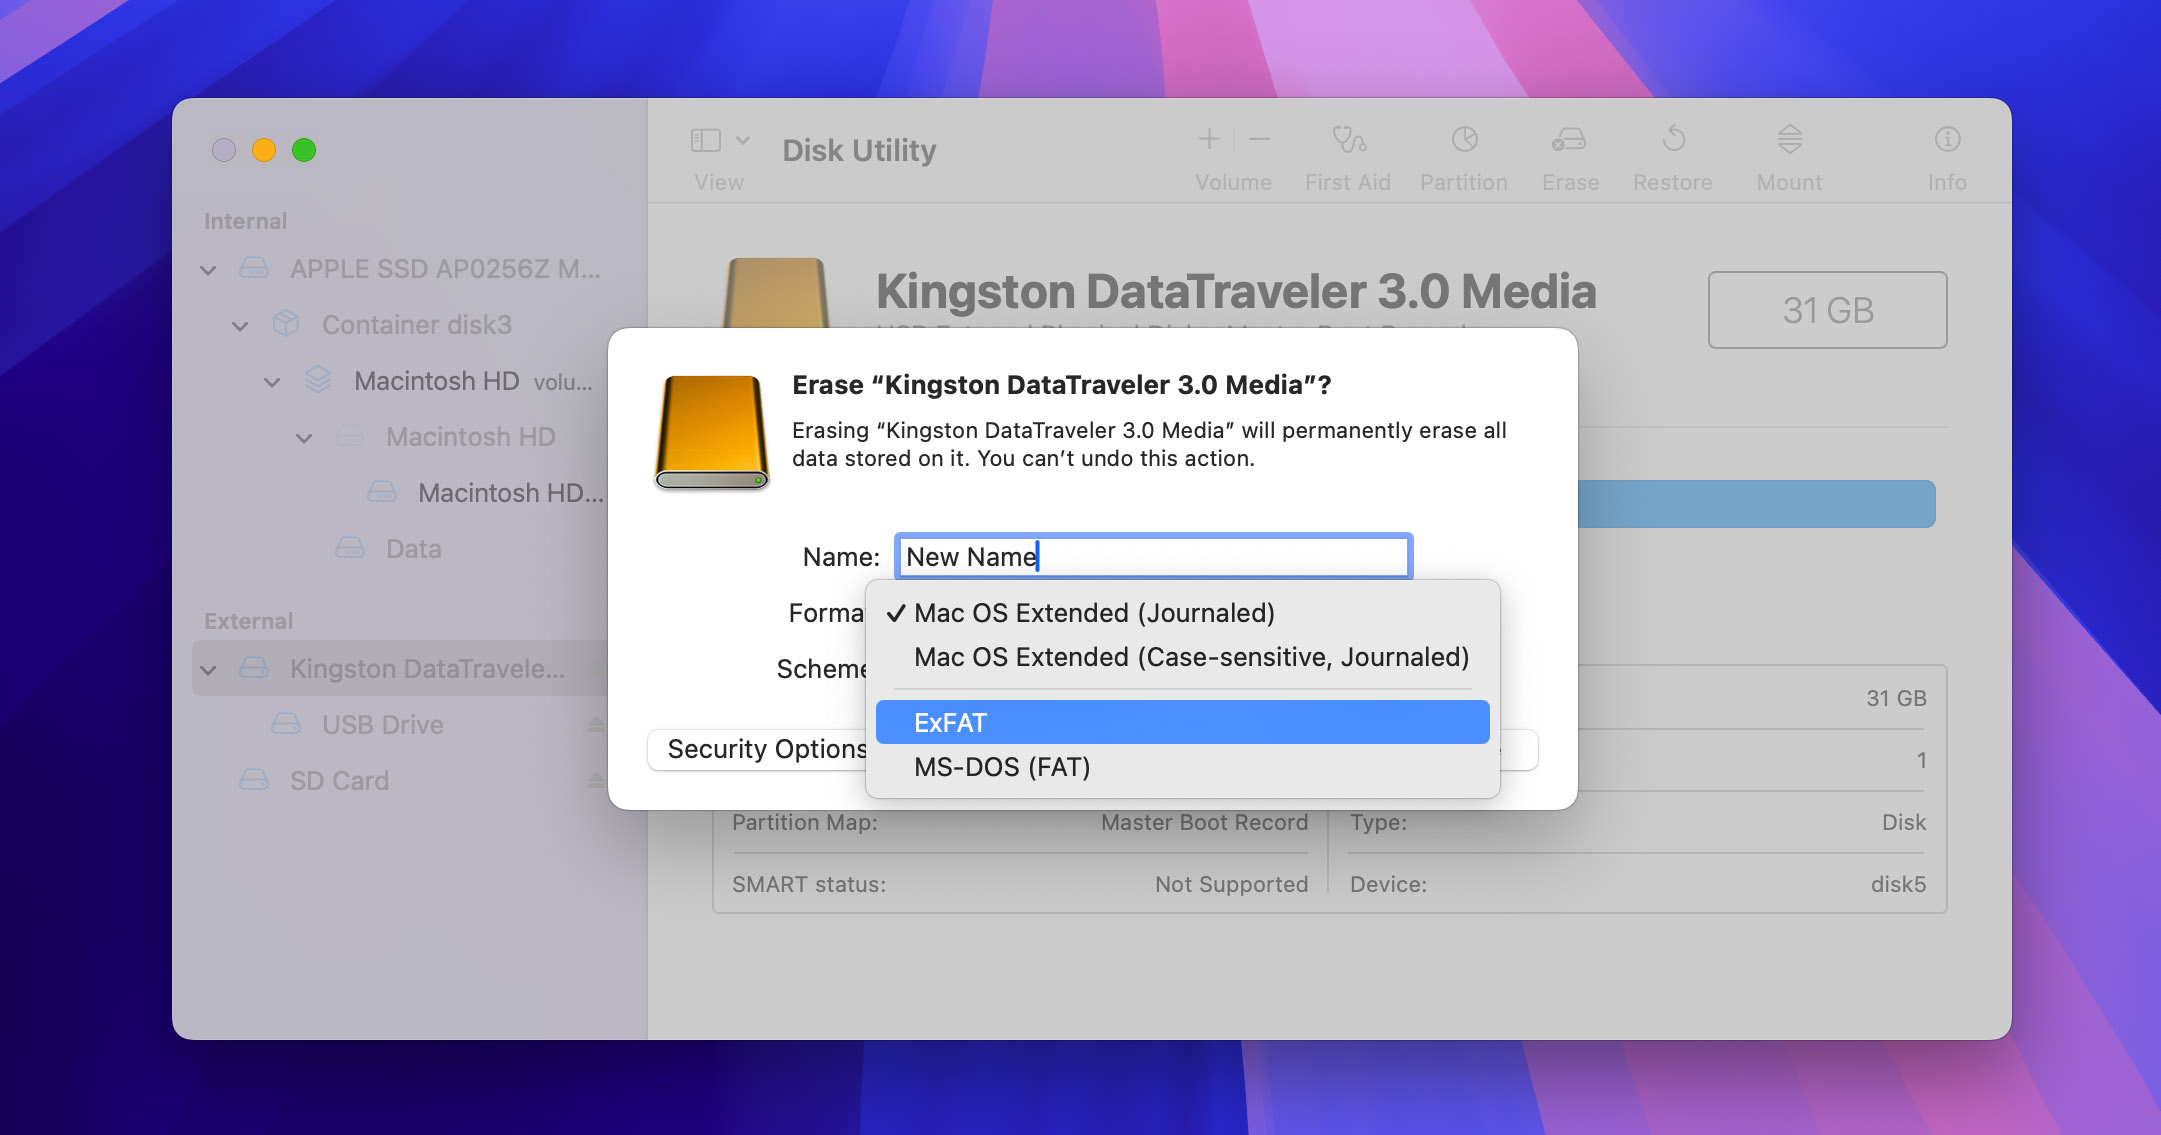
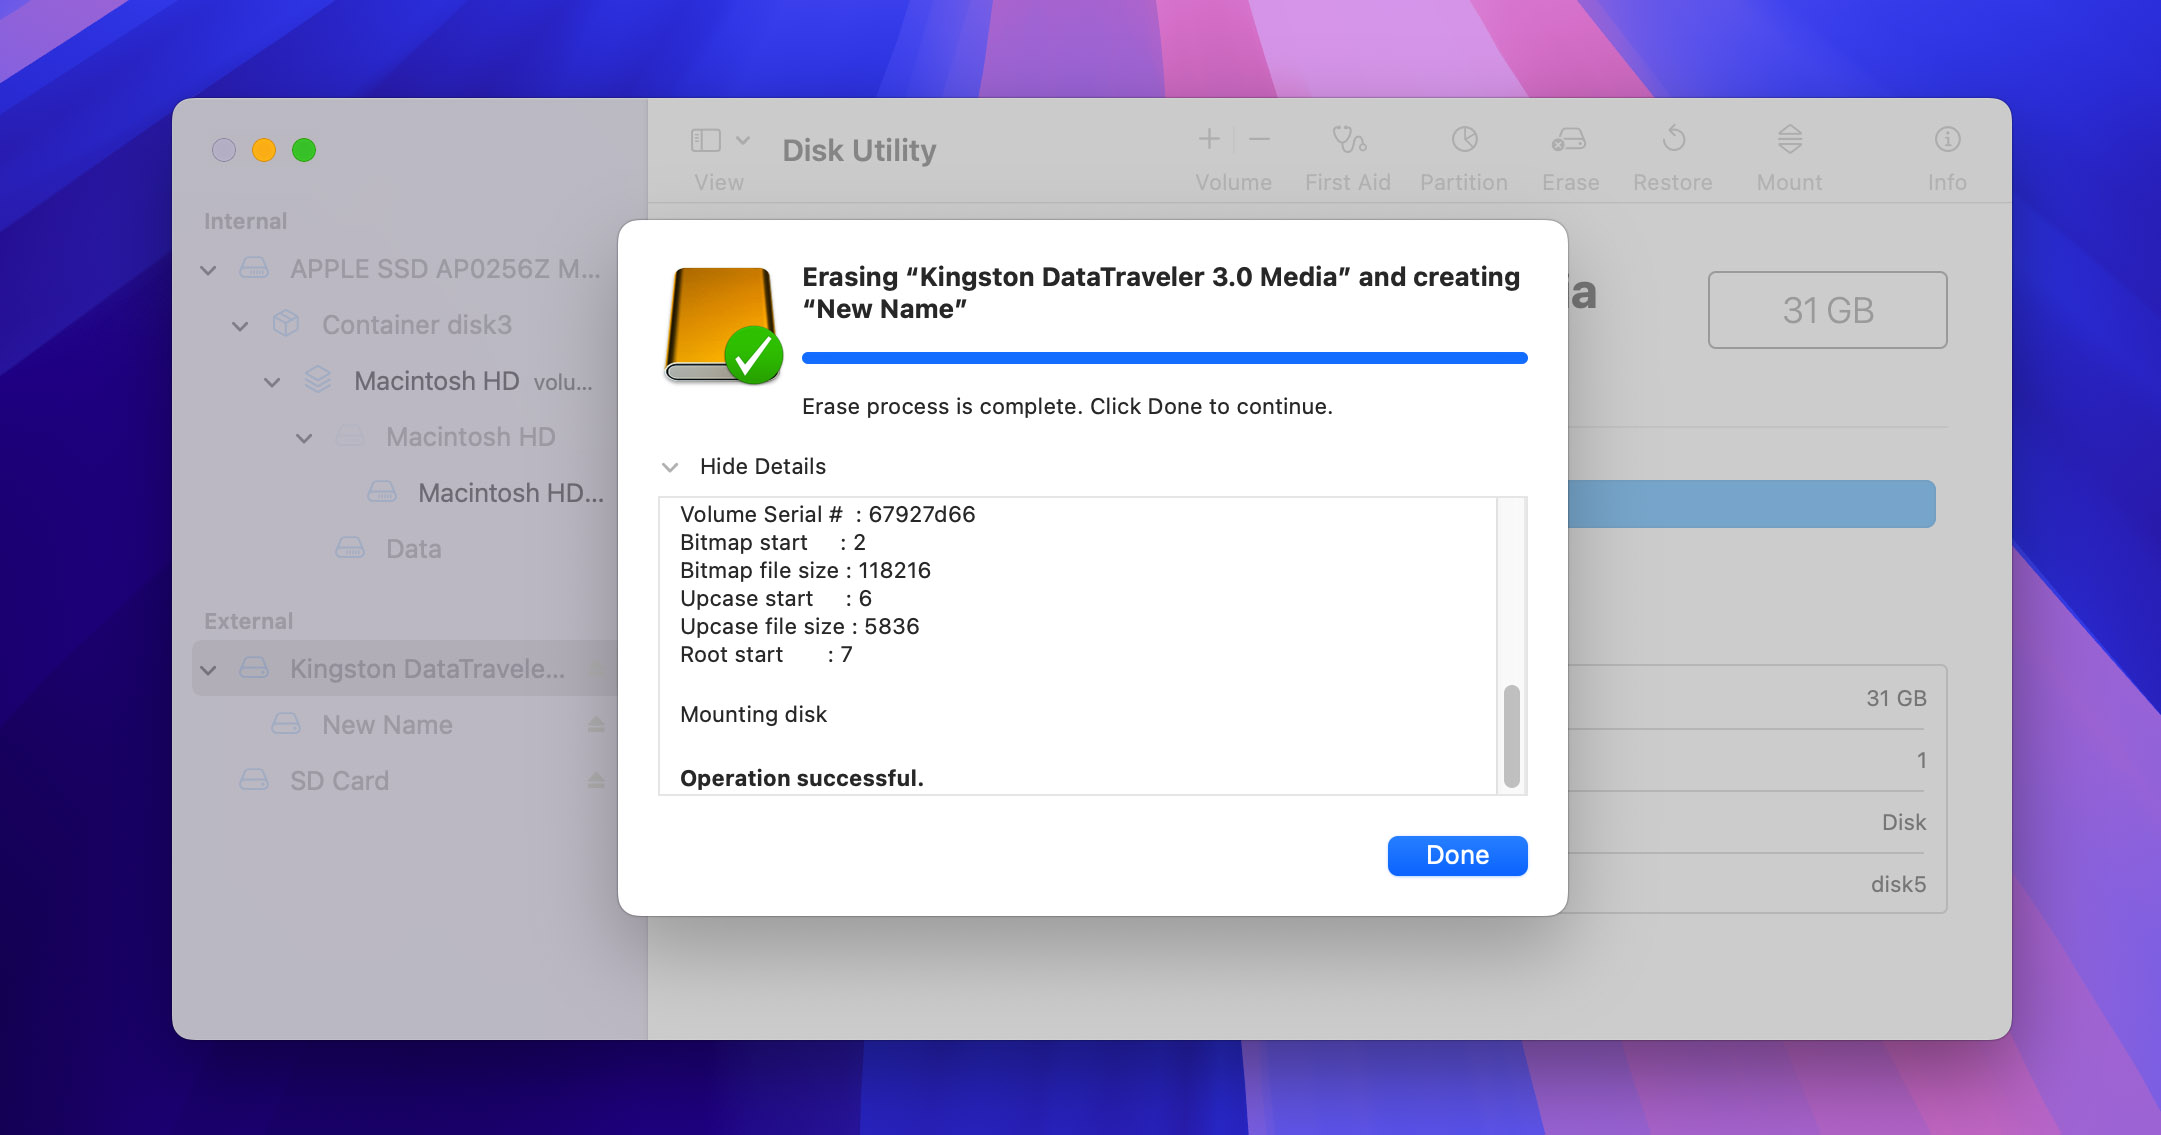
- Click the Erase button to format the USB flash drive.
Just remember that not all file systems supported by macOS are also supported by Windows and Linux. For the best cross-device compatibility, use FAT or exFAT.
Method 10: Check for Missing Software
Some specialized USB flash drives, such as those with proprietary encryption features, may require special software to be accessible. If you suspect that this could be the case with your USB flash drive, then we recommend you visit the manufacturer’s website and see if you’ve missed some important software.
On the other hand, some encrypted drives may not work on Mac at all. For instance, the Edge Memory diskGO Secure USB 3.0 uses CryptArchiver software that’s only compatible with Windows. In such cases, your only option is to first decrypt the drive using a Windows computer, after which you can use it as regular storage on your Mac.
Recovering Data From a Corrupted or Crashed Flash Drive
Even if your USB drive isn’t recognized properly on your Mac in a way that makes it accessible from Finder, you might still be able to recover data from it using USB drive data recovery software for Mac.
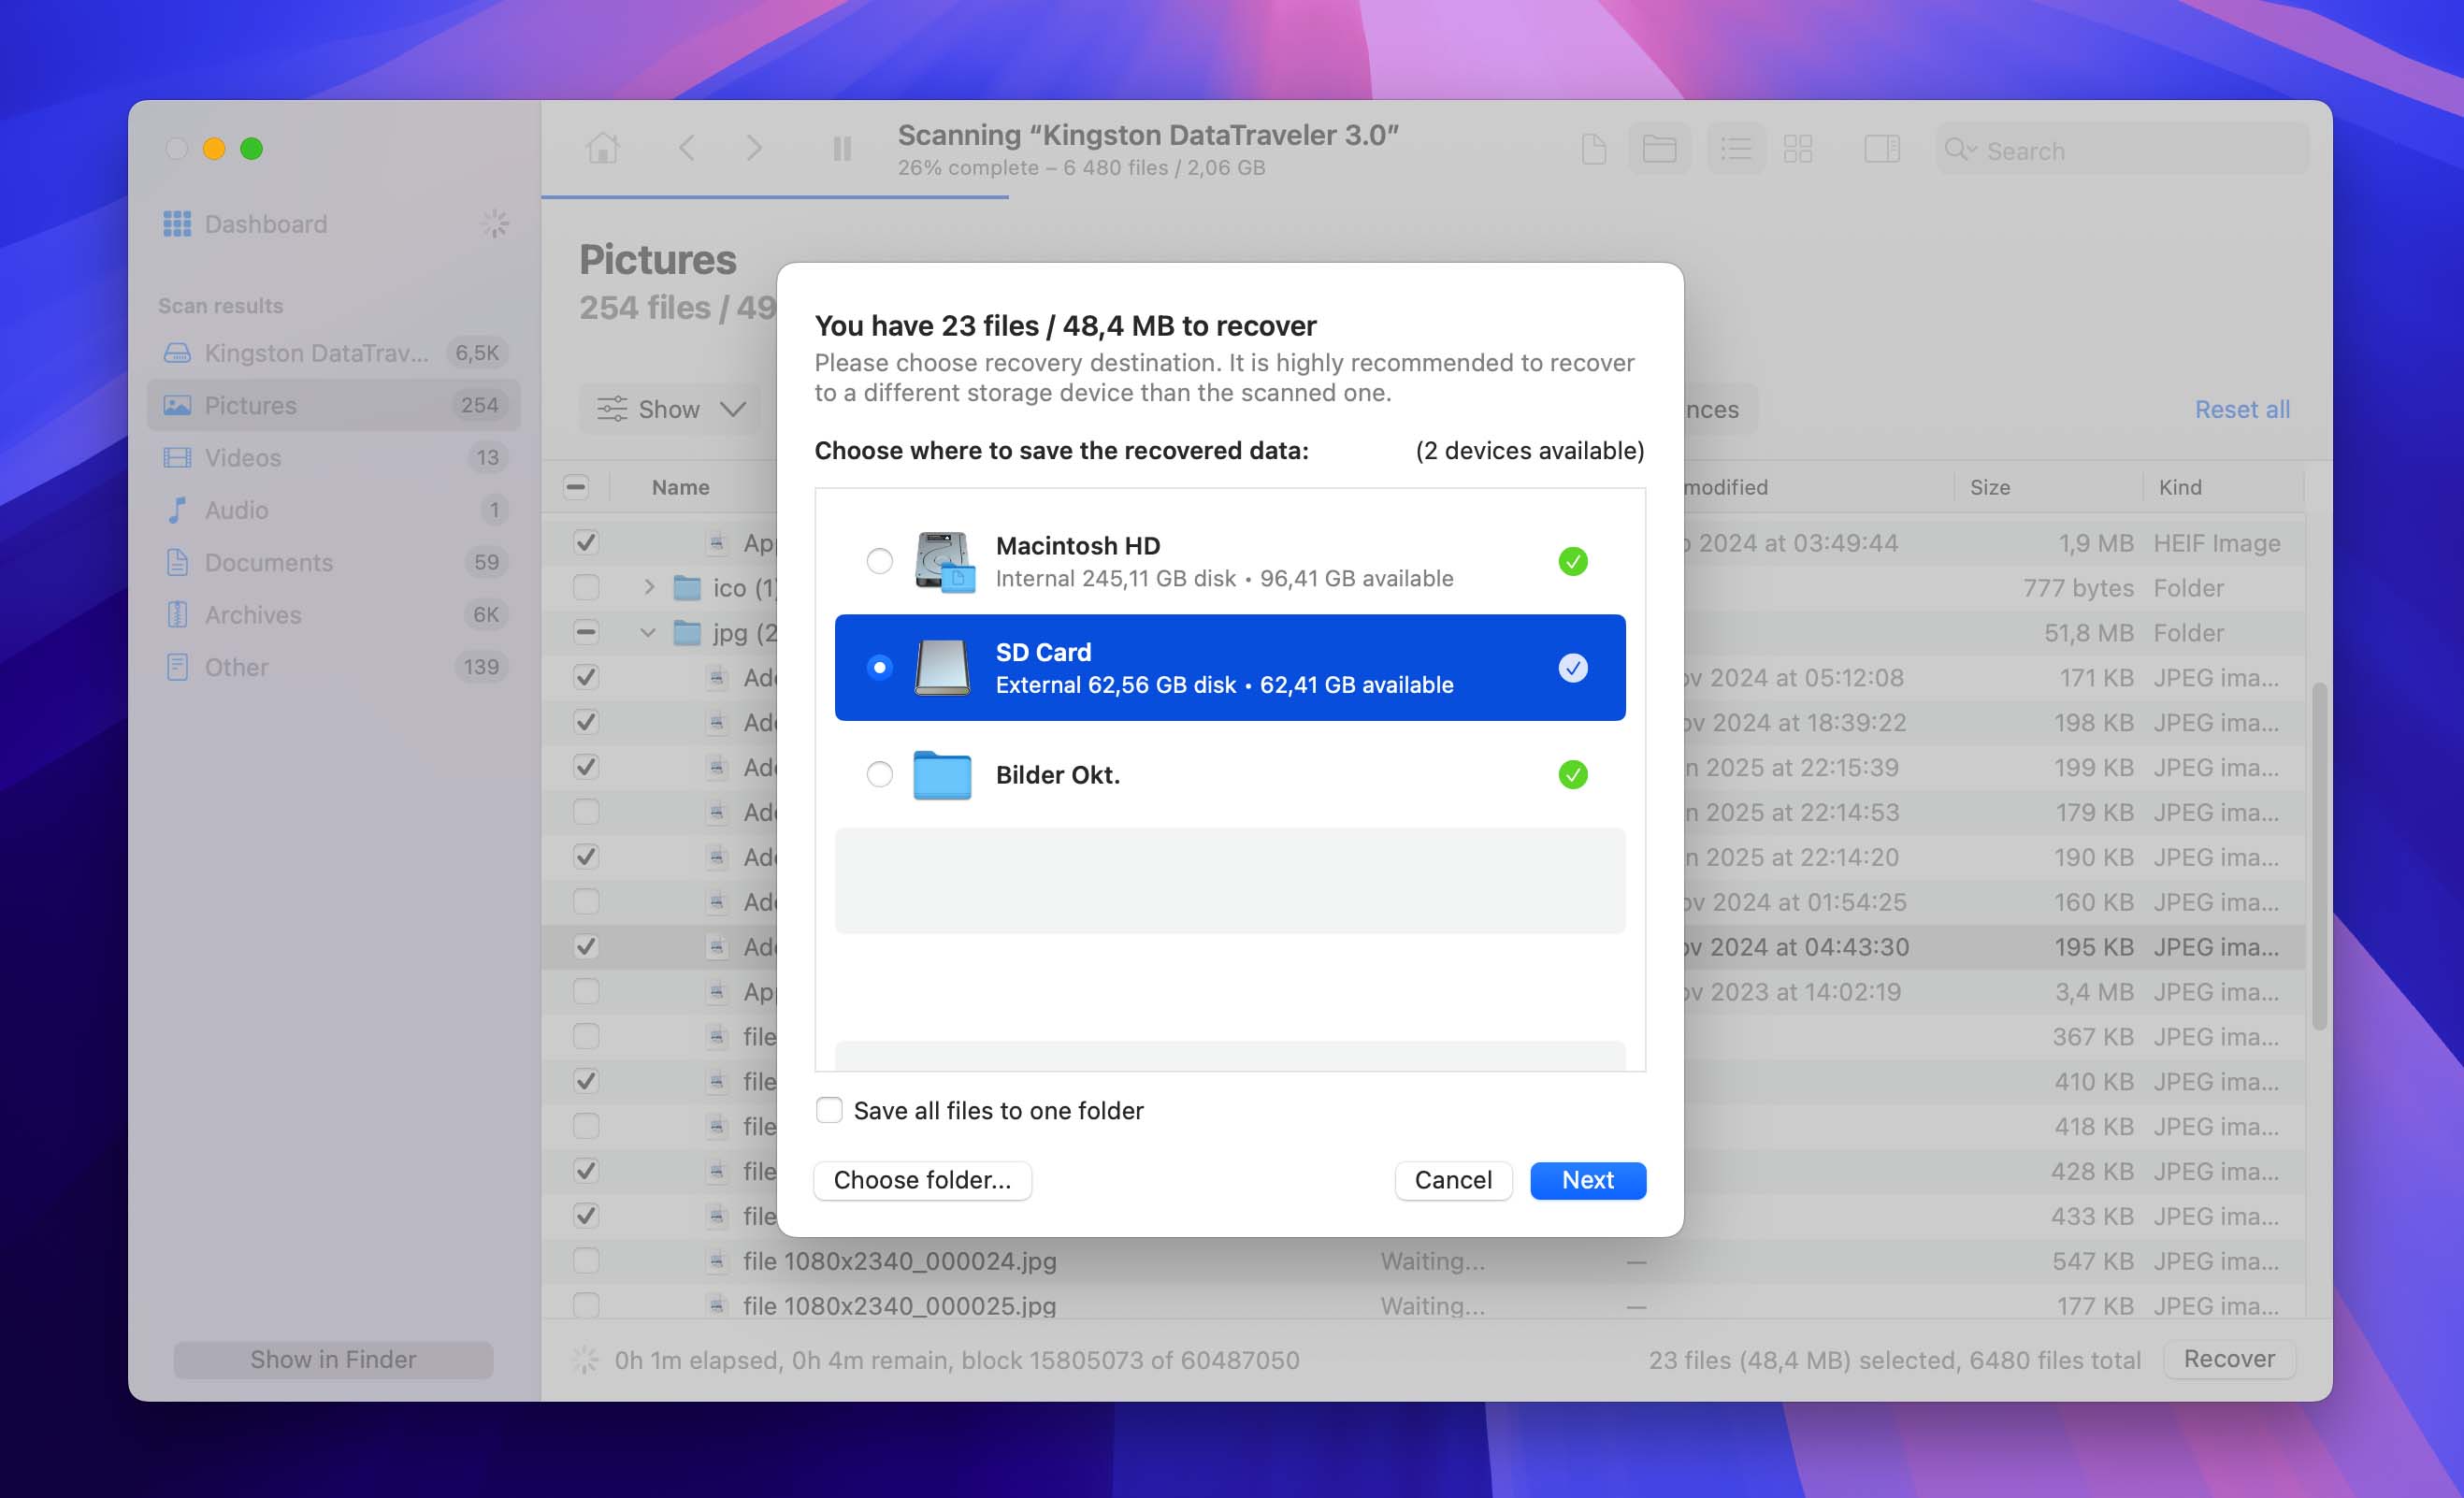
Disk Drill is an excellent choice for this situation because it can recover data from USB drives with corrupted or lost file systems and supports around 400 different file types. The only requirement is that your USB flash drive must be listed in Disk Utility with the correct size. If it appears there, Disk Drill can scan it and likely recover all or some of your data. Once you’ve safely recovered your files, you can then format the drive to address the original recognition issue.
Here’s how to recover data from a USB flash drive using Disk Drill:
- Download and install Disk Drill on your Mac. You can use the free version of the software to determine if your files can be recovered before upgrading to the Pro version of the application.
- Attach the USB or flash drive which contains the data that is to be recovered.
- Launch Disk Drill by opening Finder > Applications and double-clicking its icon.
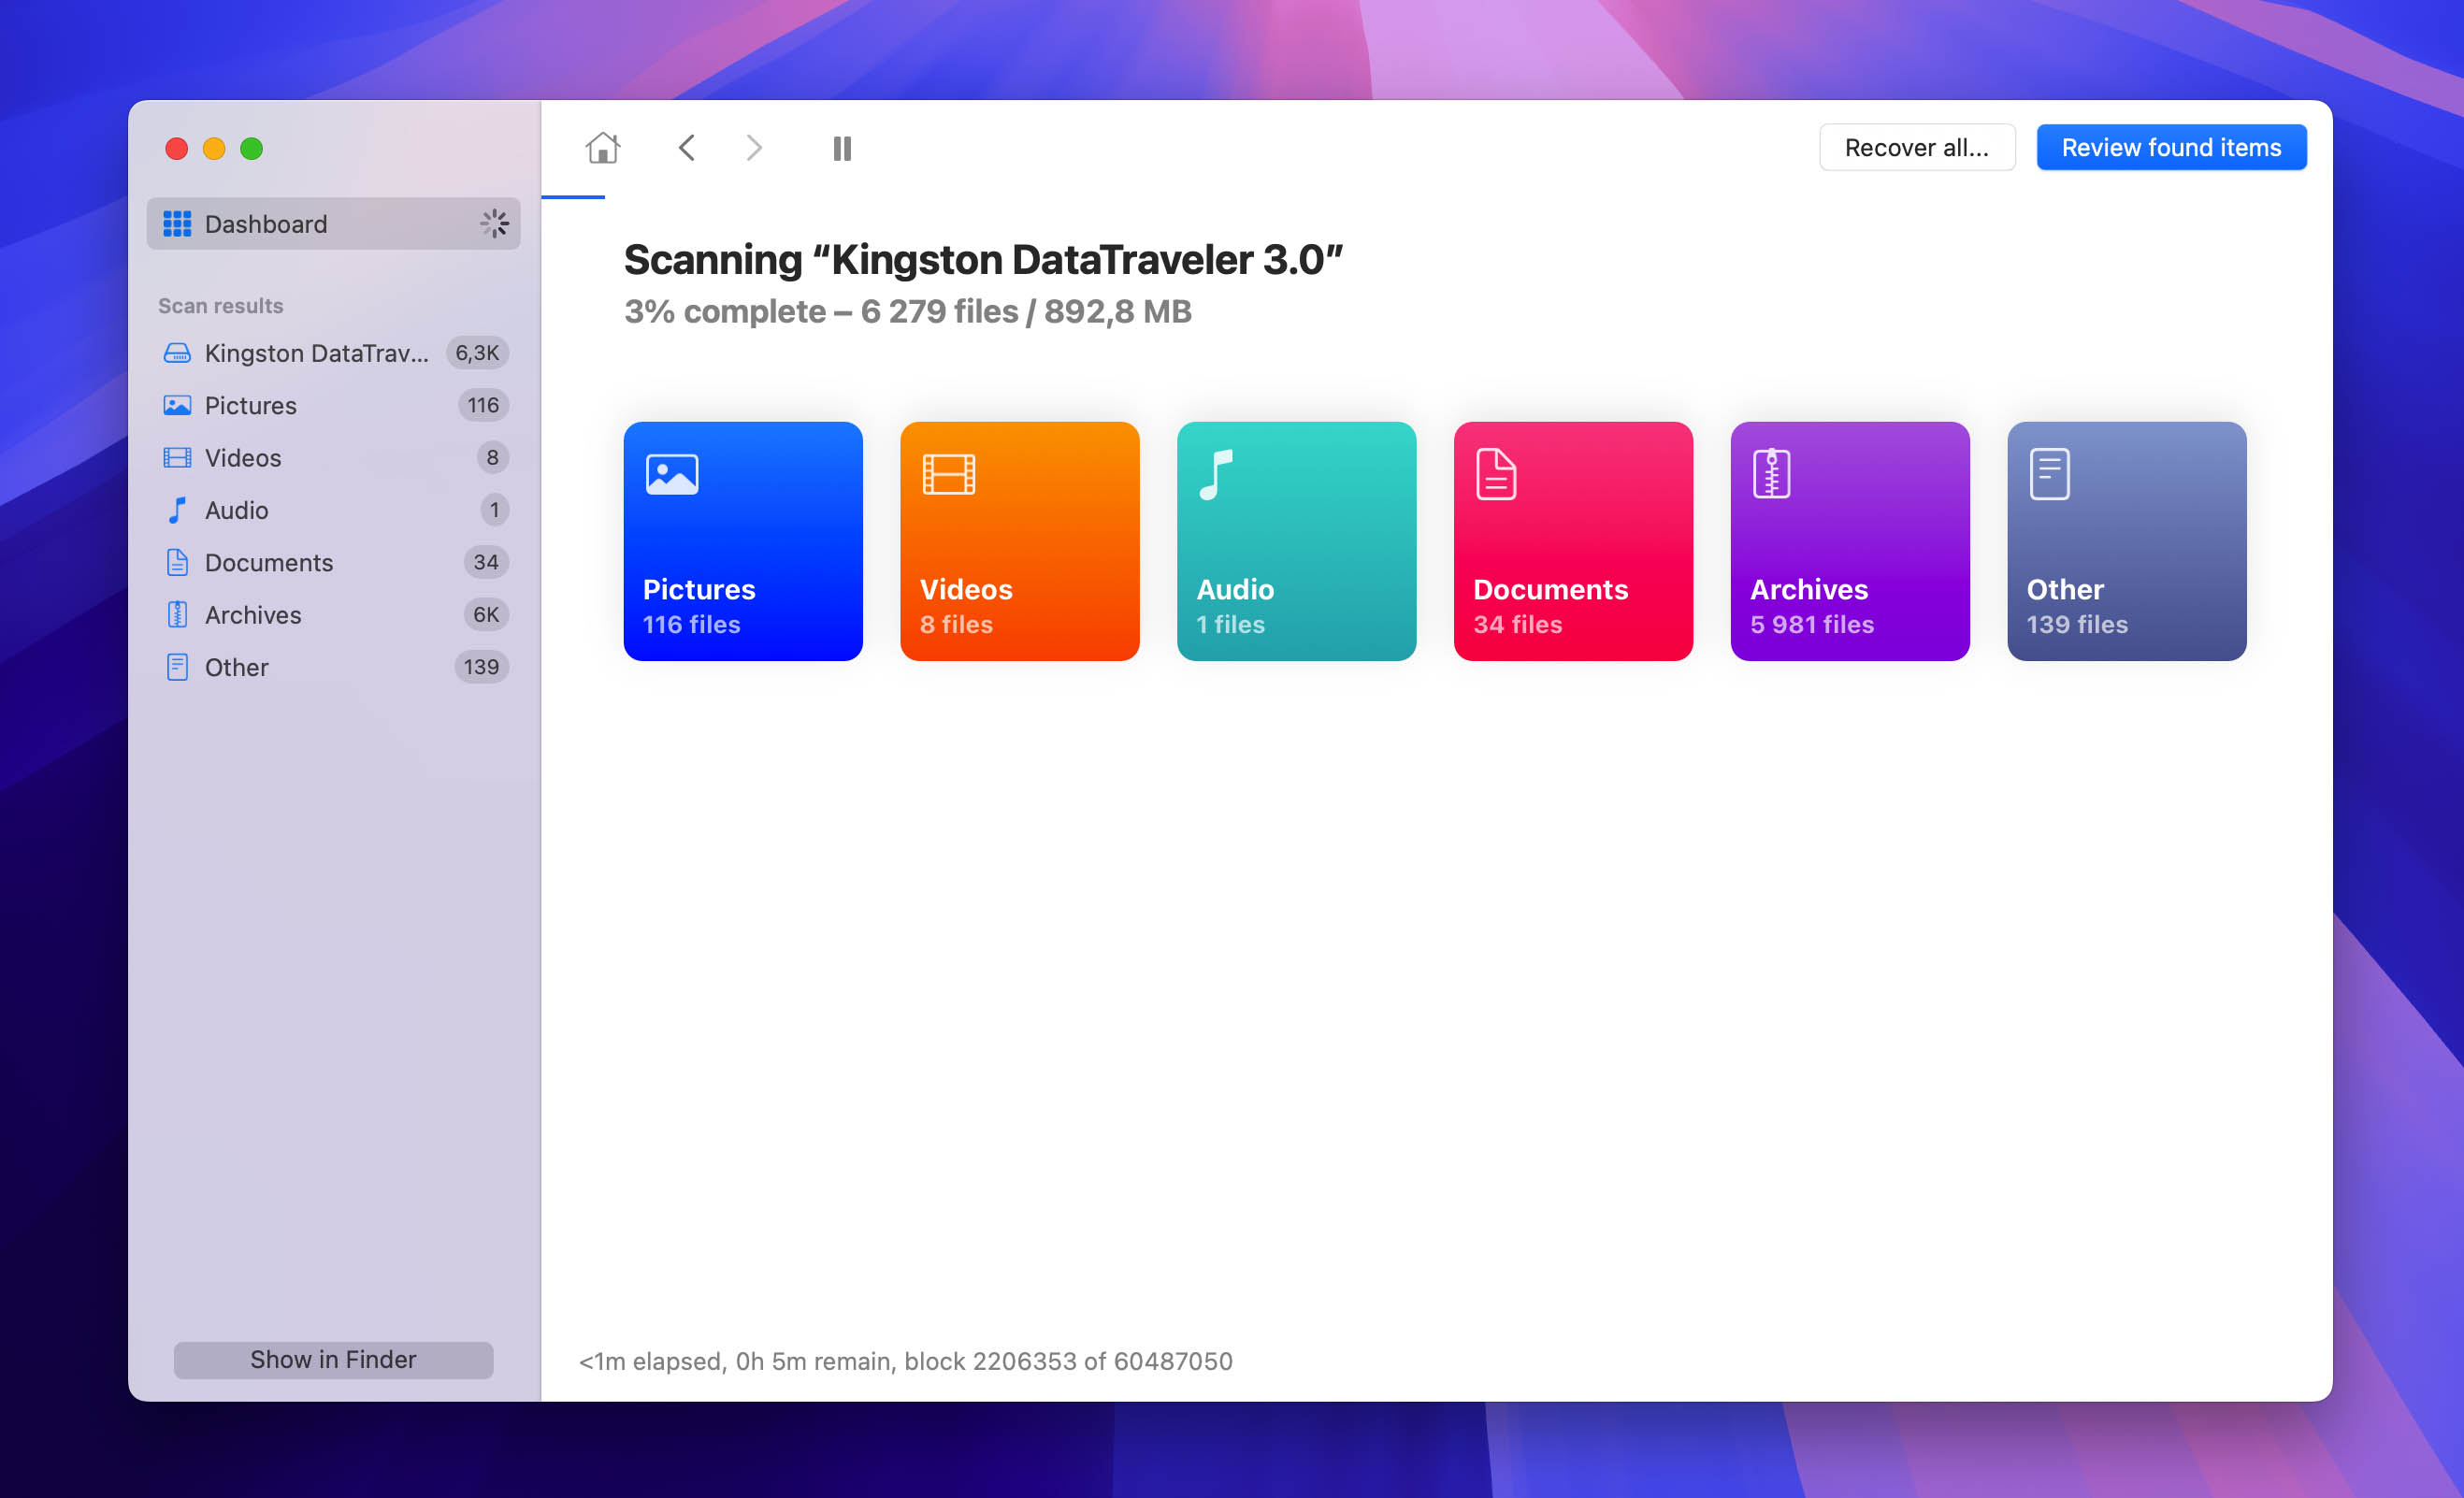
- Select your USB flash drive from the list, then click “Search for lost data.”

- Wait for Disk Drill to complete its scan, then click “Review found items.”
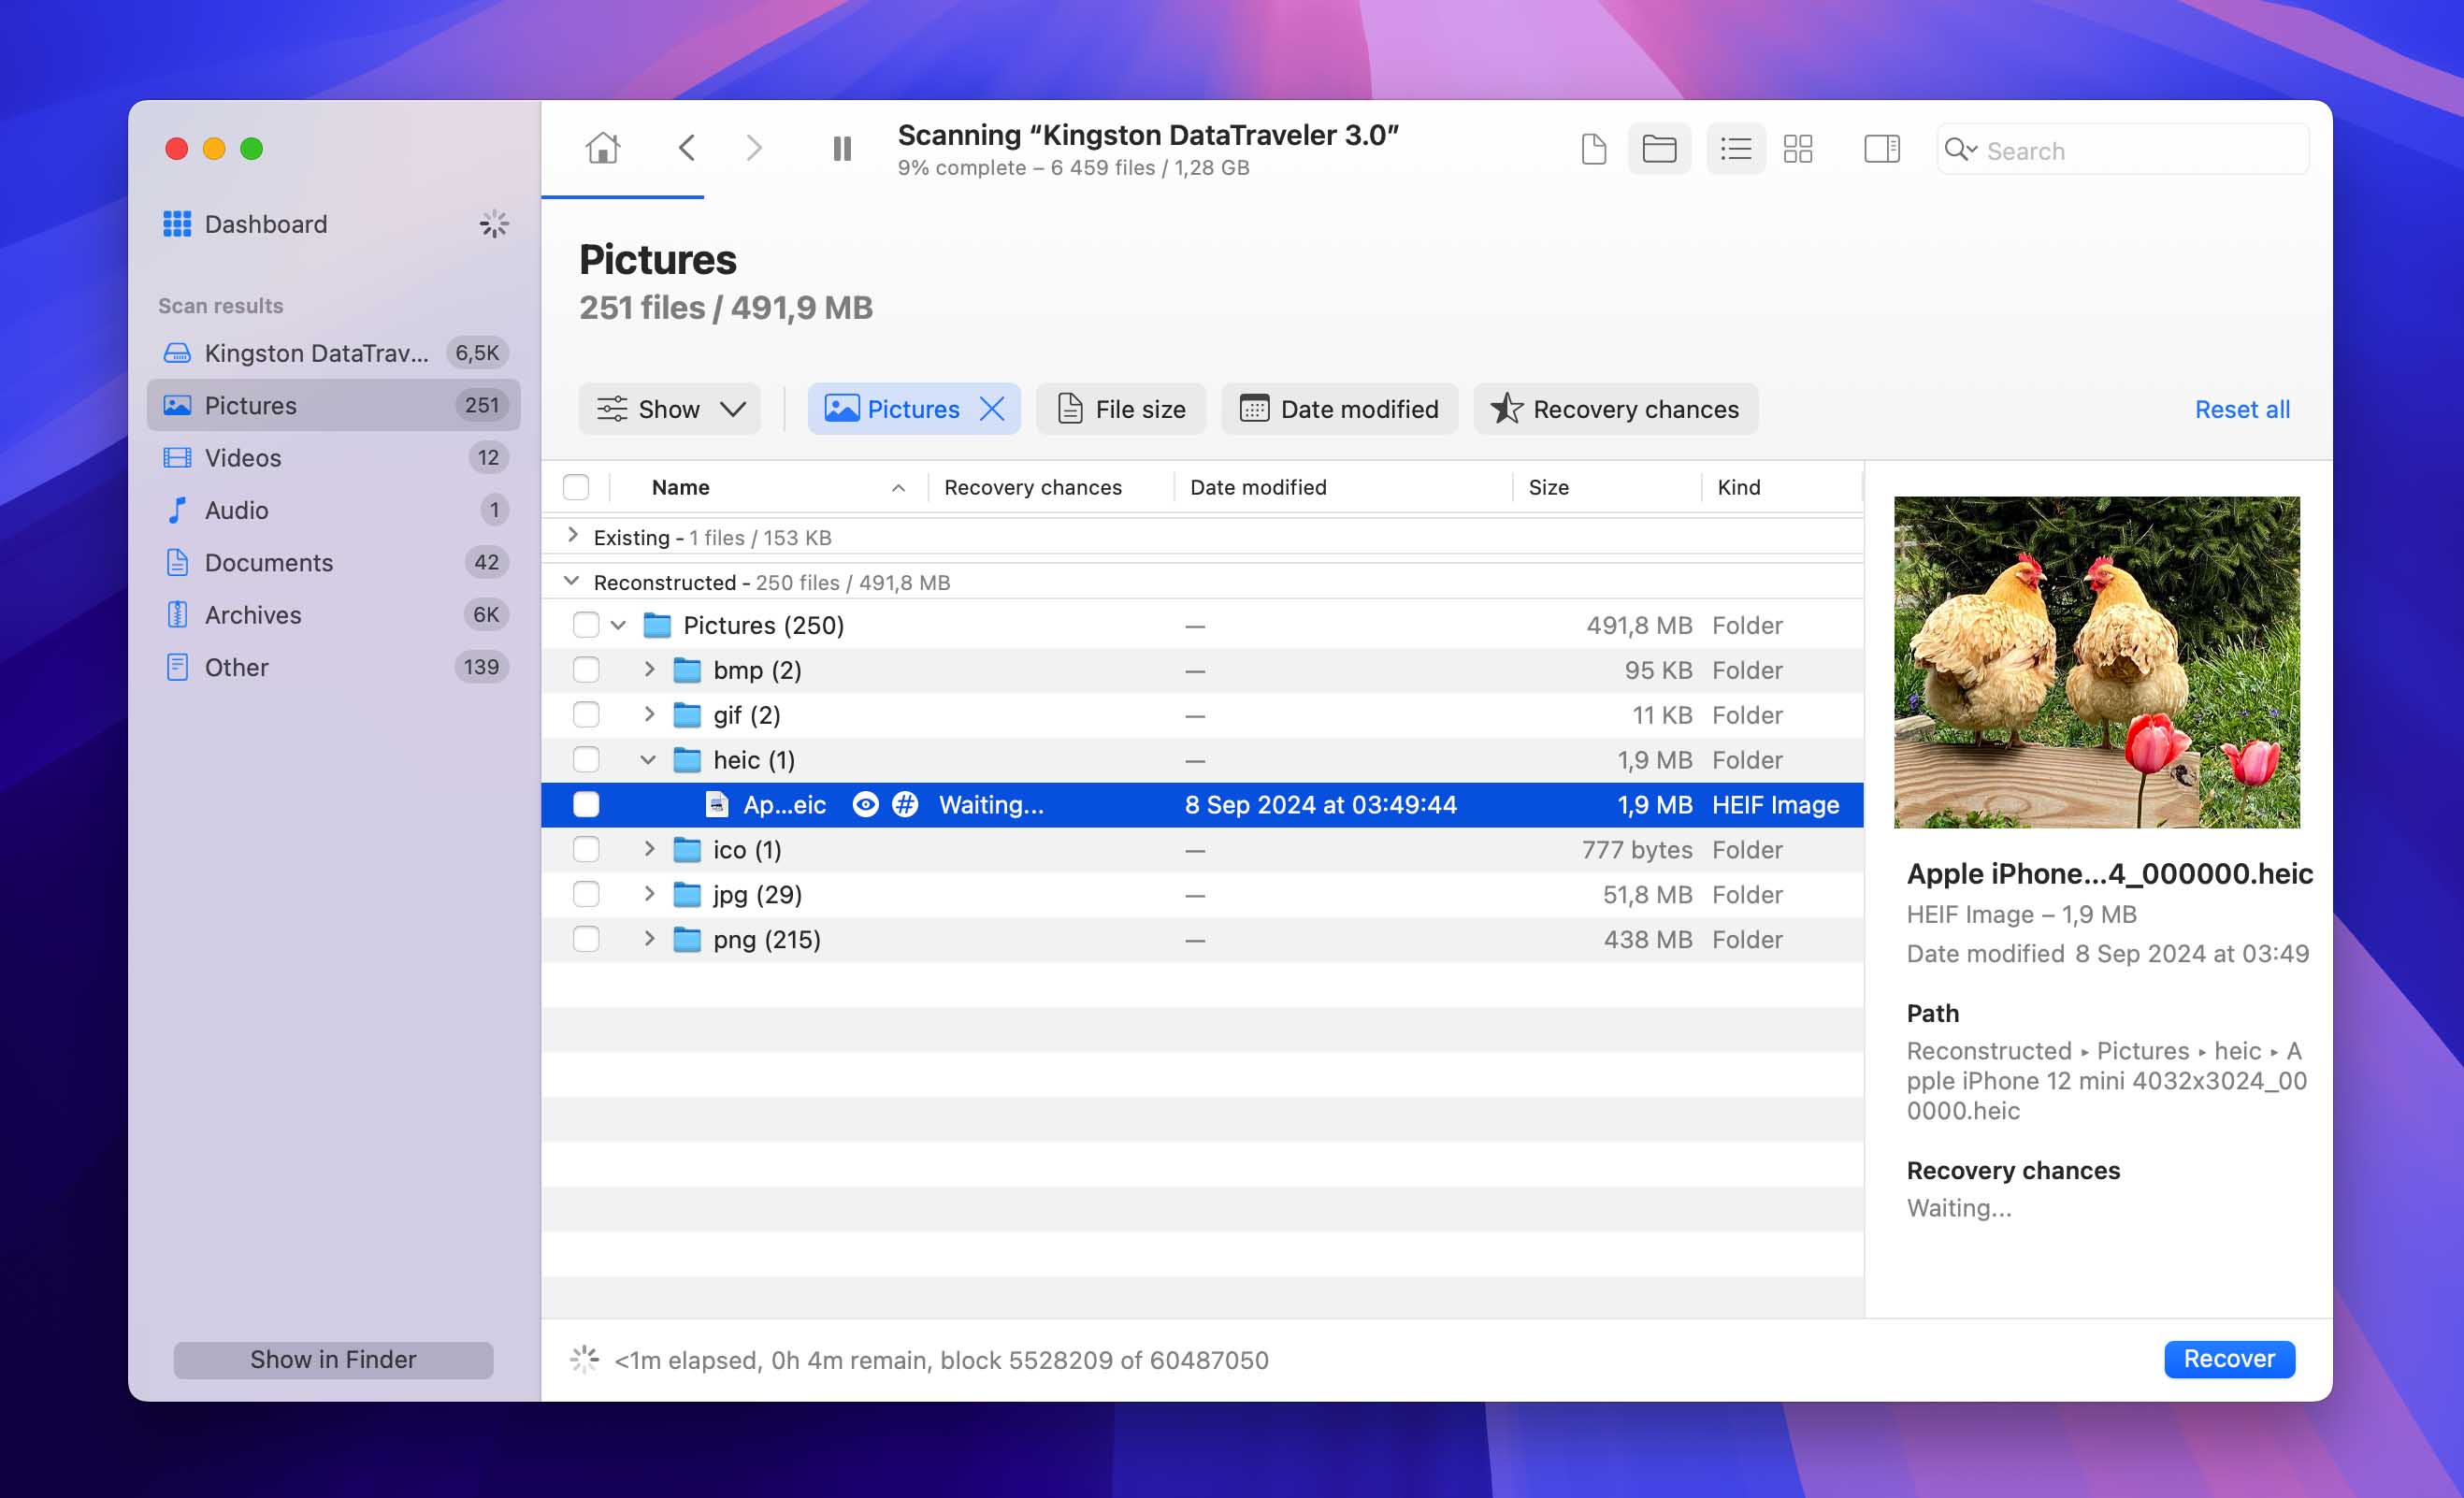
- Preview your files by hovering your mouse beside their file names and clicking the eye button that appears.
- Use the checkbox column to select the files you want to recover, then click “Recover.”
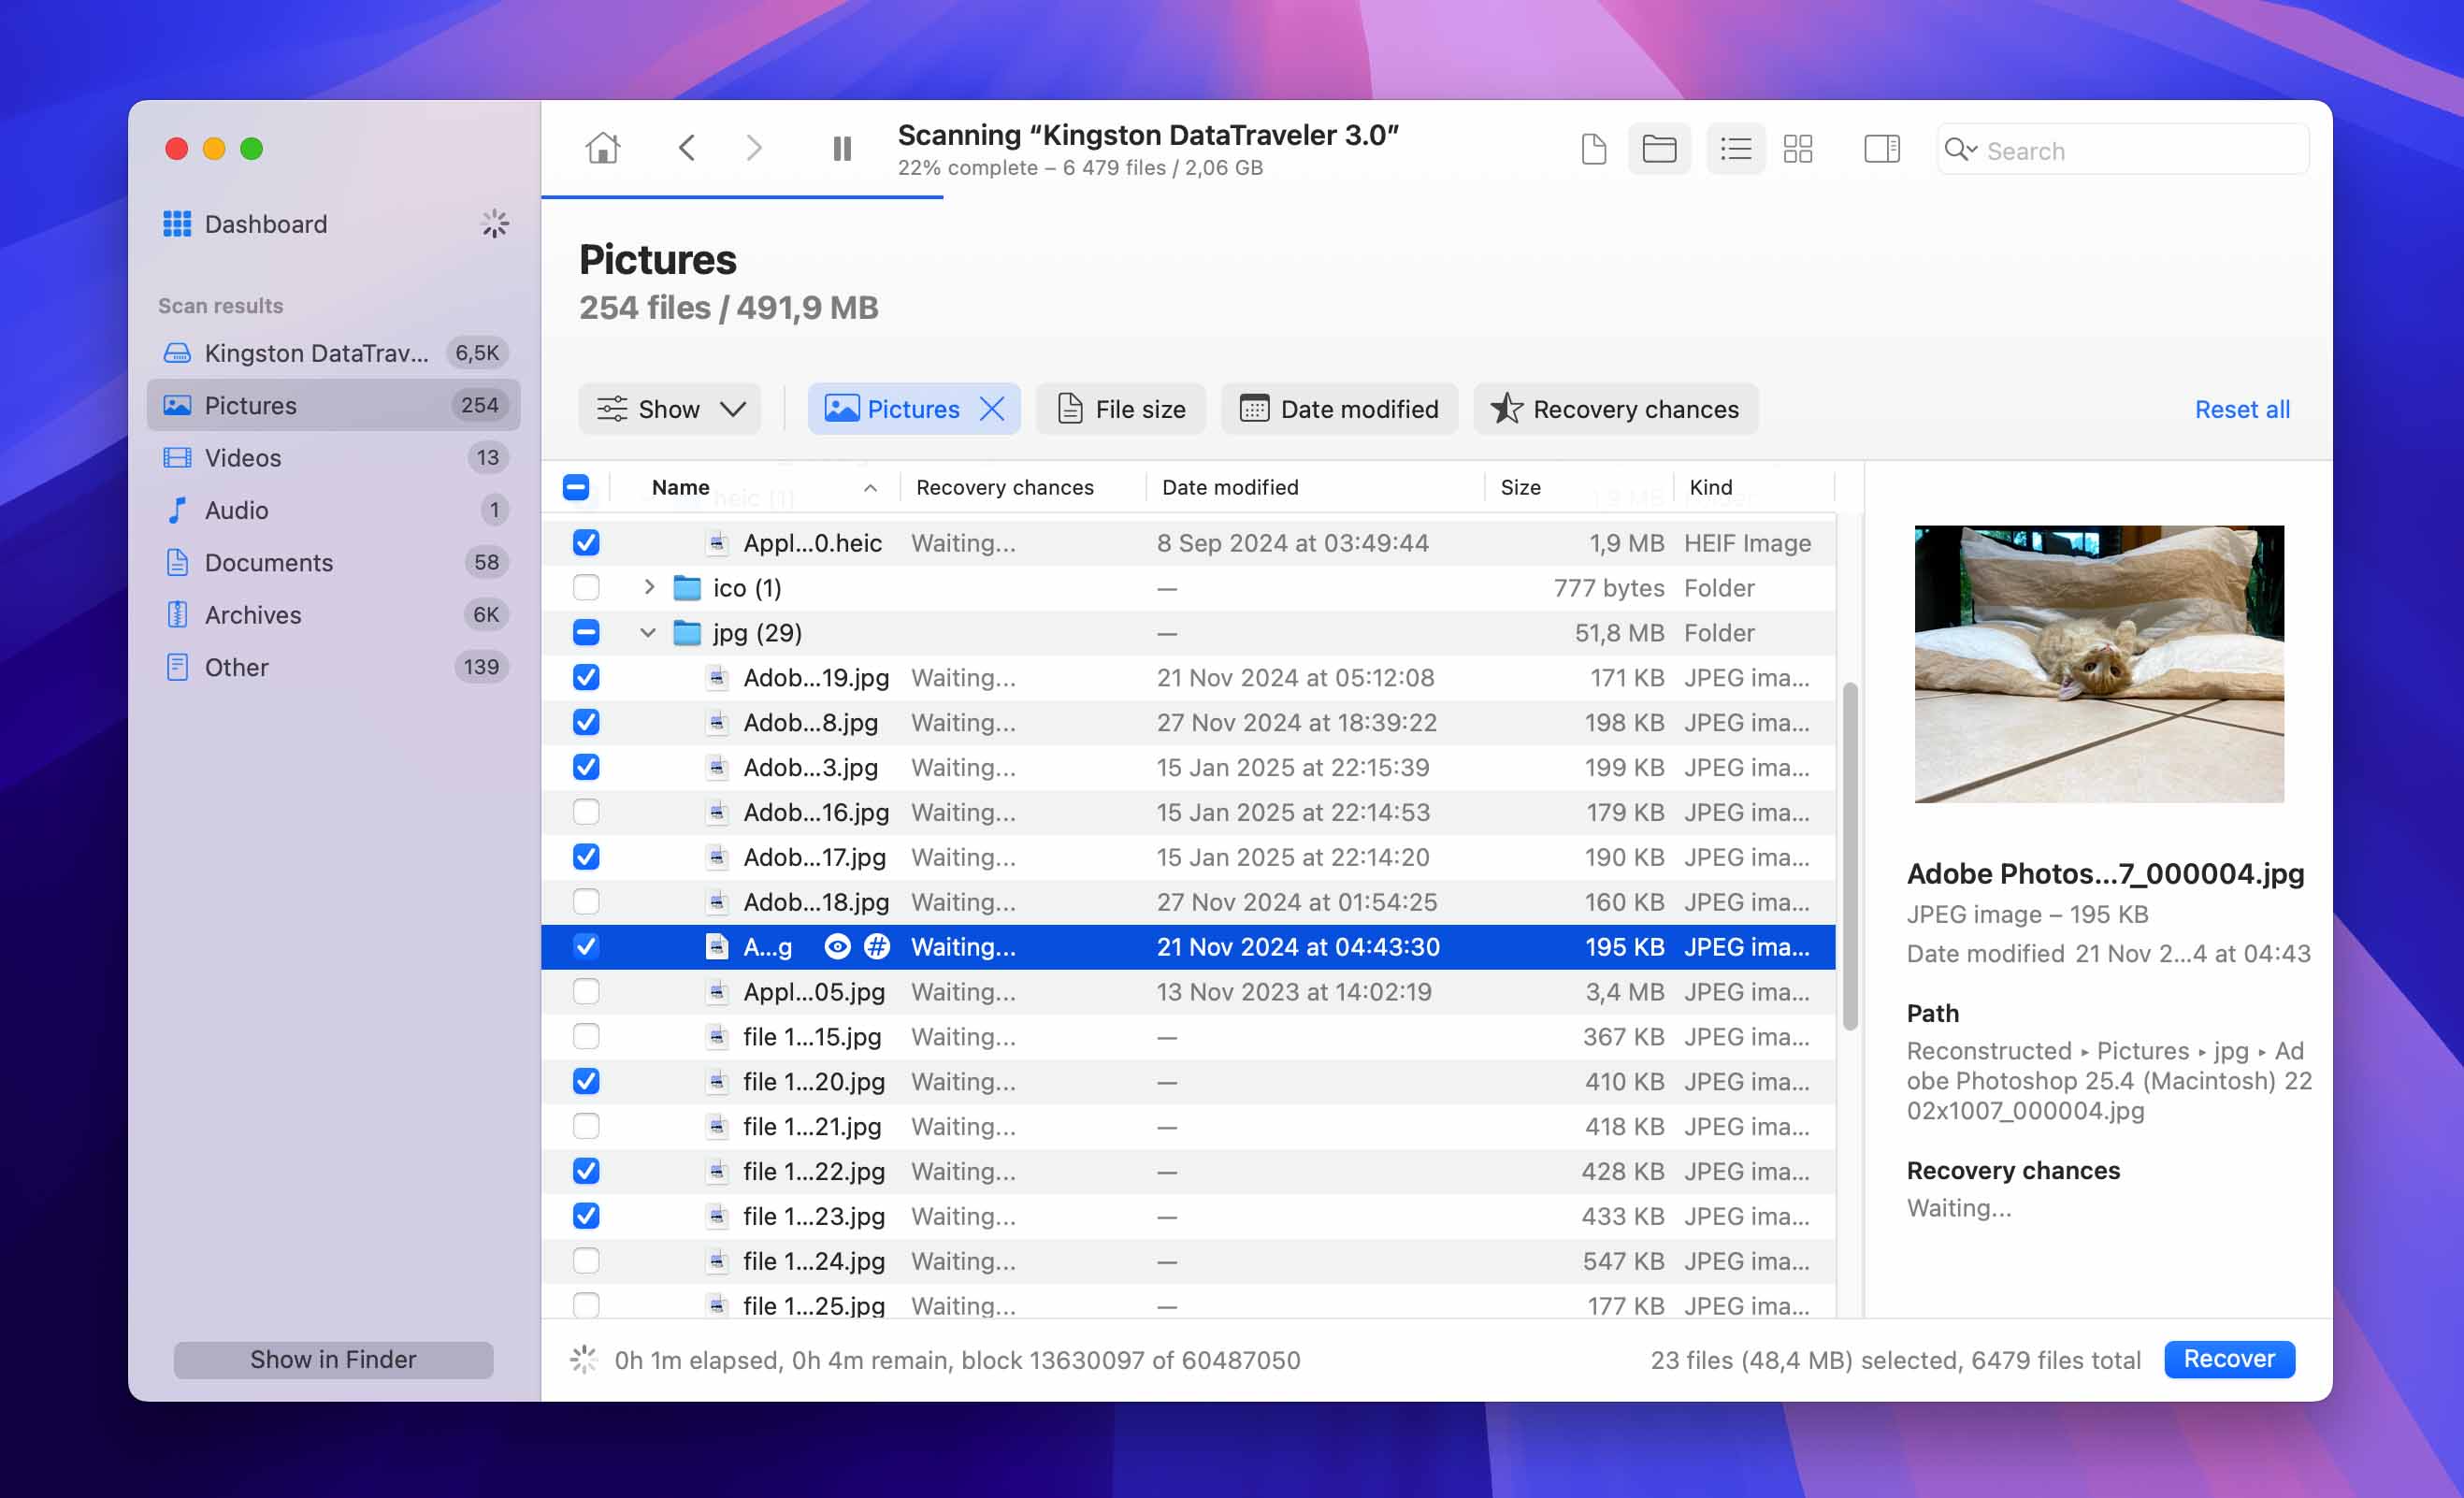
- On the dialogue box that pops up, use the dropdown menu to select a location on your computer where Disk Drill will recover your files (saving it to your USB flash drive may overwrite existing data). Then, click “Next.”

Disk Drill can be a lifesaver in situations where you cannot access files because your USB flash drive’s file system is broken. It can also recover files that have been accidentally deleted or from a disk that was inadvertently formatted. But if you’ve noticed some signs of more serious damage, you may need additional solutions to fix a broken USB stick.
Conclusion
When your USB flash drive is not recognized by your Mac, several DIY methods can make it accessible again, and we hope that the step-by-step instructions provided in this article have helped you put them to good use. However, issues with a USB flash drive not being recognized could be signs that the drive is on its last leg. If you should experience this issue repeatedly, it’s advisable to stop using the drive to prevent data loss or further damage.
FAQ
Start with basic troubleshooting: check Finder preferences, try different USB ports, connect directly to your Mac instead of through a hub, and restart your Mac. If these don’t work, use Disk Utility to check if the drive is detected and run First Aid.
Yes, reformatting can often fix issues with a USB drive that’s not showing up properly, especially if the root cause is an incompatible file system. However, reformatting will erase all data, so make sure to recover important files first using data recovery software.
Format the drive to either FAT or, better yet, exFAT file system using Disk Utility. These file system formats work across macOS, Windows, and even Linux. FAT provides the best compatiblity, but it’s limited to files under 4 GB. For larger files, use exFAT, which has extremely generous file size restrictions.
Start by restarting your computer, as this can often clear up temporary glitches. Next, check if the issue might be with the USB port by trying a different one on your Mac. If the USB works in another port, the original port might be faulty. If no USB devices work in that port, the port itself could be damaged.
You can also open the Disk Utility tool and check if the USB flash drive is listed there. If it is, then you can use the First Aid feature to repair it and the Mount button to mount it manually.
A USB drive might not show up on your Mac for several common reasons:
- Your Finder preferences might not be set to display external drives.
- There could be issues with the USB ports or physical connection.
- The drive might be using an incompatible file system format.
- The drive itself might have hardware damage.
Good question! Most of the time when we plug in a USB device, an icon for it will show up on our desktop. You can then navigate to the icon and click on it to open up the USB device. If you’re not seeing the icon on the desktop, you can open Finder and the icon should appear there for you. This will be located on the left-hand side.