If you have multiple partitions on your hard drive, nothing will scare you more than booting up your computer and finding that one partition has disappeared. What used to be a partition full of files, is now unallocated space that can’t be accessed.
This can happen for a multitude of reasons, reasons that we’ll take a closer look at in this article. The best action you can do right now is leave it as is until you’ve explored all your available options. We’ll show you several ways you can recover an unallocated partition and get your data back.
What Is an Unallocated Partition?
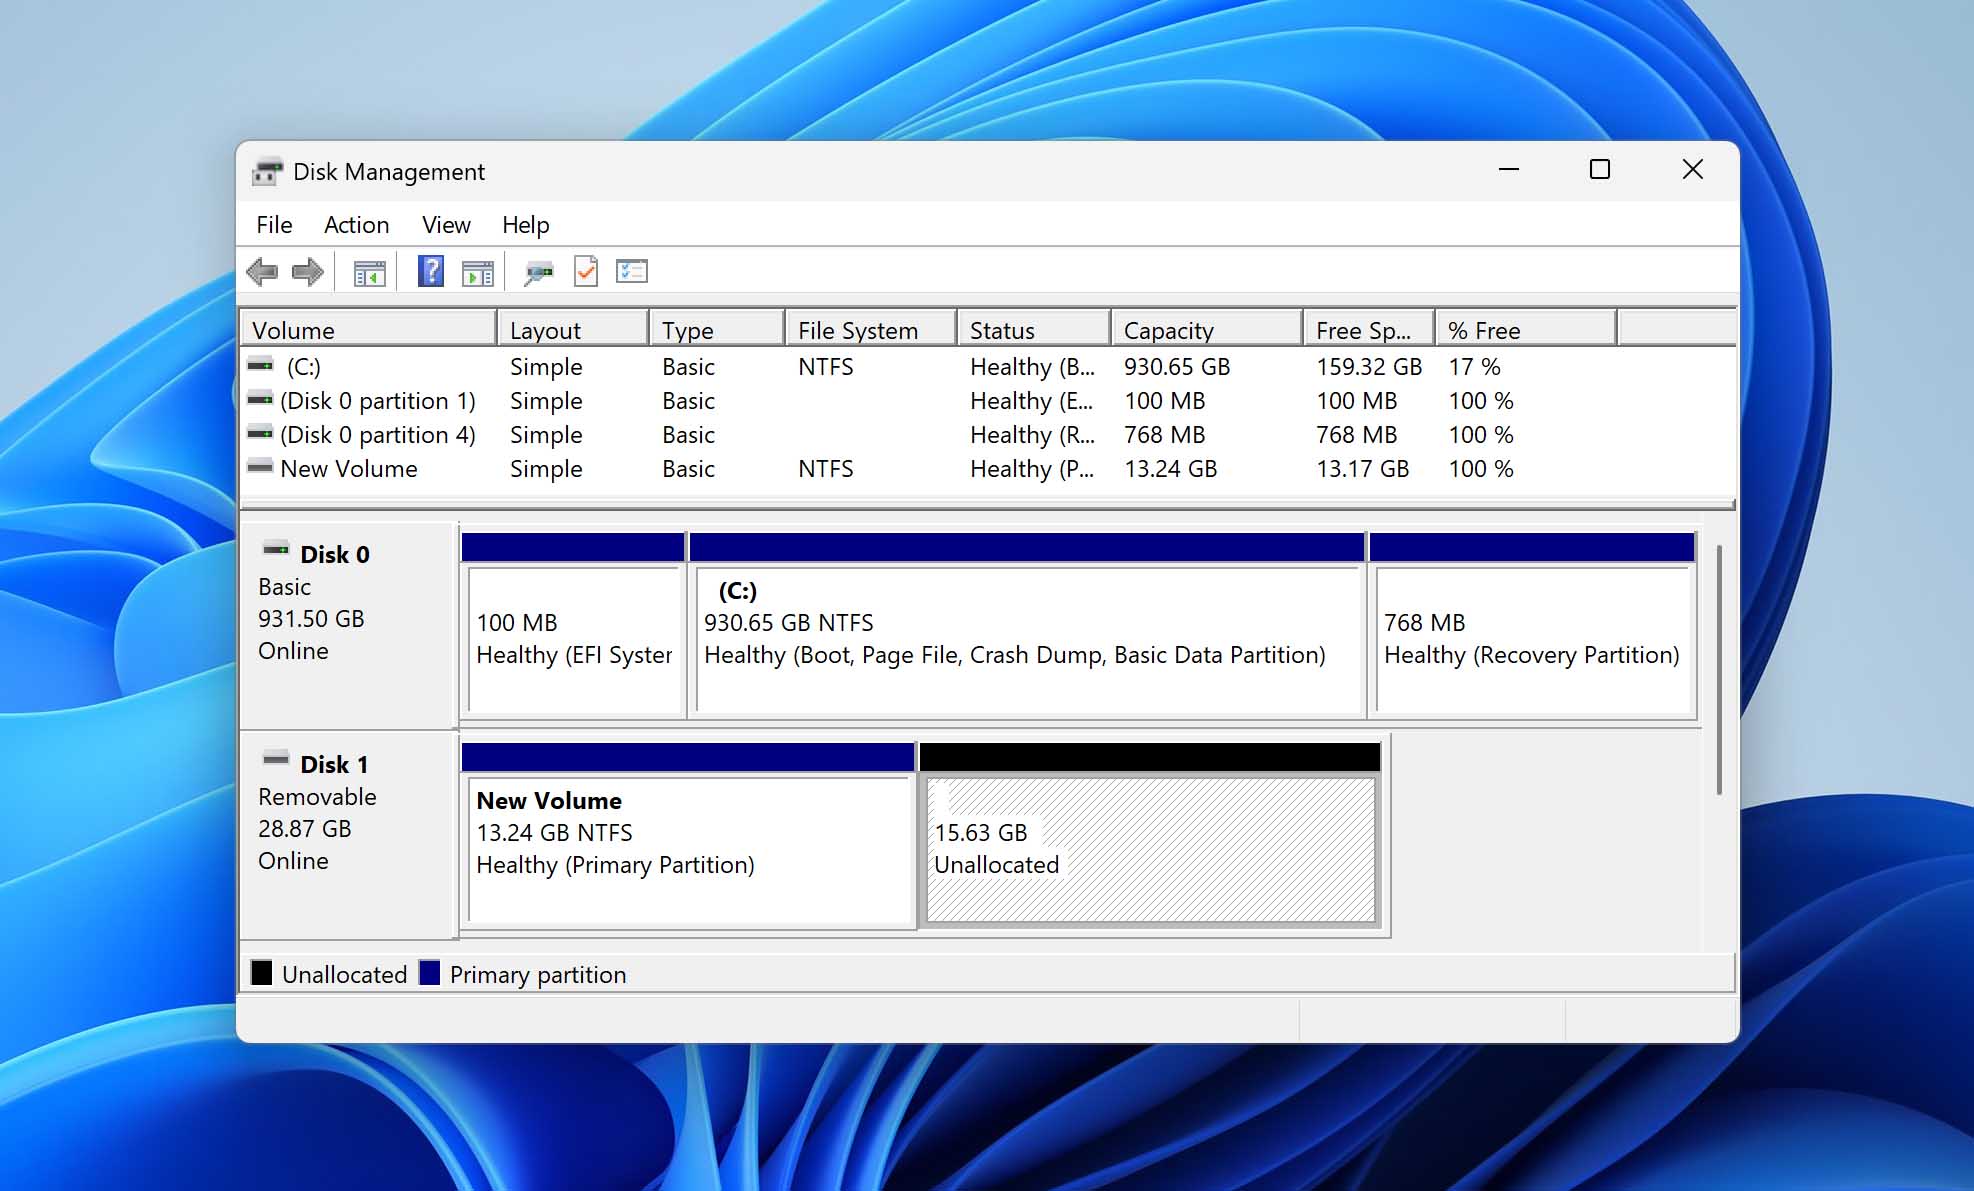
Partitions are segments of a hard drive that have been logically separated to organize the data stored on it. A single drive can have multiple partitions. When you look at your drive and see unallocated space in Disk Management, this references space on the hard drive that hasn’t yet been allocated to a partition.
Unallocated disk space cannot store files or programs, and is basically useless to the operating system unless the space is used to create a new partition or is added to an existing partition to extend it.
Reasons Behind Unallocated Partitions
A brand new hard drive will come without any partitions. When you install the drive into your system, you will need to create at least one partition before it can be used to store data. Any space that isn’t dedicated to a partition will remain as unallocated space.
However, a disk partition of unallocated space can appear as a result of something else. Here are a few common reasons why there may be unallocated space on your hard drive:
| Data loss reason | Description |
| Accidental deletion | Mistakes happen. If you accidentally deleted your partition in Disk Management, as this user did, the space that was once occupied will show as unallocated space instead. Your chances of recovery are high, so long as you leave the unallocated space untouched for now |
| Unexpected power failure | If your computer loses power during a write process to the drive, it could cause some data to become corrupted and the partition deleted. This also includes the action of unsafely removing an external drive, as demonstrated in this thread where a 1 TB hard drive became unallocated when unplugged. |
| An unallocated partition appears after Windows reinstallation or update | Windows operating system (OS) installs and updates aren’t always perfect. You may run into an issue where you can’t select the drive you want to install Windows on until you delete another, as this user faced. In this case, you shouldn’t delete the drive that contains data, but if you have, leave it untouched for now. |
| Mistakes made during disk partition migration. | When moving to a new system or drive, cloning is a quick and easy way to transfer everything seamlessly. However, cloning to a higher-capacity drive doesn’t automatically extend your partition, as this Redditor experienced. Therefore, everything outside your cloned partition will be unallocated space until it’s used. |
| Hardware failure | Hard drives are susceptible to failure. If the hard drive has failed at some point, the partition could have become lost as a result. The moving parts inside the drive also wear down with time, and the sudden appearance of unallocated space is definitely something that can be attributed to degradation over time, which could be the case with this thread. |
How to Recover Data from an Unallocated Space
No matter what causes your partition to disappear, there are various methods you can use to recover the data that was lost.
Method 1: Restore from a Backup
If you’ve created a backup of the volume that was lost, or even the data itself, you can use this backup to easily restore the files that were lost. Restoring from backups is the most effective way of getting back all the files that were lost with the most success.
If you’re unsure if you’ve ever set up a backup, here are some of the common backup solutions on Windows that are worth checking to see if they are enabled.
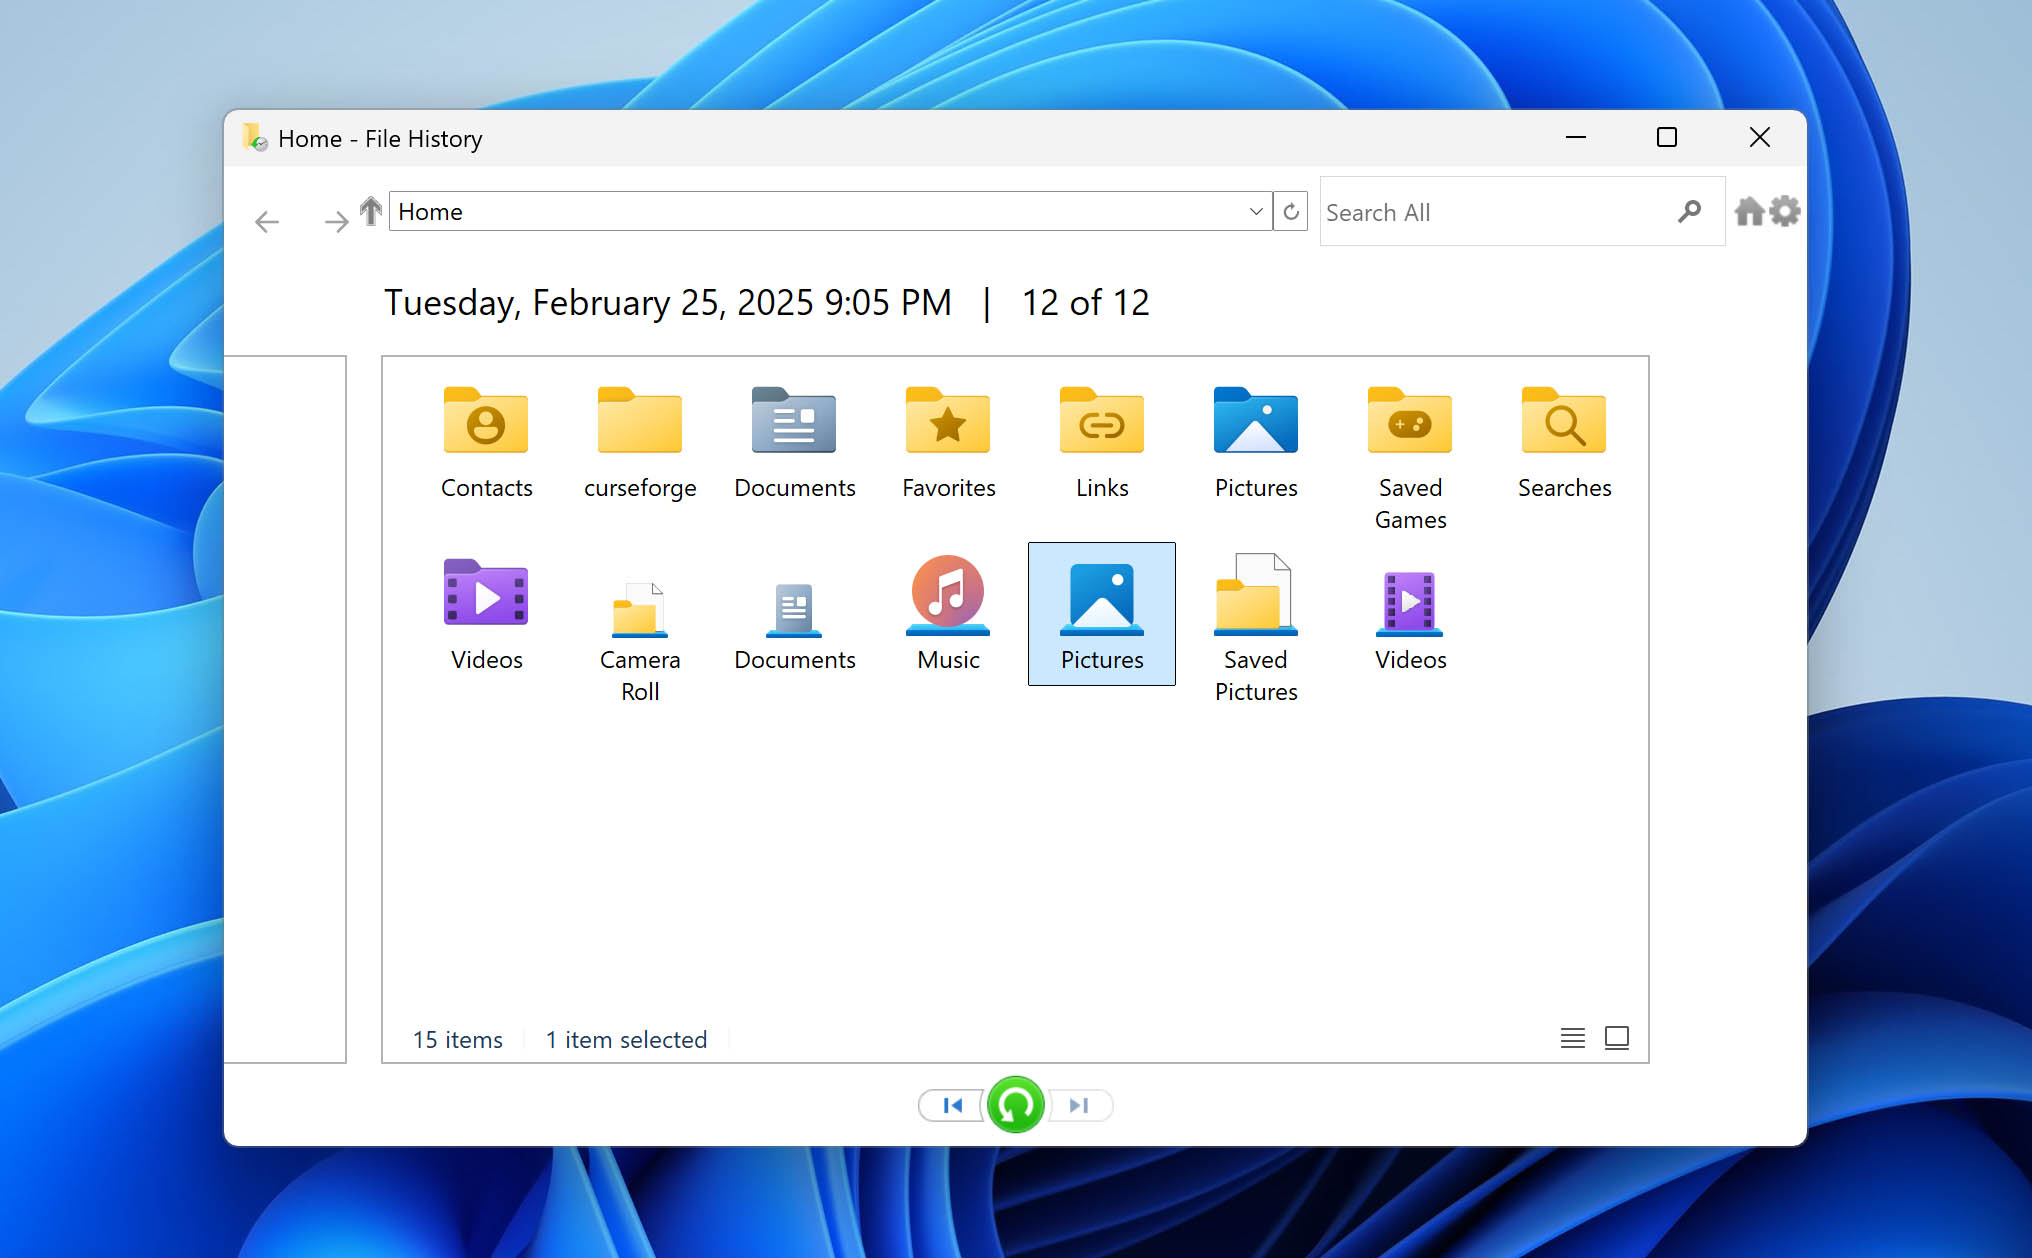
- File History – File History works by taking periodic snapshots of all default libraries, including Documents, Pictures, Videos, and Music. These snapshots not only let you restore your data but also previous versions of said data. Check if File History is enabled by opening Start and typing Restore your files with File History.
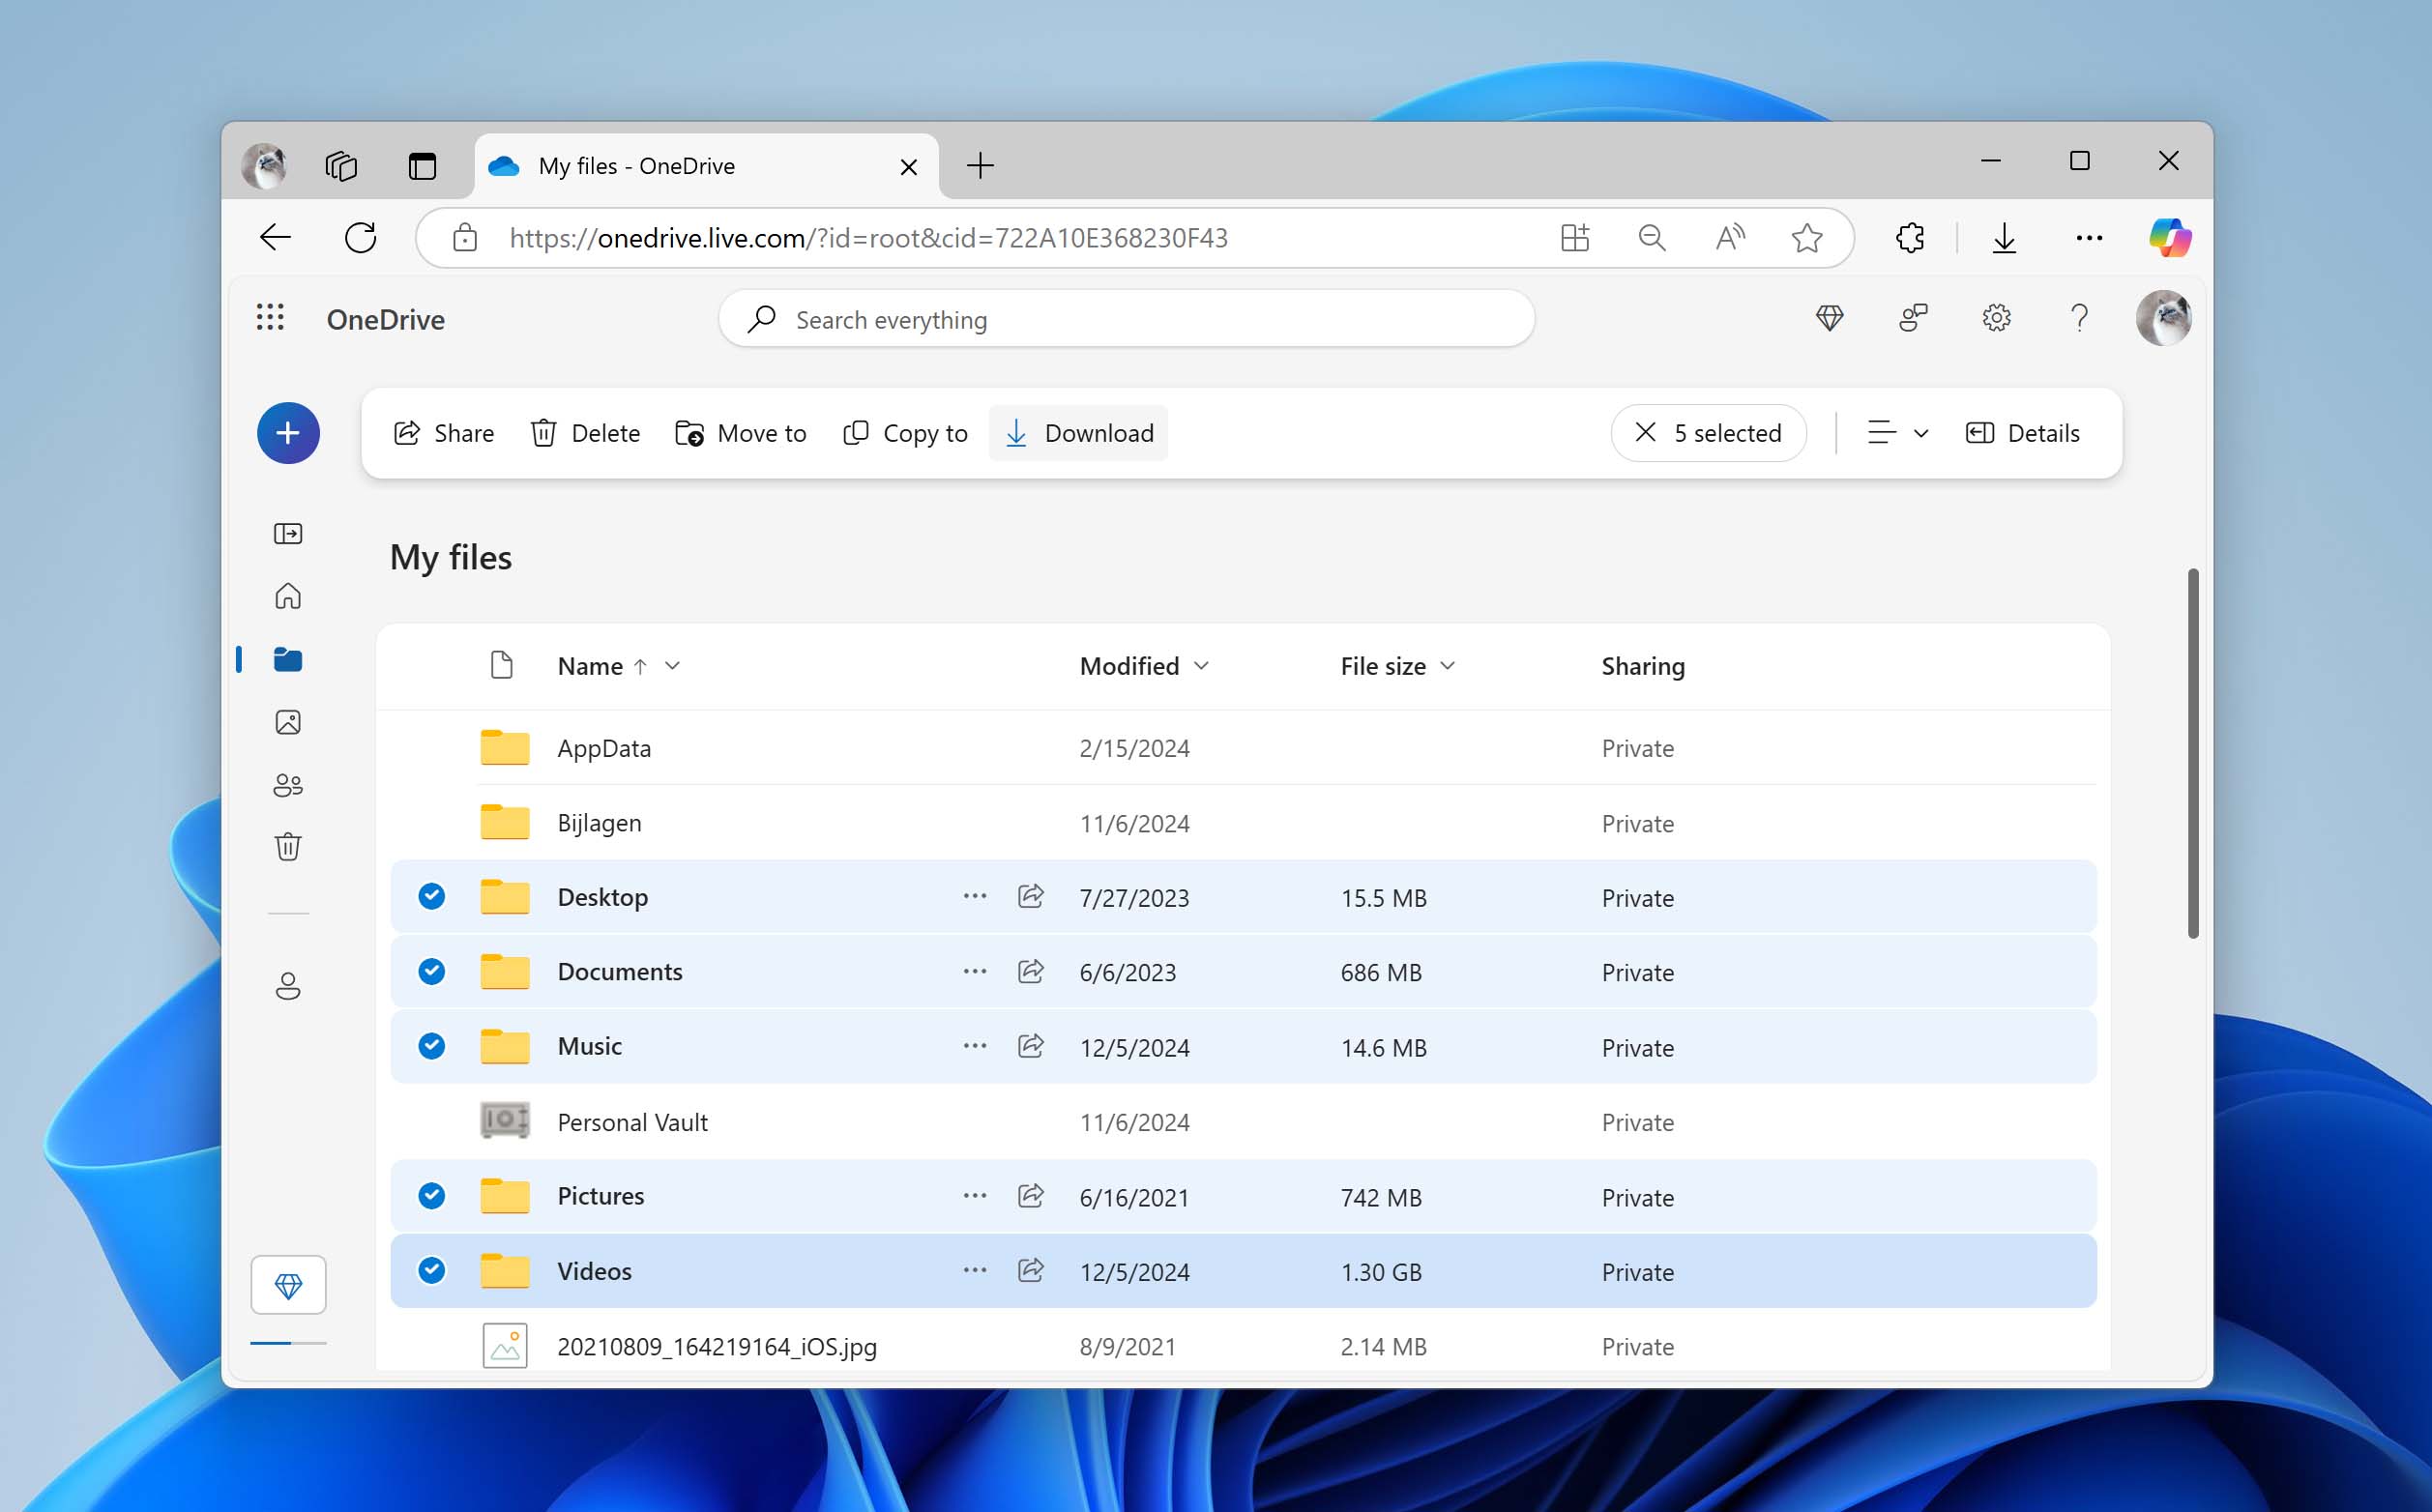
- OneDrive – OneDrive is Microsoft’s own cloud storage service. It ships natively with Windows 10 and 11, and all it needs is your Microsoft account. If you’re signed in to a Microsoft account, there’s a good chance that OneDrive is enabled and has already backed up some libraries like Desktop, Documents, and Pictures. Check the OneDrive folder on your PC, or visit OneDrive in your browser.
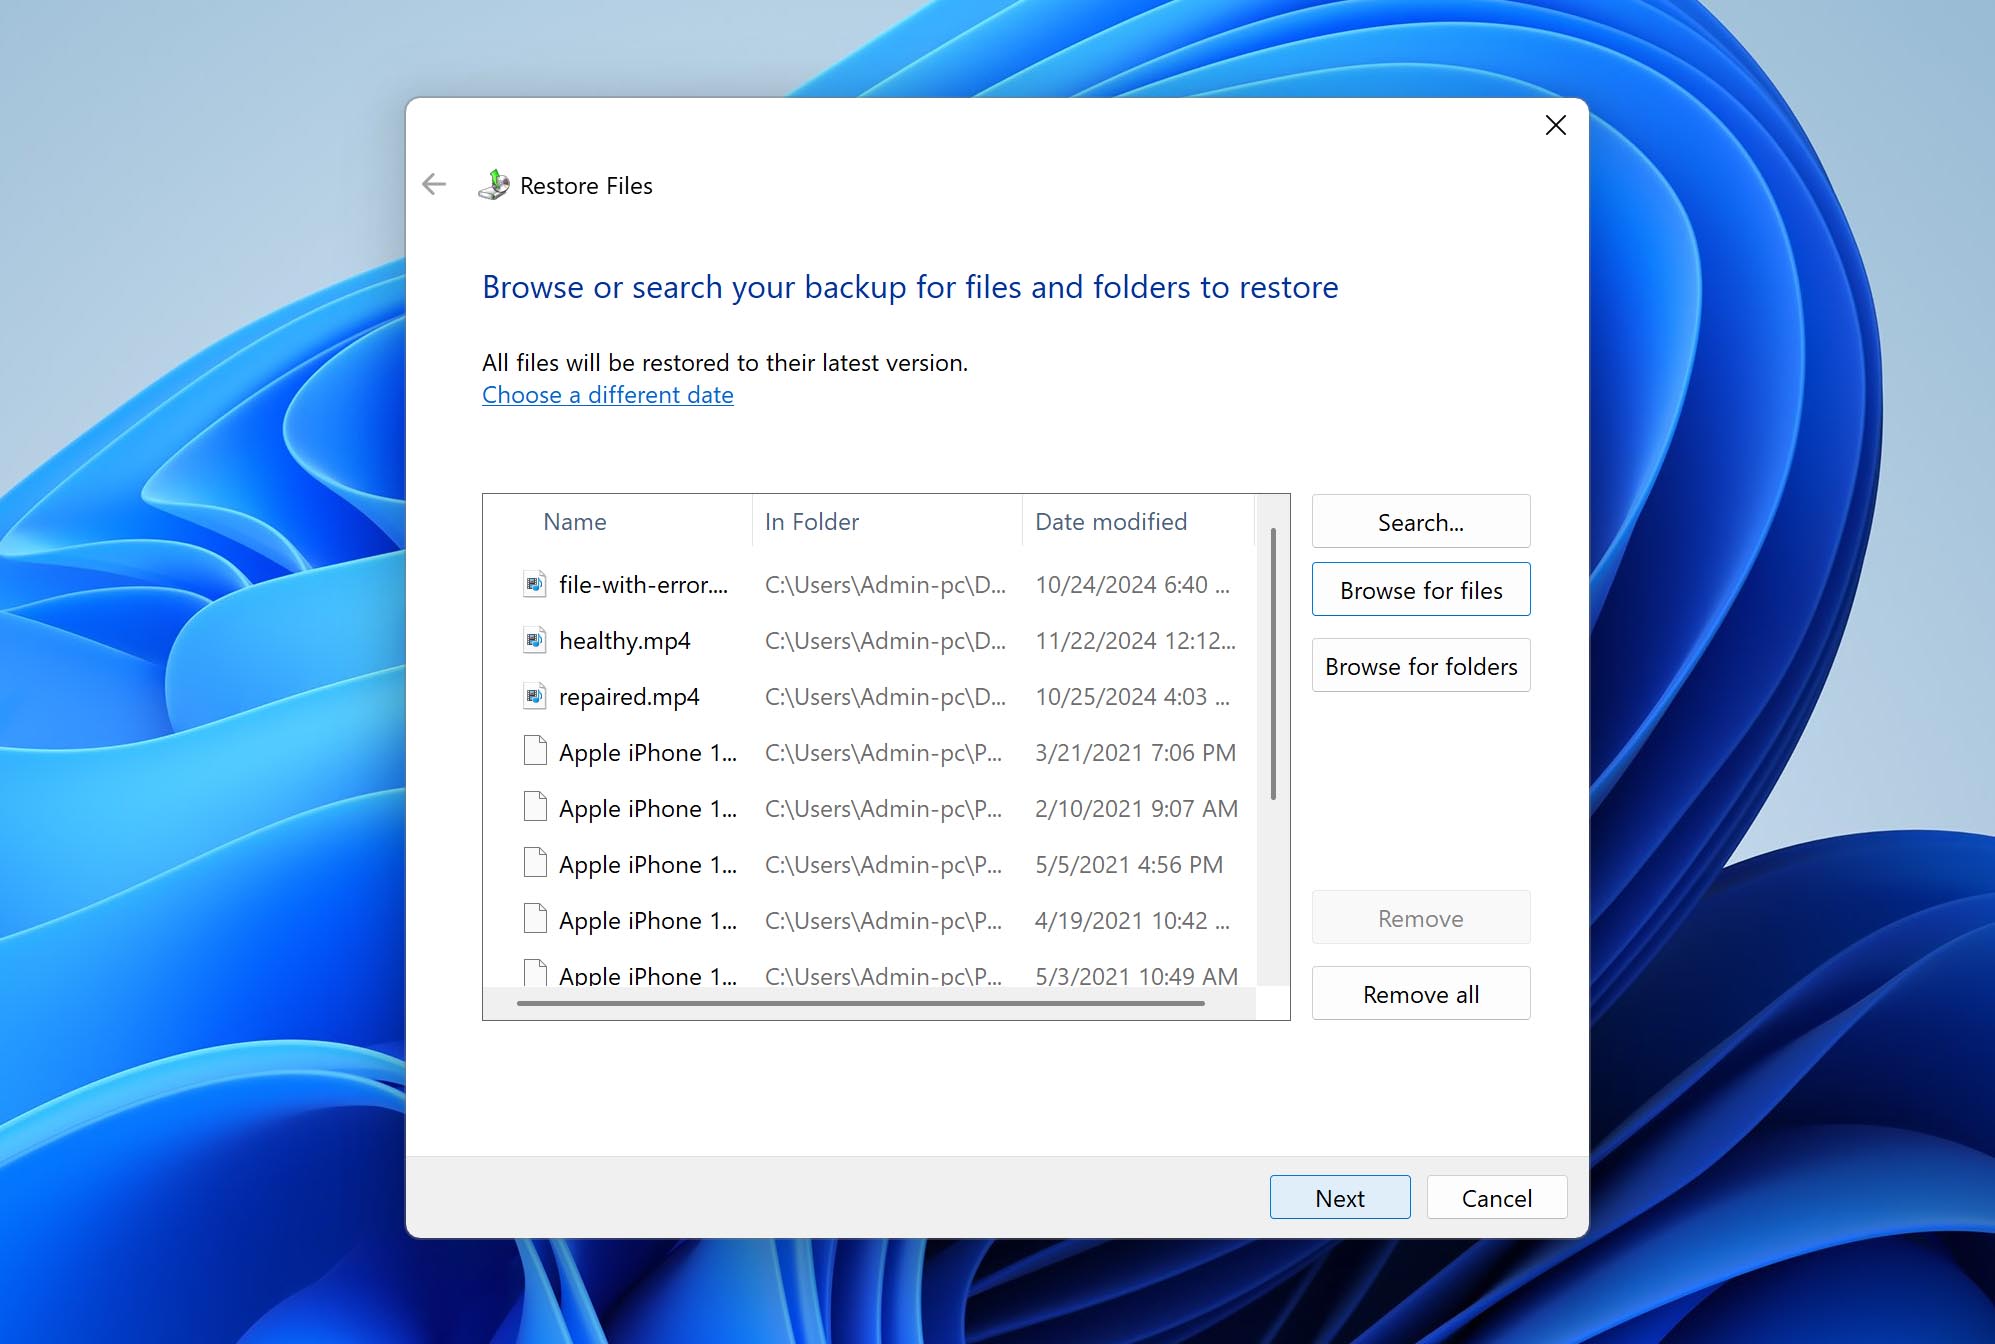
- Backup and Restore – Backup and Restore was the primary backup solution for Windows before being succeeded by File History. However, it’s still included with Windows. Arguably its primary use is to keep a backup system image prepared for quick recovery in emergencies, but it can also be used for selective file backups. On the off-chance that you set it up, open Control Panel and click Backup and Restore (Windows 7). You may need to adjust your icon view to see this option.
Method 2: Using Recovery Software
Your next best option for recovering data from a recently unallocated partition is through the use of data recovery software. Such software is designed to recover your data in almost any data loss situation, whether it was accidentally deleted or lost due to file system corruption. It can access your data by going through the drive directly, even if it’s not accessible through other means.
There are numerous data recovery solutions on the internet, but not all are suited for data recovery from unallocated hard disk partitions. For this task, we’re going to rely on Disk Drill partition data recovery tool. When Disk Drill scans a drive, it also searches for lost partitions as part of its scanning process. Upon discovering one, you can explore what data you want to recover.
Here’s how to recover data from an unallocated drive using Disk Drill:
- Download and install Disk Drill. Open it.
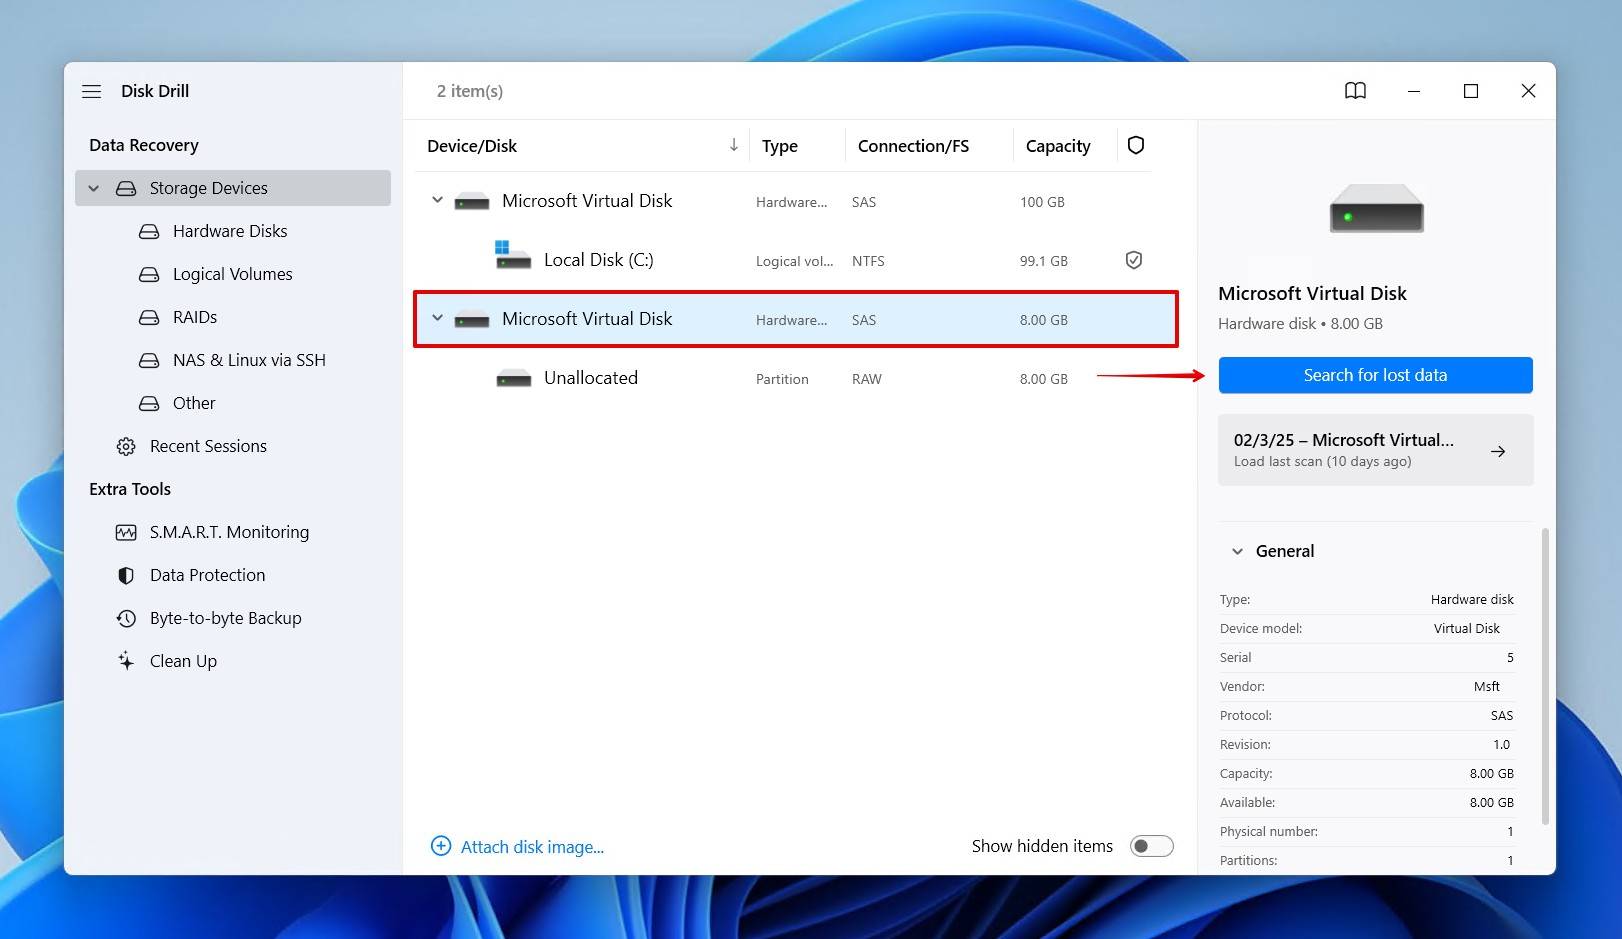
- Select the drive that contains the unallocated space, then click Search for lost data. You can scan the unallocated space specifically, but scanning the entire disk will yield more results.
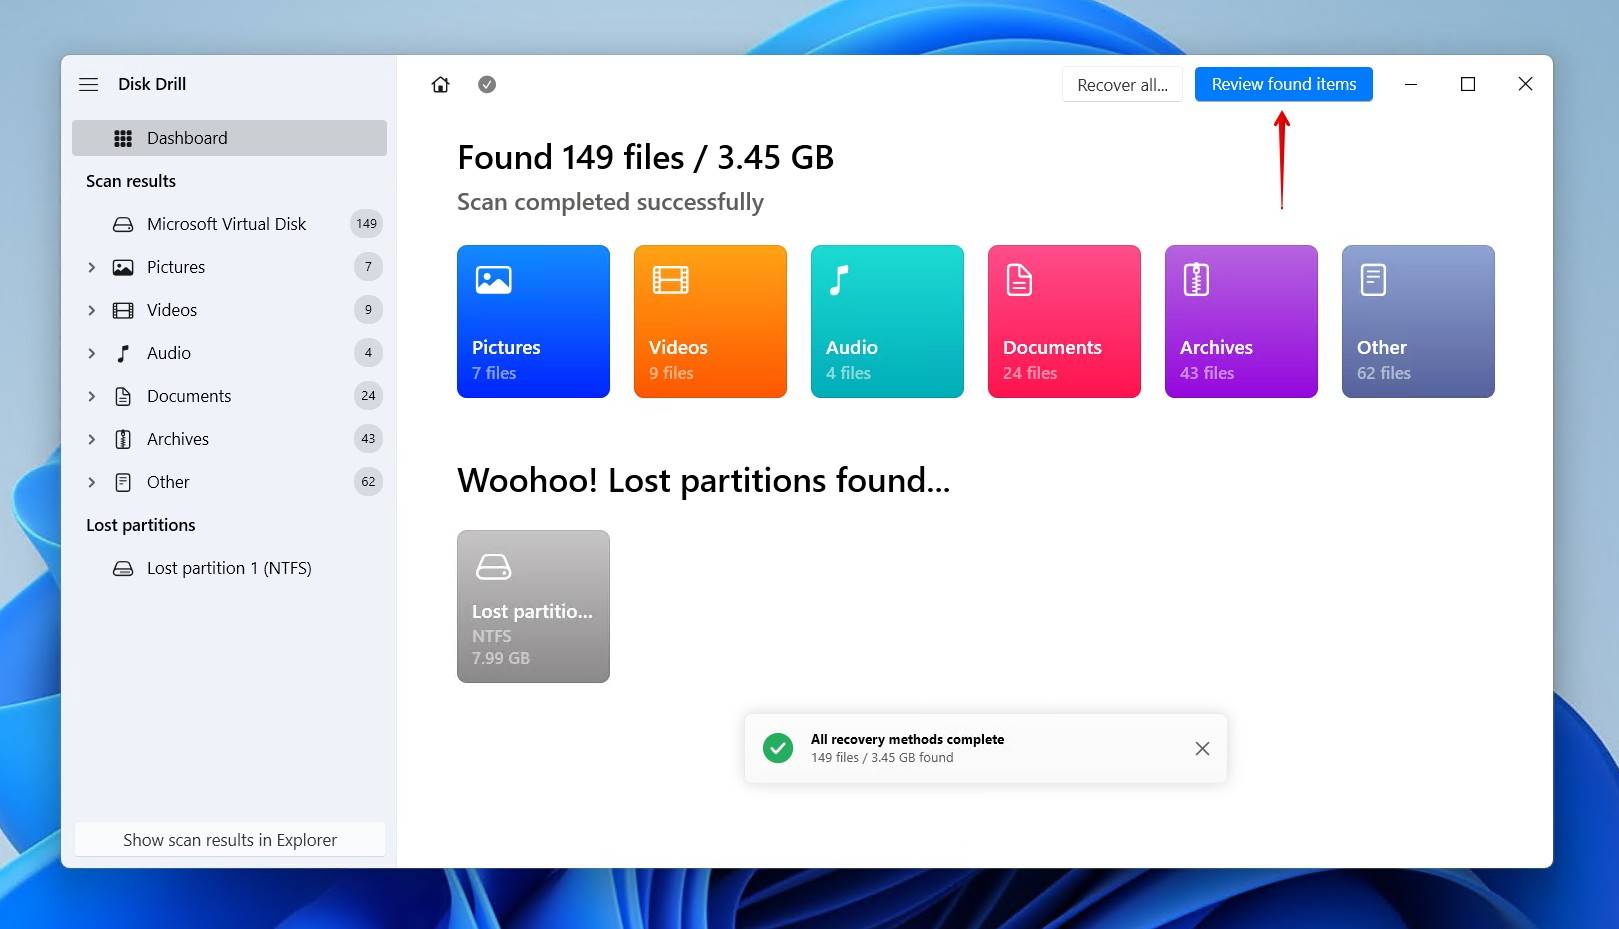
- When the scan has finished, click on Review found items. If you want to recover everything instead, simply click Recover all.
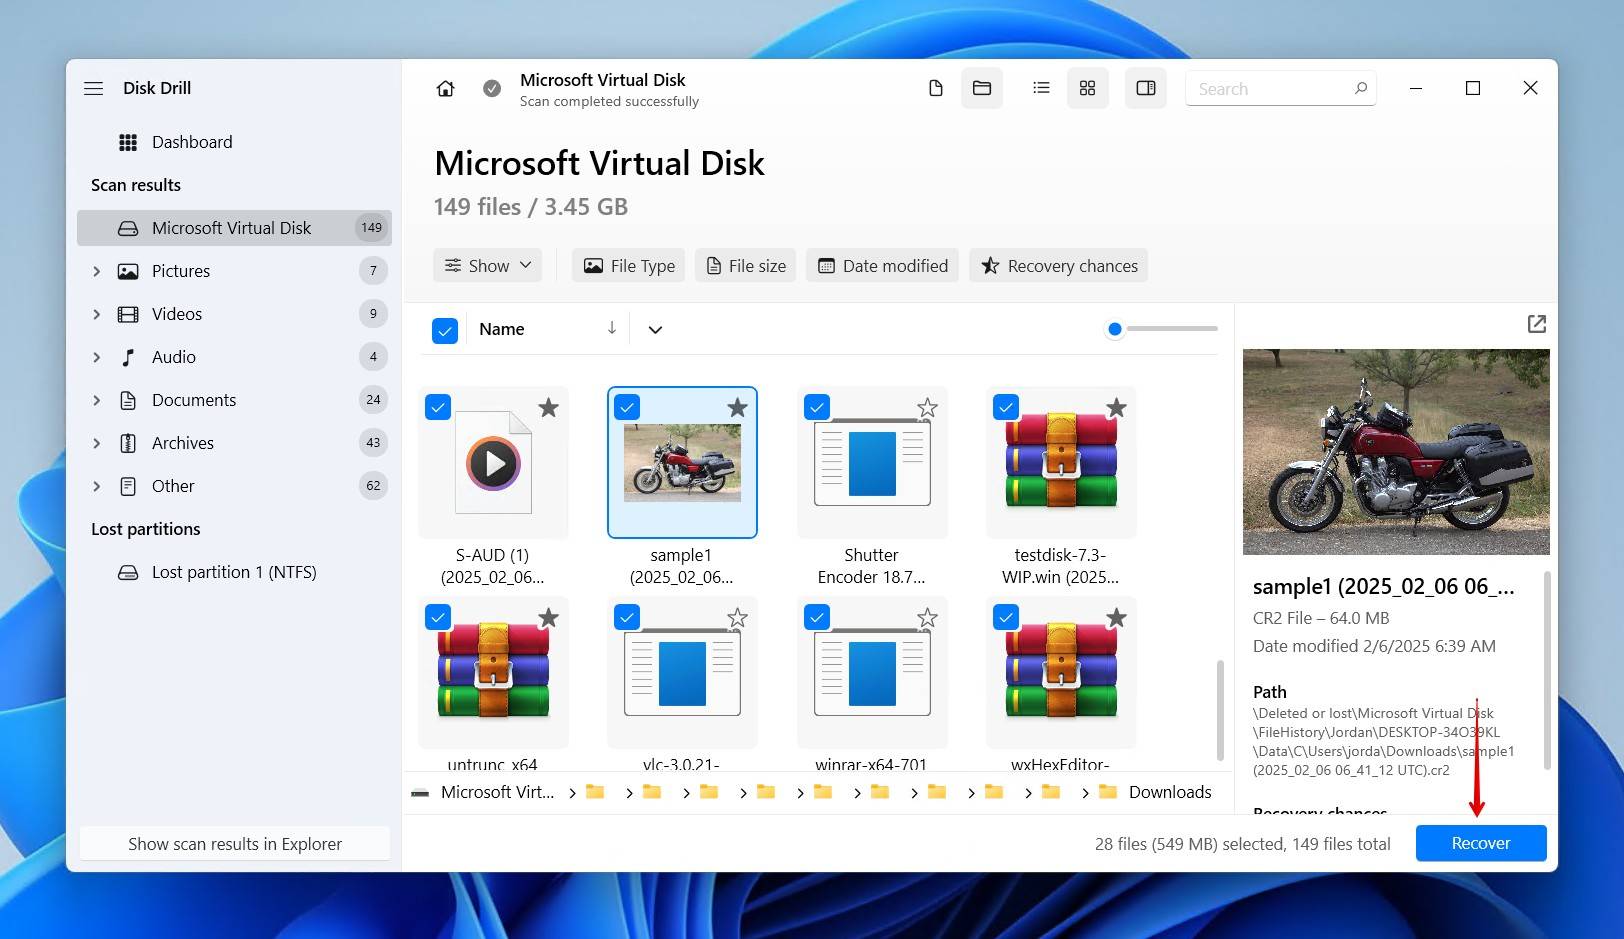
- Select the files you want to recover by checking their checkbox. This is a good opportunity to preview your data to make sure it’s intact, as partition loss due to corruption could have affected your data as well. Click Recover when you’re ready to proceed.
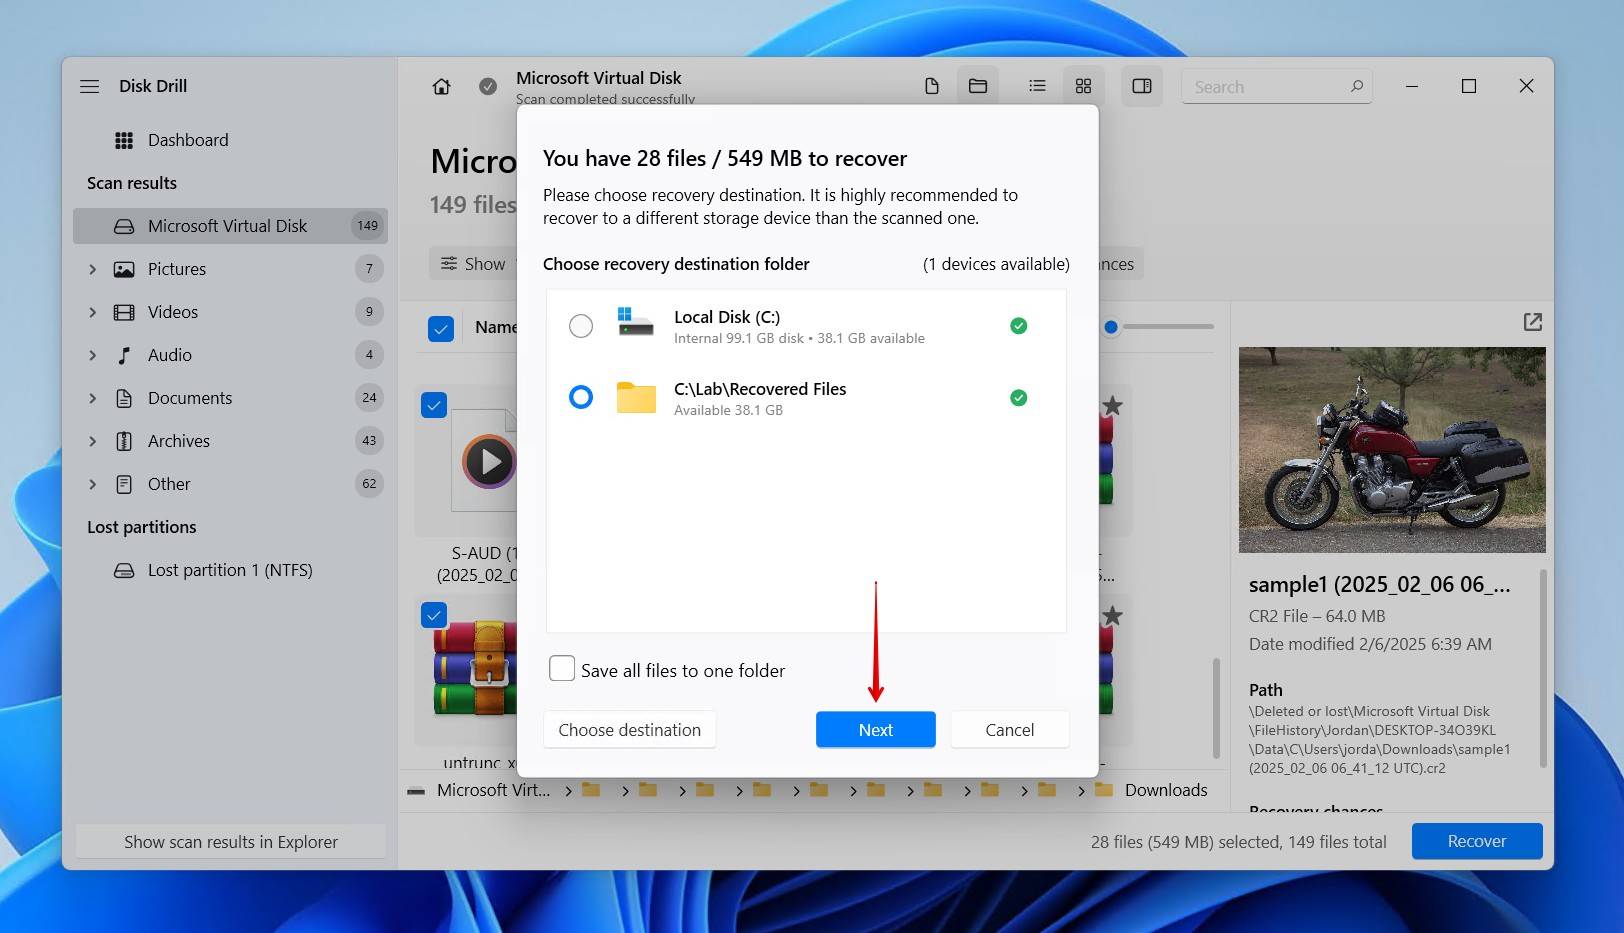
- Choose a recovery location. The general recommendation is to recover the data to a separate physical drive. Click Next to complete recovery.

Method 3: Using a Recovery Service
If none of the previous methods worked for you, you’re not particularly confident performing the steps necessary, or the hard drive is showing signs of physical damage (like clicking or grinding), then you’re better off using a professional recovery service to recover data from unallocated partition.
Recovery companies employ the services of data recovery specialists who manually recover your data. Equipped with the expertise and commercial-grade tools necessary to repair and recover data from the drive, having a professional handle everything for you provides peace of mind.
While this method may take the longest since you need to send your drive away, it will have the highest success rate as you’re leaving the recovery part to the professionals. Consider using a recovery service that offers a no data, no charge policy, like the Clever Files Data Recovery Center, where you won’t lose money if nothing of value can be recovered.
How to Fix an Unallocated Hard Drive
If your partition has disappeared from your drive, or you just want to know how you can make use of that extra space that’s currently unallocated, we’ve included several options that will help you no matter what your situation is.
Recover Unallocated Hard Drive with TestDisk
It’s possible to fix an unallocated disk without losing data by using TestDisk to recover the unallocated partition. TestDisk is a unique recovery tool in that it repairs the underlying damage that has caused the unallocated space to appear on the hard drive. It can fix the unallocated partition if it has been caused by a logical issue, like a lost or corrupt partition table, accidentally deleted partitions, or file system corruption.
This is how you recover an unallocated partition using CMD with TestDisk:
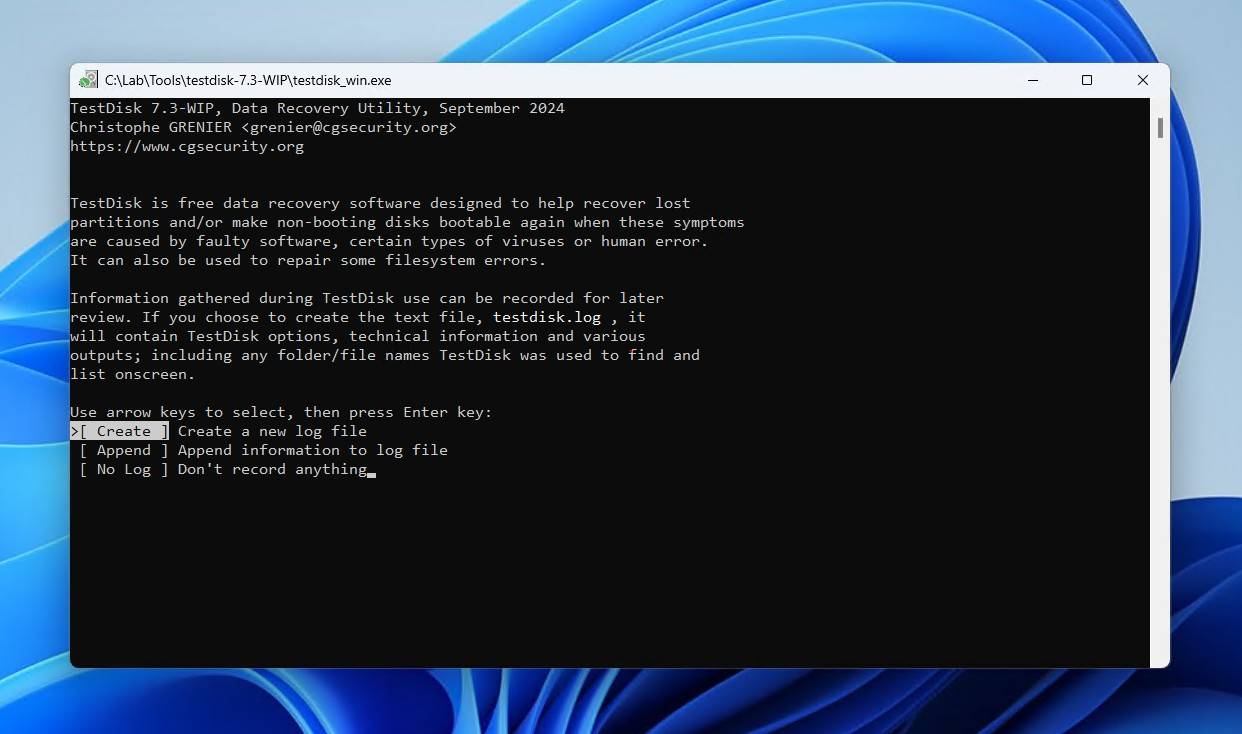
- Download and extract TestDisk. Open testdisk_win.exe.
- Press Enter to create a new log.
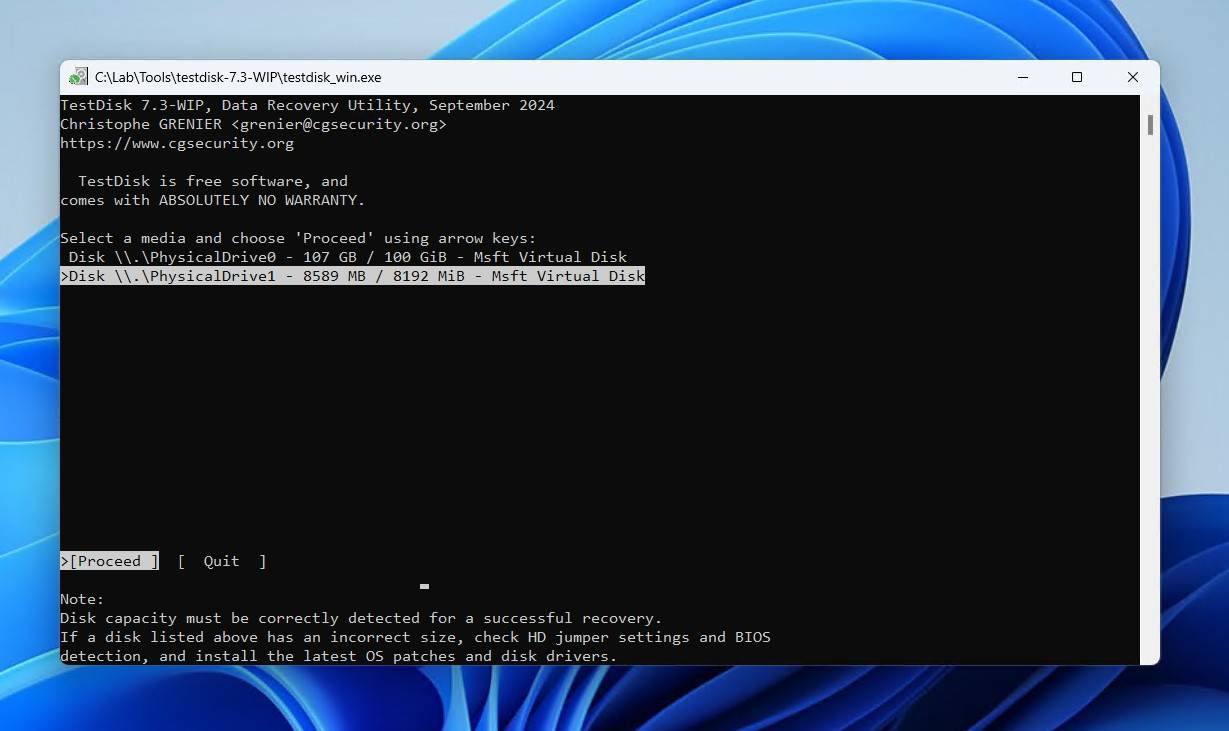
- Select the drive with the unallocated space using the up and down arrow keys. Press Enter.
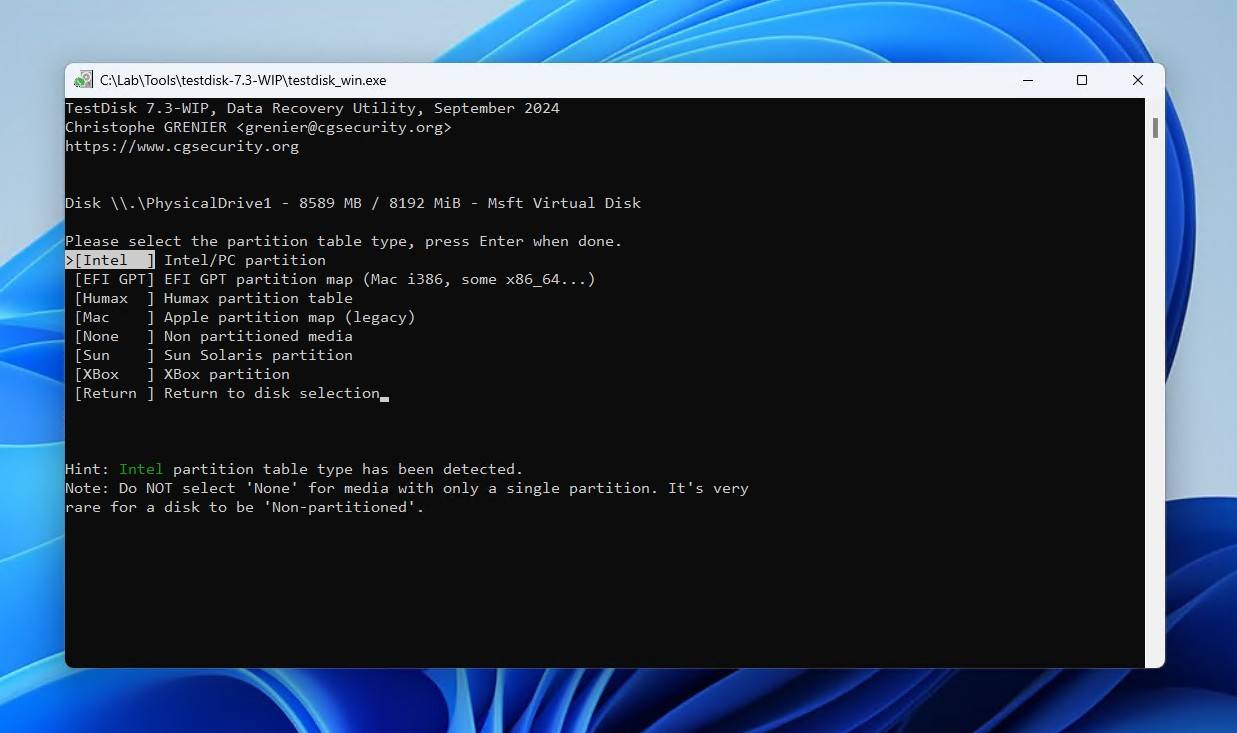
- Choose the partition table type. Press Enter.
- Press Enter to analyze the partition structure.
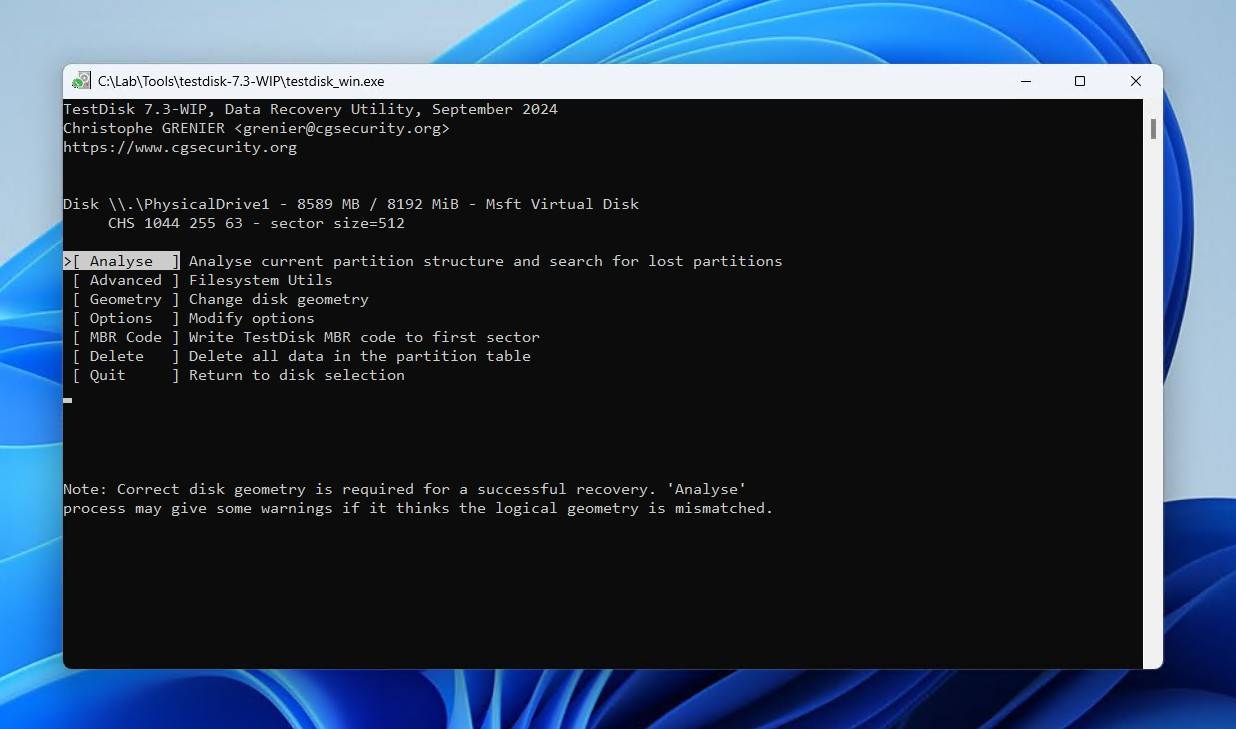
- Press Enter to begin the scan.

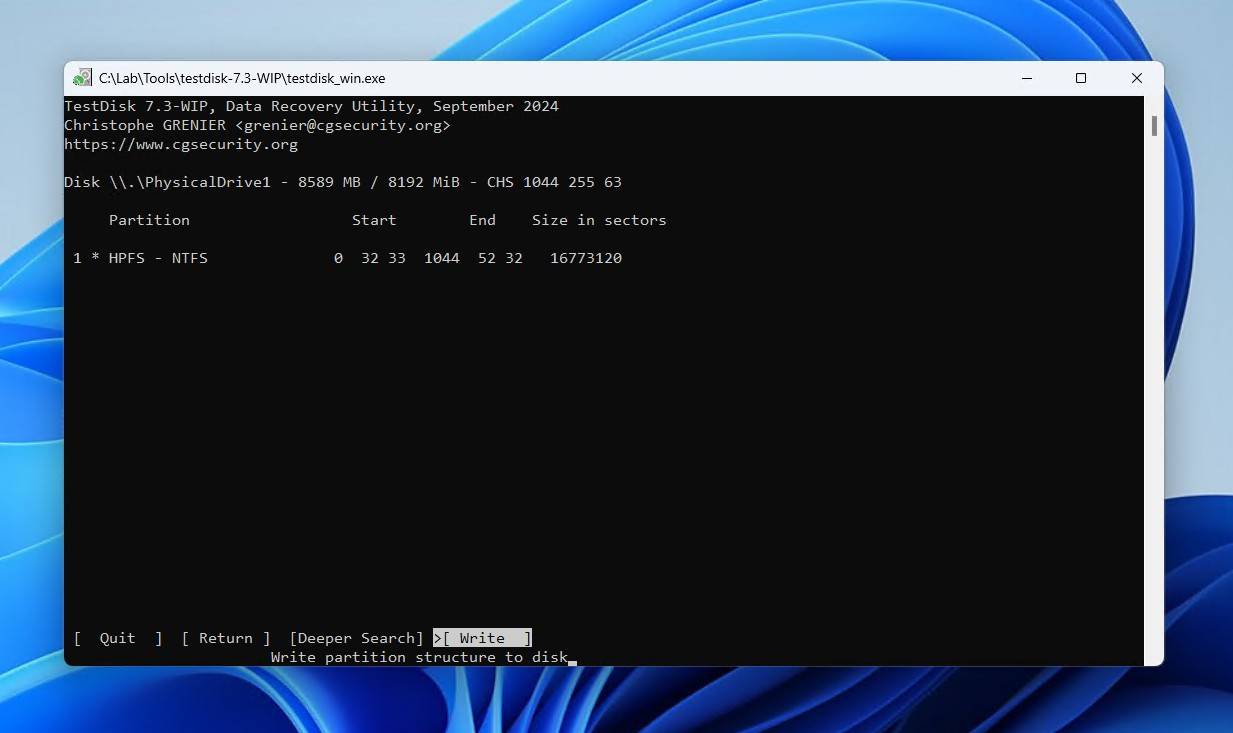
- Select the lost partition and press Enter.

- If everything looks good, you can change to the Write option and press Enter to write the partition back to the table. If nothing was found, perform a deeper search instead.
- Press Y, then restart your computer.
Create a New Partition with Disk Management
Disk Management allows you to manage the hard drives in your computer, as well as external drives. You can get unallocated disk space back by creating a new partition. Before you use drive, a new partition is necessary. This method will work, regardless if you’re replacing one that was lost or deleted, or you simply want to make full use of the unallocated external hard drive.
This is how you create a new partition with Disk Management:
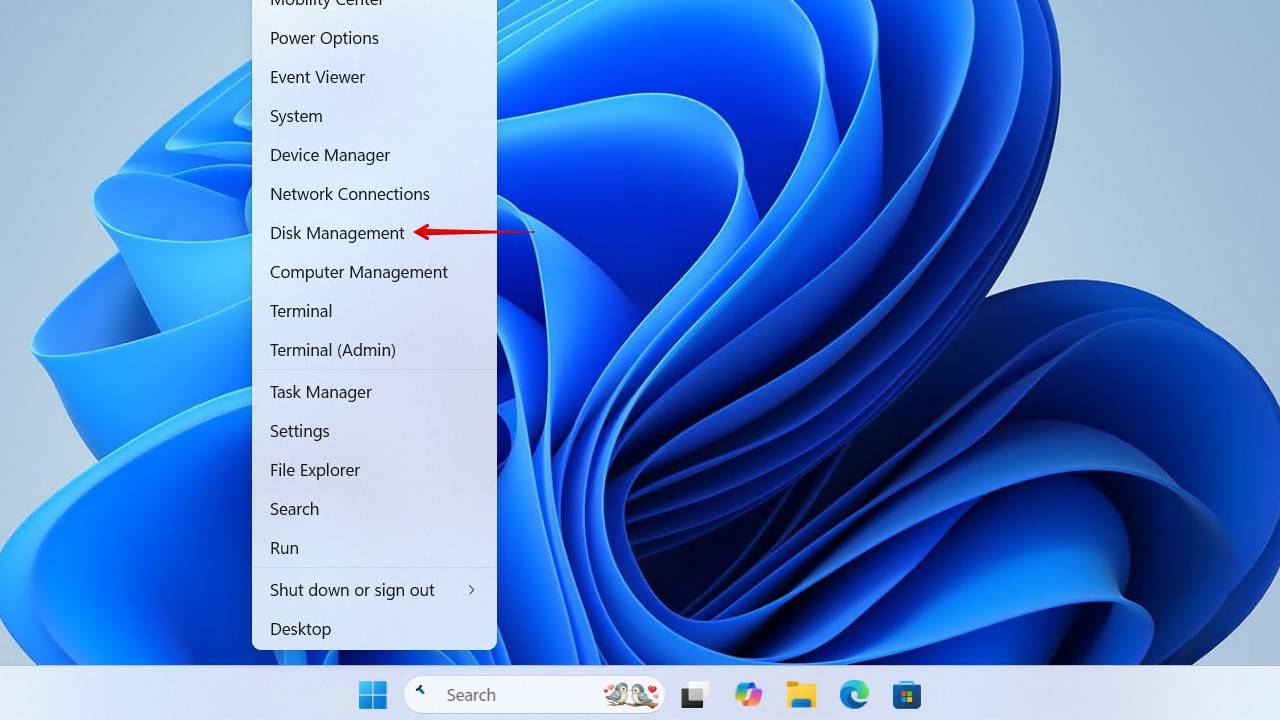
- Right-click the Start Button and click Disk Management.
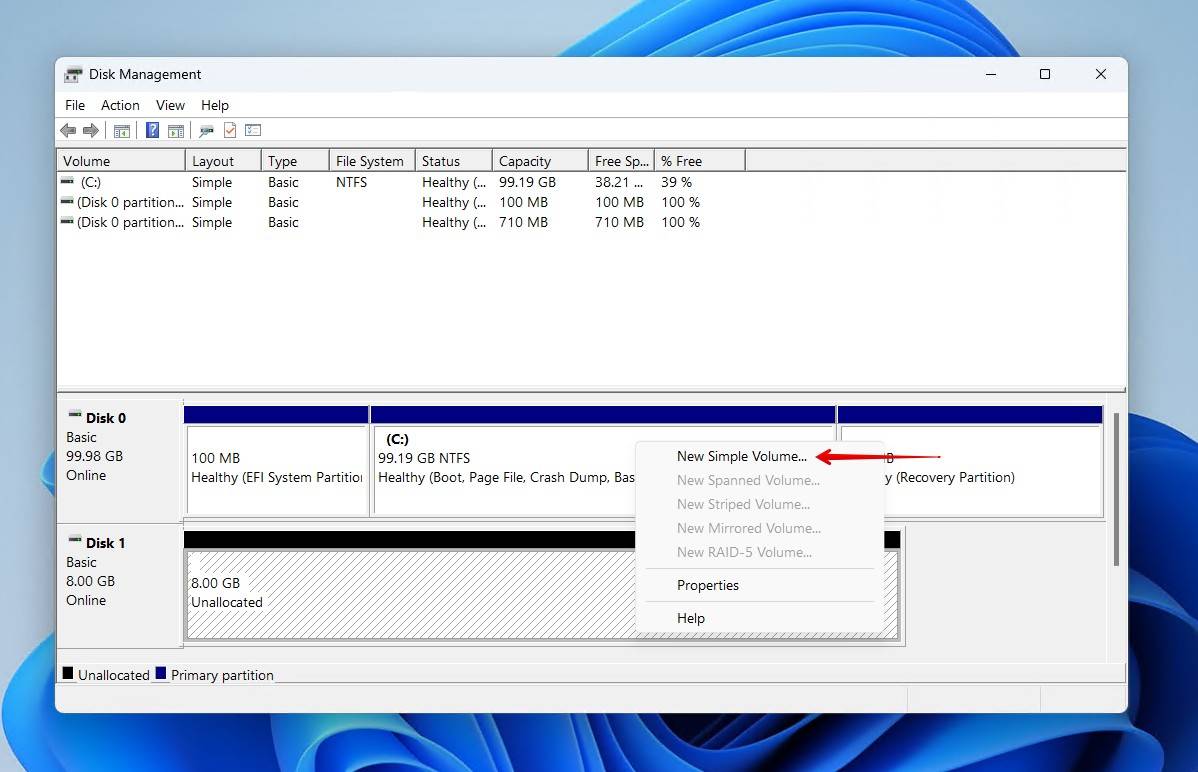
- Right-click the unallocated volume. Click New Simple Volume.
- When the New Simple Volume Wizard opens, click Next.
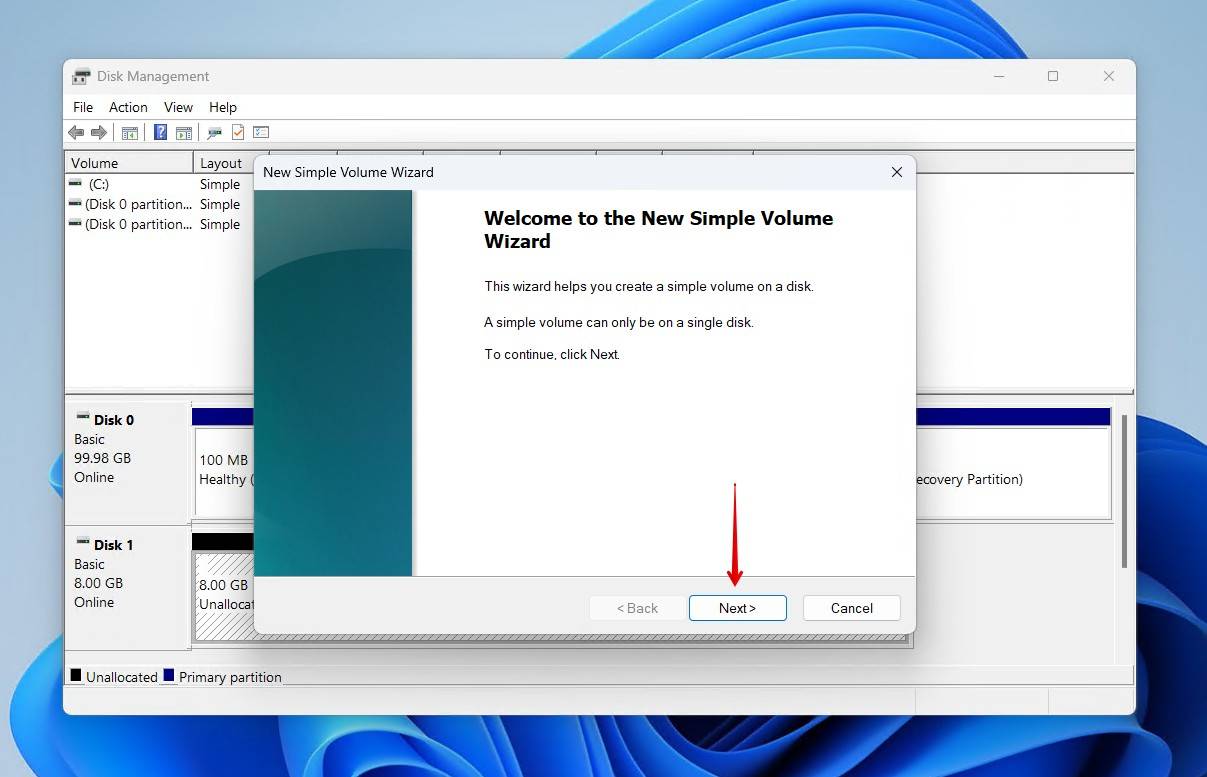
- Specify a size for the new partition. Click Next.

- Choose a drive letter, then click Next.
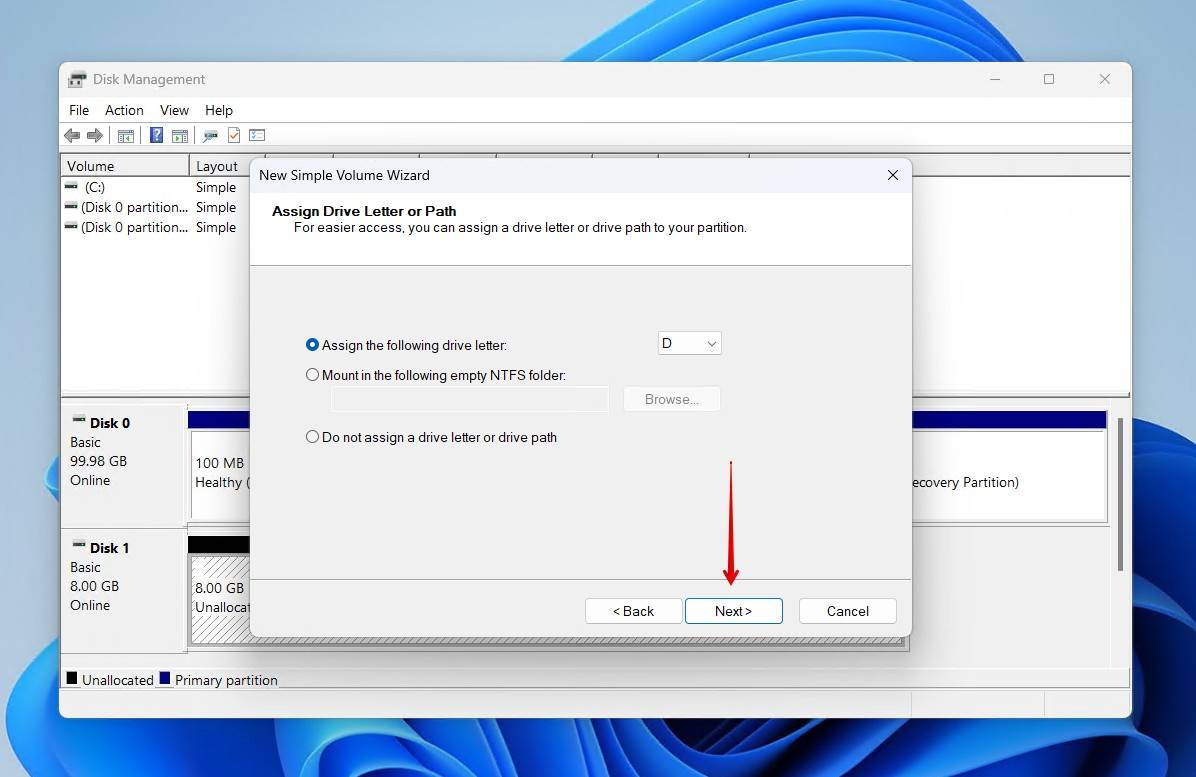
- Specify a volume label, and leave everything else as default. Click Next.

- On the final screen, click Finish.
After the final step, the new volume will appear in Disk Management. You can also access it in Windows Explorer and begin moving files to it.
Add Unallocated Space to Existing Partition
Creating a new partition isn’t always necessary. If you have a perfectly healthy partition on the drive already, you can always extend it. Extending it uses the unallocated space and adds it to the partition’s total capacity.
This is how you assign unallocated space to an existing partition:
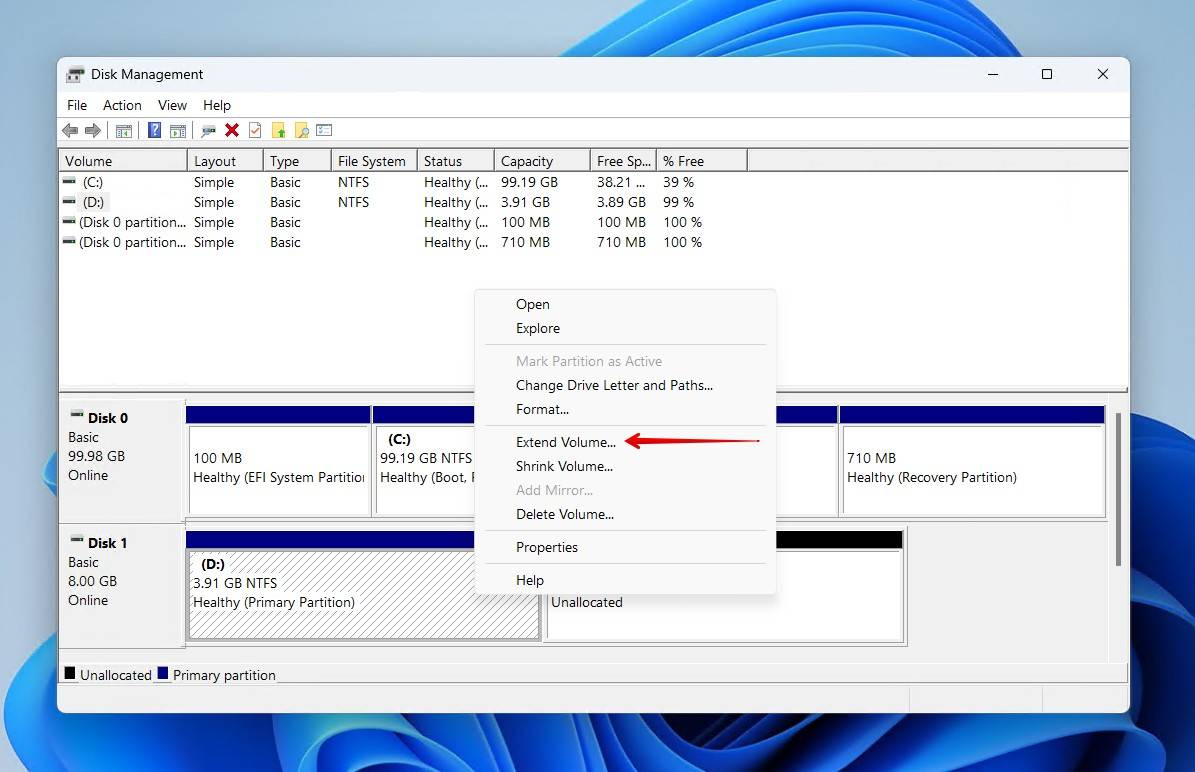
- Right-click Start and click Disk Management.
- Right-click the partition you want to extend, then click Extend Volume.
- Click Next.
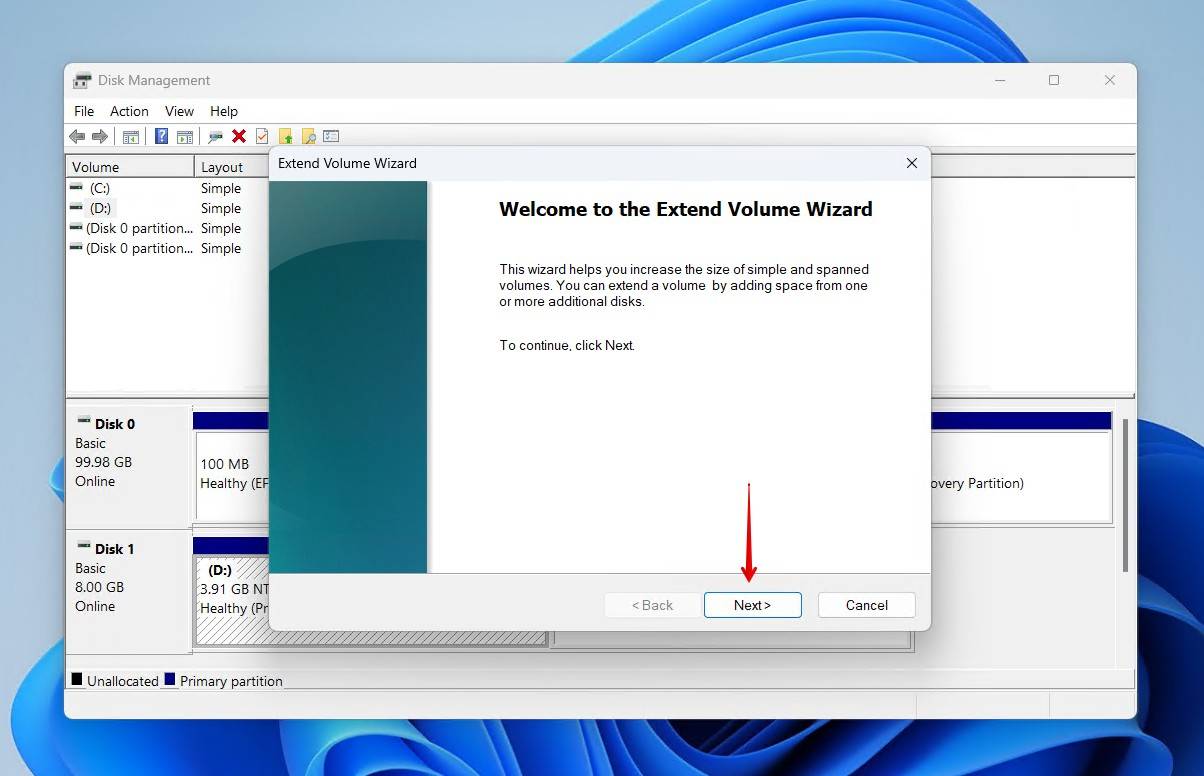
- Windows will select the unused space automatically, but if it doesn’t, you can click the space in Available, then Add to move it across. Click Next.
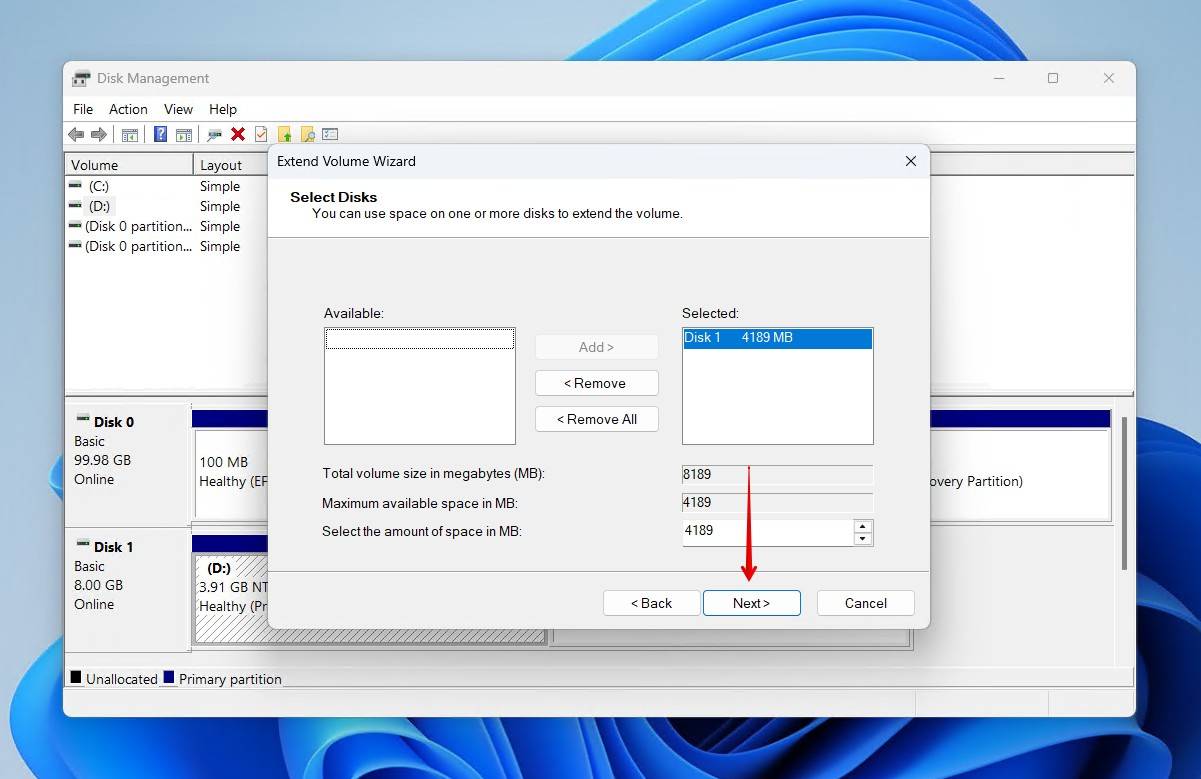
- Click Finish.
Update Your Drivers
This fix is intended for those who are still encountering problems when interacting with the disk, even after it has been restored. If the drivers for your hard drive are outdated, it can cause communication issues between your drive and OS. It doesn’t restore files or partitions, but it’s an effective fix for drives with a specific design, like hybrid drives.
This is how to fix an unallocated hard drive that’s impacted by corrupted or dysfunctional drivers:
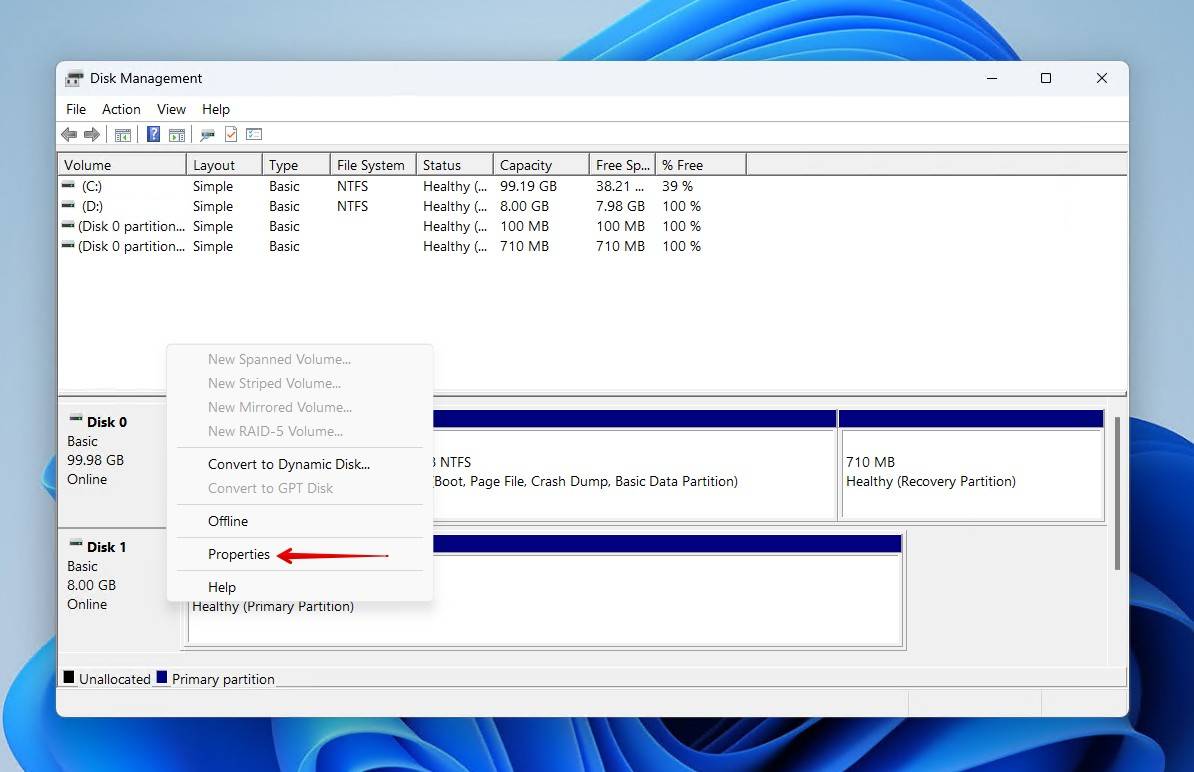
- Right-click the Start button and click Disk Management.
- At the bottom of the window, right-click the unallocated volume. Click Properties.
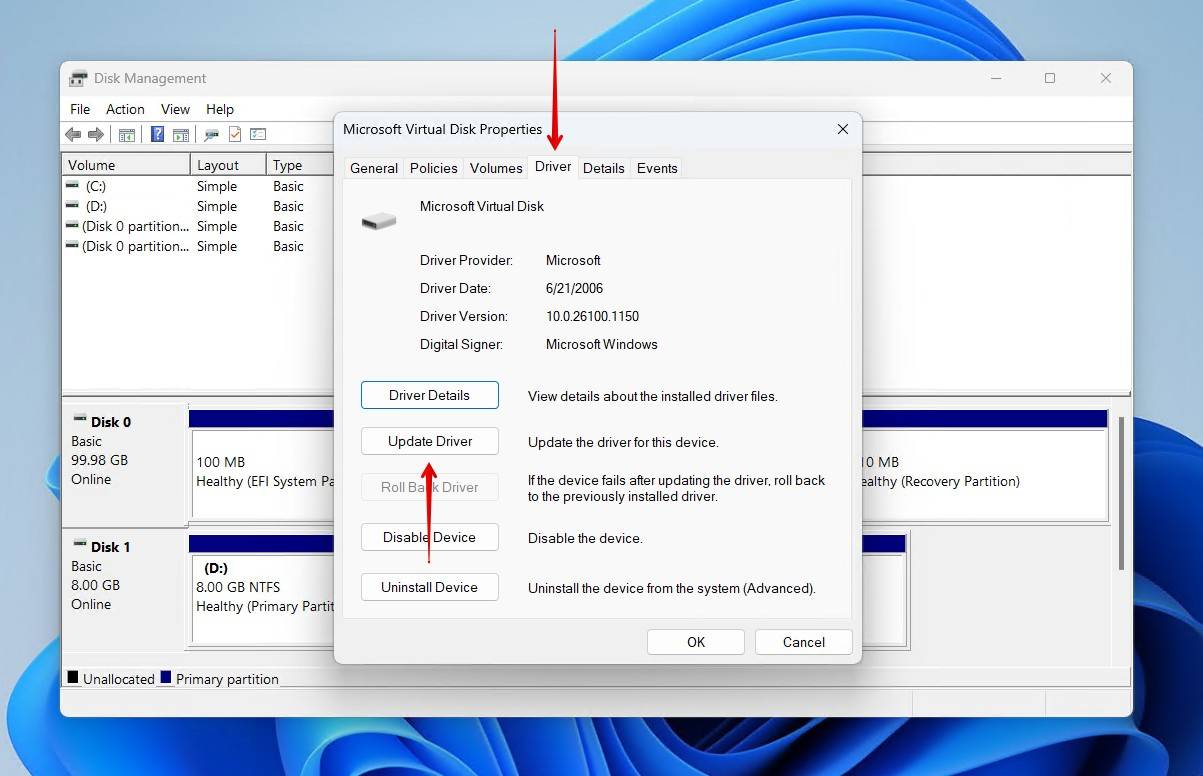
- Click on the Driver tab, then Update Driver.
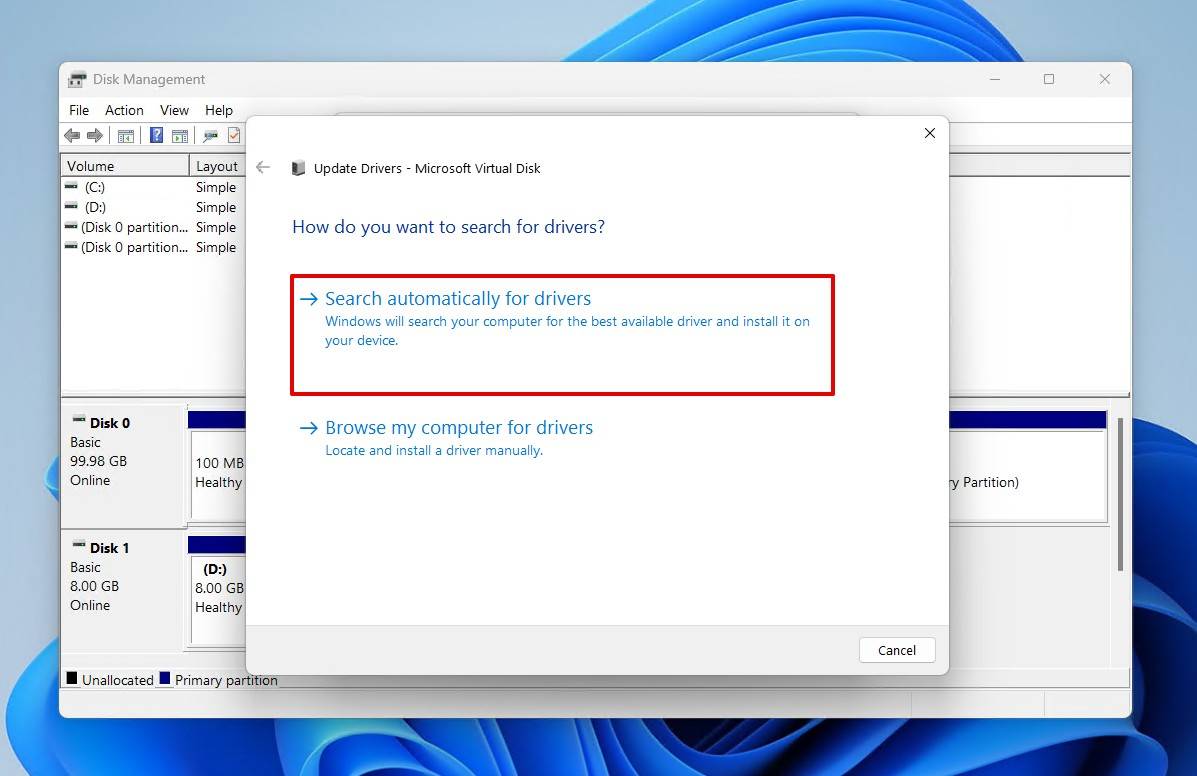
- Click Search automatically for drivers. Windows will then search for the most up-to-date drivers associated with your hard drive and install them.
- Restart your computer.
If this hasn’t worked for you, try going back to the same window from Step 3 and clicking Uninstall Device then Uninstall. Restart your computer, and Windows will download the drivers again.
Preventive Measures for Future Partition Problems
Data recovery can be made a lot easier with a few simple steps. Some of these steps can be performed immediately, while others are more for protecting your data in the long-run. Here are some actionable steps you can take that may allow you to avoid recovering files from unallocated space in the future.
- 🩺 Monitor drive health – Stay on top of your drive’s condition by making use of S.M.A.R.T. data. S.M.A.R.T. data tells you a lot about how your drive is performing, and you can view it using tools like CrystalDiskInfo. One of the most important S.M.A.R.T. values, deemed by Acronis as a critical parameter, is Uncorrectable Sector Count, which records when your drive fails to read data from or write data to a sector.
- 💽 Use quality hardware – Just as you should only shop from trusted hard drive vendors for high-quality storage, using high-quality cables and adapters matters a lot. Low-quality cables can lead to connection issues, like frequent disconnections. Above all else though, you should always eject your drive safely.
- 📀 Implement a backup strategy – Backups are the only way to guarantee safe recovery of your data. There are plenty of backup strategies out there that will work depending on what storage demands you have. Veeam is an advocate for the 3-2-1 backup rule, which entails keeping 3 backups across 2 different storage mediums, ensuring 1 remains off-site.
- 🔍 Prepare for partition management – It’s important to exercise patience when performing sensitive drive operations, like creating or extending a partition; especially if it’s something new for you. Take the time to research trusted tools, read reliable guides, and back up the most important data before doing anything.
Conclusion
Even though losing a partition can be a scary moment, you can put your mind at ease by following the solutions outlined in this article. If done correctly, you can recover your files without much effort, whether it’s an internal drive, external hard drive, or USB flash drive. Data recovery from a recently unallocated partition heavily depends on how long ago the partition was deleted and whether or not any new data was written to the drive.


FAQ
Before fixing the unallocated drive, you should first recover the files that were lost using TestDisk:
- Open testdisk_win.exe. Create a log.
- Select drive. Press Enter.
- Choose partition table type. Press Enter.
- Analyze, then scan.
- Select lost partition. Press Enter.
- Write partition, confirm with Y.
- Restart.
If the unallocated partition is the result of another partition being deleted, you should first recover the data that was lost before attempting to fix the partition. Once you’ve recovered the data, you can either extend an existing partition or create a brand new partition.
- Right-click the Start Button and click Disk Management.
- Right-click the unallocated volume. Click New Simple Volume.
- When the New Simple Volume Wizard opens, click Next.
- Specify a size for the new partition. Click Next.
- Choose a drive letter, then click Next.
- Specify a volume label, and leave everything else as default. Click Next.
- On the final screen, click Finish.