Some photo deletions are accidental right from the first moment, such as when you fumble with your phone and tap the wrong icon or when you’re scrolling through a gallery and accidentally swipe the delete button. Other times, you might delete photos on purpose but change your mind later, perhaps realizing the image had sentimental value you didn’t initially recognize. Regardless, the loss of an important photo is always unpleasant—but not necessarily unpleasant.

In this article, we explain how to retrieve lost photos from an iPhone to help you save the day no matter how hopeless the situation looks right now. If luck’s on your side, you might bring back every deleted photo with just a few taps. For tougher cases, we also cover how to use iPhone recovery software to rescue photos many would think are gone forever.
📱 Compatible iPhone Models:
The methods described in this article can be applied on all iPhone models including iPhone 16 (Plus/Pro/Pro Max), iPhone 15 (Plus/Pro/Pro Max), iPhone 14 (Plus/Pro/Pro Max), iPhone 13 (Mini/Pro/Pro Max), iPhone SE (3rd), iPhone 12 (Pro/Pro Max), iPhone 11 (Pro/Max), and older. All you need to do is follow our detailed step-by-step instructions as closely as possible.
Restore Deleted Pictures on iPhone with Photos App
If you delete a photo in the Photos app, it’s moved to the Recently Deleted album folder, where it stays for 30 days before being permanently removed from your device. During this grace period, you have the opportunity to recover any mistakenly deleted images by following the simple recovery steps below:
- Open the Photos app.
- Scroll down to Utilities and select the folder labeled Recently Deleted. It will show the pictures that are scheduled for deletion and how much longer until they are removed permanently from the iPhone.
- Unlock the Recently Deleted album using Face ID or Touch ID if asked to do so.
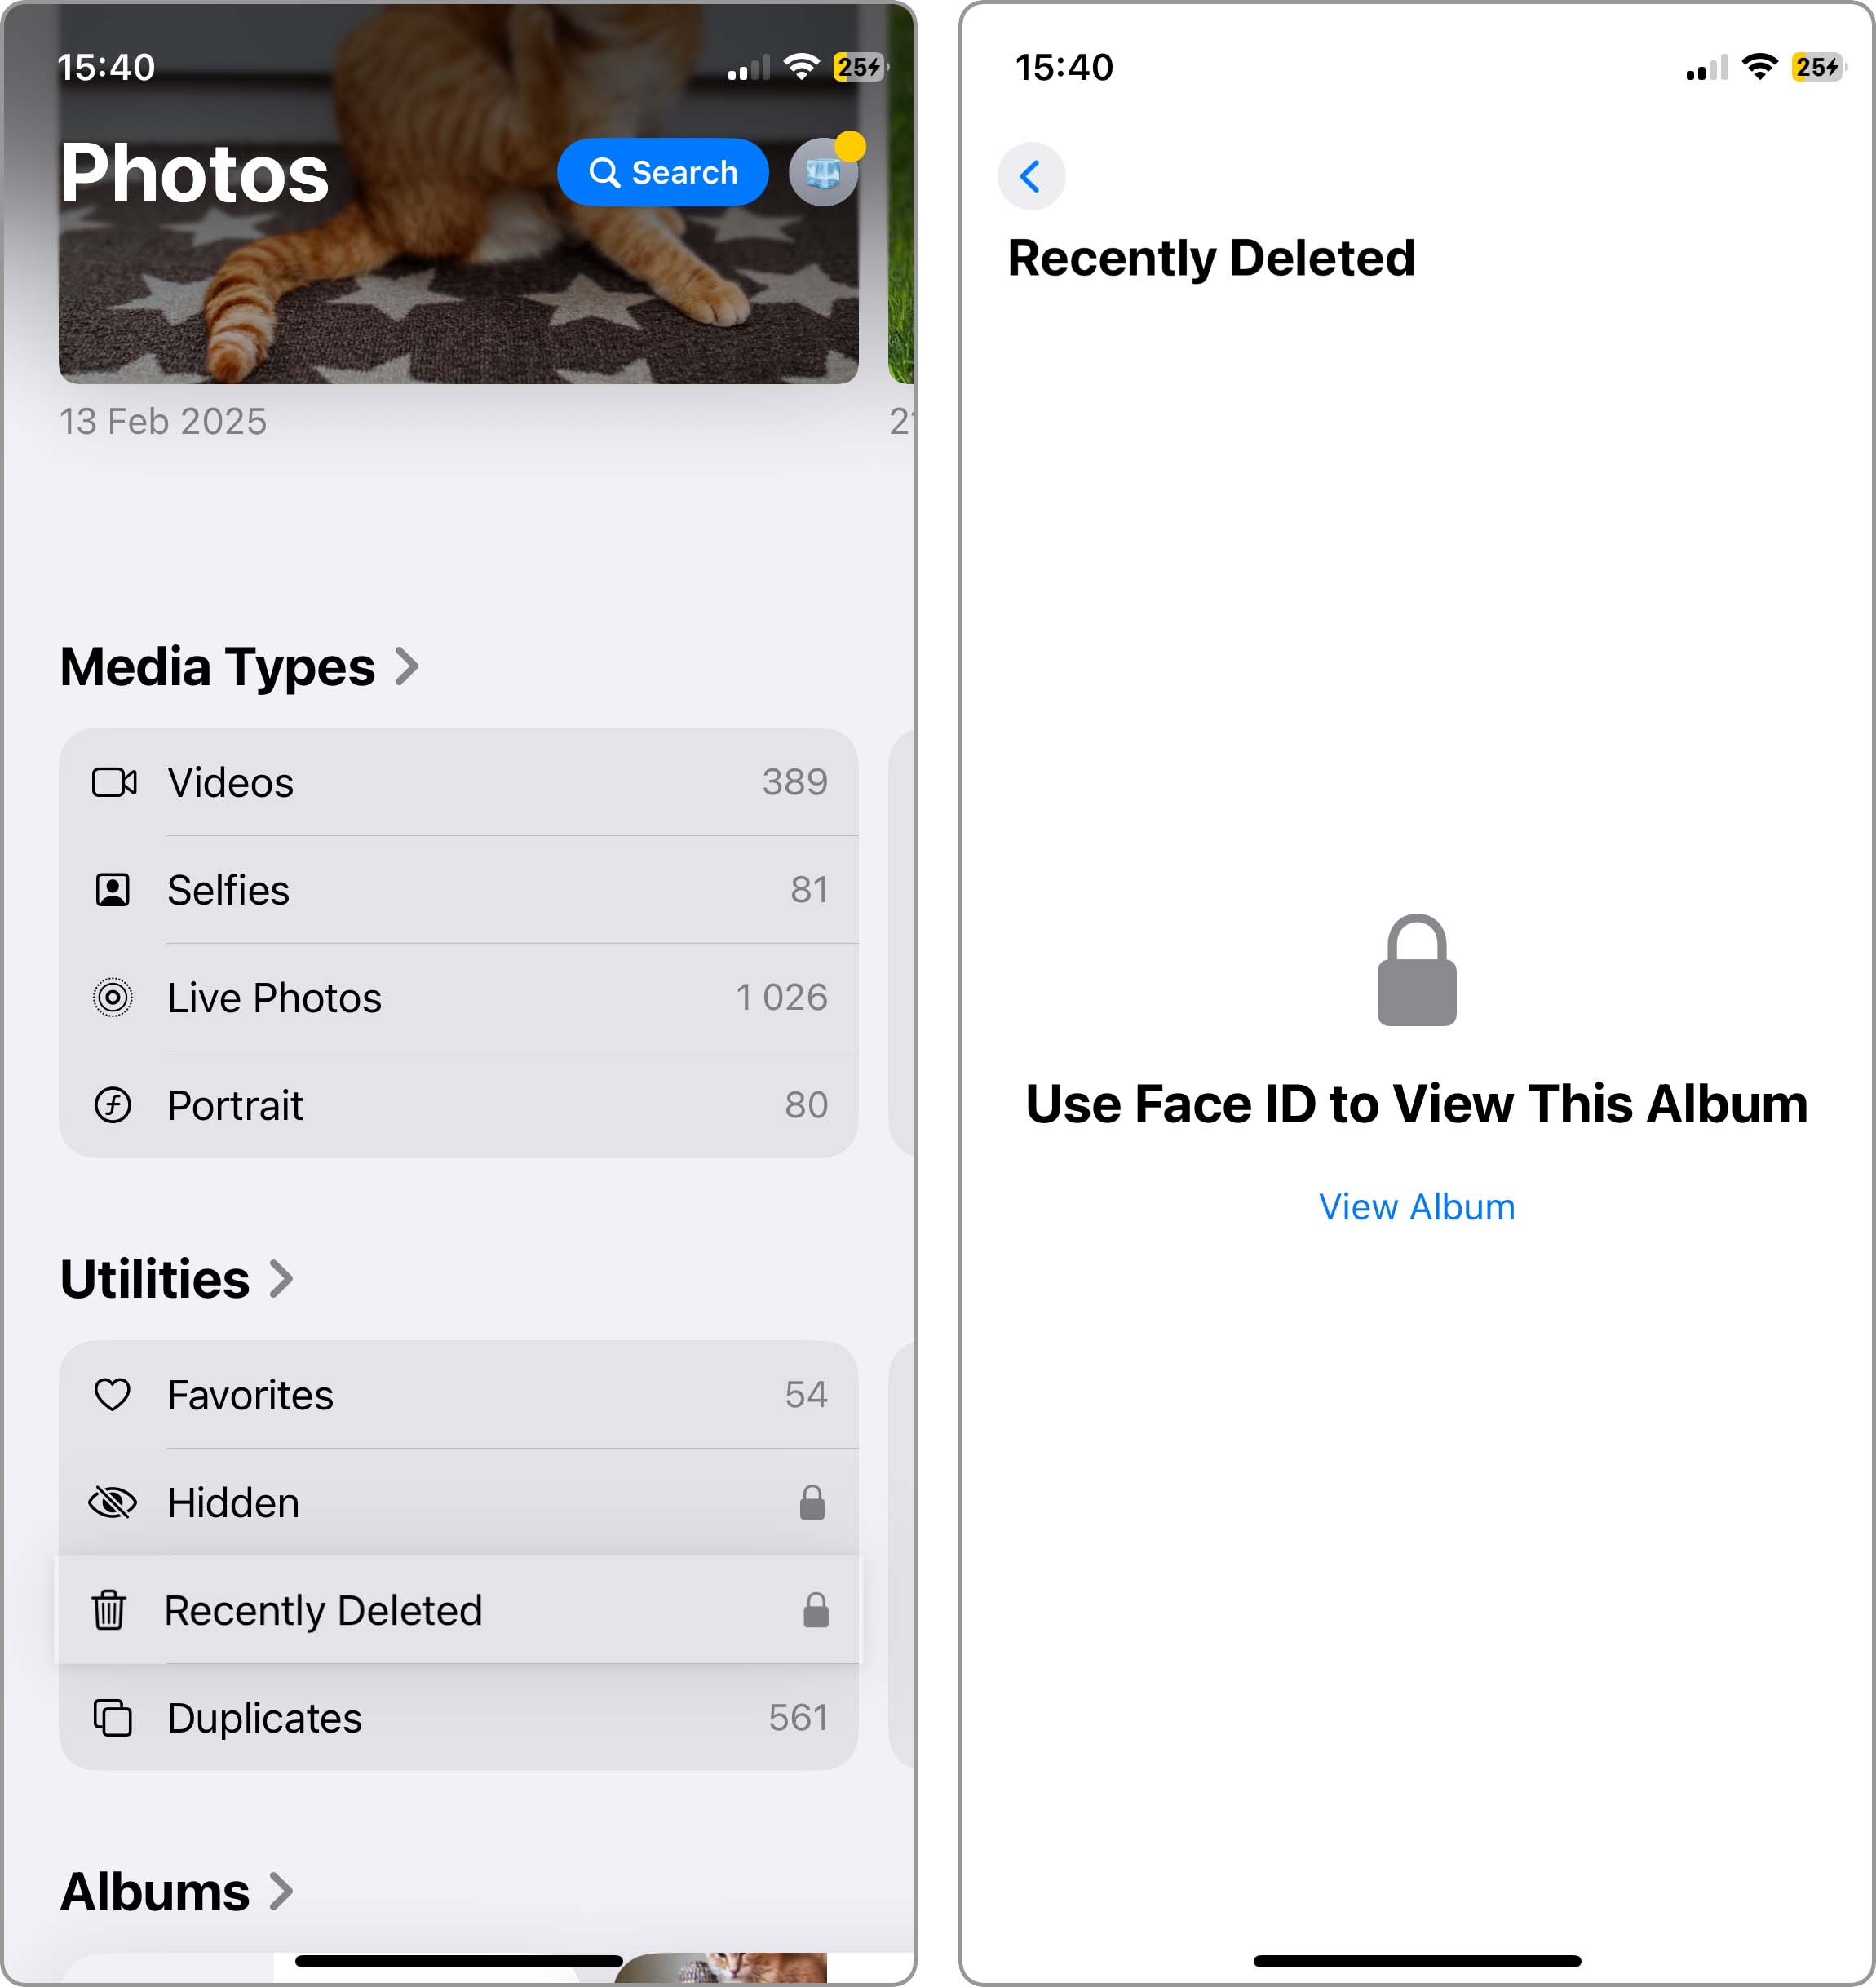
- Tap the Select button in the top-right corner.
- Tap the picture (or pictures) you want to recover, and then tap the circle with three dots inside located in the bottom-right corner.
- Select the Recover option, and the photo will be restored.

No luck with the Recently Deleted album? Before attempting more complex recovery methods, we recommend that you check if your photos aren’t simply hidden rather than deleted by going to the Hidden album in the Utilities section.
Ways to Recover Deleted Photos from an iPhone Backup
Backups are your second-best option how to retrieve deleted photos on iPhone. Since there are several different ways how to backup photos on iPhone, we provide three different solutions, and it’s up to you to select the one that works best for you.
When recovering deleted photos from iPhone with backups, keep this in mind:
- Backup timing matters: The backup you need depends on when the deletion occurred. If you accidentally deleted photos and then created a backup afterward, those photos won’t be in your latest backup, so you’ll need to use an older backup that was created before the deletion happened.
- iCloud Photo synchronization: Photos are only included in iPhone backups (iTunes/Finder) if iCloud Photos synchronization was turned off when the backup was created. With iCloud Photos enabled, your photos are stored in the cloud and not in local backups. However, some photos might still end up in your iTunes/Finder backups even with iCloud Photos turned on, which is why it’s a good idea to check both.
Now, let’s explore the three main ways to recover your deleted photos from backups.
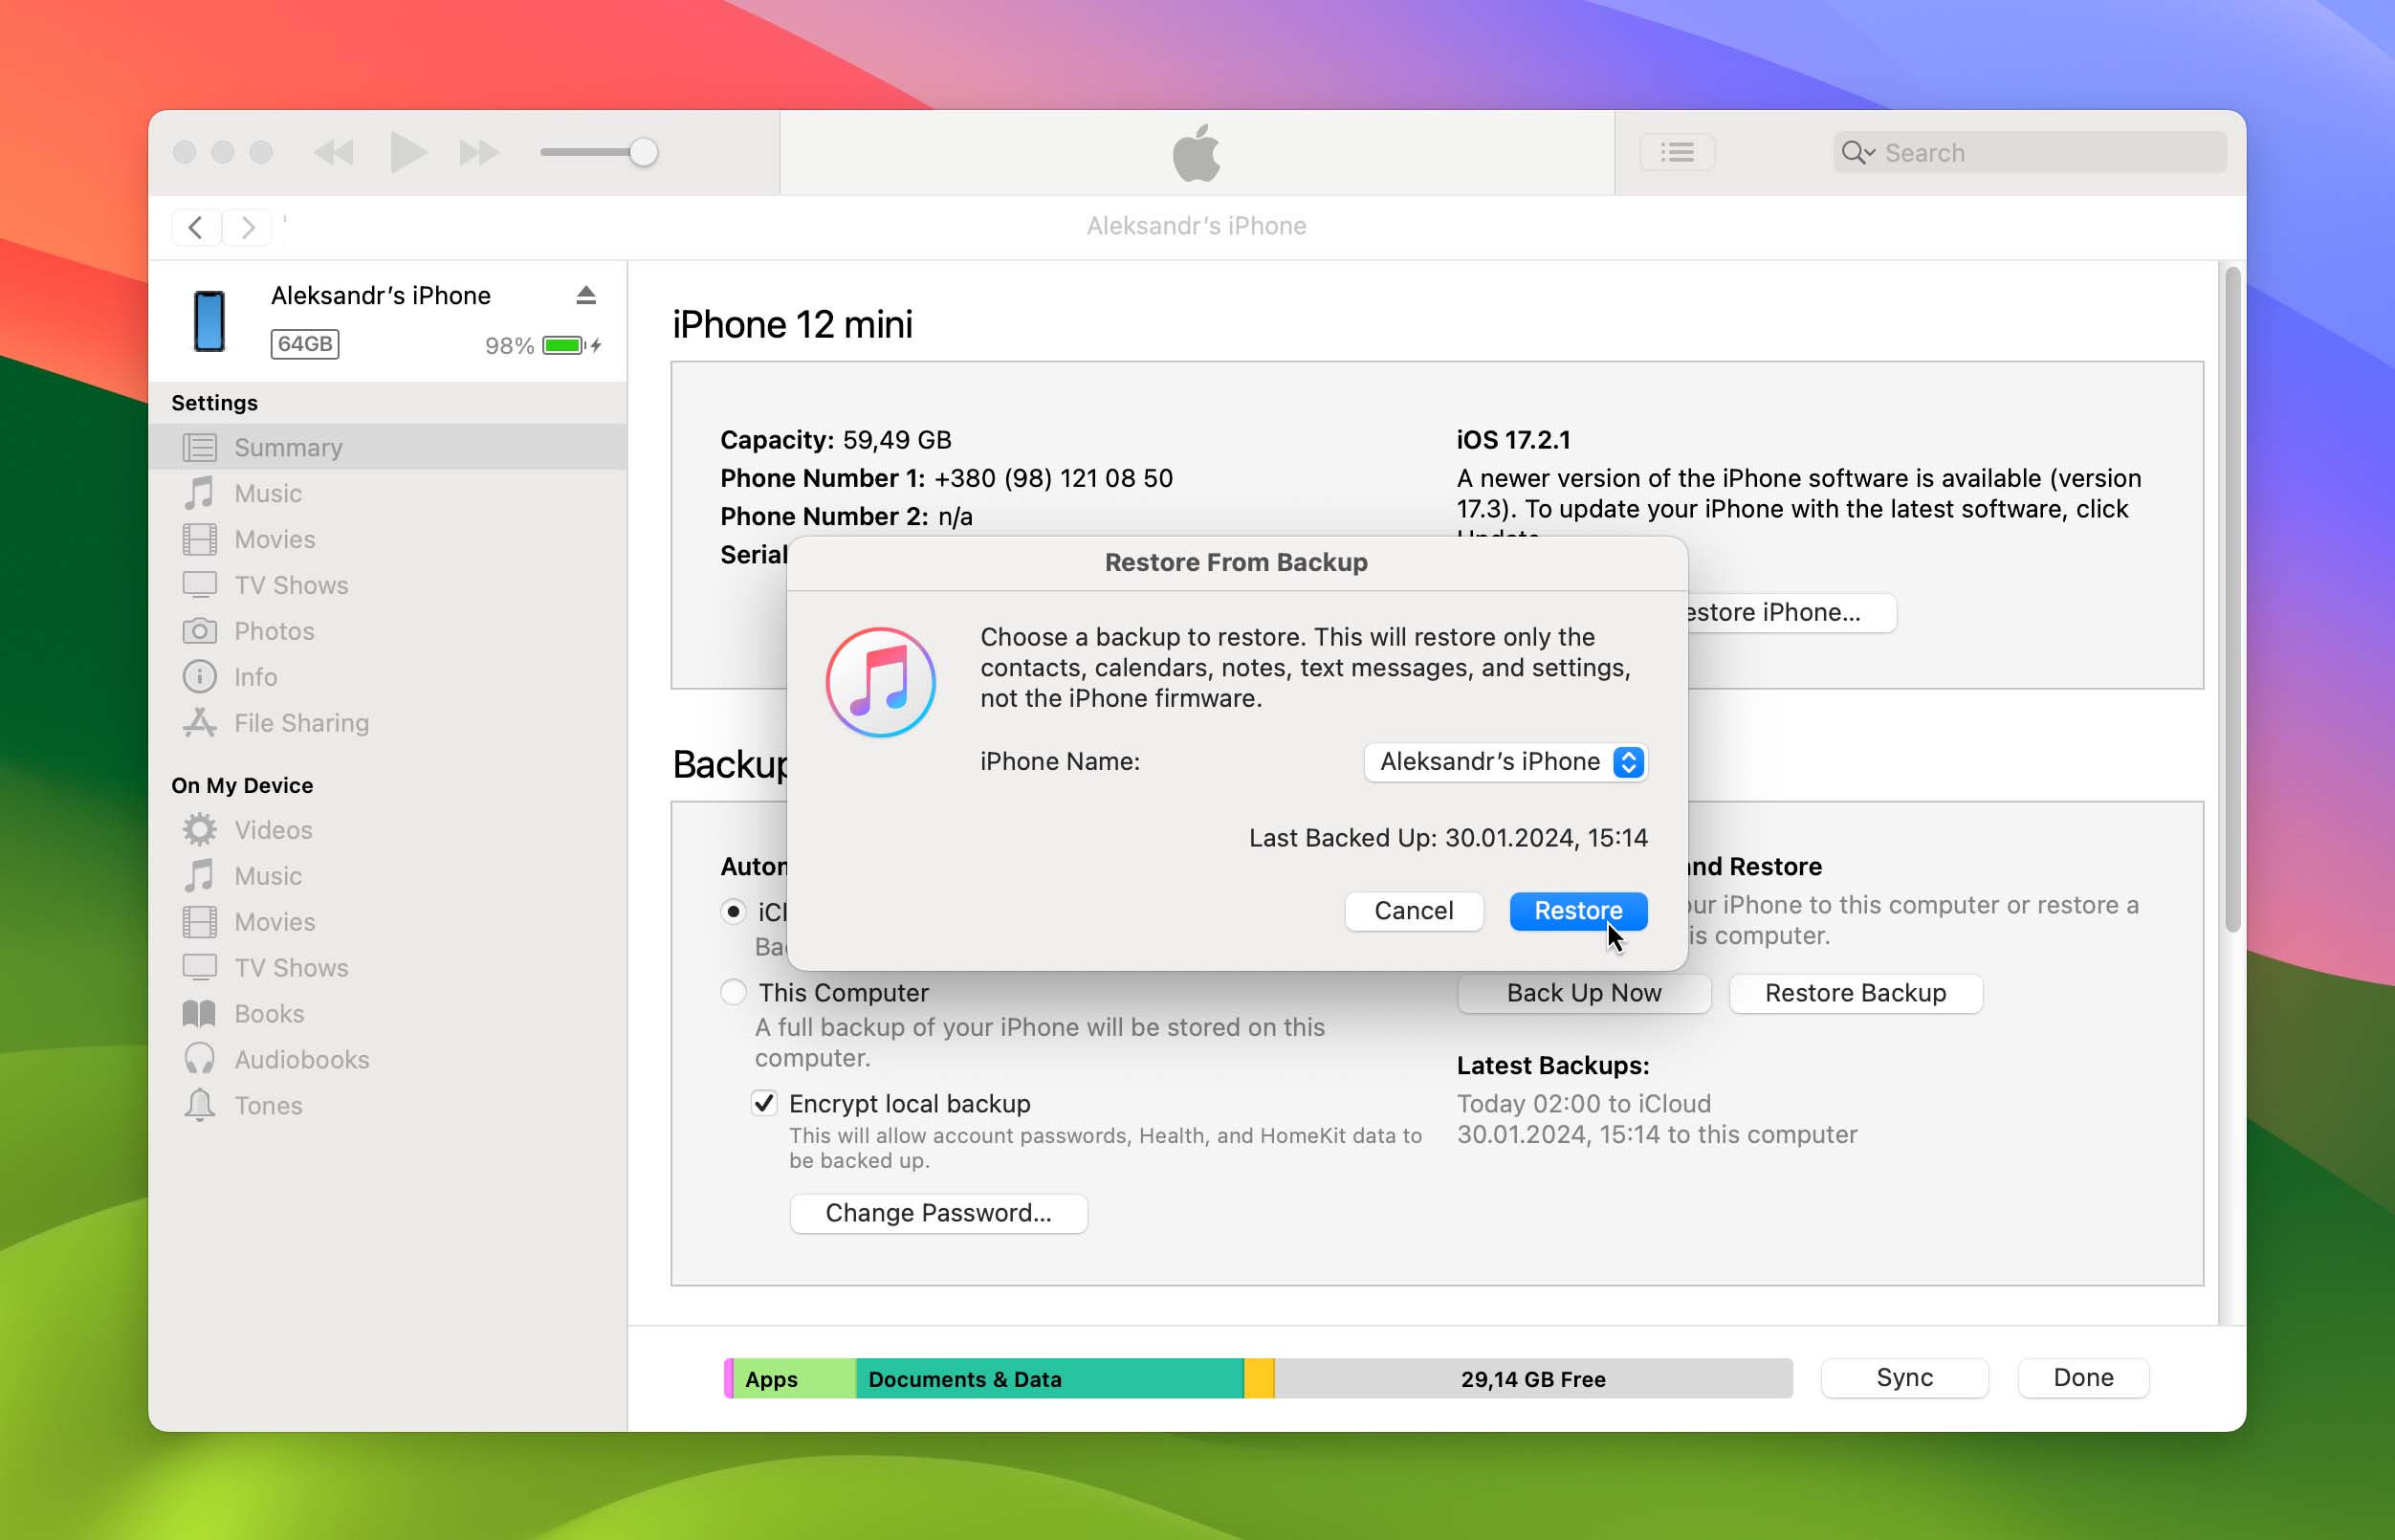
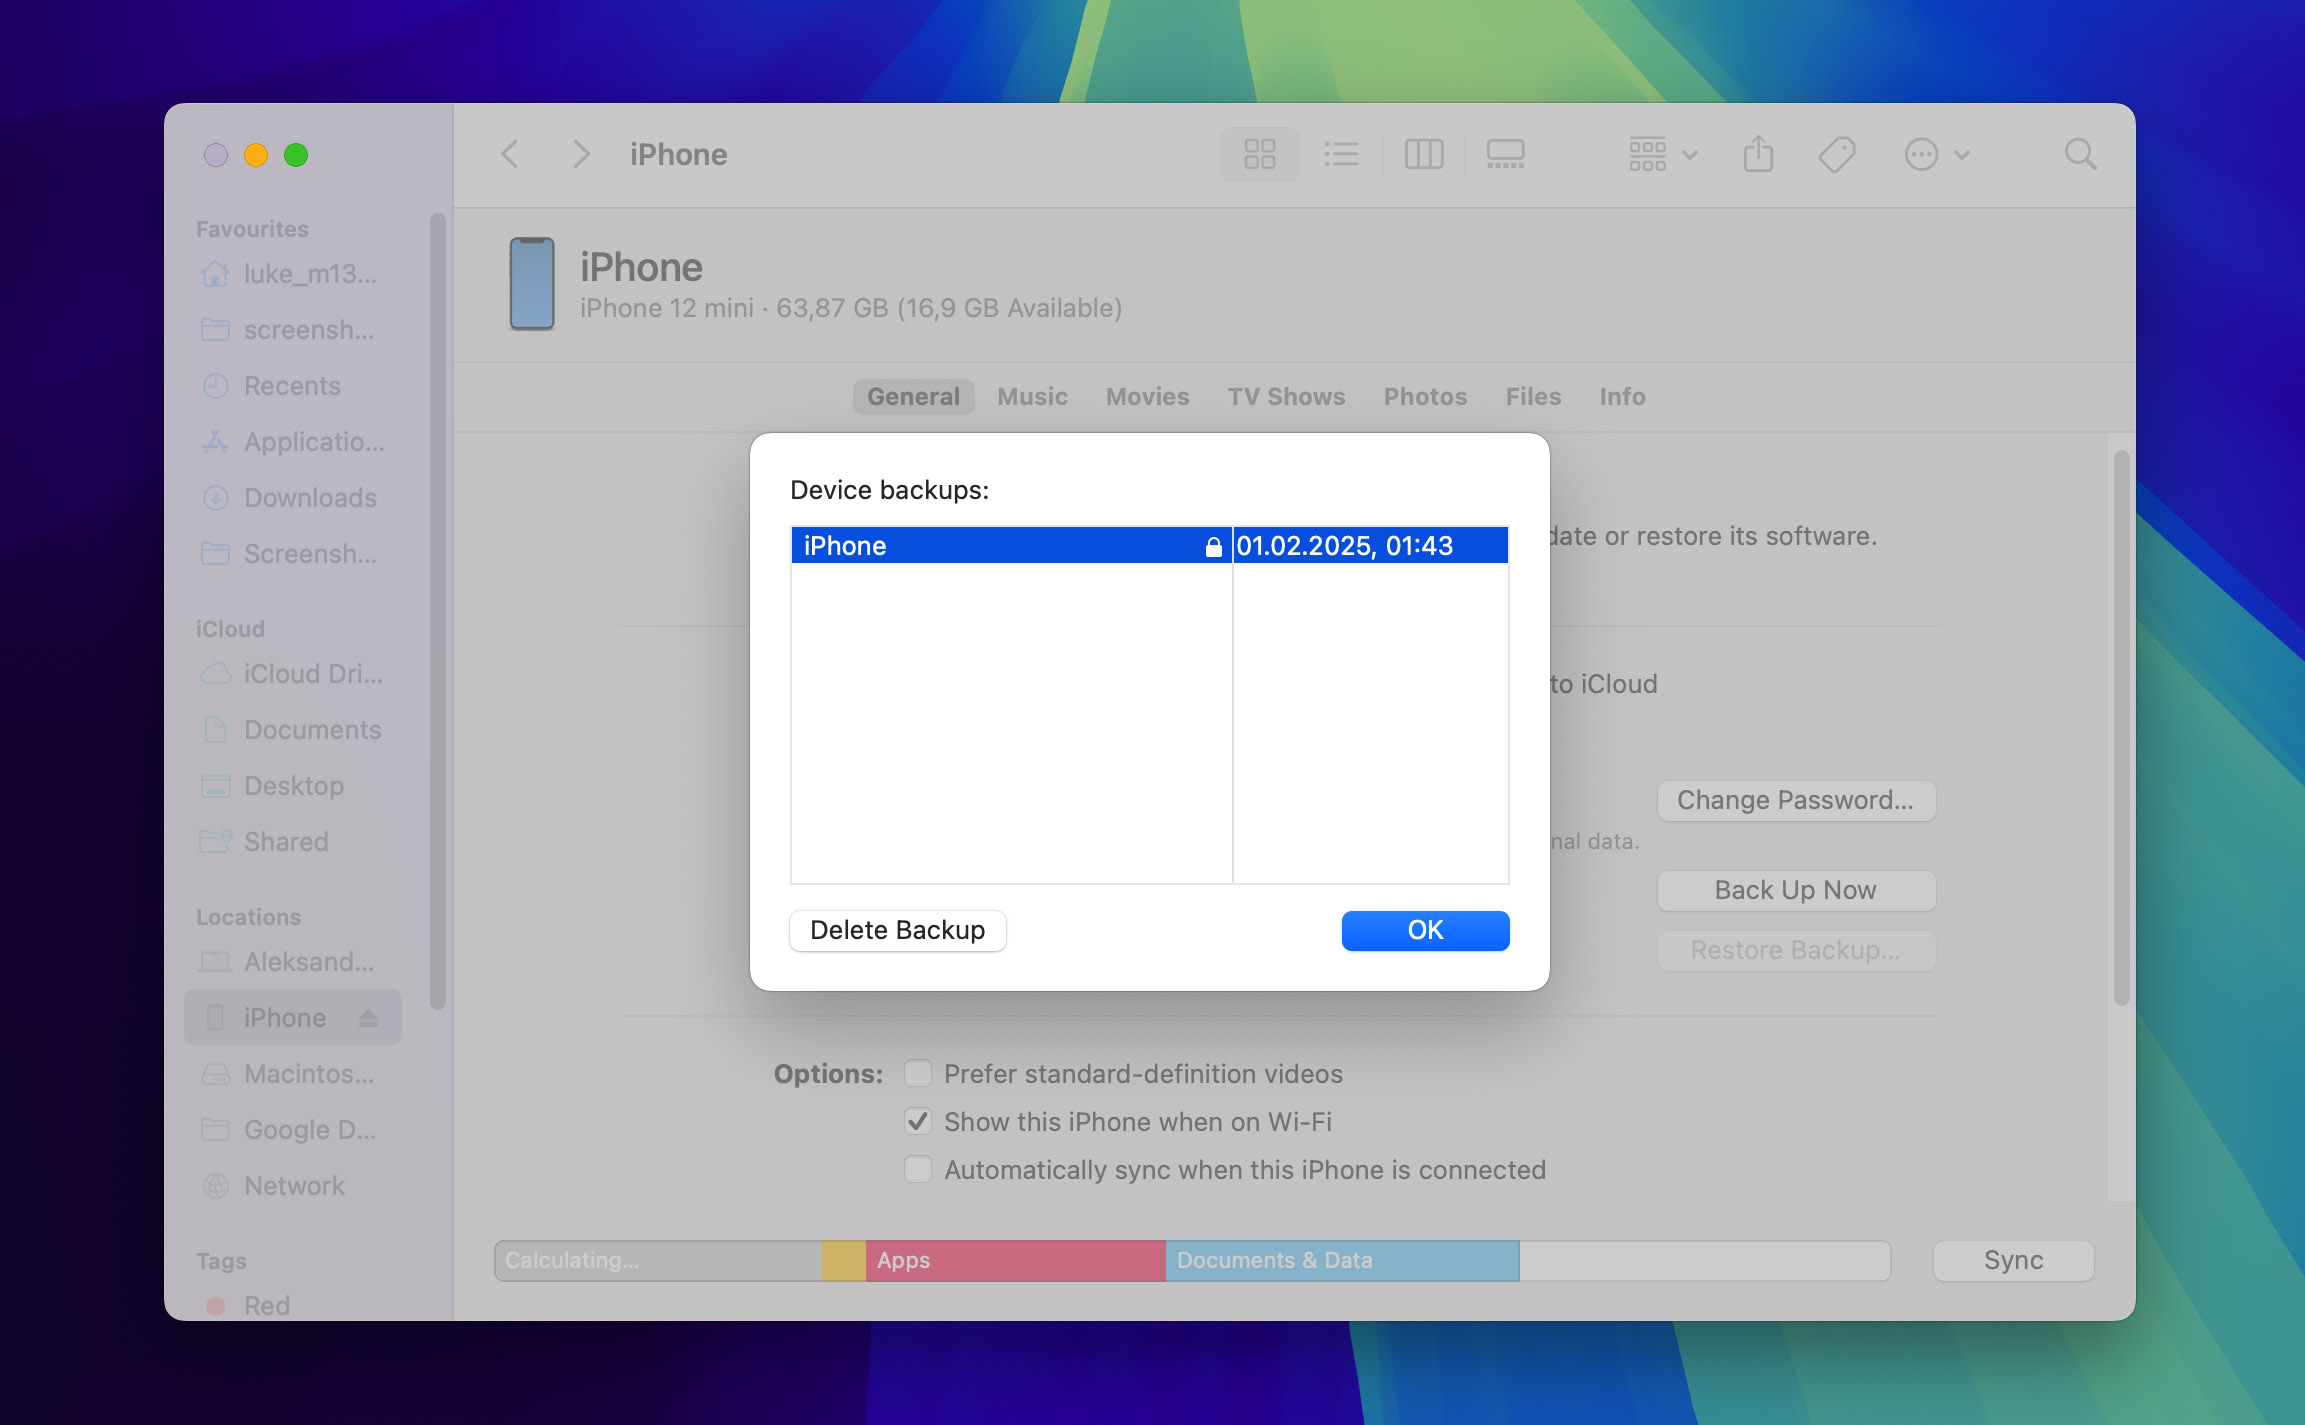
Way 1: Recover Deleted Photos with Finder
Since macOS Catalina, the Finder is in charge of iPhone backups and recoveries from them. If this is your first time recovering from an iPhone backup with Finder, you have nothing to worry about because Apple made the process completely painless.
Follow these steps to recover lost photos with Finder:
- Launch Finder.
- Connect your iPhone to your computer.
- Select your iPhone from the list of locations on the left.
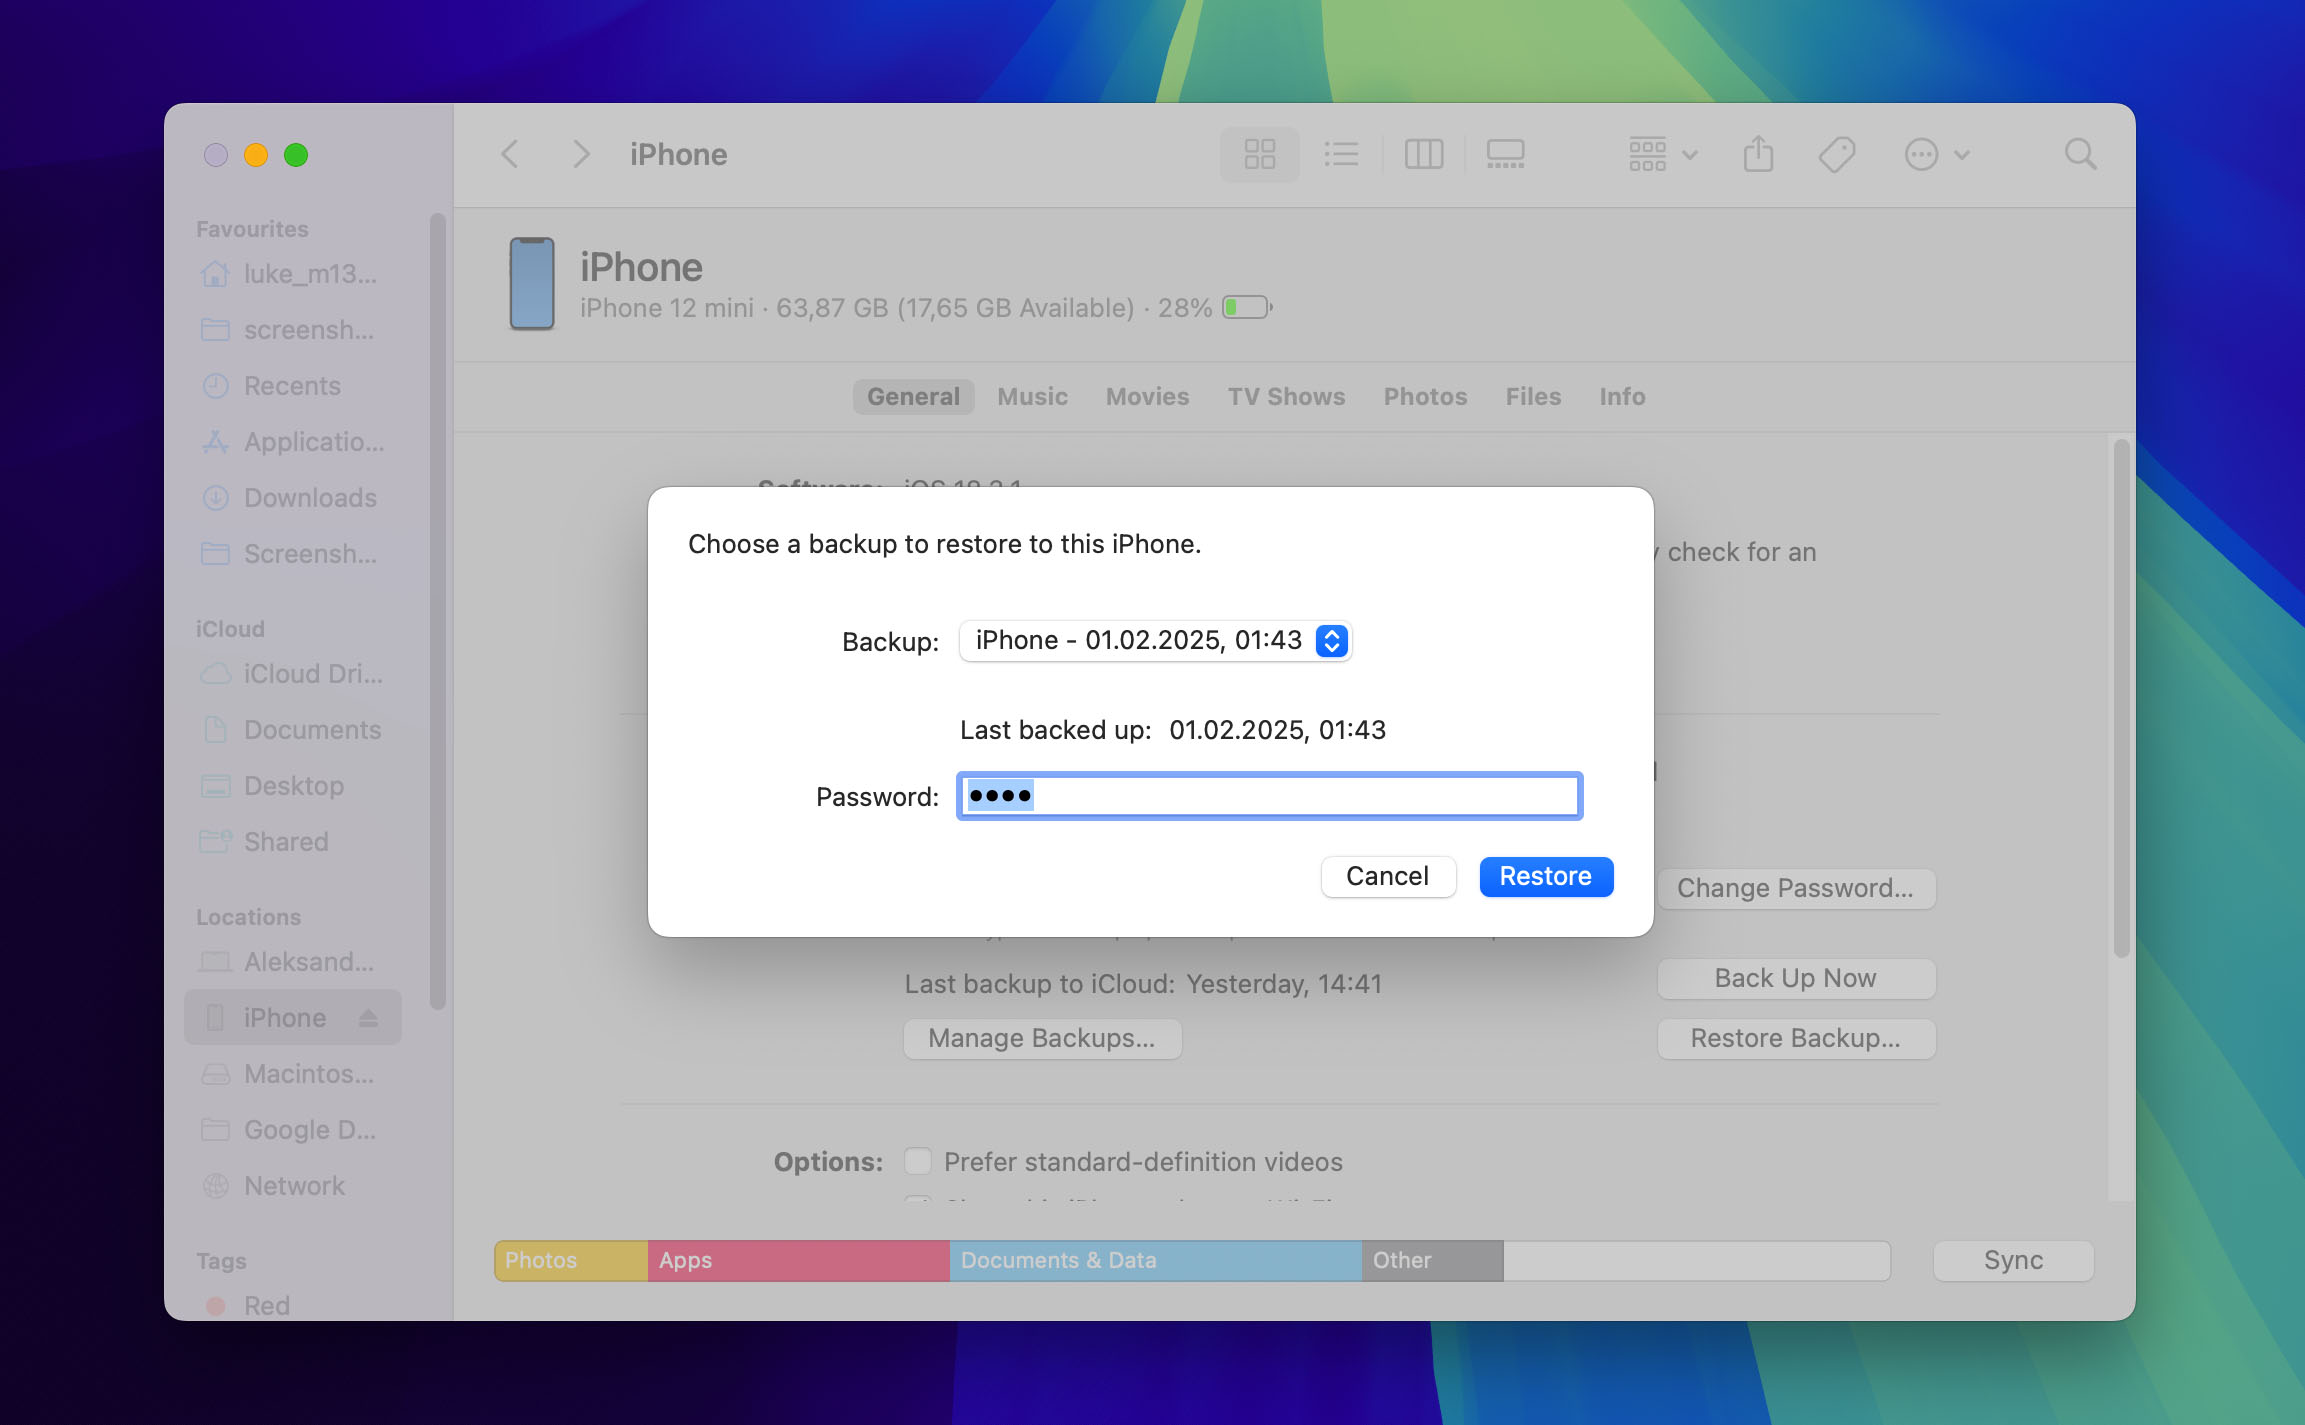
- Click the Restore Backup button located in the General tab.
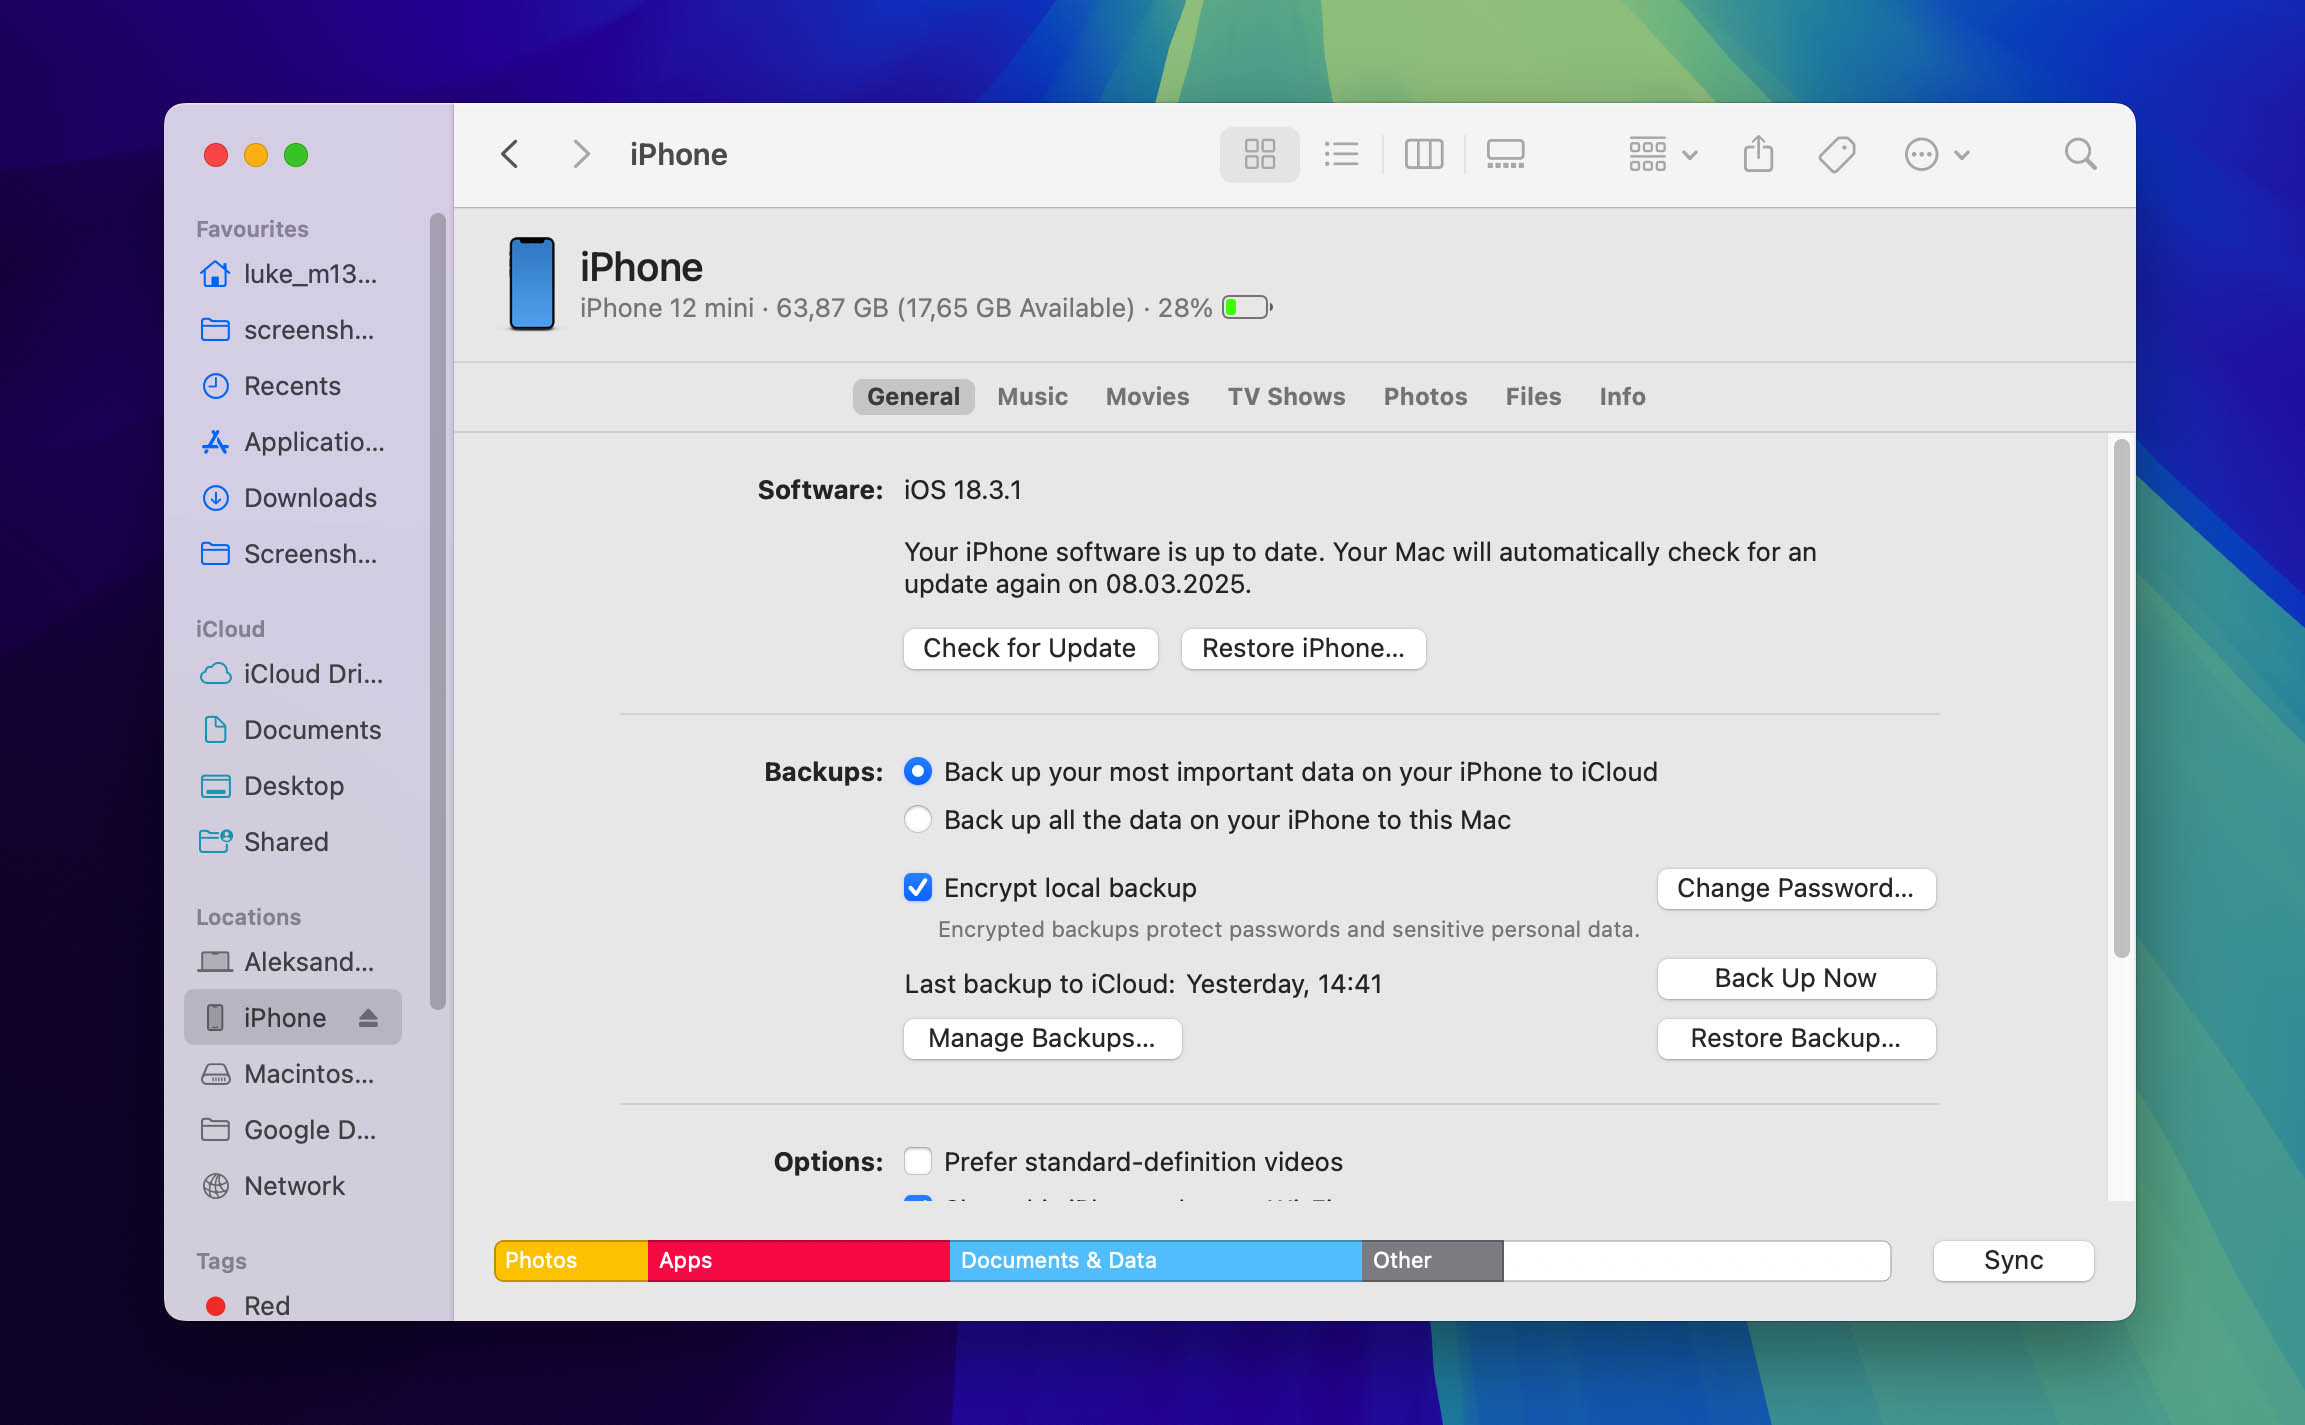
- Choose the latest backup that includes the photos you’re trying to recover.
- Click the Restore button to confirm that you’re ready to restore your iPhone from the selected backup. Enter your password if prompted to do so.
Way 2: How to Recover Deleted Photos from iTunes Backup
On macOS Mojave or earlier, or on a PC, you can restore deleted photos from an iTunes backup. Because iTunes can do a lot more besides restoring deleted data from backups, iPhone users are often afraid of going through the recovery process on their own. But with our instructions, you’ll be able to get your photos back with just a few clicks.
To recover deleted photos from iTunes backup follow these steps:
- Open iTunes.
- Use an original Apple cable to connect your iPhone to your computer.
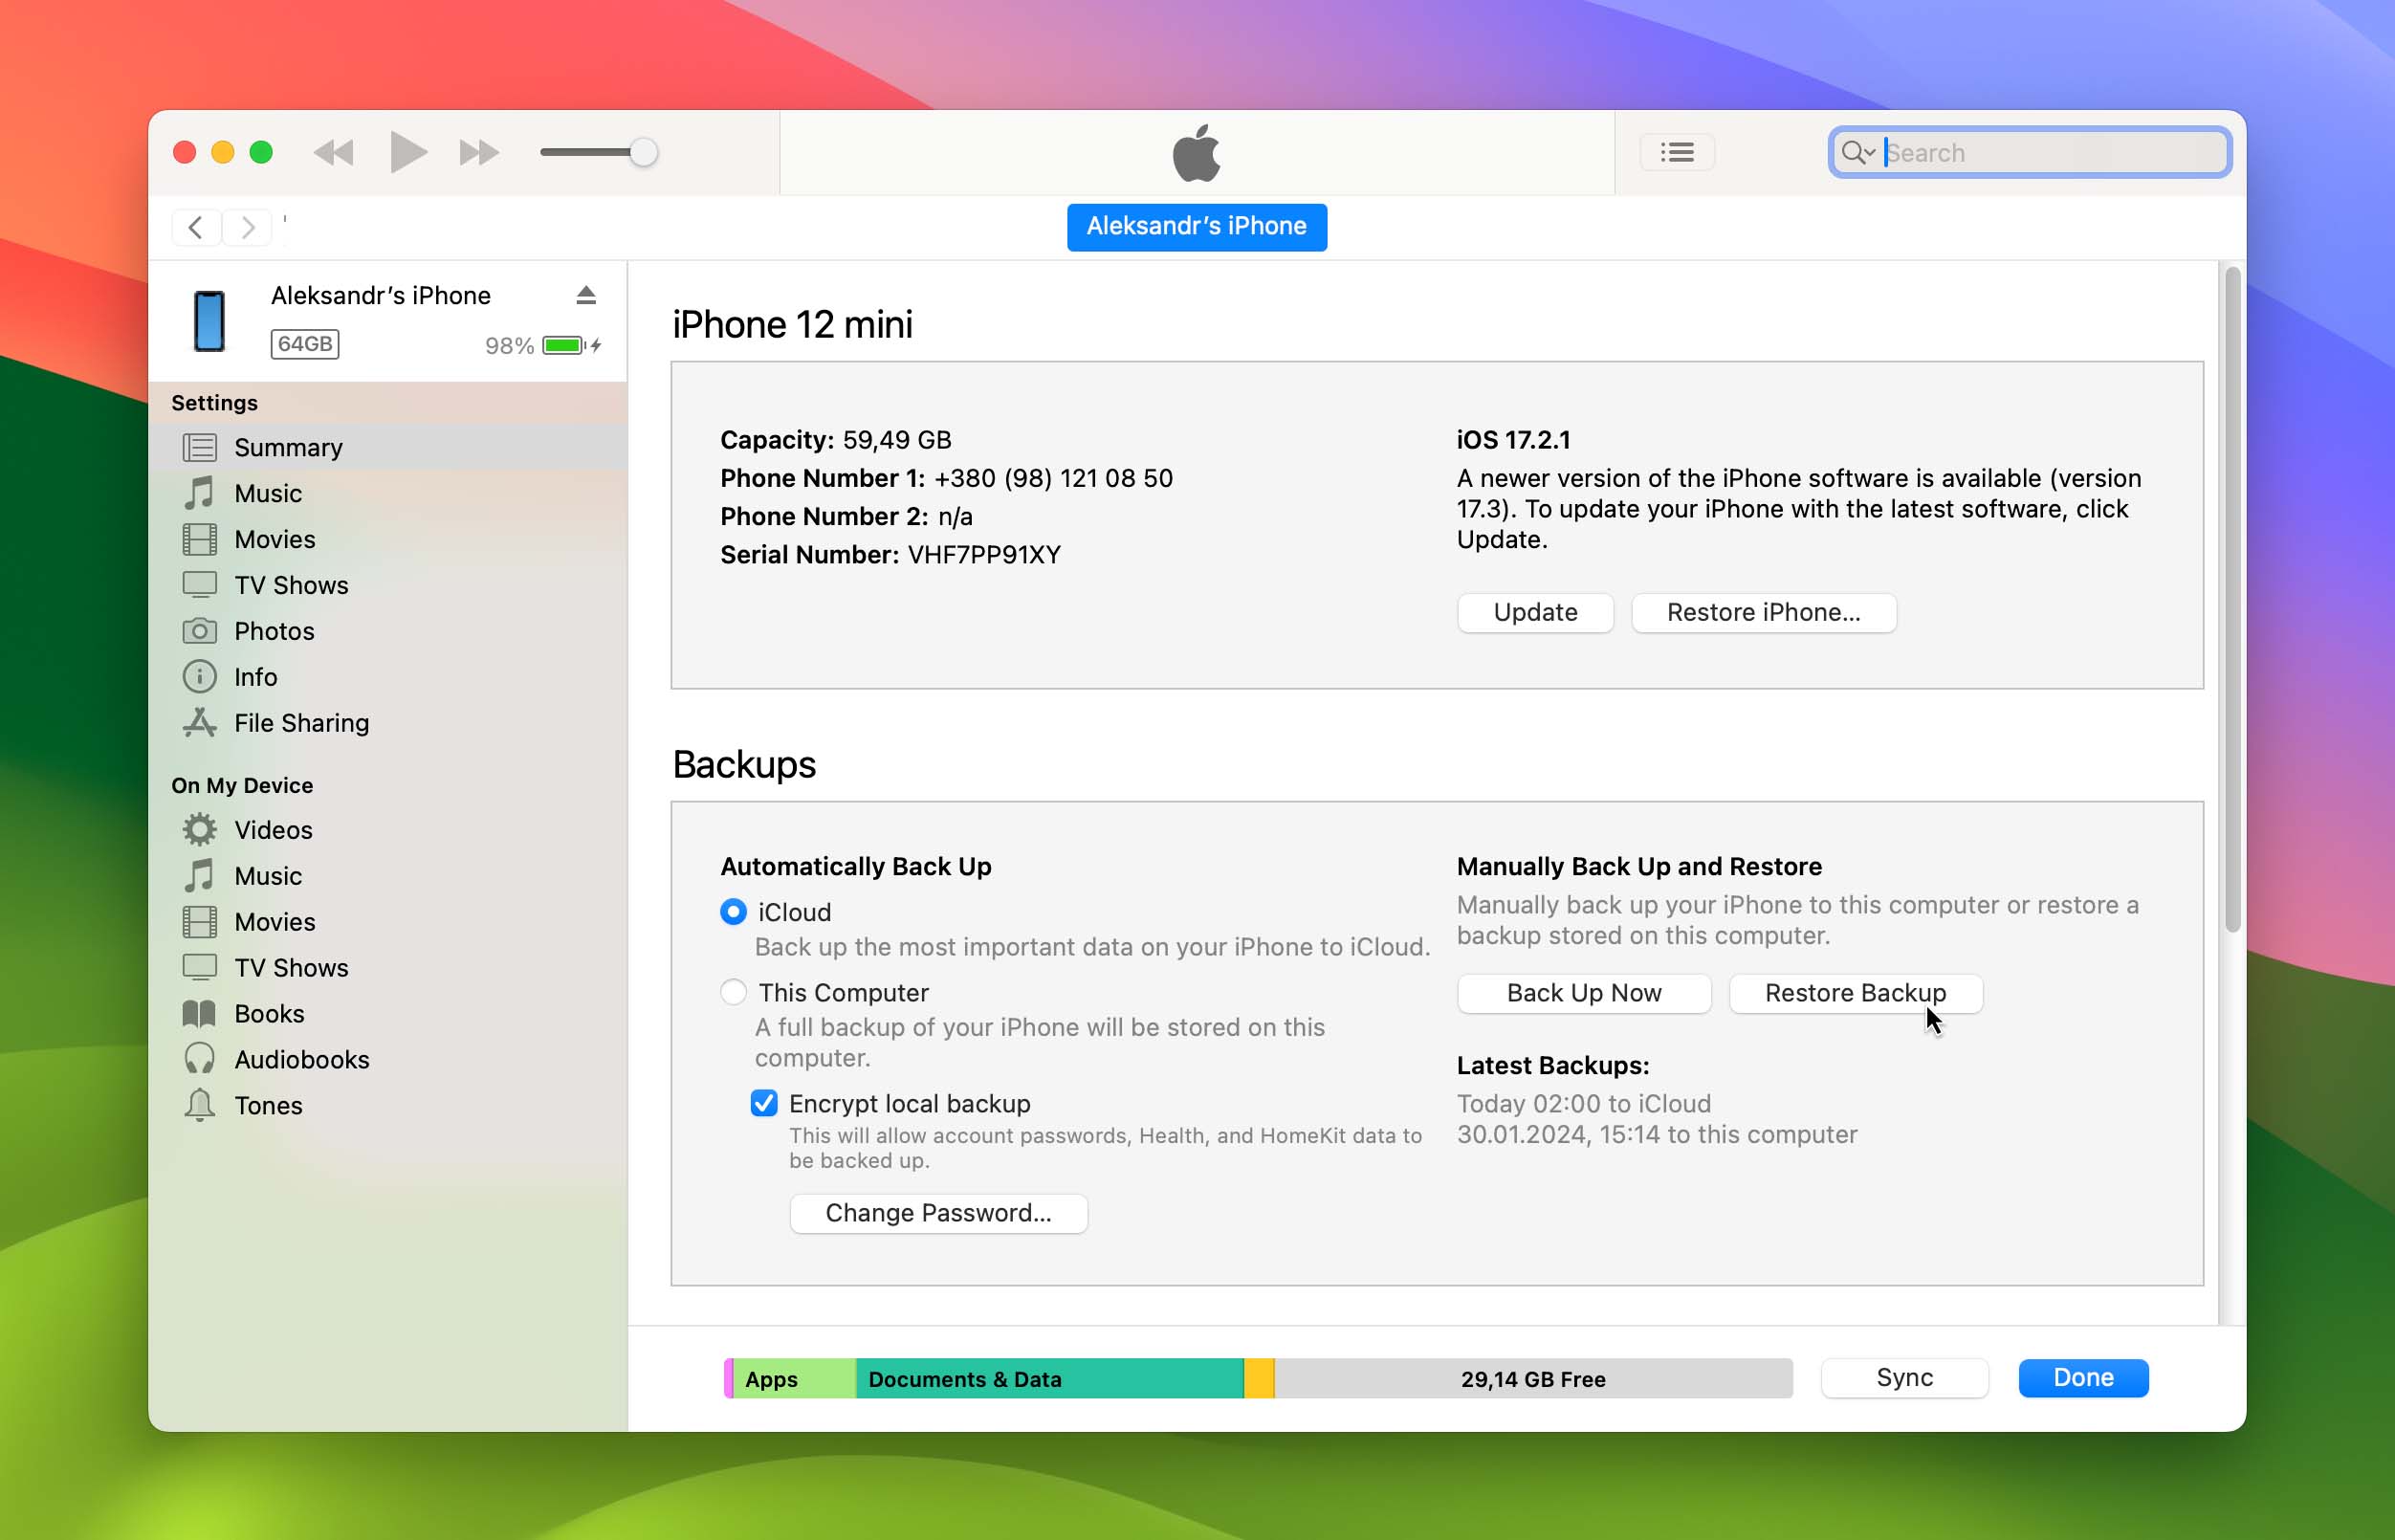
- Select the Restore Backup option.
- Pick the most relevant backup.
- Click Restore and wait for the restore process to finish.
Way 3: How to Recover Deleted Photos via iCloud
If iCloud Photos synchronization was enabled, your photos are stored in the cloud rather than in local iPhone backups (like those made through iTunes or Finder). Here’s how to restore deleted photos on iPhone without backing it up to the computer first.
Follow these steps to recover deleted photos via iCloud:
- Go to https://www.icloud.com. This provides access to Apple’s cloud services, offered for free.

- Log in with your username and password.
- Once logged in, select Photos from the web page.

- Click the album marked Recently Deleted. Select the photo we want to restore and click Recover. It’ll be back into our photo albums. It will also be restore onto the iPhone once it syncs with the iCloud service again.
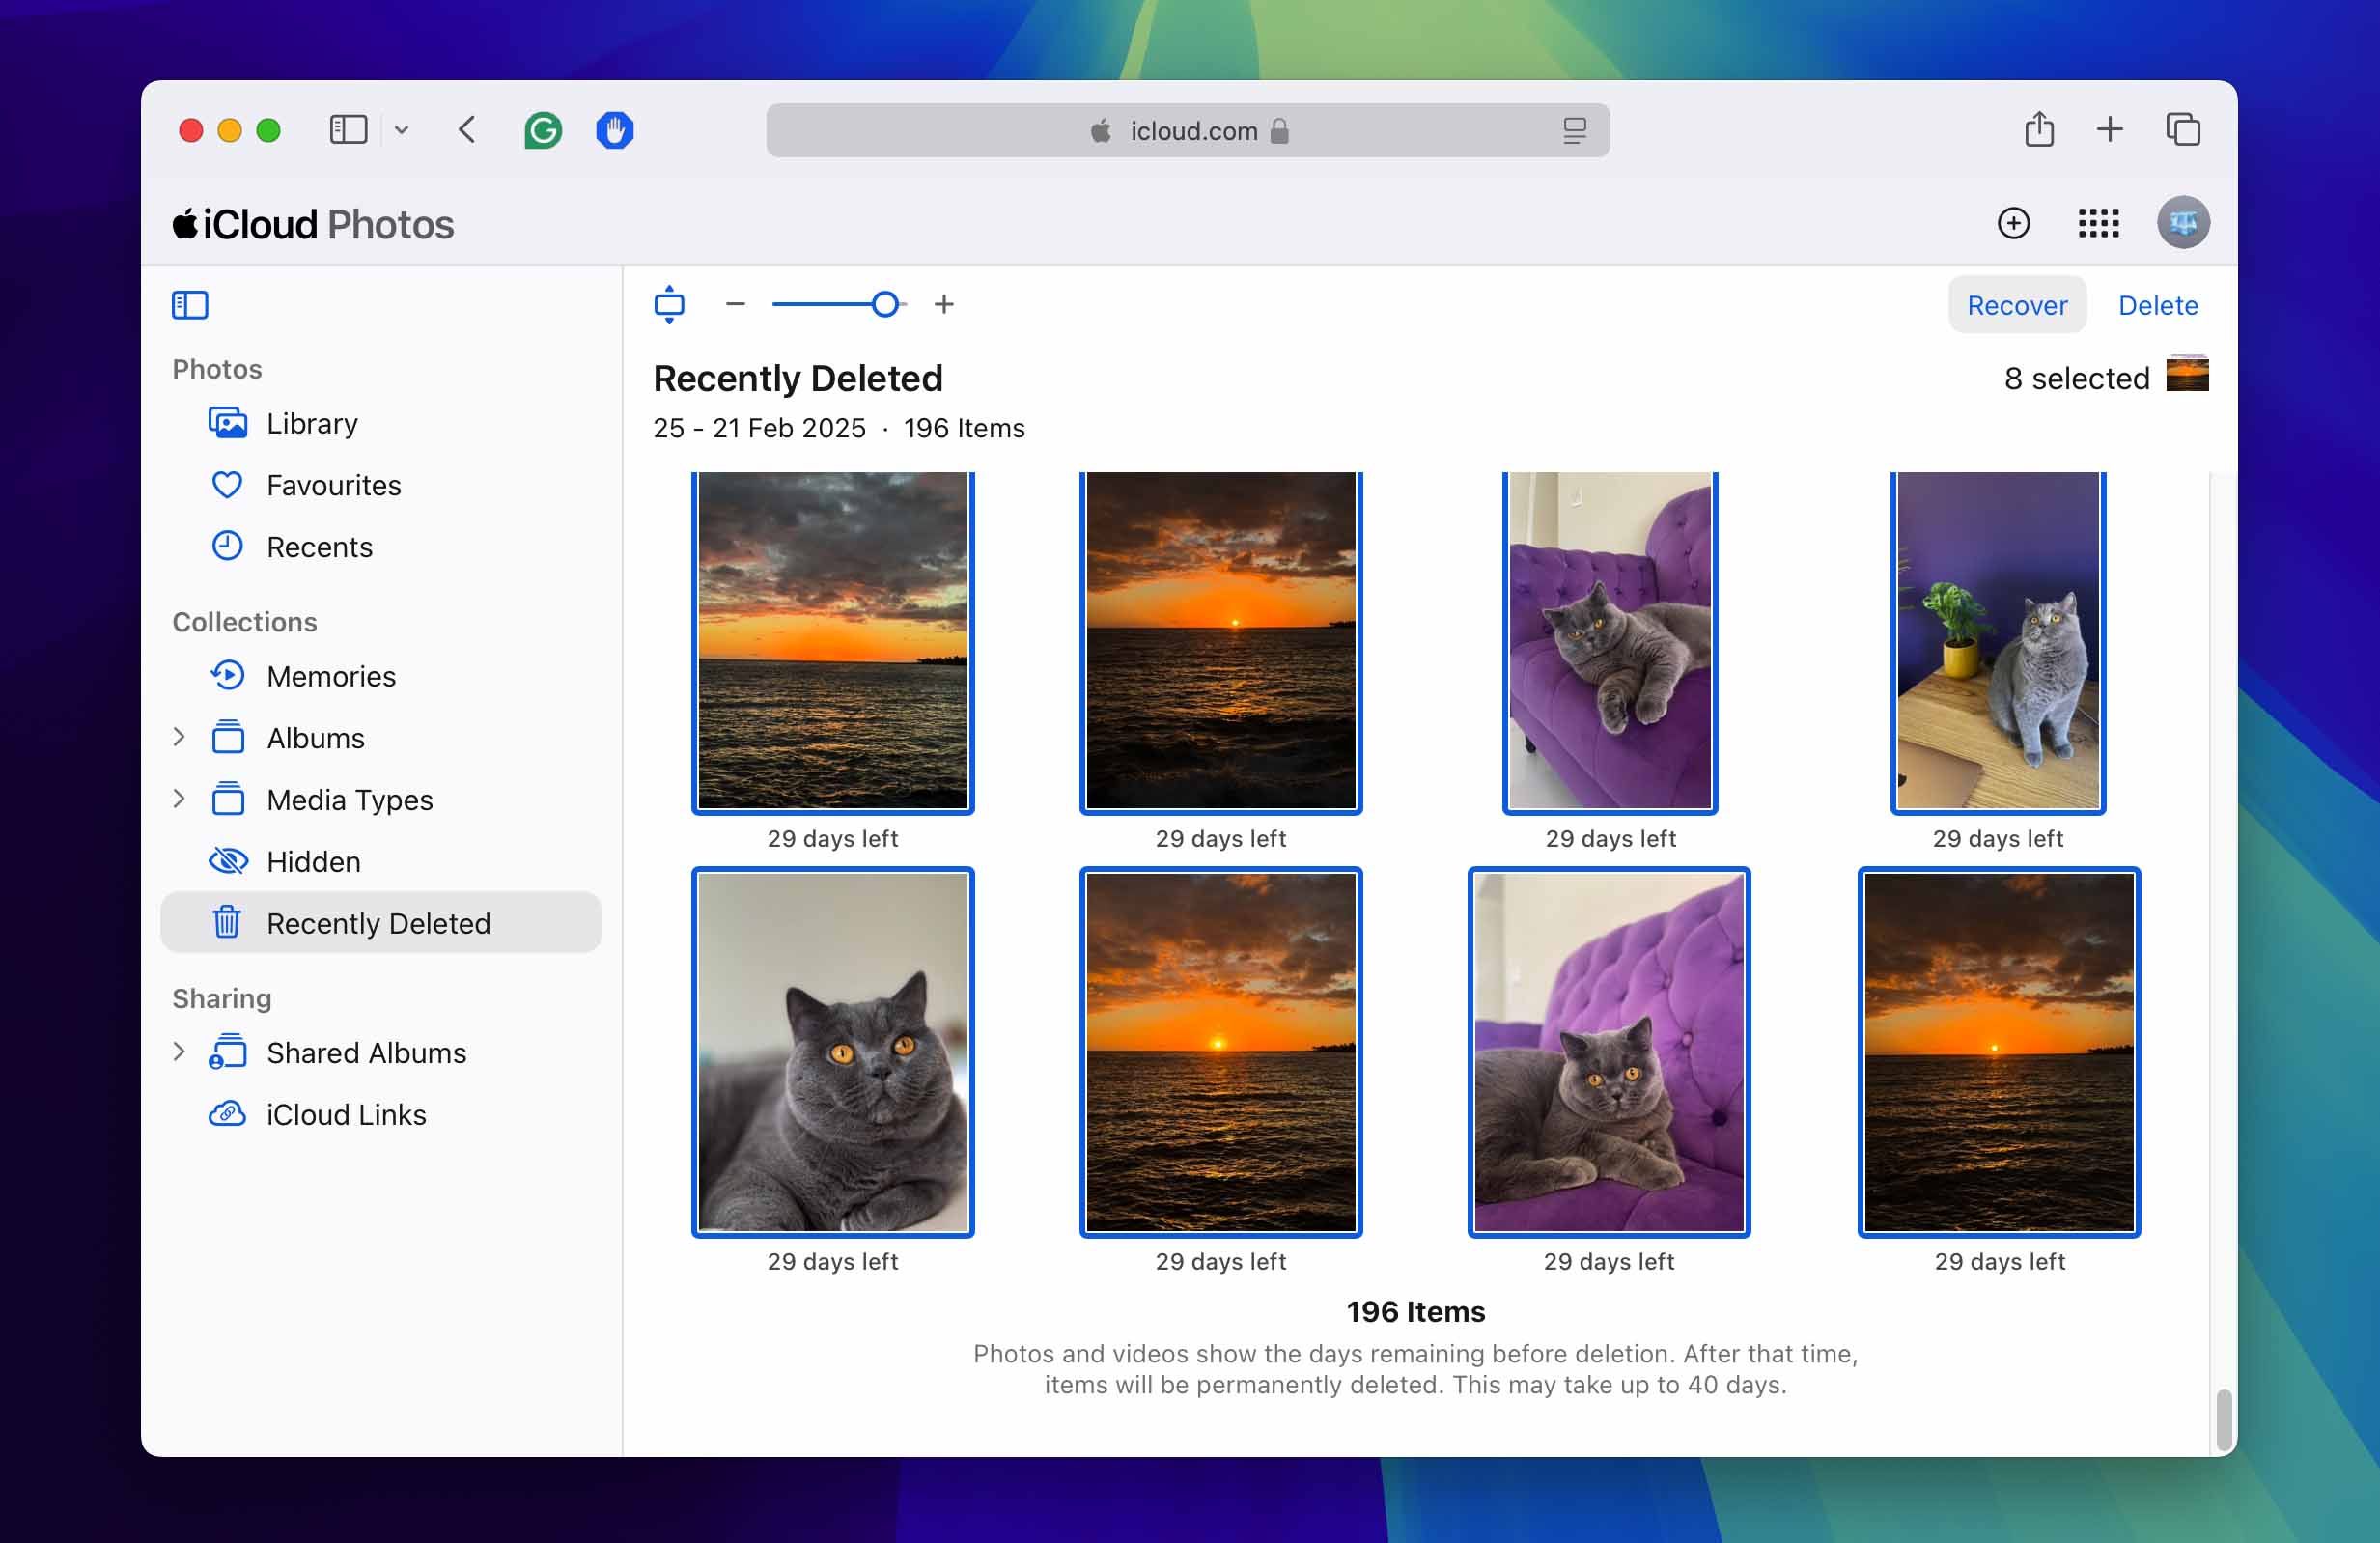
Keep in mind that the Recently Deleted folder in iCloud Photos, just like on your iPhone, only keeps photos for 30 days. After this period, they’re permanently deleted from Apple’s servers. If you’re looking to recover photos deleted after 40 days, you’ll need to use other methods.
Retrieve Deleted Photos on iPhone with Software (without backup) ✅
With the help of a capable third-party iPhone recovery software solution like Disk Drill, you may be able to recover some deleted photos even without a backup.
While retrieving deleted files from an iPhone without any backup is upgraded from headache to migraine, best-in-class software solutions like Disk Drill iPhone Recovery can often recover thumbnail versions of deleted photos by accessing cached data that isn’t normally accessible. Though these may not be in full quality, they can be better than losing the photos completely.
Steps to Recover Deleted Photos from an iPhone on Mac
Although this section is called “without backup,” Disk Drill actually allows you to scan existing Finder/iTunes backups and restore individual photos from your phone’s gallery as well as other sources, such as messaging apps like WhatsApp, or Telegram, without having to restore your entire phone to the backup state.
For the best recovery results, we recommend encrypting your iPhone backup in Finder. Encrypted backups contain more data and give Disk Drill access to additional files that might otherwise be inaccessible.
- Download Disk Drill. Open the .dmg file and drag the Disk Drill application to the Applications folder on your Mac hard drive. The application supports all current iOS devices, including the iPhone 16, iPhone 16 Plus, iPhone 16 Pro, iPhone 16 Pro Max, iPhone 15 Plus, iPhone 15, iPhone 15 Pro, and iPhone 15 Pro Max running the latest iOS 18.
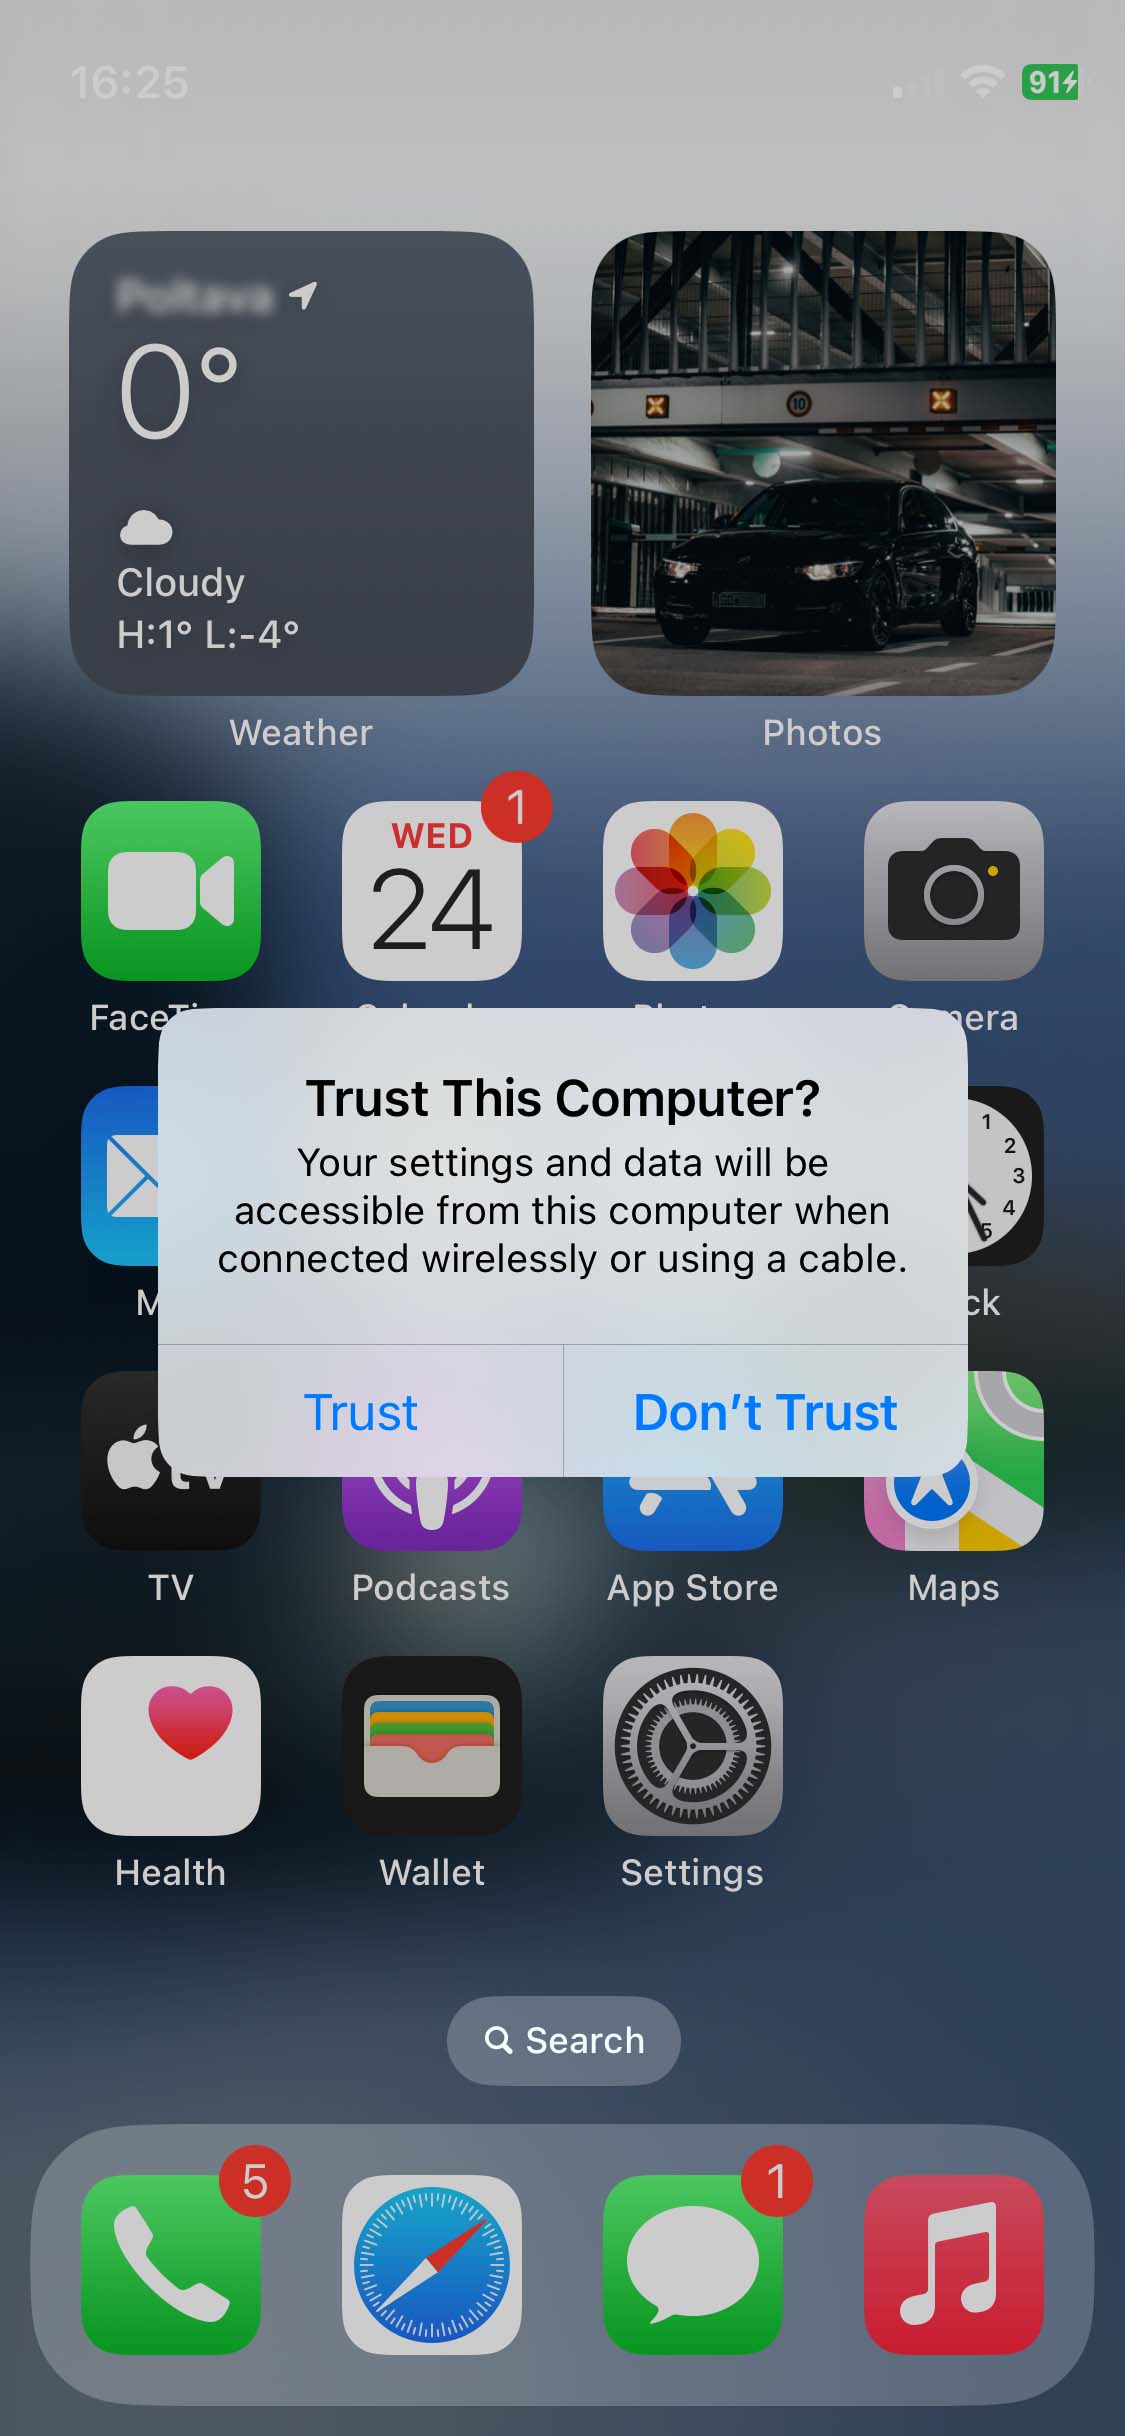
- Plug the iPhone into the computer. If asked by the iPhone if we trust this computer, select Trust and enter the unlocking code.
- Close all programs on the Mac. Especially those that connect to the iPhone like iTunes, iPhoto, and the like. The less communication that other applications have with the iPhone, the better it will be.
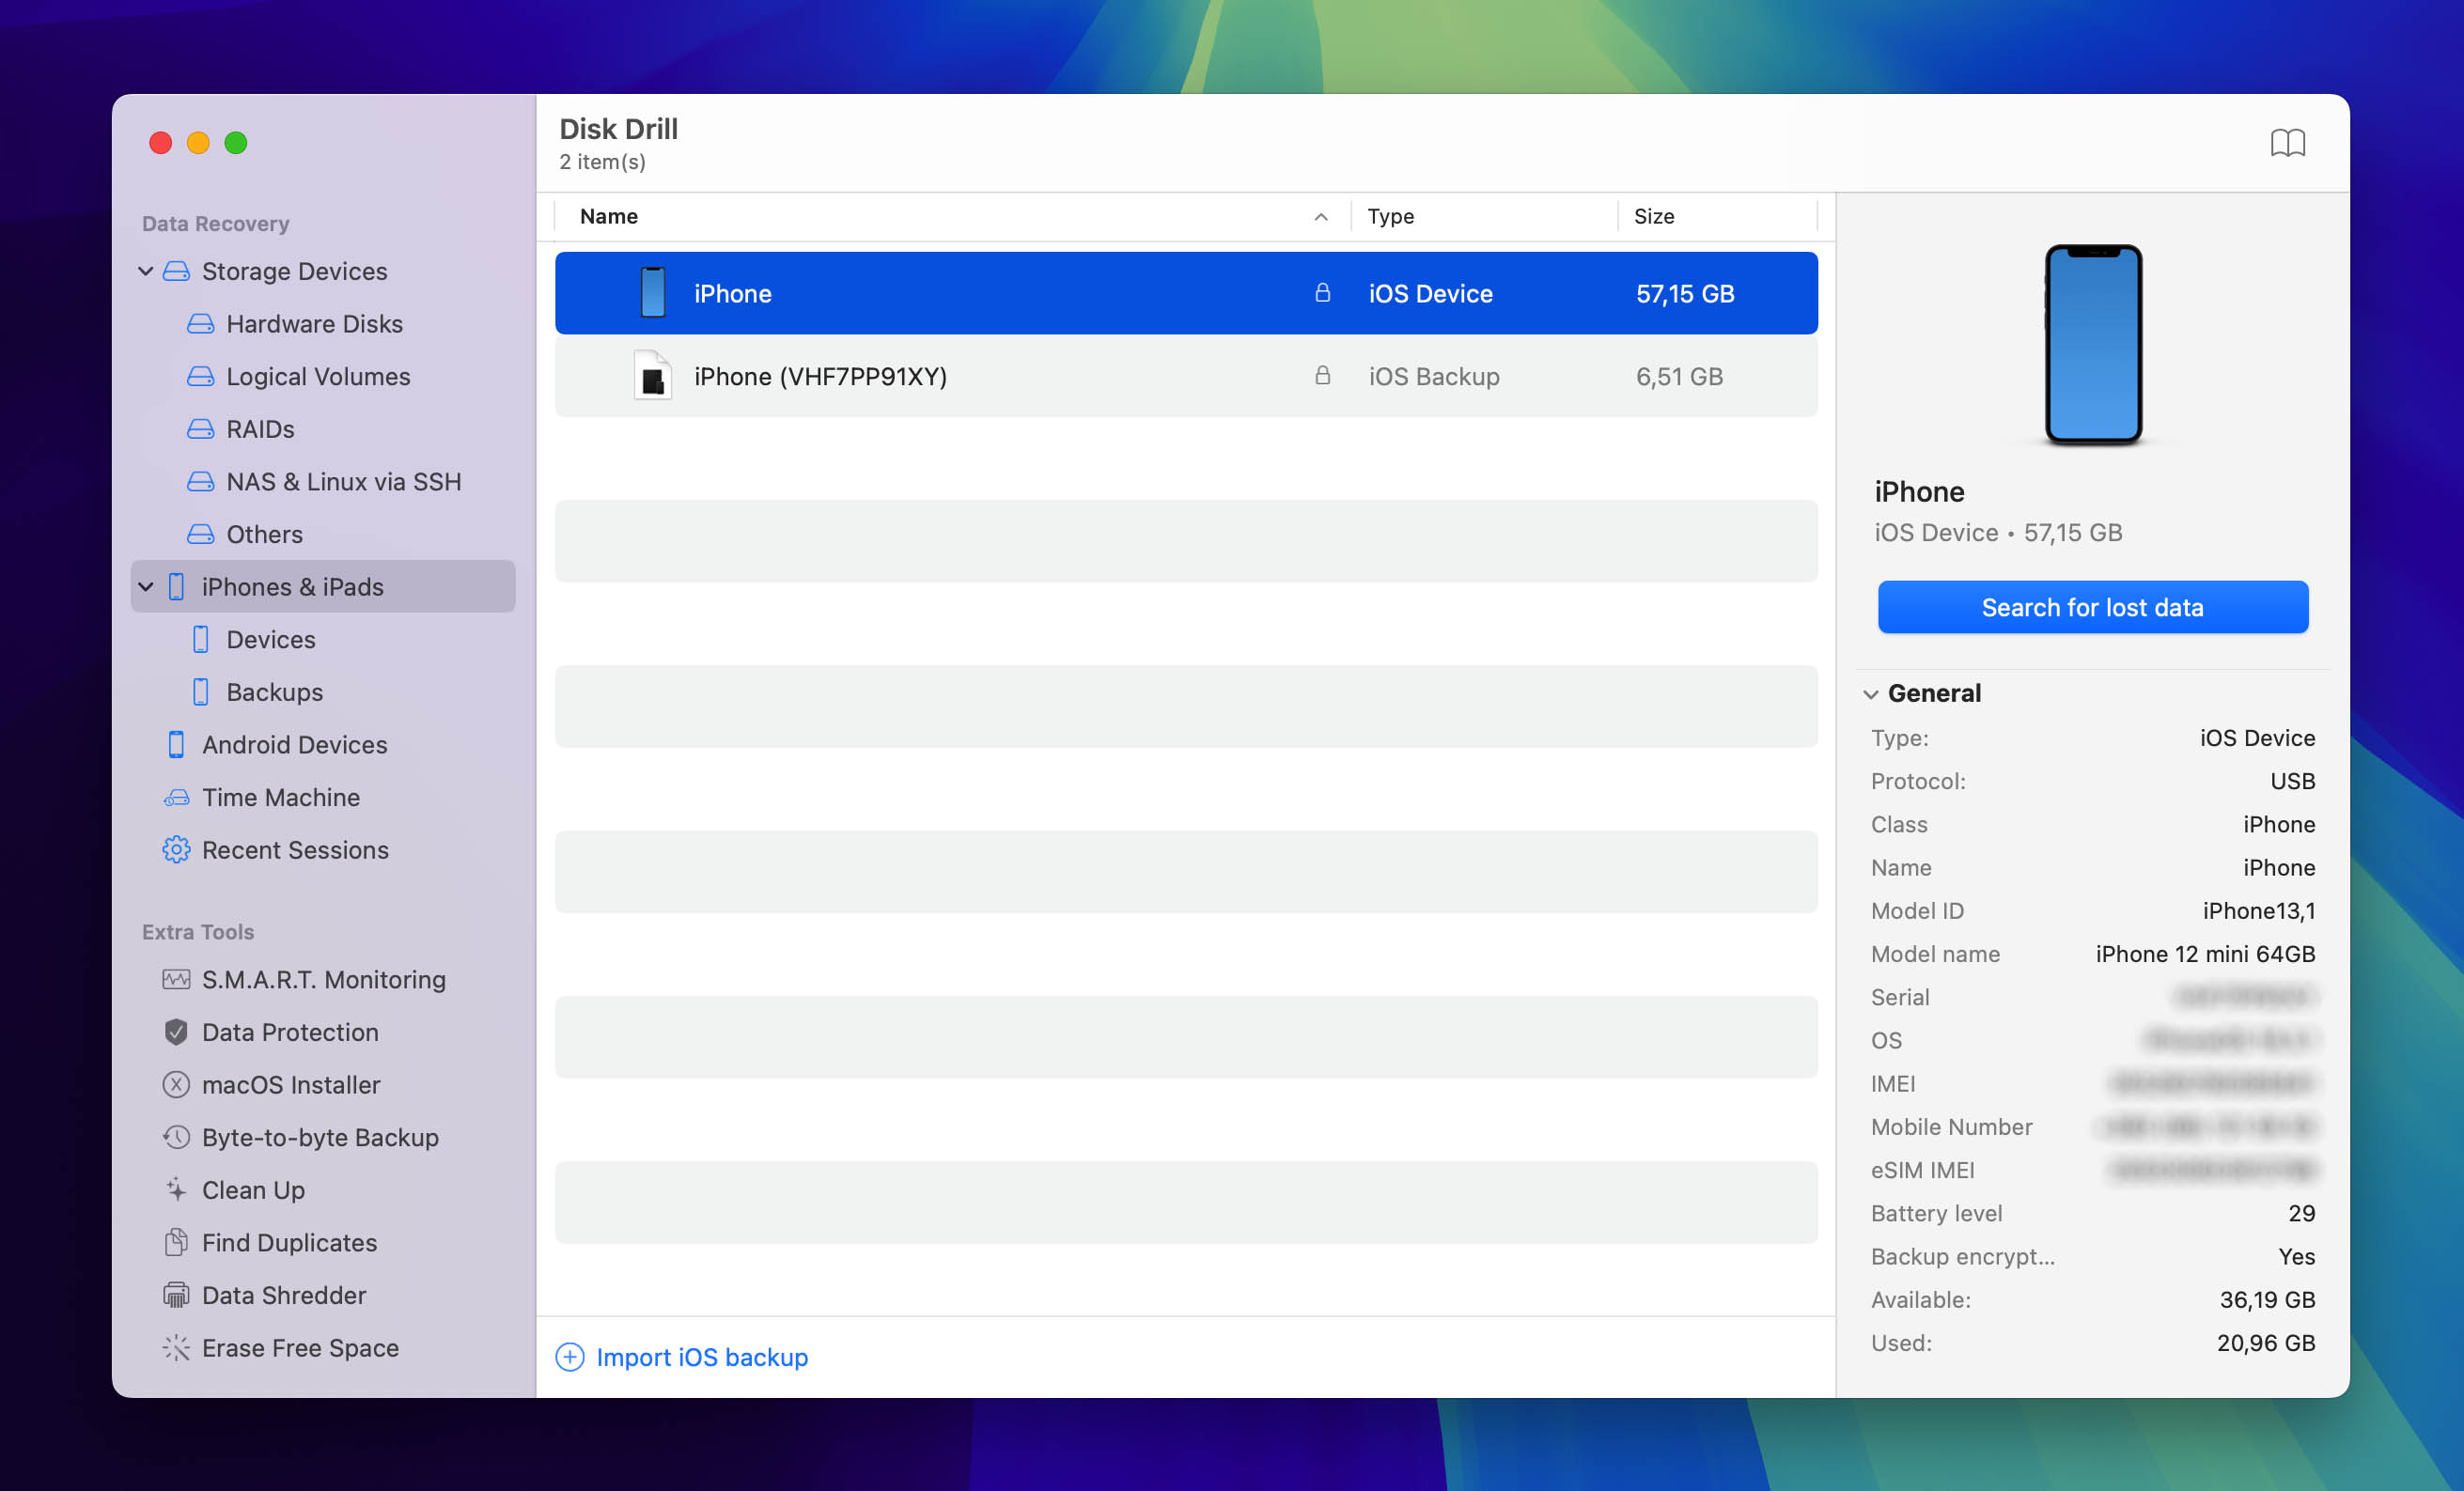
- Double-click on Disk Drill to run it. There are several installation procedures to be aware of, as well as additional file protections and monitoring that Disk Drill offers. When everything is finished, we’ll see a list of drives and devices.
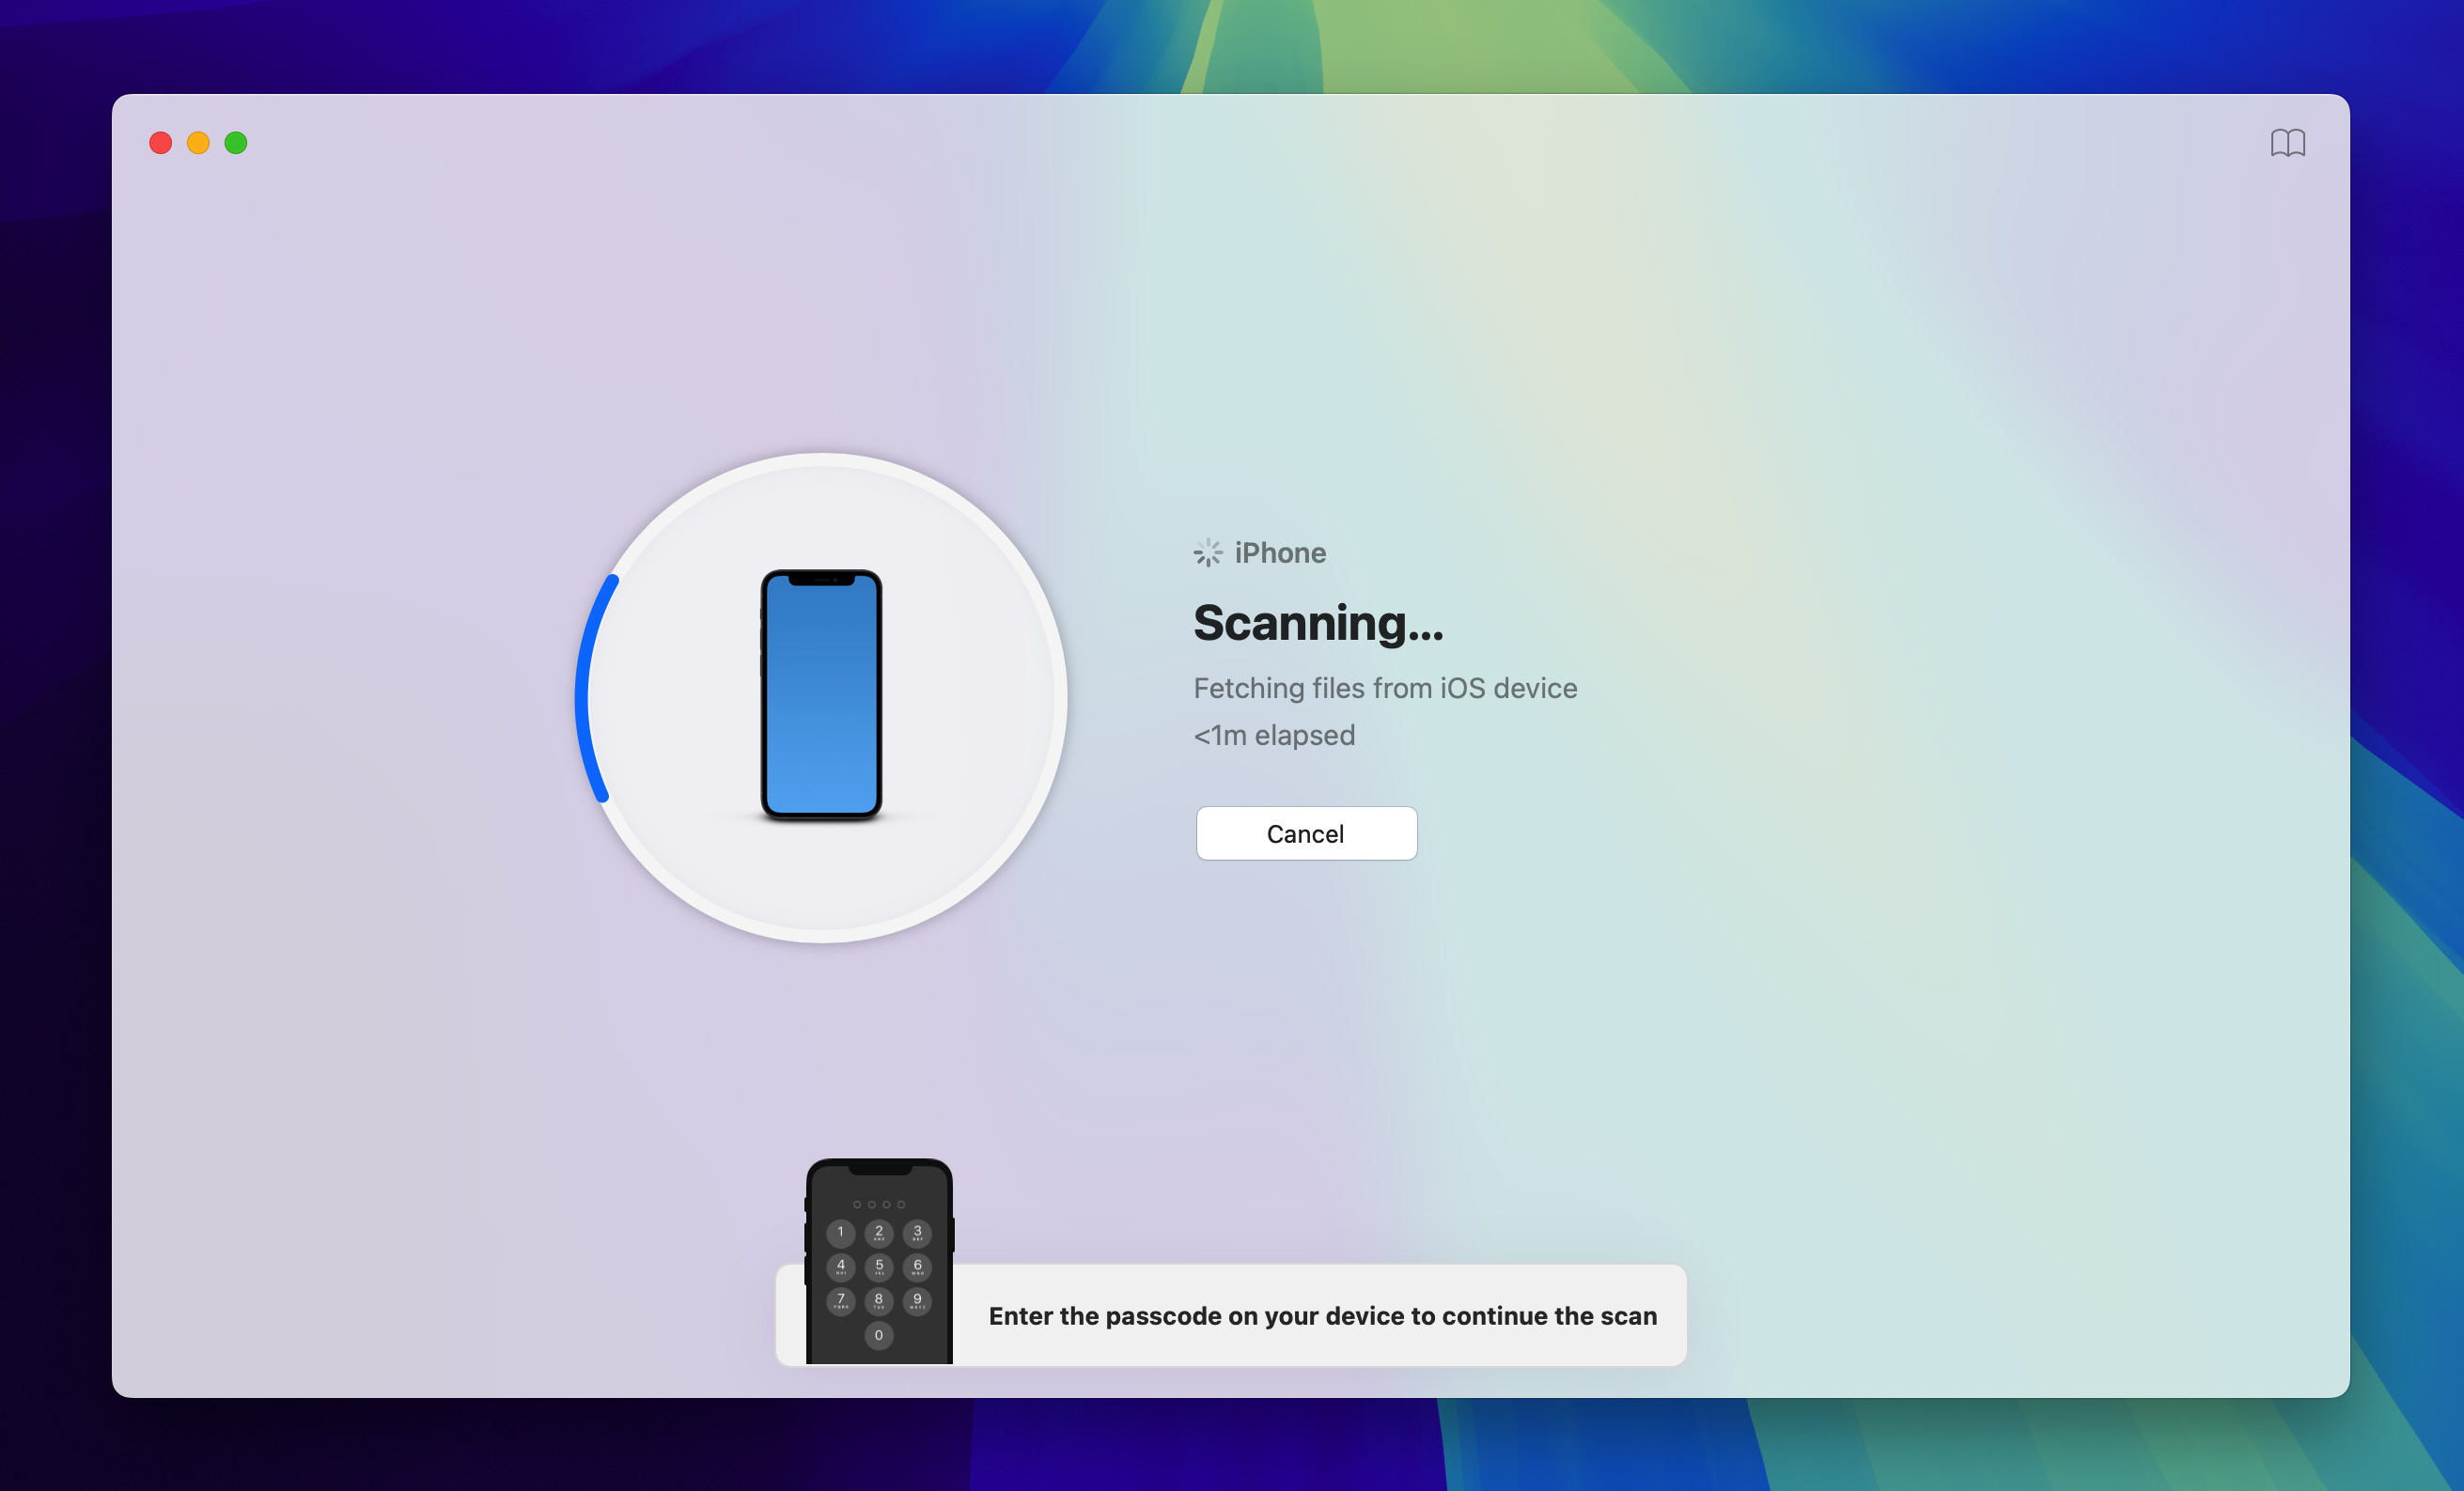
- Navigate to the iPhones & iPad section in the left pane, select your iPhone, and then click on Search for lost data. This will prompt Disk Drill to create a backup of your iPhone and then analyze that backup for recoverable files. Keep in mind that with iOS 16 and later, you’ll need to enter your iPhone unlock code directly on your iPhone during this process.
- Enter the iPhone’s encryption password if Disk Drill asks for it. This is the one used for encrypting iPhone backups through iTunes on the local computer.
- Wait. This is an important part. Disk Drill will be analyzing the iPhone’s databases and files, looking for recoverable data. During this time, don’t use the iPhone or anything that might interact with it. We want to maximize our chances of getting back information.
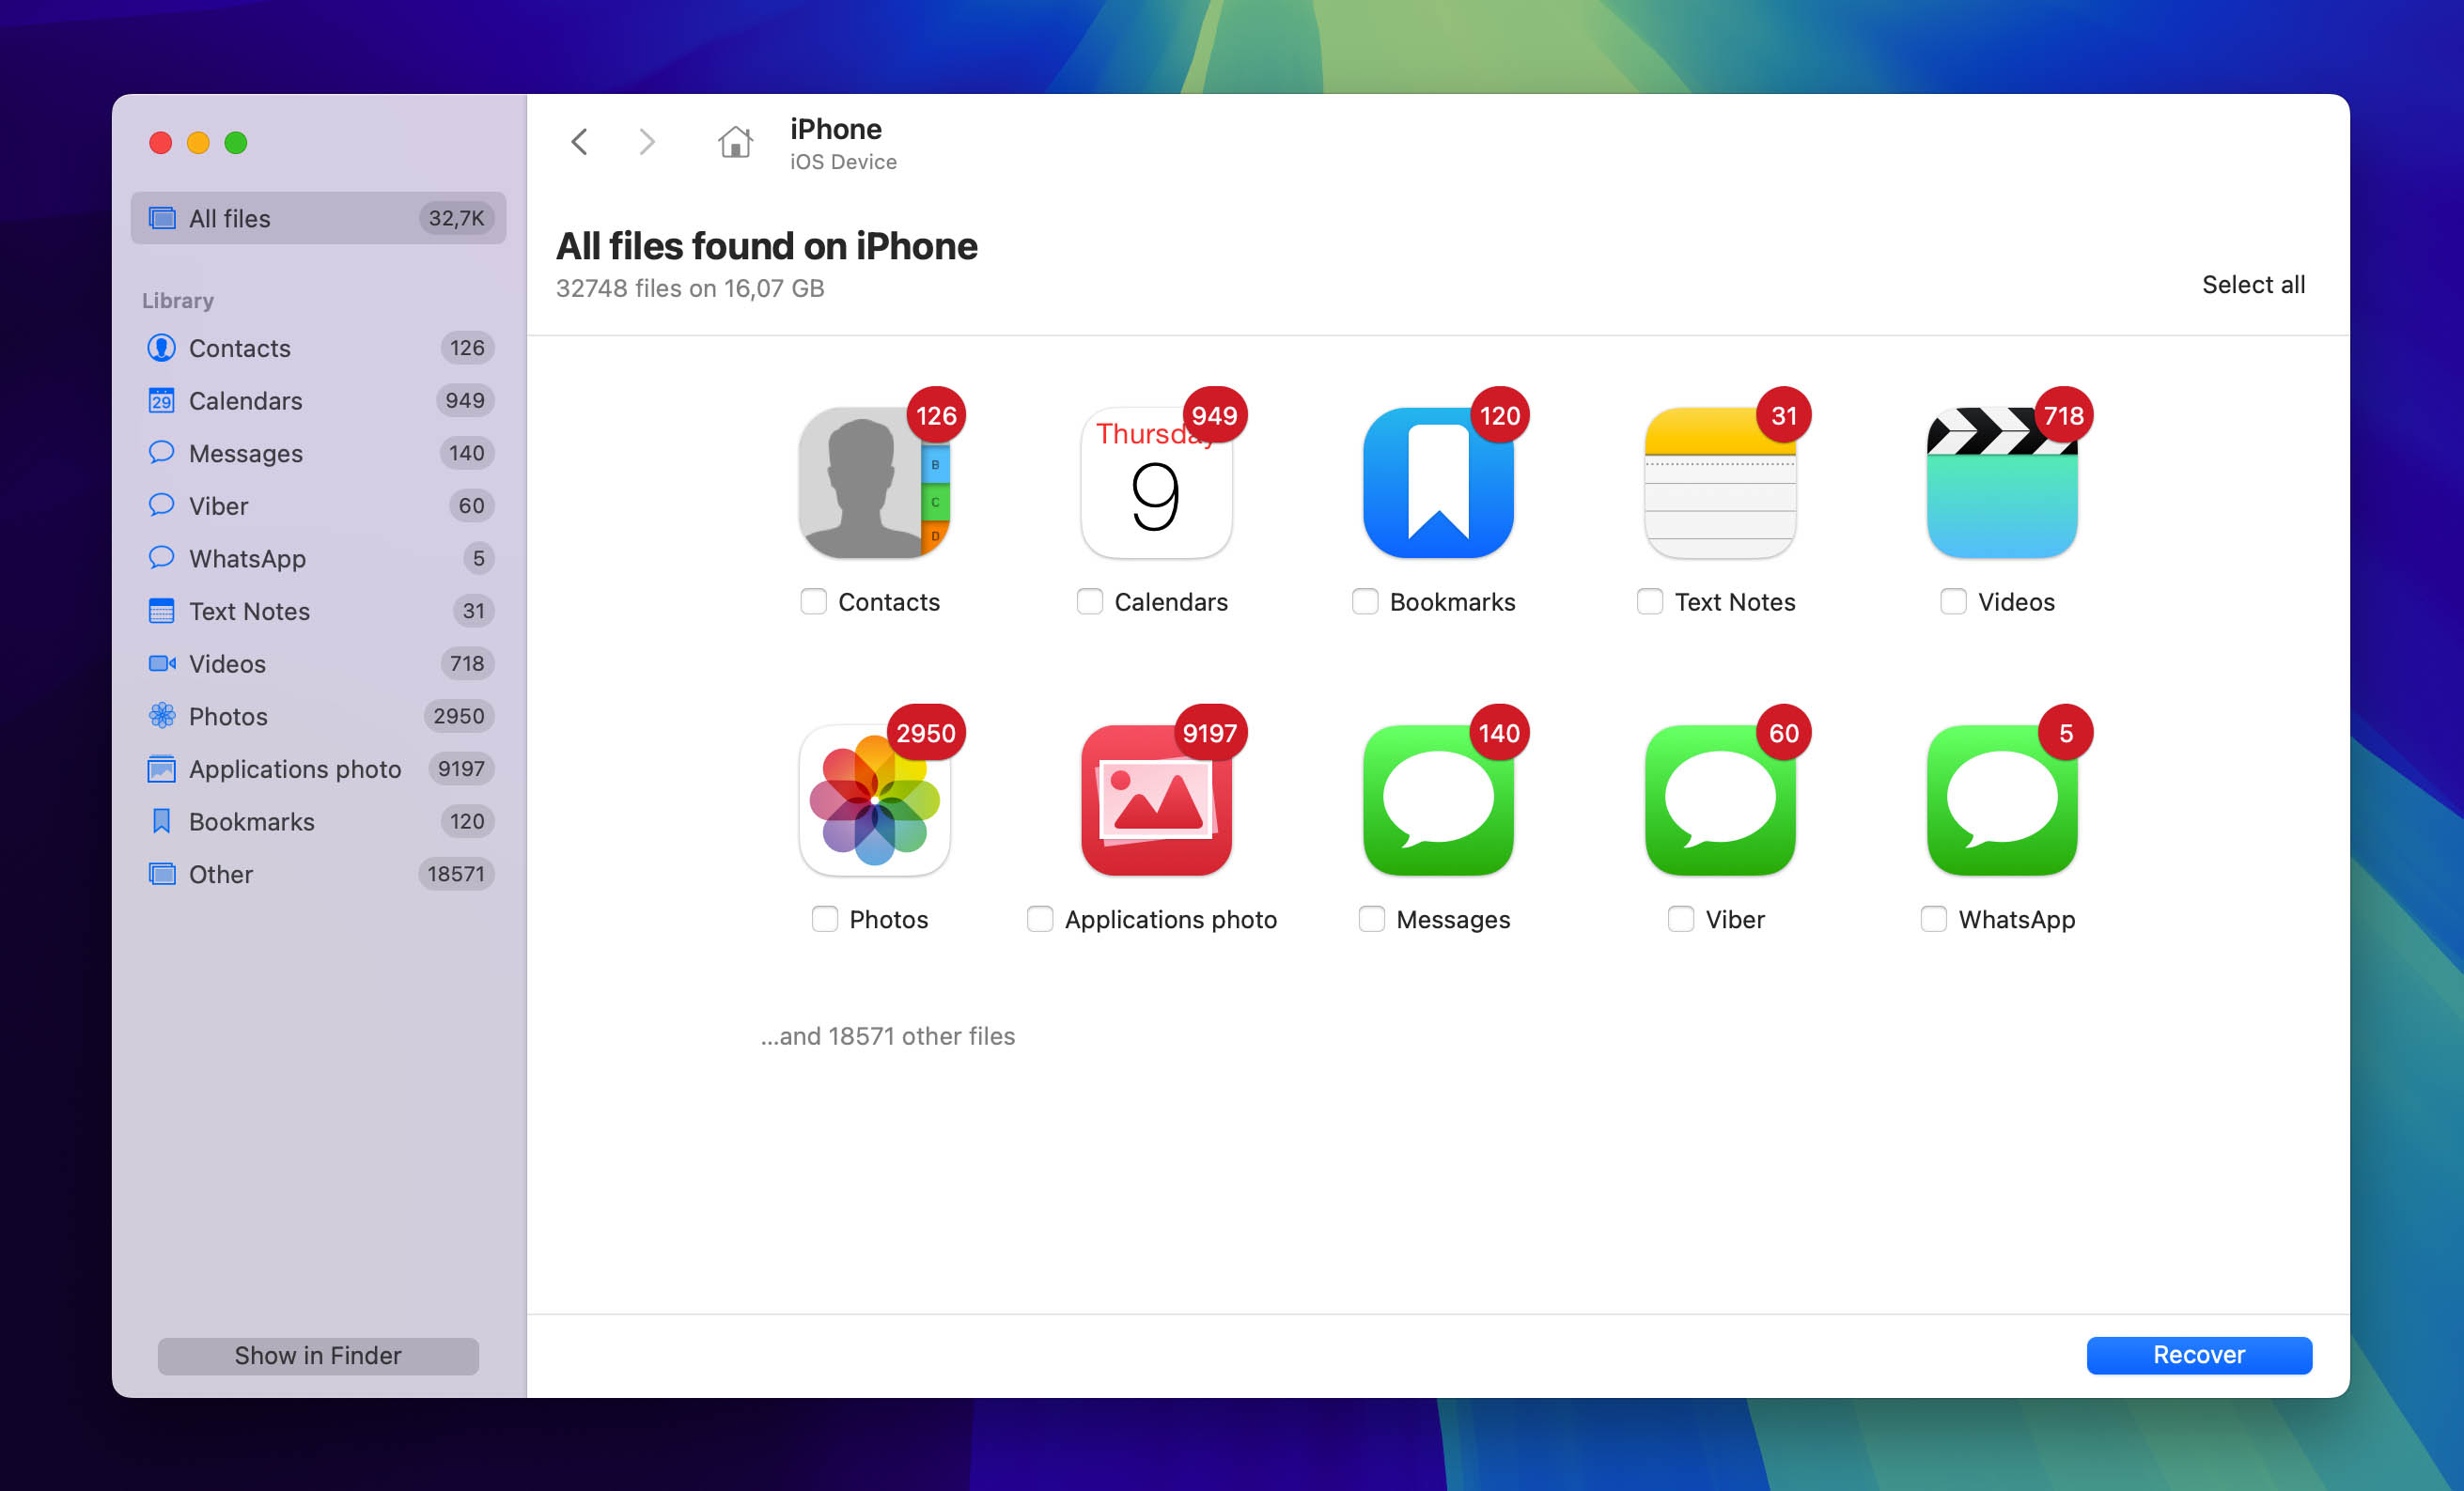
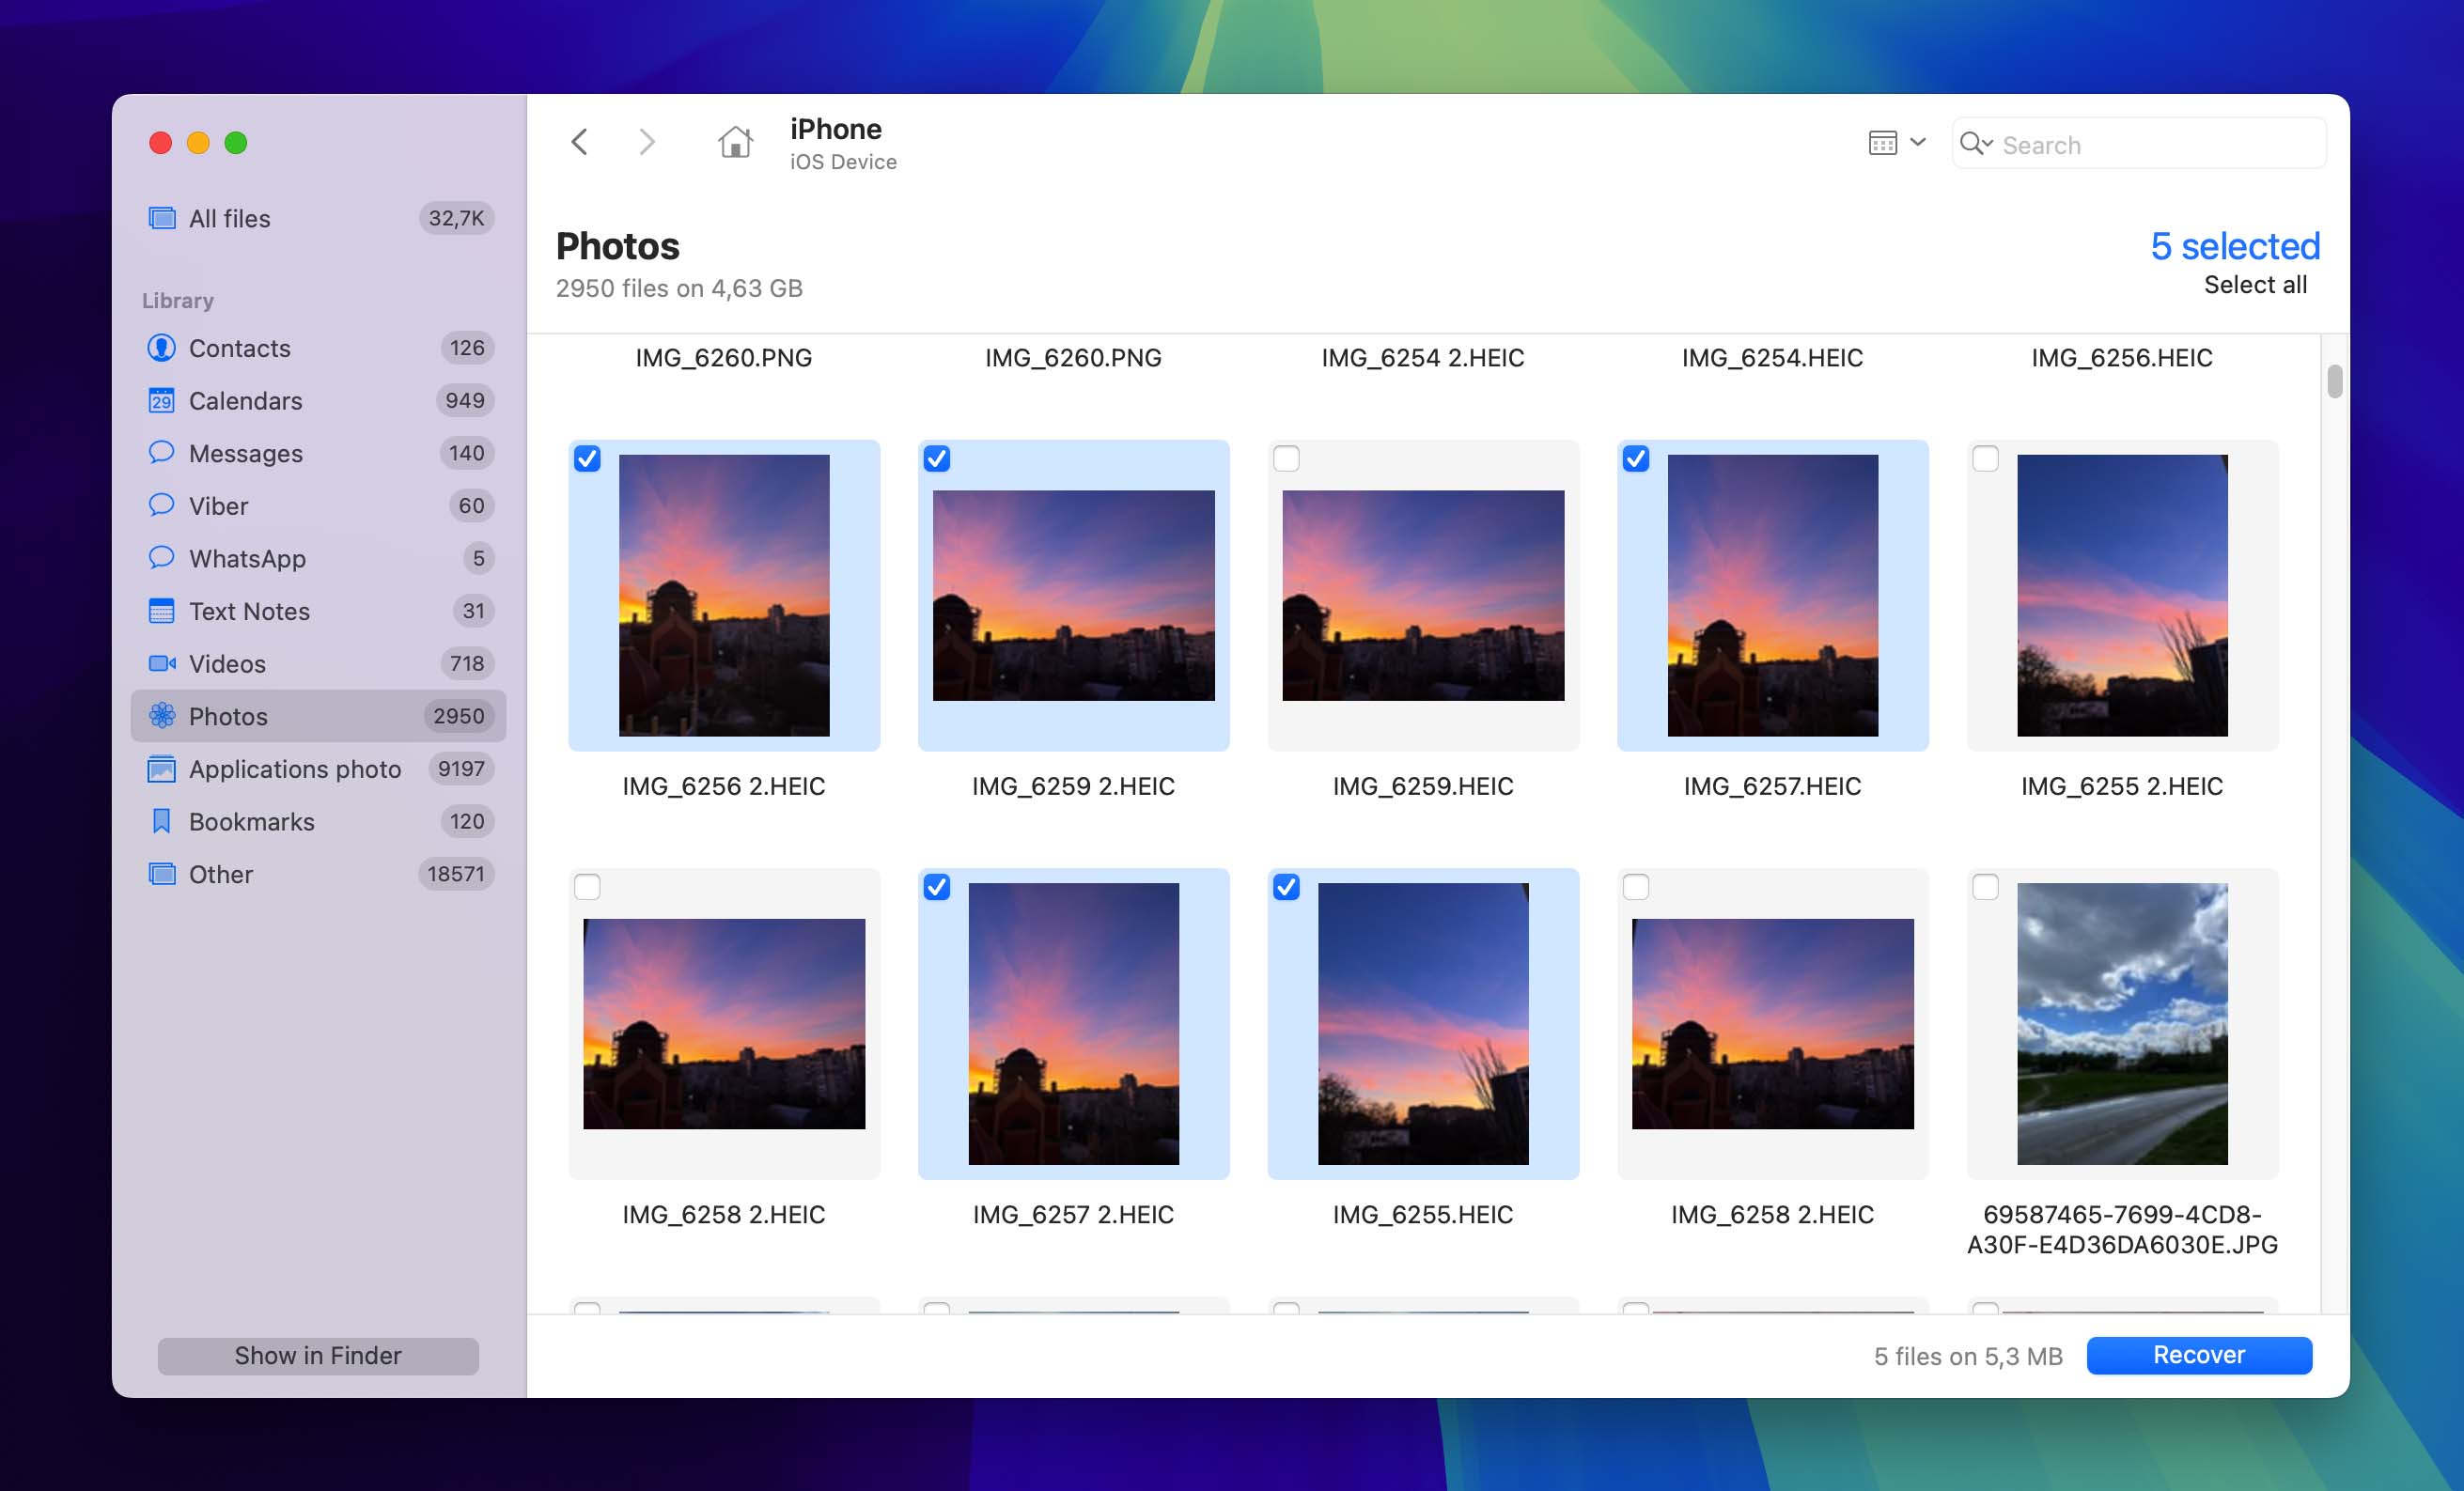
- Review the files that Disk Drill displays when the scan is complete. This will include everything from iMessages, Notes, and other information that the iPhone can store. Since we’re only interested in photos, you can activate the corresponding filter in the left pane. You can click on any photo to preview it before recovery.
- Once you’ve identified the photos you want to restore, select them, click the Recover button, and choose a safe location to save them. Click the Next button to finalize the recovery process.

Alternatively, you can tell Disk Drill to show your recoverable photos directly in Finder by following these alternative steps:
- Click Show in Finder. Note that this option is available only in the Pro version of Disk Drill.
- Navigate to the Recoverable folder where Disk Drill has mounted your recoverable files for easy access.

- Follow the directory path through Files → CameraRollDomain → Media → DCIM to locate your iPhone’s camera roll structure. Browse through the organized subfolders to find and preview the photos you’re hoping to recover before making your selection.

- Copy your desired photos directly from this Finder view to a safe location on your computer to complete the recovery process.

Success! Our cherished photo has been successfully recovered—our four-legged friend’s disappointed expression when we selfishly refused to share our donut is now safely back in our collection. (Don’t worry about his feelings; we made amends later by offering him an even better treat.)


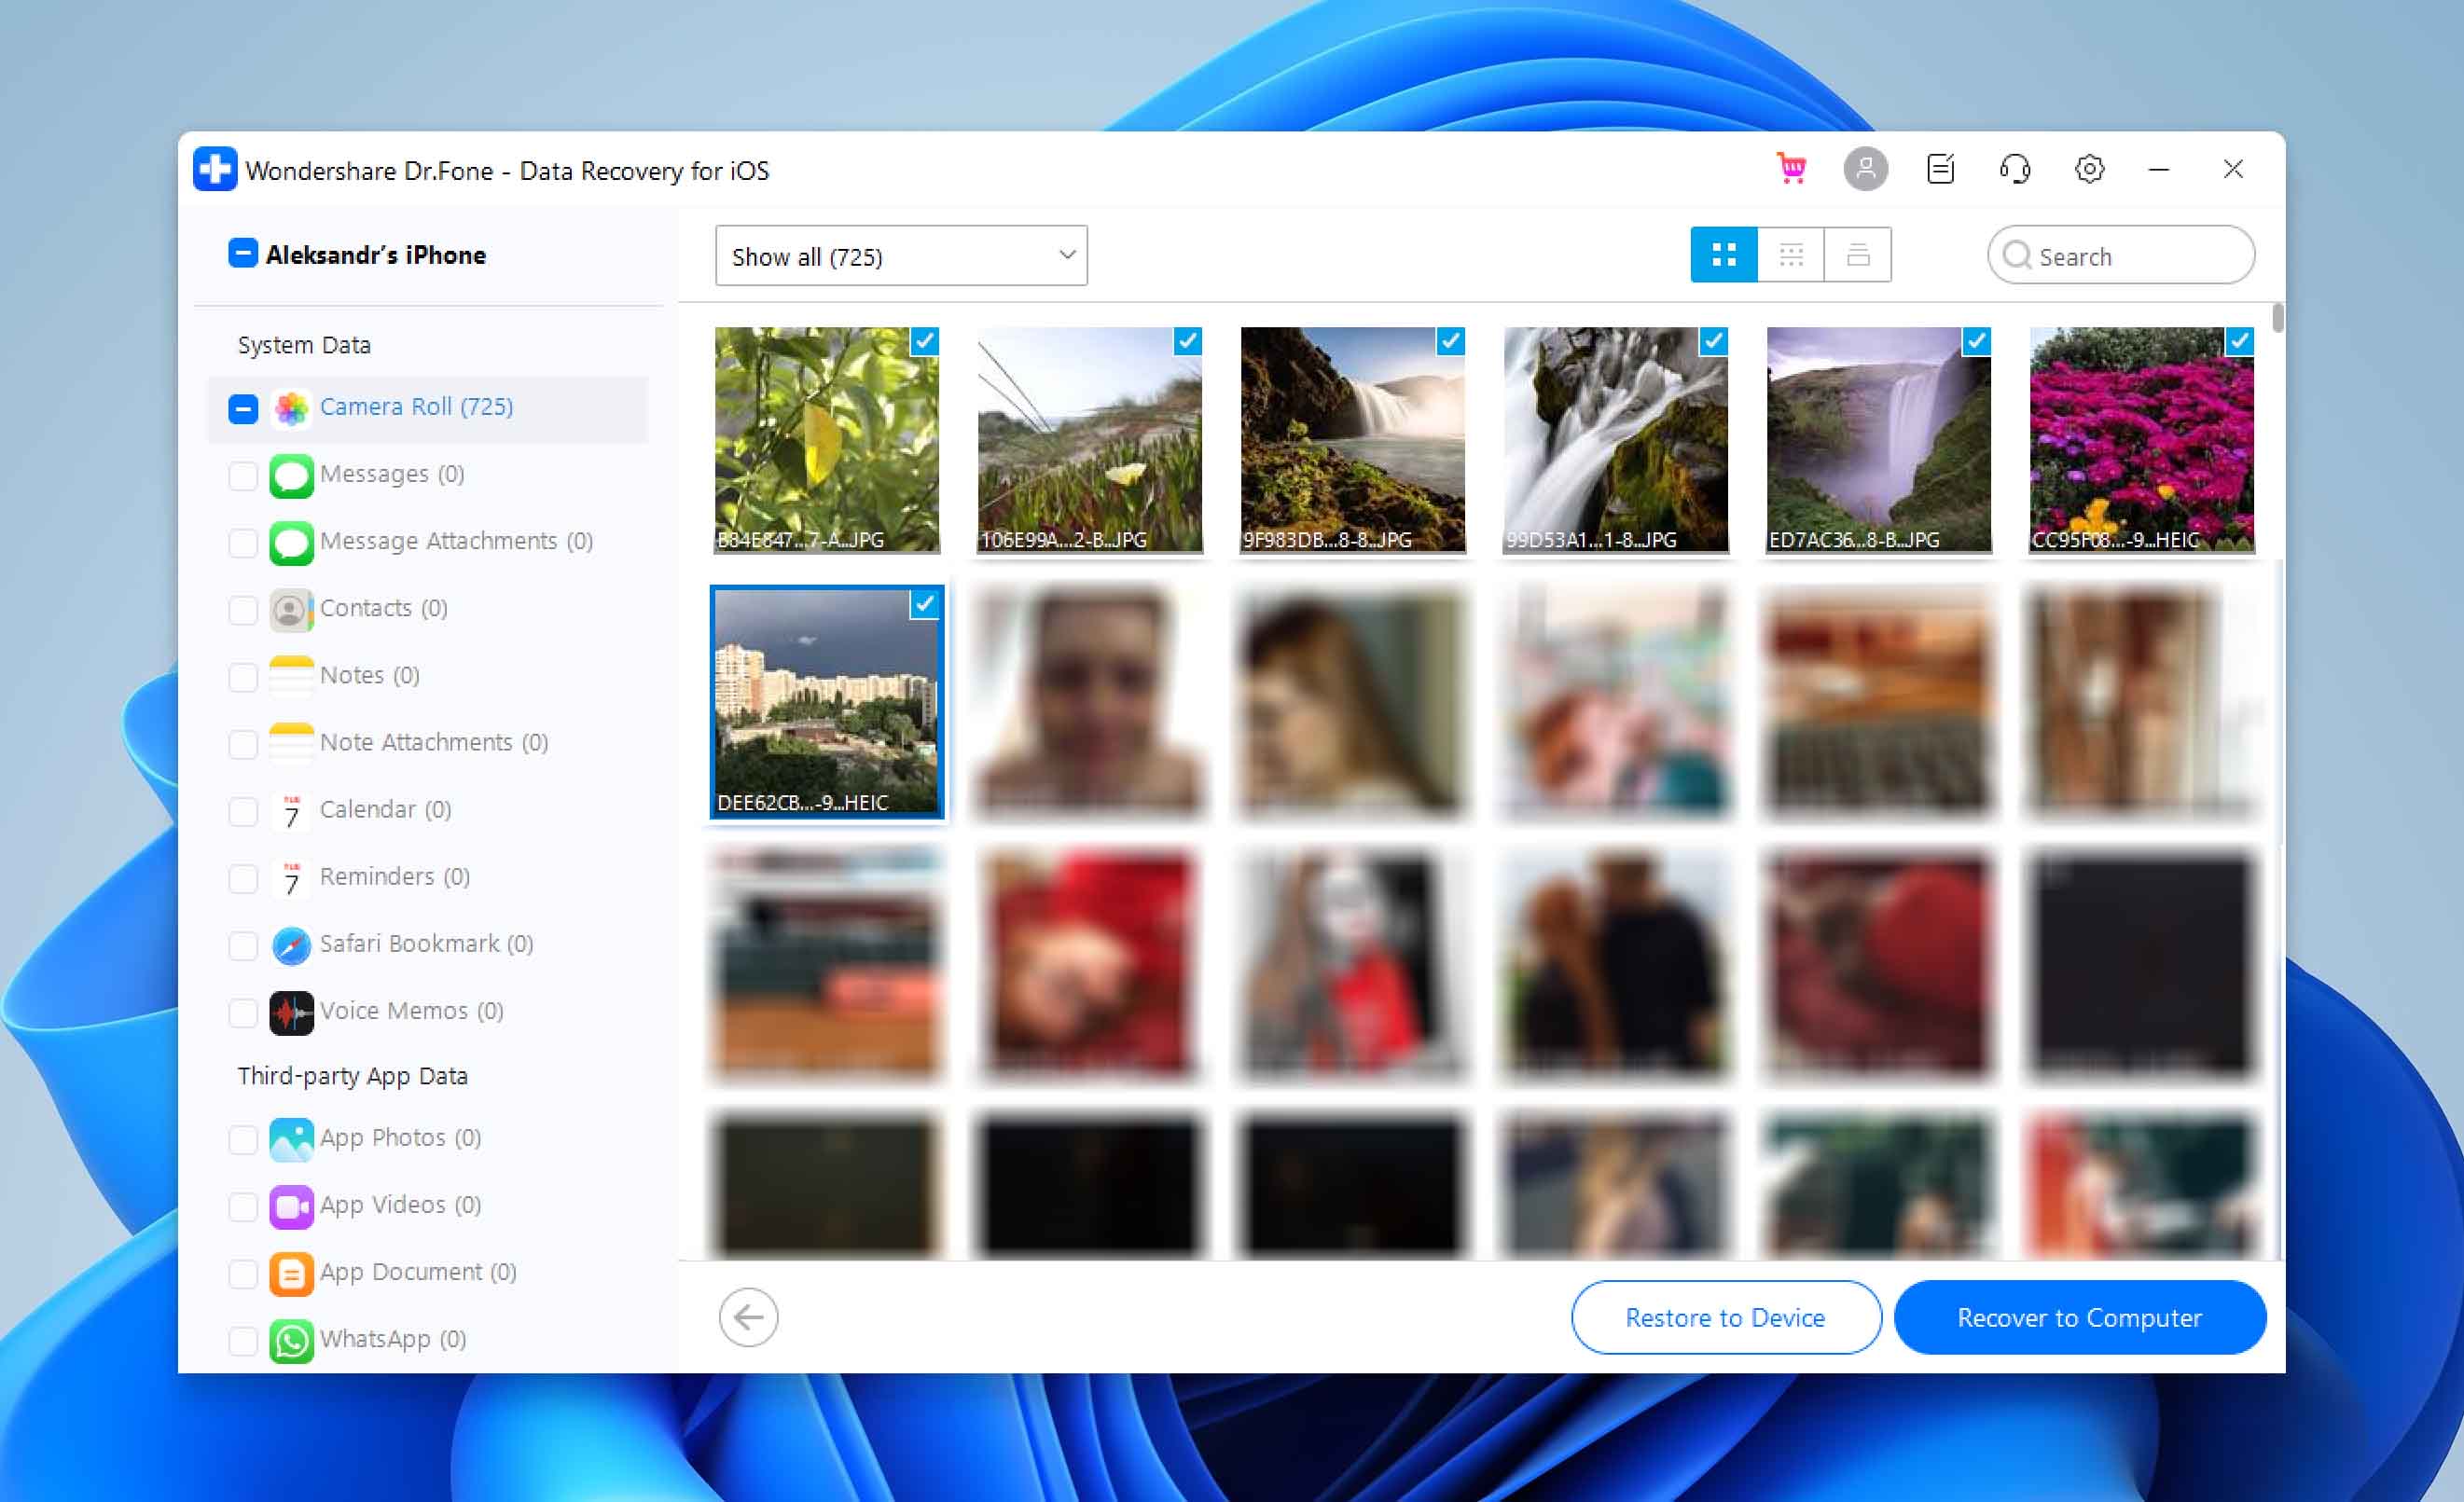
Steps to Recover Deleted Photos from an iPhone on Windows
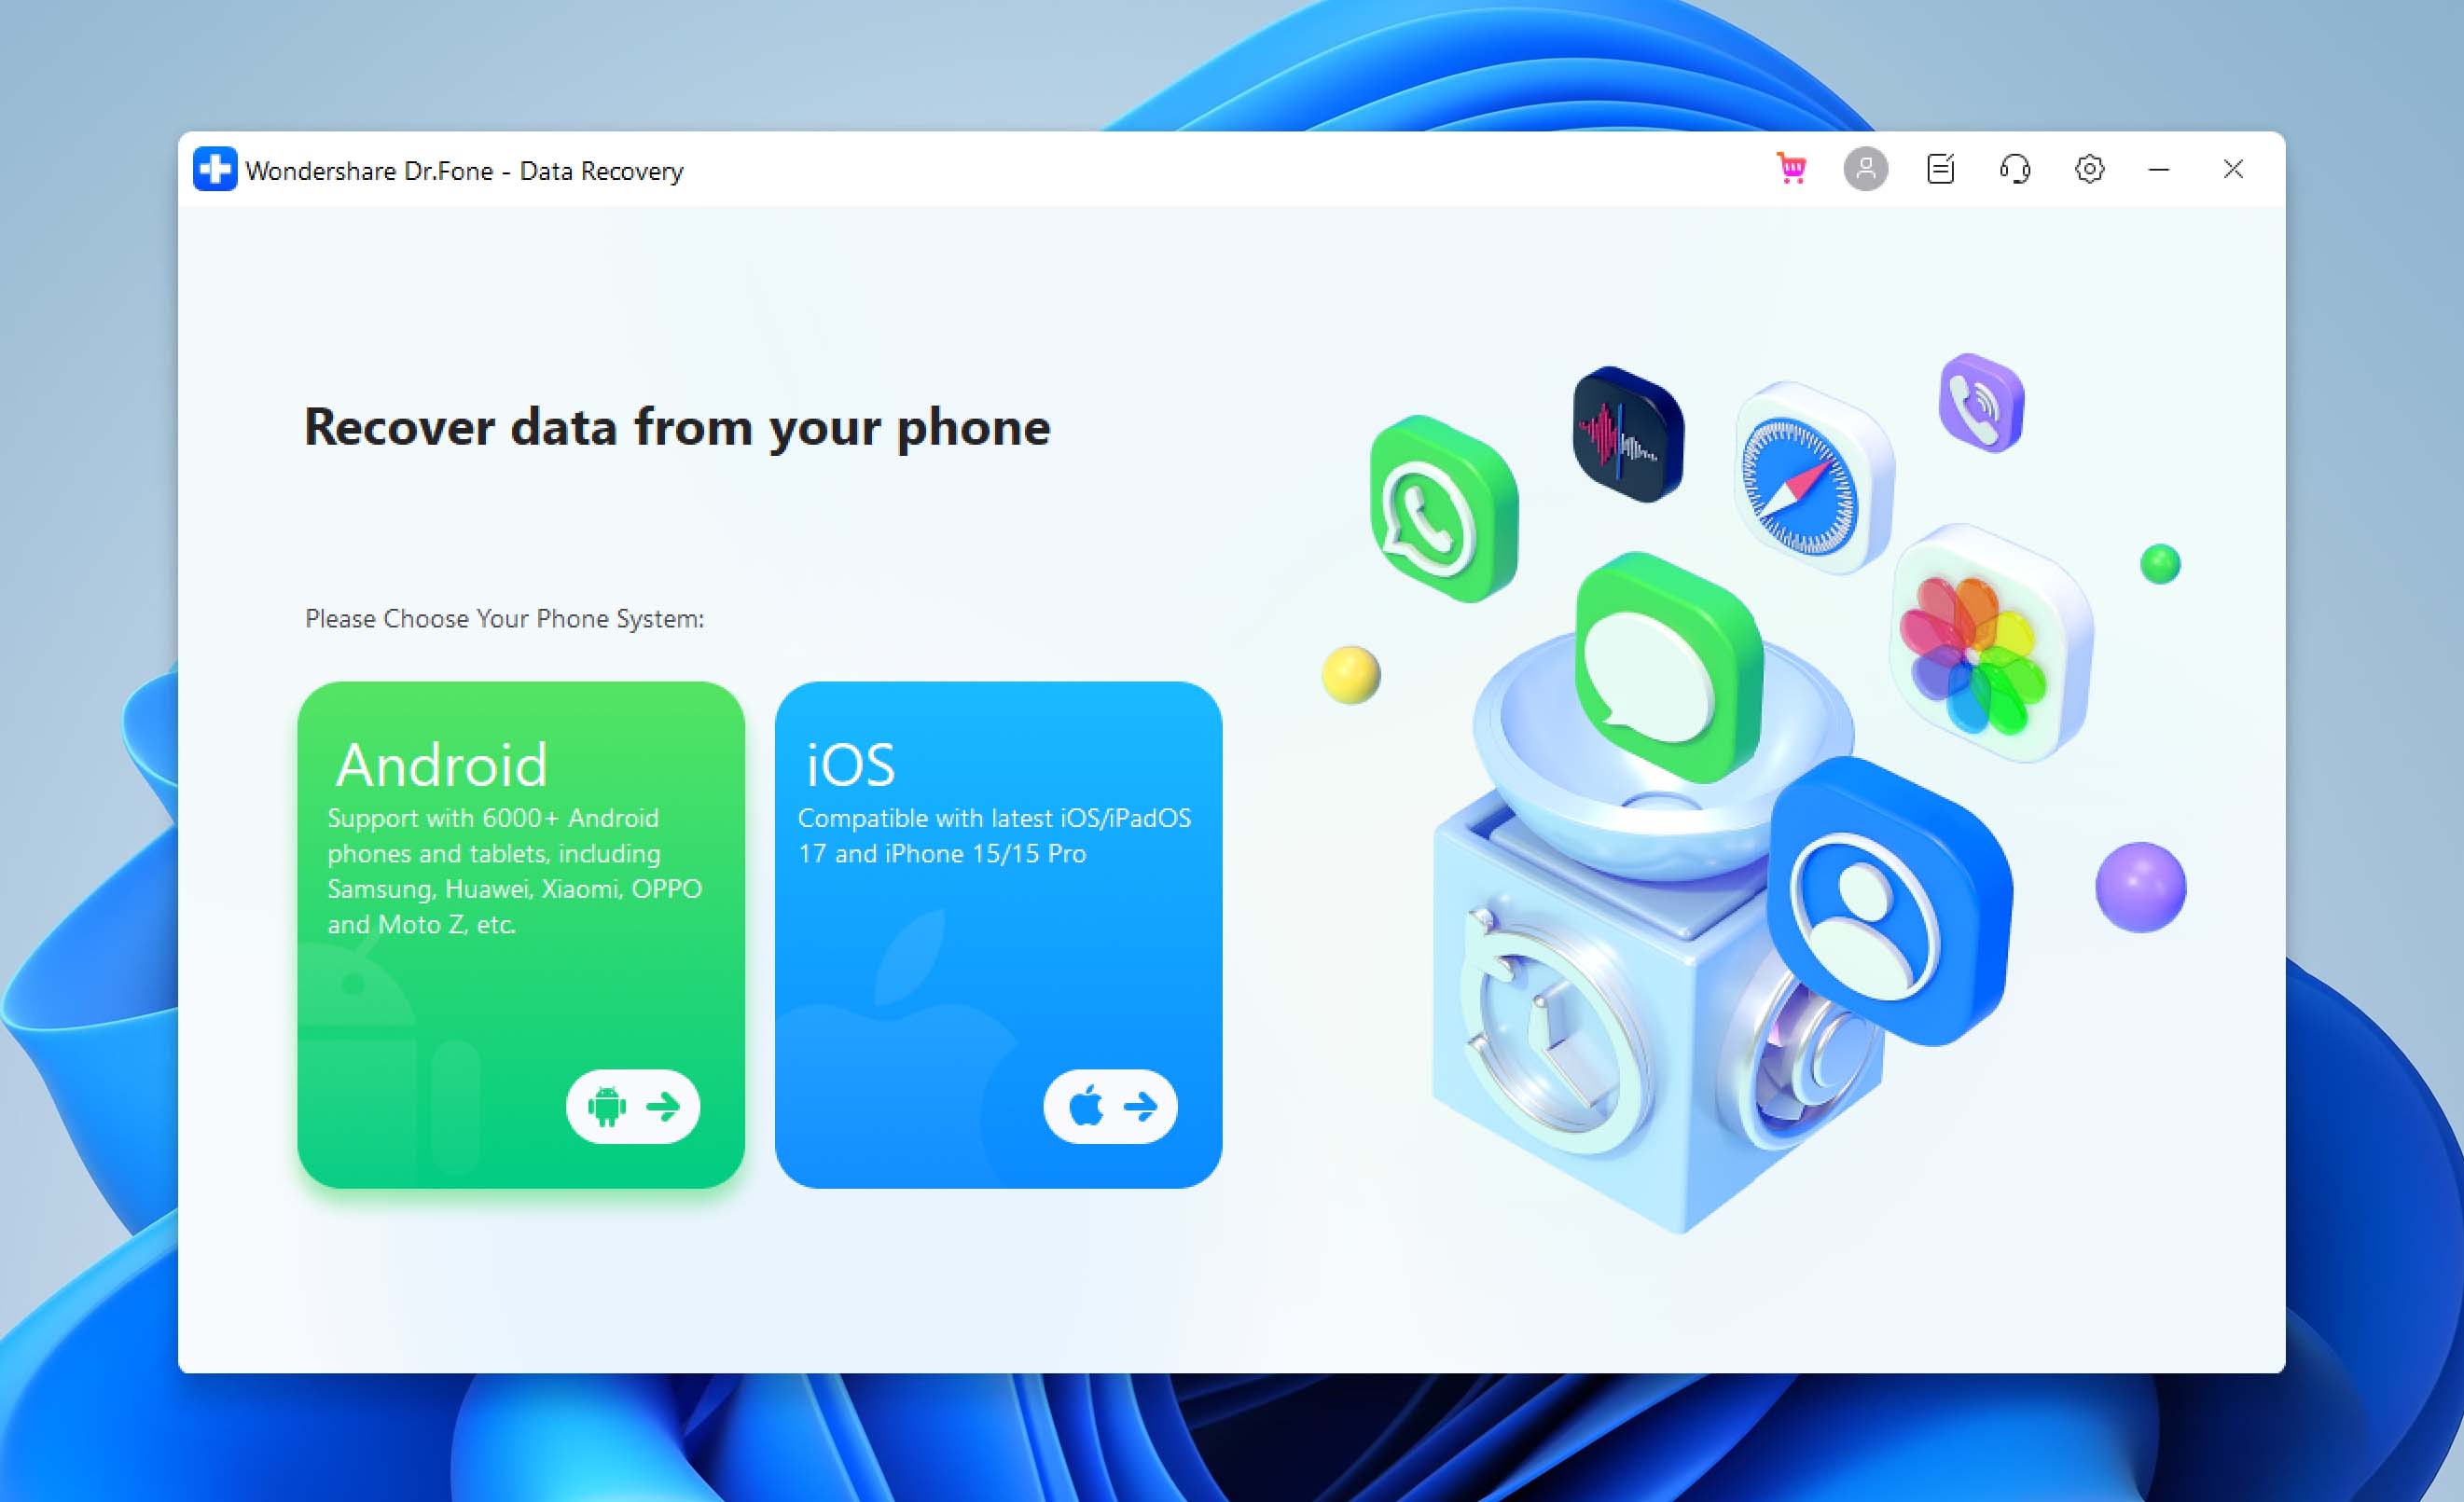
If you don’t have access to Mac OS X and can’t use Disk Drill to recover deleted photos from your iPhone, you can use dr.fone by Wondershare, a Windows data recovery application capable of recovering deleted photos from any iOS device.
- Download dr.fone. Launch the downloaded installation file and follow the installation instructions.
- Connect your iPhone to your Windows PC. Make sure to use the USB cable that came with your iPhone. Third-party USB cables can sometimes cause connection issues.
- Launch dr.fone and choose the Recover iOS Data option.
- Wait for dr.fone to detect your iPhone and click the Start Scan button. The application will scan your iPhone for deleted photos.
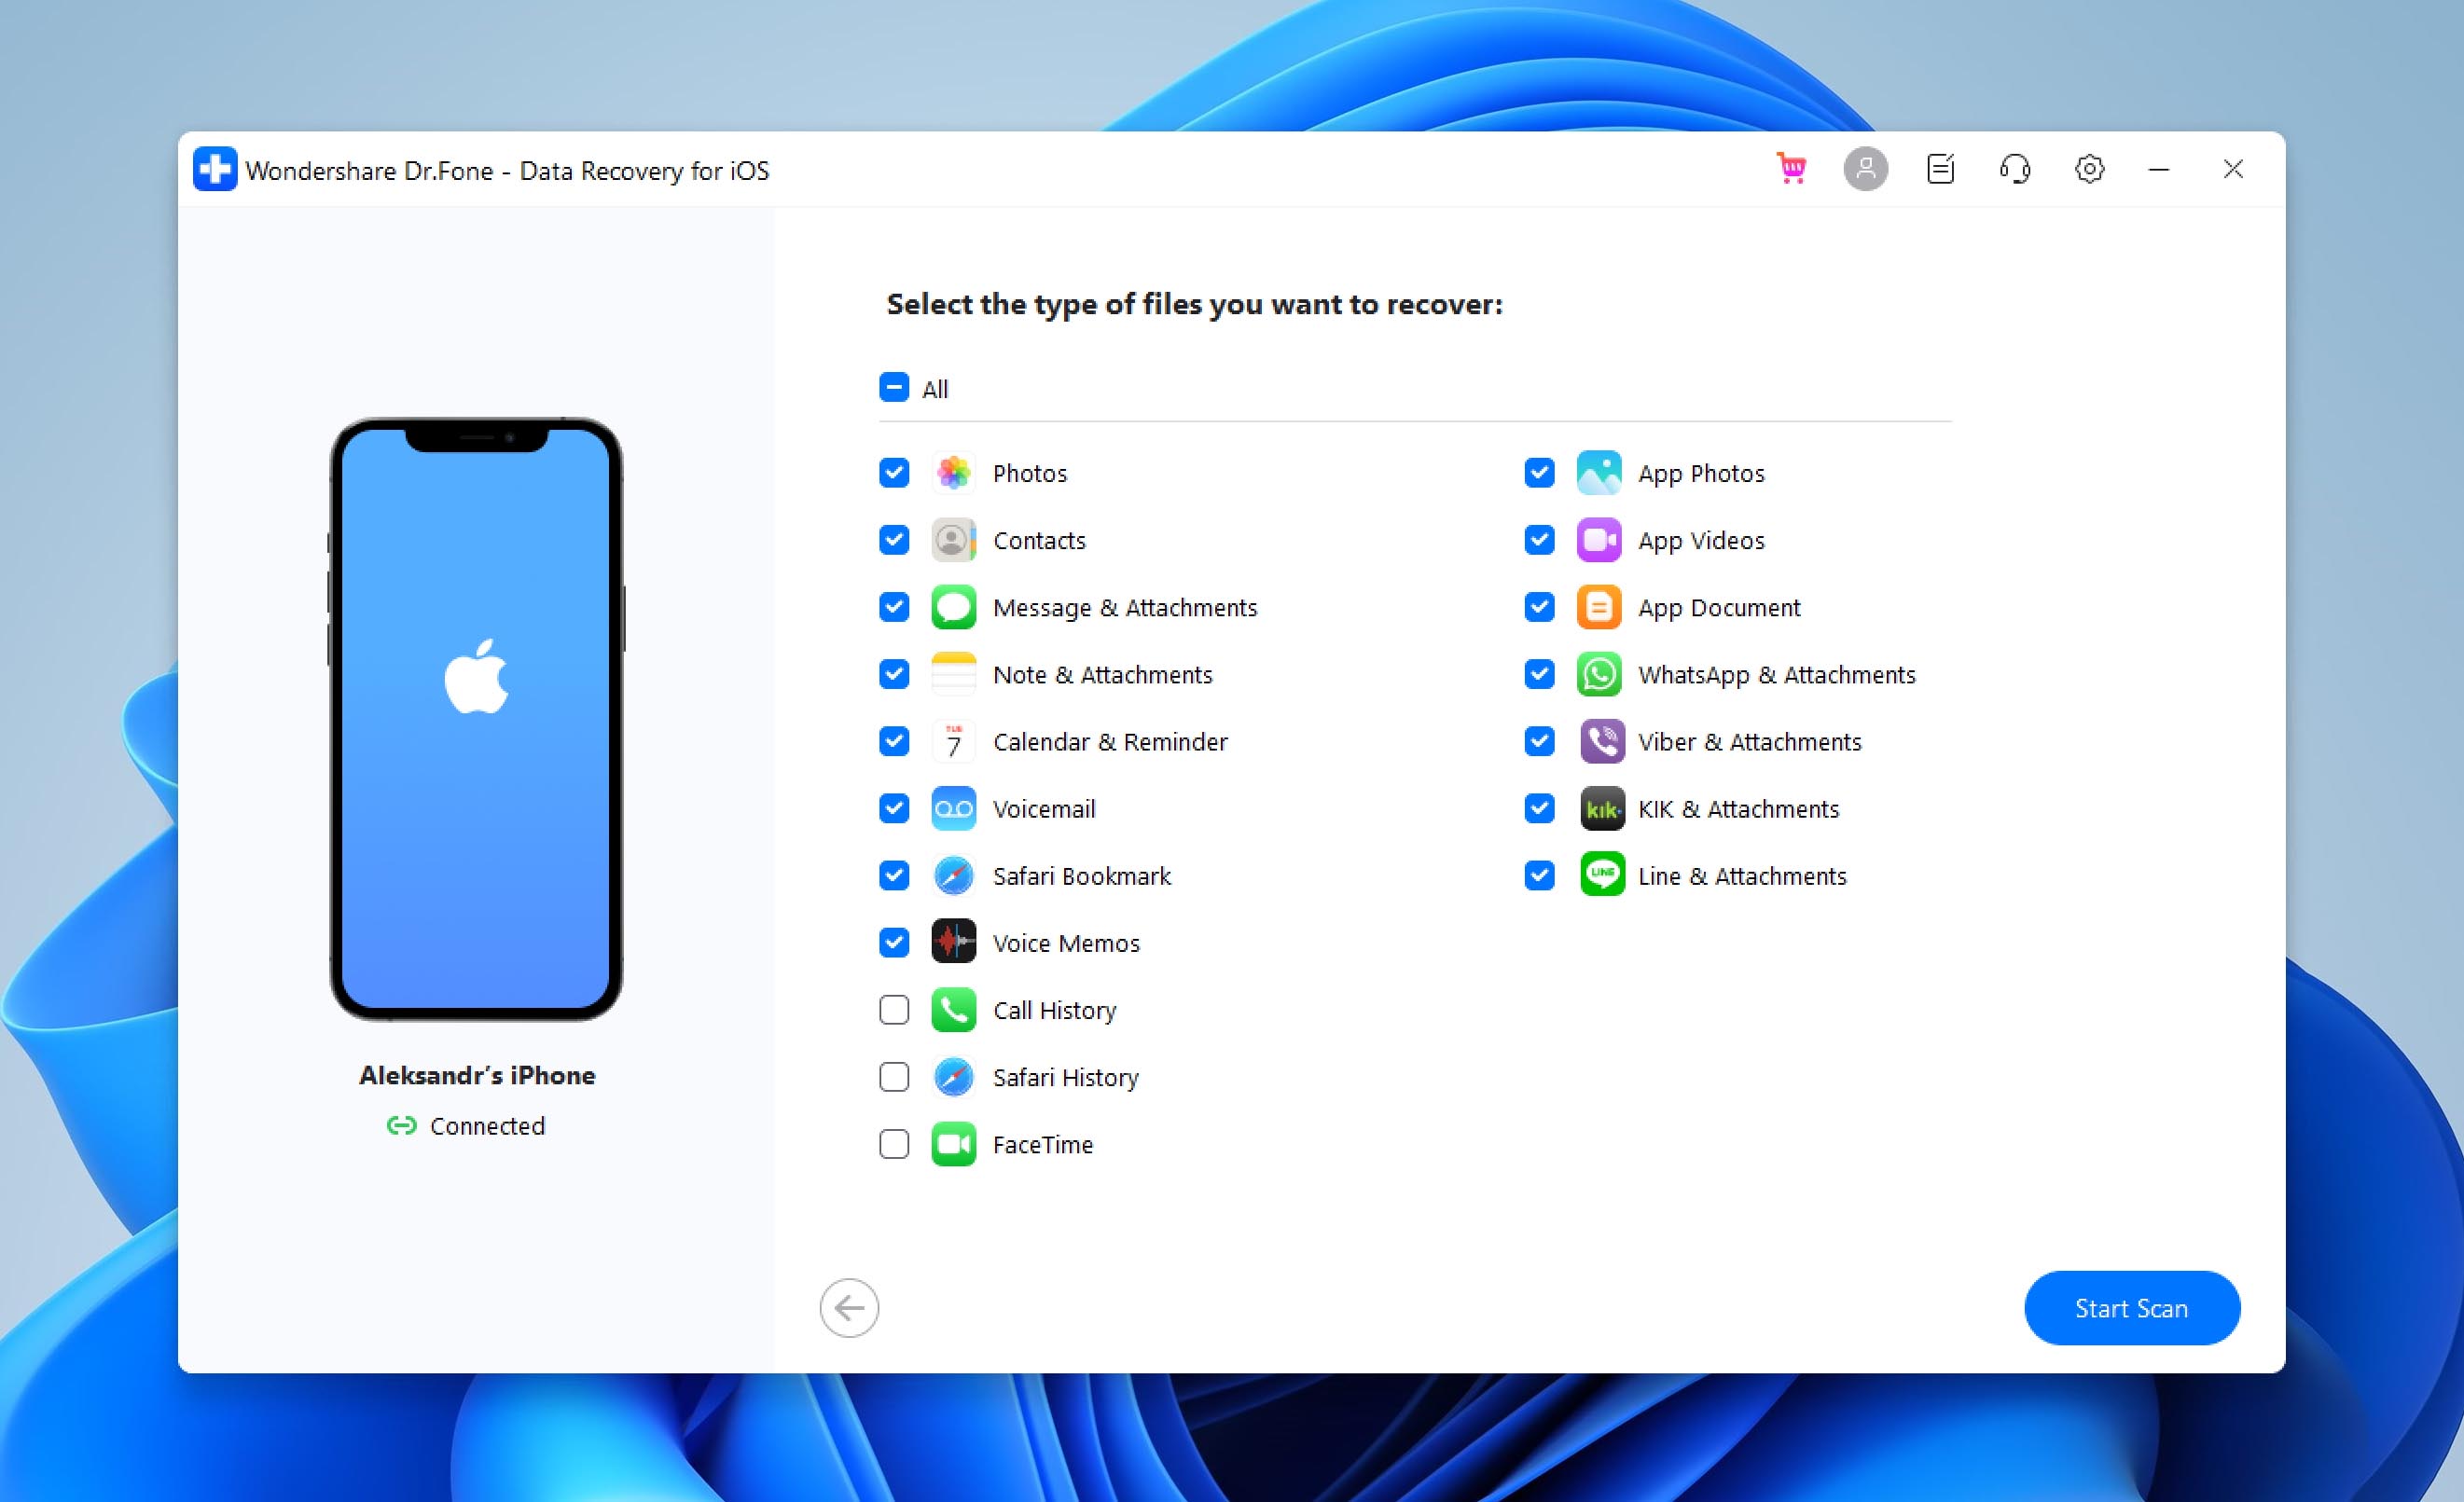
- Select Camera Roll from the list of options on the left and preview the deleted photos.
- Select which photos you want dr.fone to recover and click the Restore to Device button.
How to Recover Deleted Photos from iPhone with Messaging Apps
If the above methods fail, you might still have a chance to recover some photos if you’ve shared them via any messaging apps like WhatsApp, Telegram, or Viber. Even if a photo is deleted from your phone after you’ve sent it, it will still exist on the app’s servers and in the chat history.
In the worst case, you might lose some of the original quality if the app compresses its images (which most do). But a slightly compressed version is certainly better than losing the picture altogether!
Most popular messaging apps store shared media and make it easily accessible:
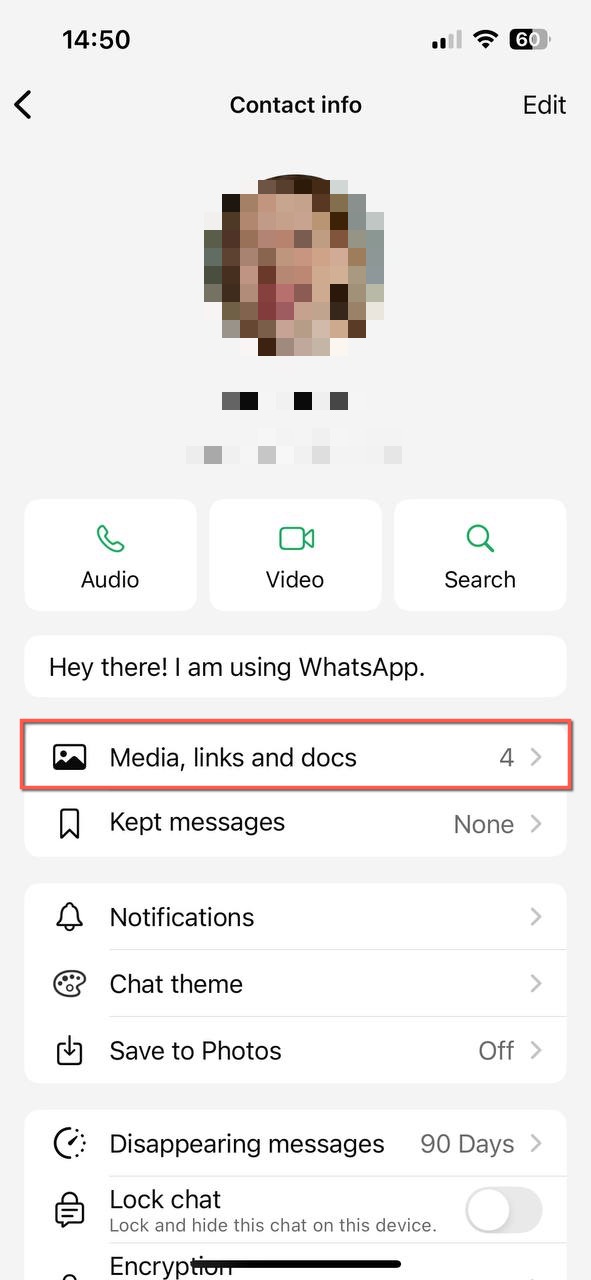
- WhatsApp allows you to view all media shared in a conversation by opening the chat, tapping on the contact’s name at the top, and selecting Media, Links, and Docs. From there, you can browse all photos ever shared in that conversation, tap and hold on any image, and save it back to your Photos app. You can find more information about features like this one in the WhatsApp help center.
- Telegram offers similar functionality with even better image quality retention. To access shared photos in Telegram, open the relevant chat, tap the chat name at the top, then select Shared Media to browse through all images. Telegram’s official guide on accessing shared media provides additional details about managing and recovering photos from their platform.
- Viber users can also recover deleted photos by opening a conversation, tapping on the conversation name, navigating to Chat Info & Settings, and then selecting Media, Links and Files to view all shared images. For additional information about managing media in Viber, their official help page on storage management offers valuable guidance.

Unfortunately, there are a few black sheep that don’t make it convenient for users to find old shared images, and the most prominent offender is Discord, which expects users to apply search modifiers like “has:image” or “from:your-user-name” to show only messages containing images or messages from a specific person.
How to Recover Deleted Photos from a Damaged iPhone

The above-described methods can help you recover lost photos from your iPhone if the device is working correctly. Unfortunately, they won’t help you if the deletion of your photos is also accompanied by physical damage, such as a cracked display that doesn’t turn on or a port that’s so worn out that it’s not possible to charge the battery.
In such situations, it’s necessary to repair the damage first, and that’s where professional data recovery services come in. The experts they employ can fix even serious physical damage and use sophisticated recovery techniques to get back as much lost data as possible.
Yes, the cost of professional data recovery may be high depending on how bad the damage is, but you can always ask for a free price quote to know what to expect.
How to Avoid iPhone Photo Loss in the Future
Anyone who has ever experienced the loss of a treasured photo wants nothing more than to avoid the same thing happening again in the future. The good news is that there are several ways how you can make your images more resilient to data loss.
Because even the most reliable data backup strategy in the world can fail, we recommend you always have more than one backup ready. A backup of a backup can save you when a disaster strikes, and you’ll be very glad that you have it.
1. Back up your iPhone
The first way to prevent photos from being lost from an iPhone is to have it registered with a cloud service like Apple’s iCloud. It provides several services such as backups to Apple’s cloud service storing photos, documents, and most importantly “Find my Phone” so if it gets lost or misplaced, the iPhone can tell us where it is.
Another option is to use another backup service such as Mega or Google Photos. Both services can work as a “backup to the backup”, so even if we delete it from the iPhone or iCloud, another copy might be on those systems as well. Mega offers 50 GB of free online storage, and it gives its users a chance to earn additional storage space by completing various challenges.
In addition to using cloud backup services, you should also create a local iPhone backup using iTunes (macOS 10.14 and older) or Finder (macOS 10.15 and newer). These local backups provide an additional safety net if something happens to your iCloud account or if you accidentally delete photos.
By combining these approaches, you can achieve a solid implementation of the 3-2-1 backup rule, which is a widely recommended approach that suggests maintaining three copies of your data: two on different storage media and one offsite, such as in the cloud.
2. Understand iCloud Storage Limitations
While Apple’s iCloud is convenient, it has important limitations to be aware of. If you use the “Optimize iPhone Storage” feature, only compressed versions of your photos are stored on your device, with originals in iCloud. However, when you delete a photo from your iPhone, it’s also deleted from iCloud. Additionally, when iCloud Photos synchronization is turned on, your photos aren’t included in your regular iCloud backups.
Even with Apple’s Advanced Data Protection for iCloud (introduced in December 2022), which uses end-to-end encryption to protect 23 data categories, cloud storage isn’t immune to security issues. According to IBM’s Cost of a Data Breach Report, more than 80% of data breaches involve data stored in the cloud. Cloud misconfigurations and vulnerabilities can put your precious photos at risk, regardless of the provider.
If you want to keep your photos in the cloud but be extra safe, then you might want to consider setting up your own self-hosted photo backup server using a tool like Immich. With it, you can automatically and securely create backups of iCloud Photos, and you can then recover from your local backups even if the photos are no longer in iCloud.
3. Safeguard your iPhone
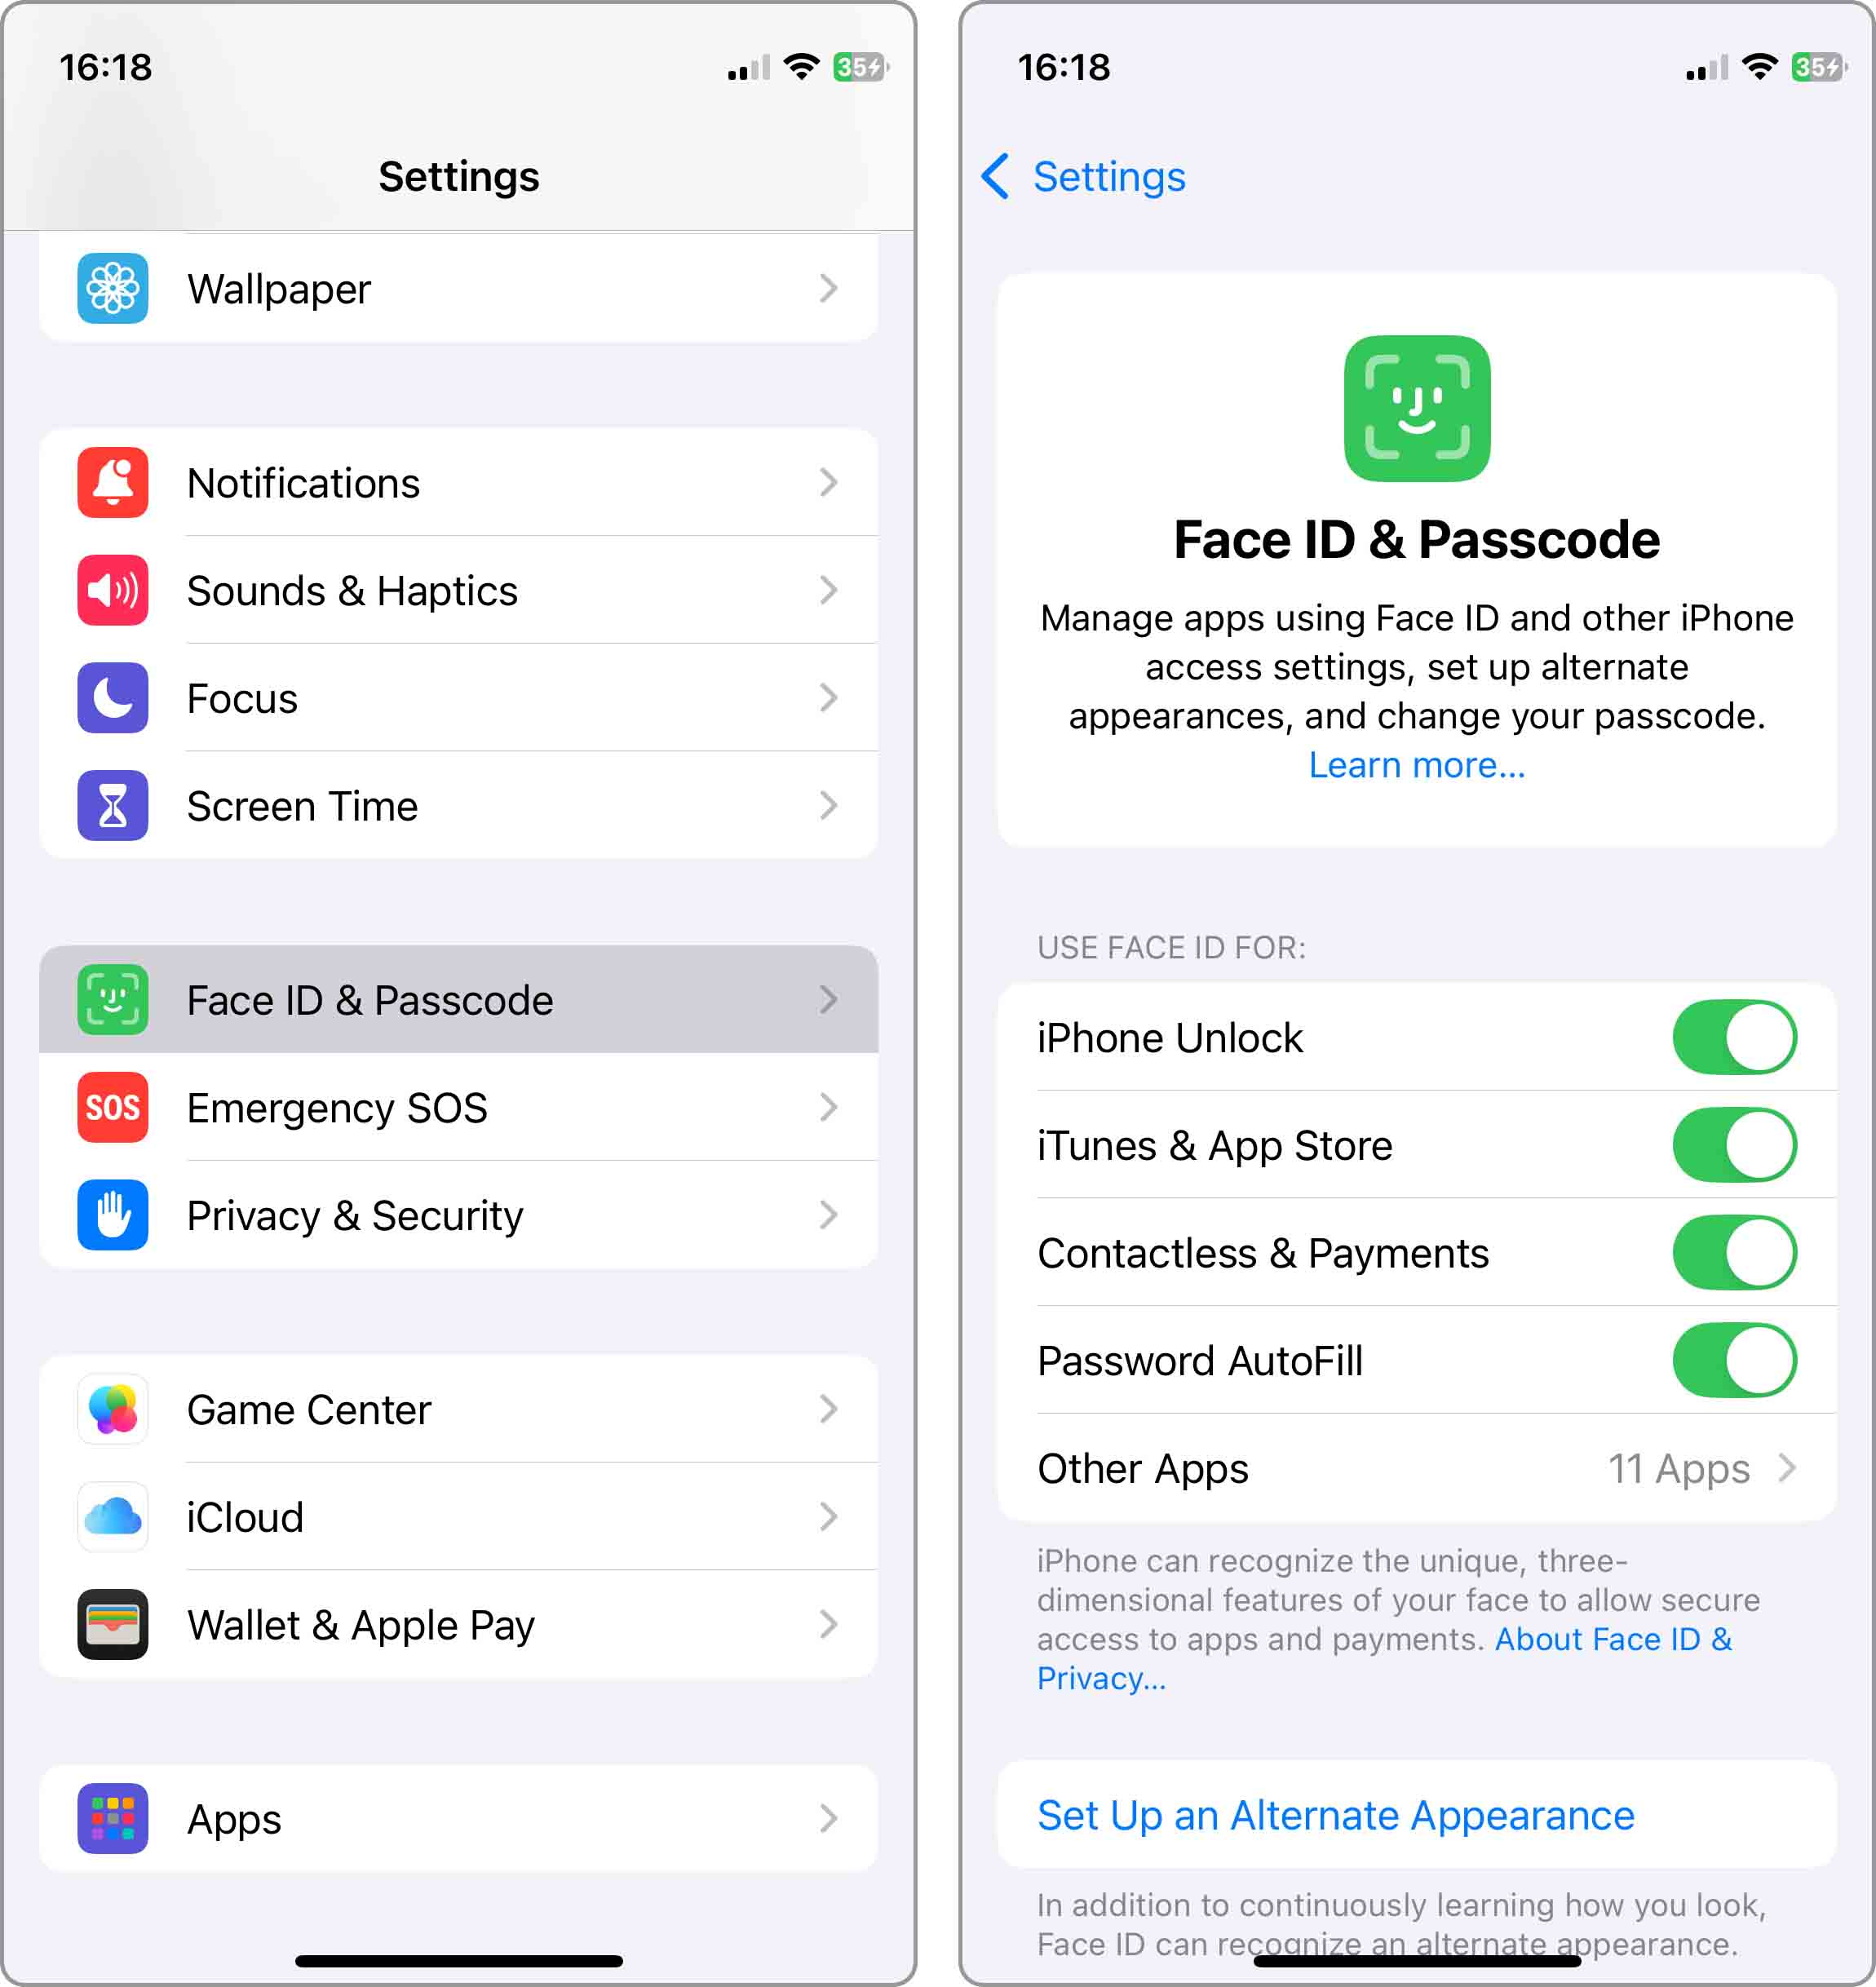
Do you have kids and often leave your iPhone unattended? If so, don’t be surprised when they wipe out all photos from it. That’s why you should activate either Touch ID or Face ID and keep your iPhone locked when it’s not in use:
- Go to Settings on your iPhone
- Scroll down and tap on Face ID & Passcode (or Touch ID & Passcode for older models)
- Enter your current passcode if prompted
- Toggle on iPhone Unlock if it’s not already enabled
- Set up an additional face or fingerprint if needed for backup access
- Scroll down and check if the Require Passcode setting is set to Immediately.
For additional protection, consider using the Hidden album feature in Photos, which allows you to move important photos to a separate album that doesn’t appear in your main library.
Last but not least, you should think twice before you jailbreak your iPhone. Apps on a jailbroken iPhone don’t have to abide by the restrictions imposed by Apple, and that means a poorly written app or an unfortunate user mistake can have devastating consequences, including the deletion of all photos from your device.
Summary
Whenever you need to recover deleted photos from an iPhone, start by checking the Recently Deleted album in the Photos app. Deleted images remain there for 30 days, so you might be able to get them back with ease. If you’ve missed this 30-day recovery window, you still have several options. You can restore photos from iTunes/Finder backups on your computer, recover them through your iCloud account, or use specialized third-party recovery software like Disk Drill for Mac or dr.fone for Windows.
FAQ
Yes, restoring from an older backup will replace all current data on your iPhone with the data from that backup. This means any photos, apps, messages, and other content added to your iPhone after that backup was created will be lost. Before proceeding with a backup restore:
- Make sure to back up your current iPhone state first.
- Consider using selective recovery software like Disk Drill instead, which can retrieve specific photos without affecting your current data.
- Try alternative recovery methods like checking Recently Deleted, iCloud Photos, or messaging apps for your missing photos.
If you still have your iPhone, you should first check the Recently Deleted album in the Photos app. You can also use a data recovery solution like Disk Drill to recover deleted photos that are not in the Recently Deleted album. Finally, you can recover them from your iCloud backup.
Yes, it’s possible to recover photos from an iPhone even without any backups. First, always check the Recently Deleted folder in your Photos app, where deleted photos remain for 30 days before being permanently removed. If your photos aren’t there, check messaging apps like WhatsApp, Telegram, or iMessage, as these often store shared media independently of your Photos app.
Your deleted pictures can be found in several places:
- Check the Recently Deleted folder in the Photos app, right under the iPhone camera roll.
- If you can’t find the pictures there, look for them in the same folder on iCloud.
- Still nothing? Then use Disk Drill to recover them from your iPhone’s memory.
When you delete a photo on your iPhone, the photo doesn’t immediately disappear from your device. Instead, it’s moved to the Recently Deleted folder, which you can find among your albums in the Photos app, below the iPhone camera roll. To recover a deleted photo from it, simply tap on it and select Recover.
Your best option how to recover deleted photos after 30 days is to restore them from a local iTunes backup:
- Connect your iPhone to your Mac.
- Open iTunes.
- Select your iPhone.
- Click on the Restore Backup button.
- Select your backup and wait for the process to finish.
To retrieve deleted pictures from your iPhone photo gallery:
- Open the Photos app.
- Tap on the Albums icon on the bottom.
- Select which deleted pictures you want to retrieve. *HINT: You can choose to recover all deleted pictures at the same time.*
- Tap the Recover button.
A common way how to get old pictures back on iPhone without a computer is with the help of iCloud, a cloud storage service that lets you store backups of your pictures on Apple’s servers:
- Open Safari and go to iCloud.com
- Sign in.
- Go to Photos > Albums > Recently Deleted.
- Select the images you want to recover.
- Click the Recover button.