You want to use your SD card, but the device you’ve plugged it in doesn’t recognize it and asks you to format it. There’s a slight problem with that: your SD card’s already filled with files you wouldn’t want to lose!
Is it possible to format an SD card without losing data? You’ve heard that a format will erase everything, so how can you preserve the pictures you’ve grabbed with your Android phone’s camera on its MicroSD card? Do you have to forget about the work-related files you’ve stored there using your favorite Windows apps?
Reasons You Might Need to Format Your SD Card
You might have to reformat an SD card for various reasons. We’ve identified the most common reasons and provided solutions, which you can jump to using the table below.
| Reasons | Steps |
| Your Windows PC asks you to format your SD card. You get the “You need to format the disk in the drive before you can use it” error message. |
|
| You need to format an SD card to the appropriate file system for compatibility with another device. |
|
| You need to format an SD card on Android without losing data |
|
| The SD card shows up as RAW, corrupted, or empty. |
|
| The SD card doesn’t show up at all on a PC. |
|
| The SD card is physically damaged. |
|
Does Formatting an SD Card Delete Everything?
A single-word answer to the question “does formatting an SD card delete everything?” would have to be “yes”. However, the more accurate two-word answer is: ‘It depends’.
- A quick format will delete all references to the data, but the data itself will remain on the drive until it is overwritten by new files. In this state, the card will appear empty, but the data itself can be recovered.
- A full/complete format will not only delete the references to the data but also manually overwrite any data on the SD card with zeroes, rendering it unrecoverable.
The best way to reformat an SD card without losing data is by first backing up its contents. Still, you might be able to recover your files even without a backup if the format was a quick one: you can use a data recovery solution to scan and recover any files that existed on the SD card before formatting, as we saw in our guide on how to recover a formatted SD card.
How to Format SD Card without Losing Data on Windows 10/11
To format a memory card without losing data, you should:
- 💾 Start by backing up its content.
- 🧲 Format your SD card.
- 🌞 Restore your files from that backup.
Let’s go through these steps together.
Step 1. Back-Up an SD Card Before Formatting
Backing up the data may seem the obvious first step, but it’s not always so straightforward; especially when some form of corruption is present. When corrupted, the data on your SD card will become inaccessible through traditional means like File Explorer. When Windows detects an issue with your SD card, it will prompt you to format it.
For those with access to the data, you can simply copy it to another storage device. All other cases will require the use of software that’s capable of working with an SD card in this state.
To back up inaccessible SD cards, we recommend Disk Drill. Disk Drill is primarily a data recovery solution, but it’s also an optimal choice for such scenarios because:
- 💪 It comes with a very powerful byte-to-byte backup solution as one of its extra tools.
- ♾️ It’s compatible with any storage device that can be detected by the computer and Windows, including SD cards of all types (standard, micro, or mini) from all manufacturers (Samsung, Transcend, etc.).
- 🎛️ It’s much more straightforward to use compared to many other specialized backup solutions.
Use Byte-to-byte Backup to capture the SD card as a free image. You can preview unlimited files from that copy and, on Windows, recover up to 100 MB at no charge. For many “format-without-loss” cases, that covers the essentials while you verify results. Anything beyond 100 MB requires a Pro license.
To back up everything in your SD card using Disk Drill:
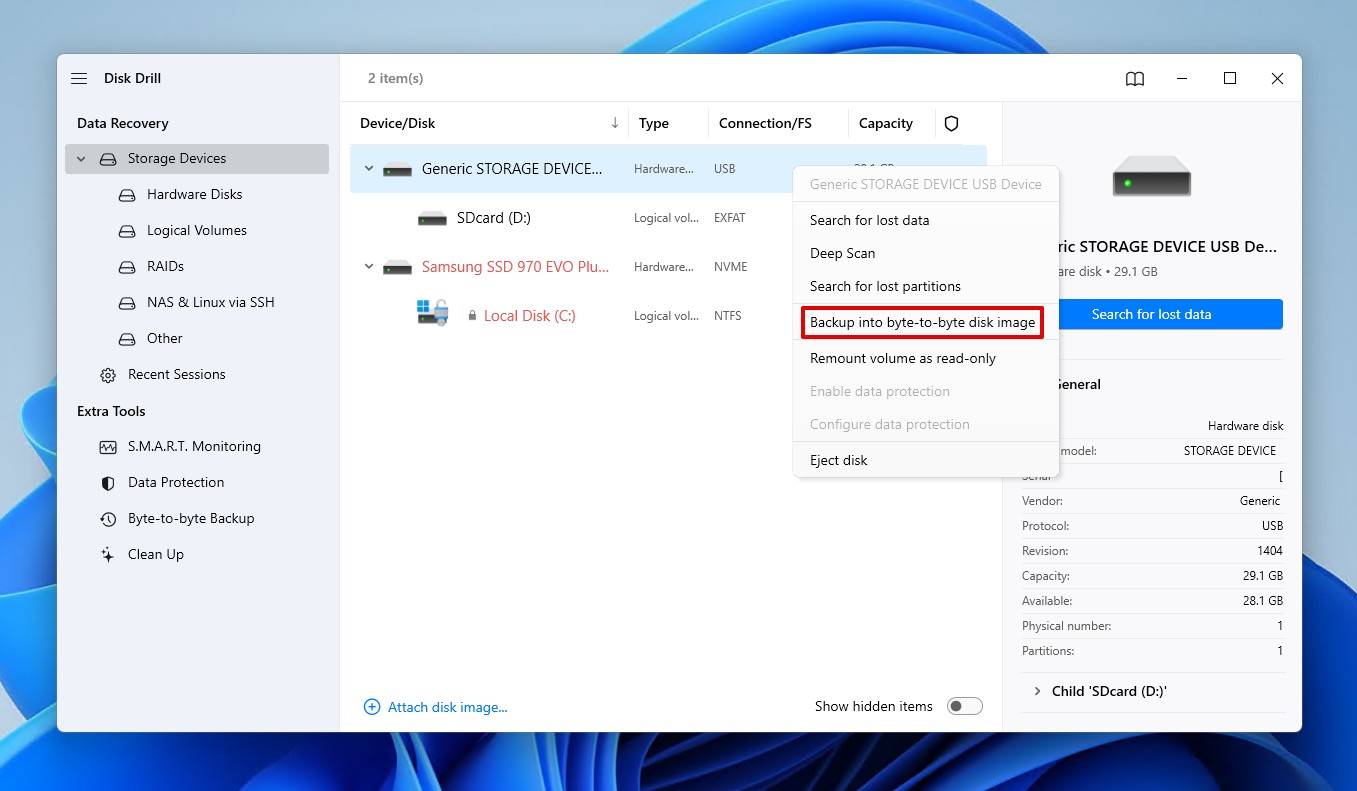
- Download the app from its official site.Then, install, and run it. Right-click on your SD card on Disk Drill’s Device/Disk list, and choose Backup into byte-to-byte disk image.
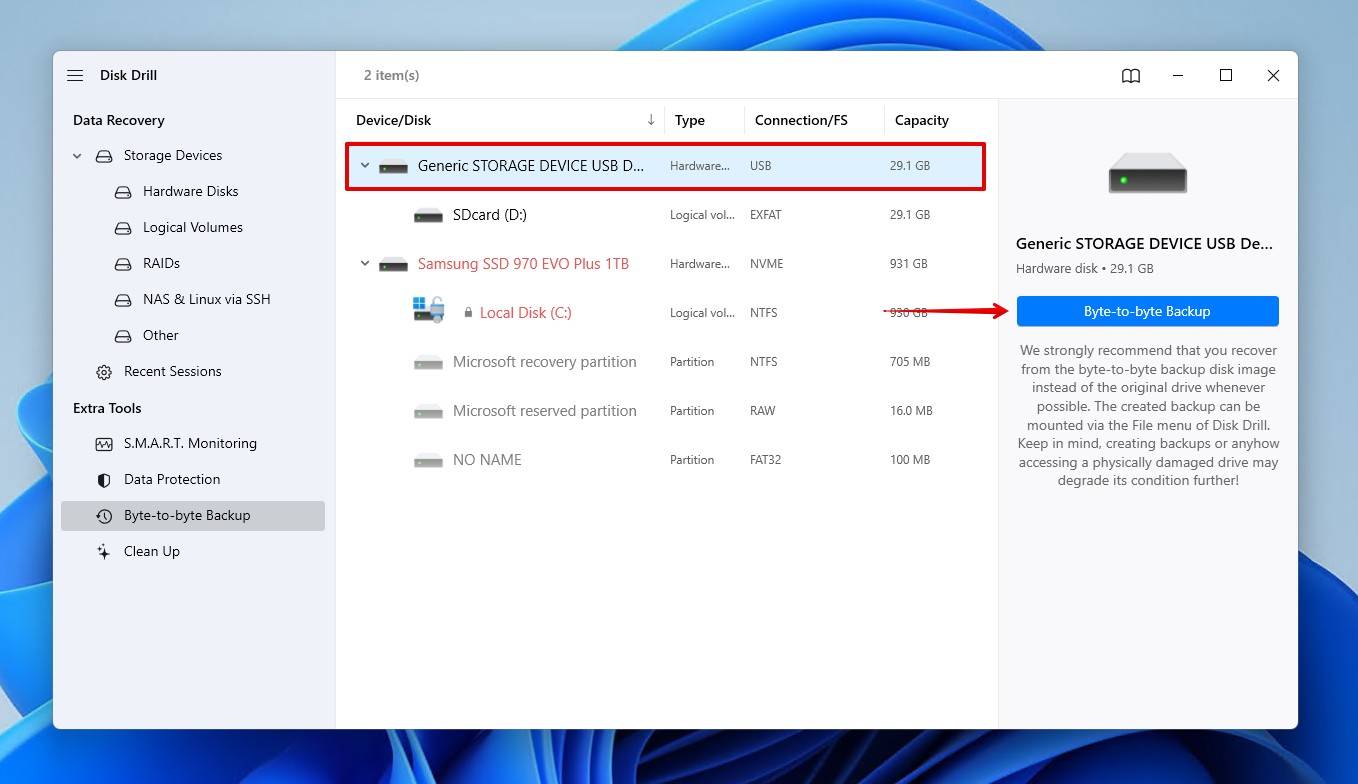
- Alternatively, you can click on Drive Backup under Extra Tools on the left, and then on OK, Let’s do it!. Then…
- Select the SD card you’d like to back up, and click on Byte-to-byte backup on the top right of the window.
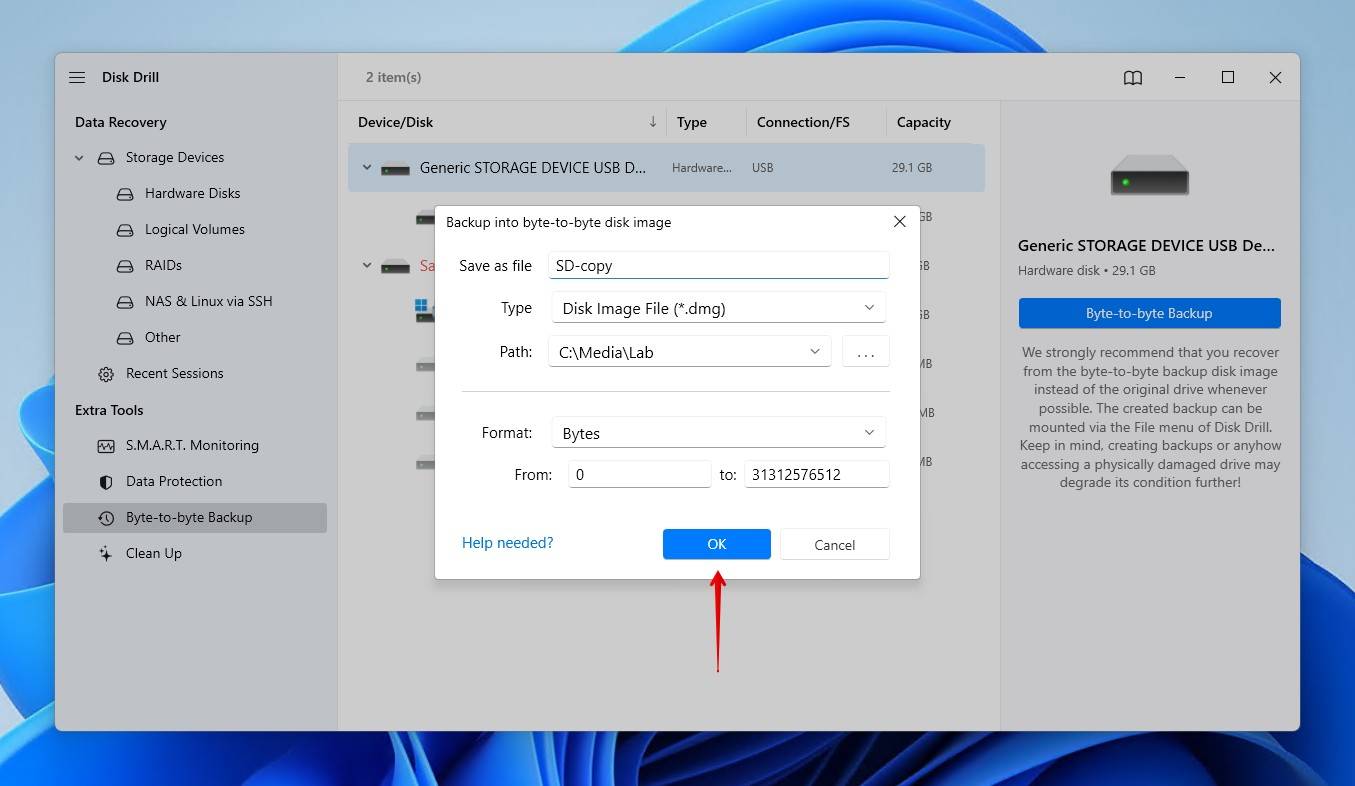
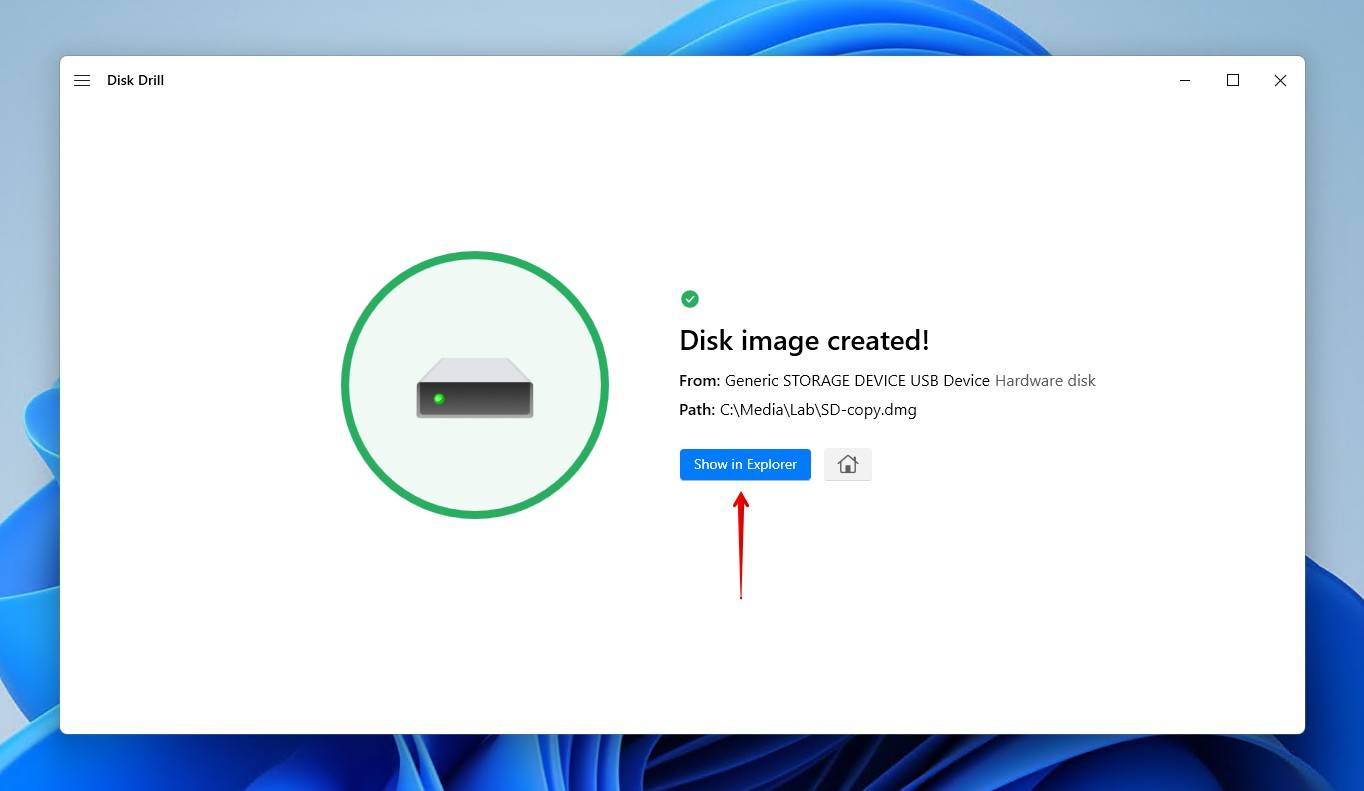
- Disk Drill will show you a window with details about the backup image. You can change its name from the Save as file field and tweak the rest of the options. Click only on the button with the three dots to select where the image will be stored. When ready, click OK.
- Give Disk Drill some time to create the complete byte-to-byte image. The time needed depends on the speed of your computer, media, and the size of the media being backed up.
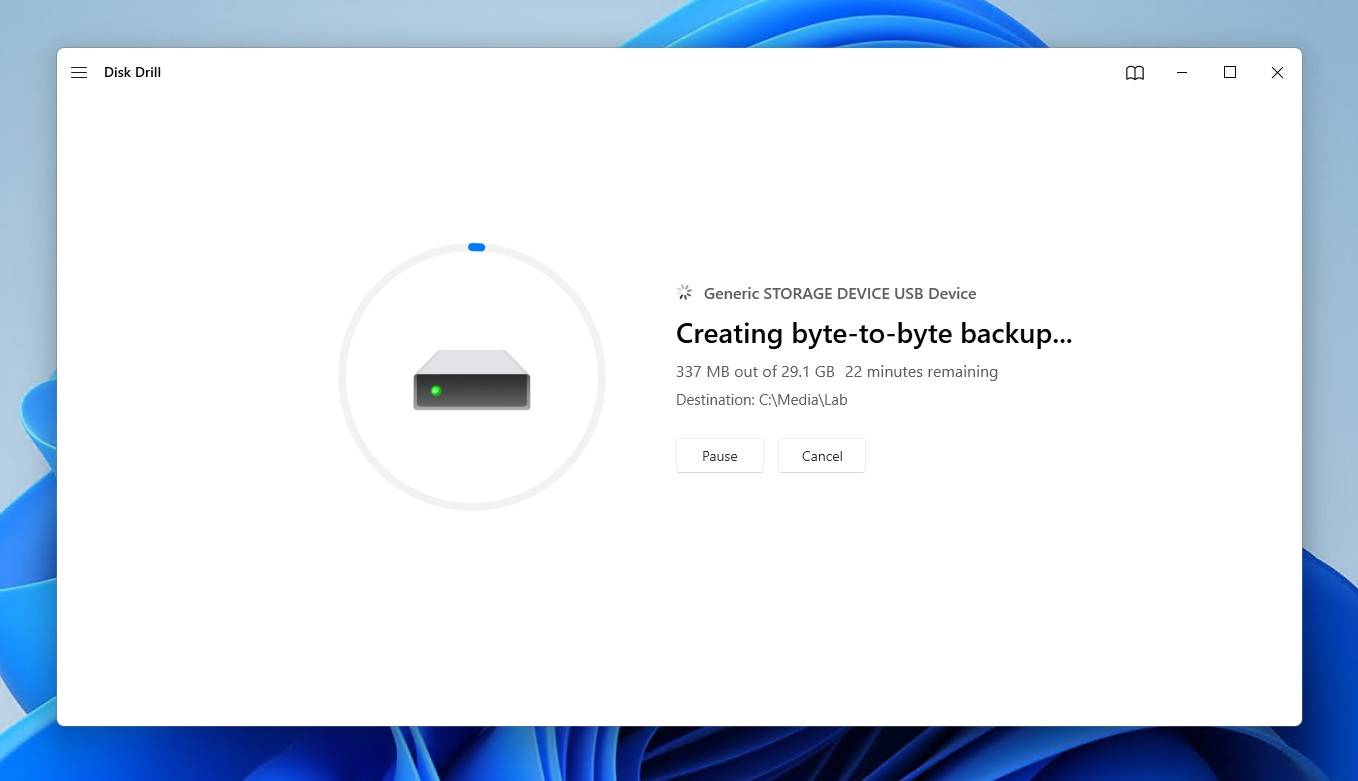
- Disk Drill will update you when the backup is created and allow you to check it out using the default byte manager with a click on Show in Explorer.

Step 2. Format Your SD Card
With its contents backed up, you can safely reformat your SD card without losing data with any method you prefer. On Windows, the most popular methods for doing that are File Explorer, Disk Management, and Command Prompt.
Method 1: Using File Explorer
Arguably one of the fastest ways to format your SD card without losing data is through File Explorer. Most people are familiar with it, so navigation should be easy.
To format your SD card using Windows File Explorer:
- Use the Windows key + E to launch a File Explorer window. Right-click on your memory card and choose Format.
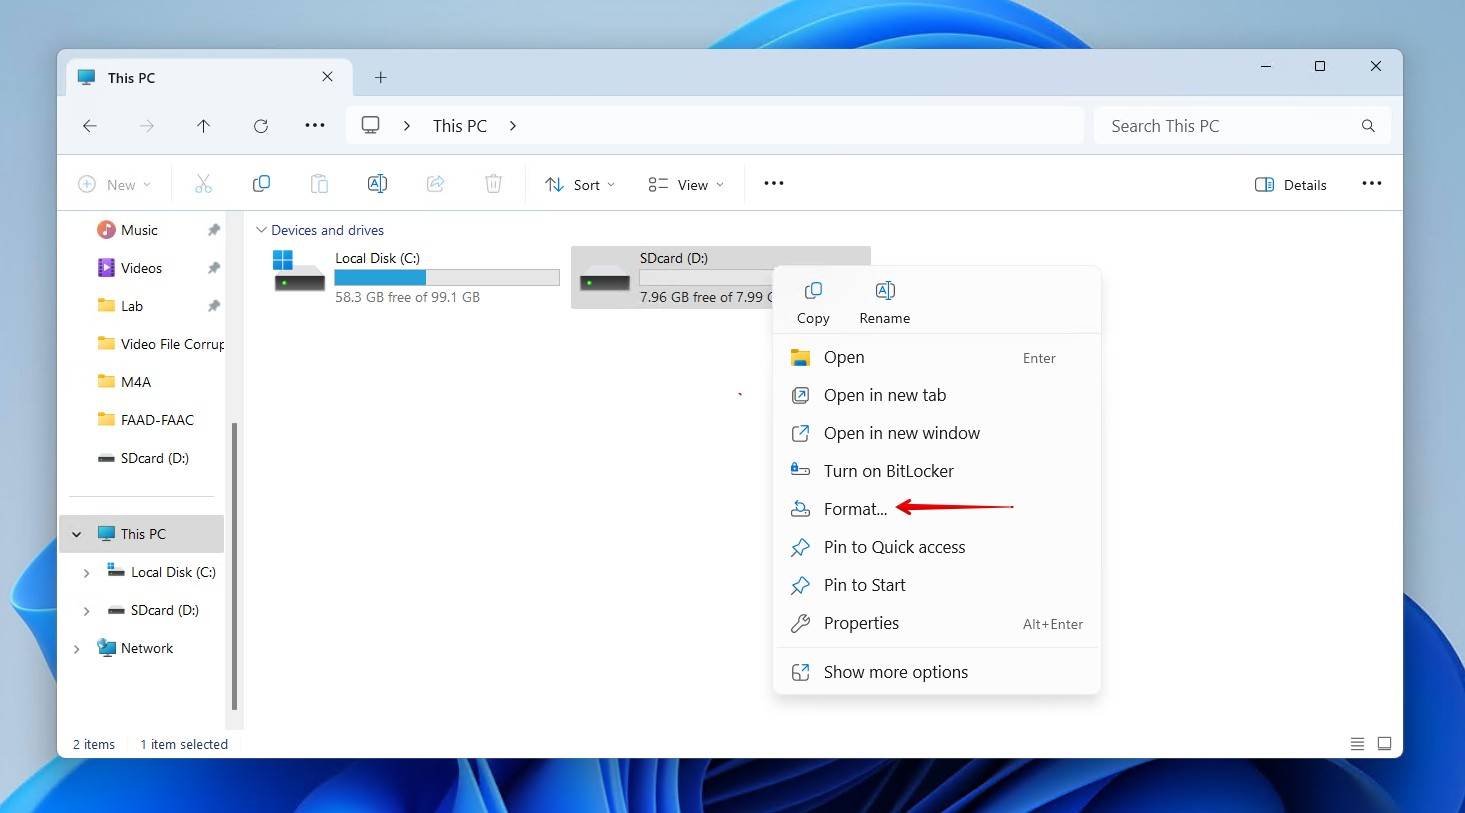
- Choose your desired file system, change its volume label if you wish, and choose if you want a full or quick format by placing a checkmark before Quick Format under Format Options. Then click on Start.

Method 2: Using Disk Management
Another method to format your SD card is using the more powerful Disk Management tool built into Windows, which specializes in managing drives and partitions.
To format your SD card using the Disk Management tool:
- Launch the Disk Management by seeking it by name in the Windows Start menu or using Search. It’s even quicker, though, to do it through the Power User menu by pressing Windows key + X and selecting Disk Management from the menu that pops up.
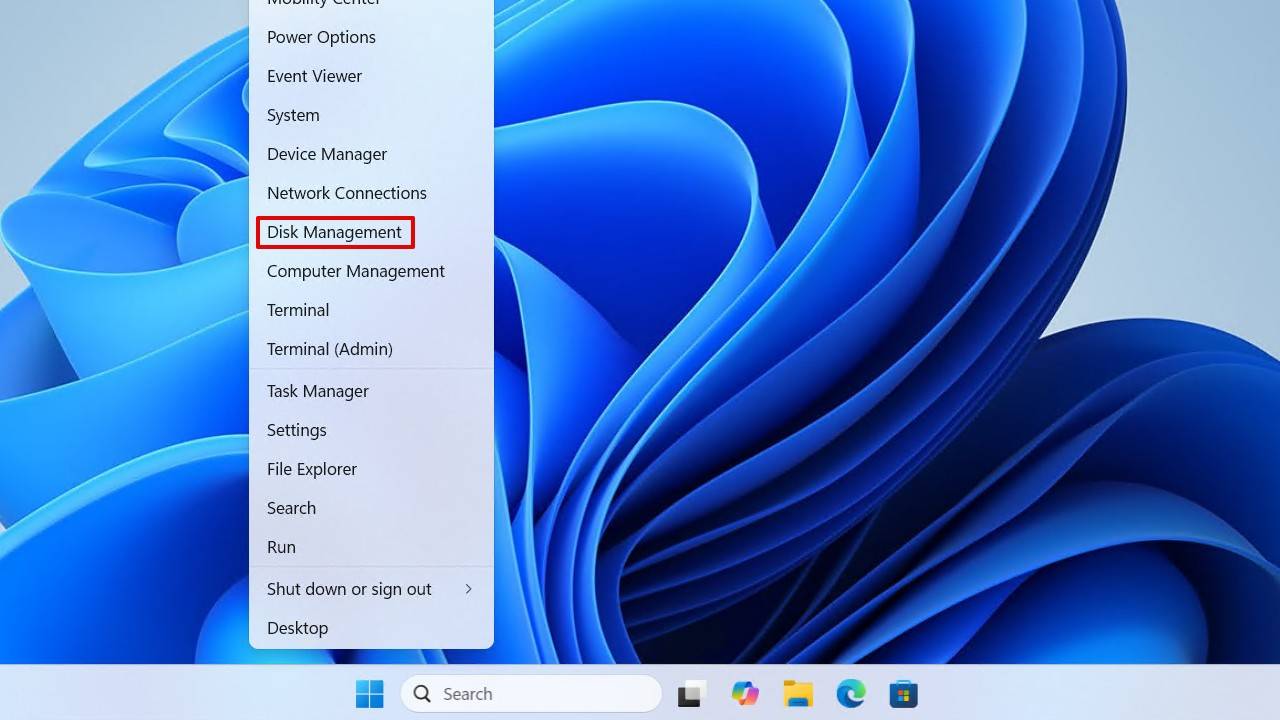
- Find your SD card in Disk Management’s list, right-click on it, and choose Format.
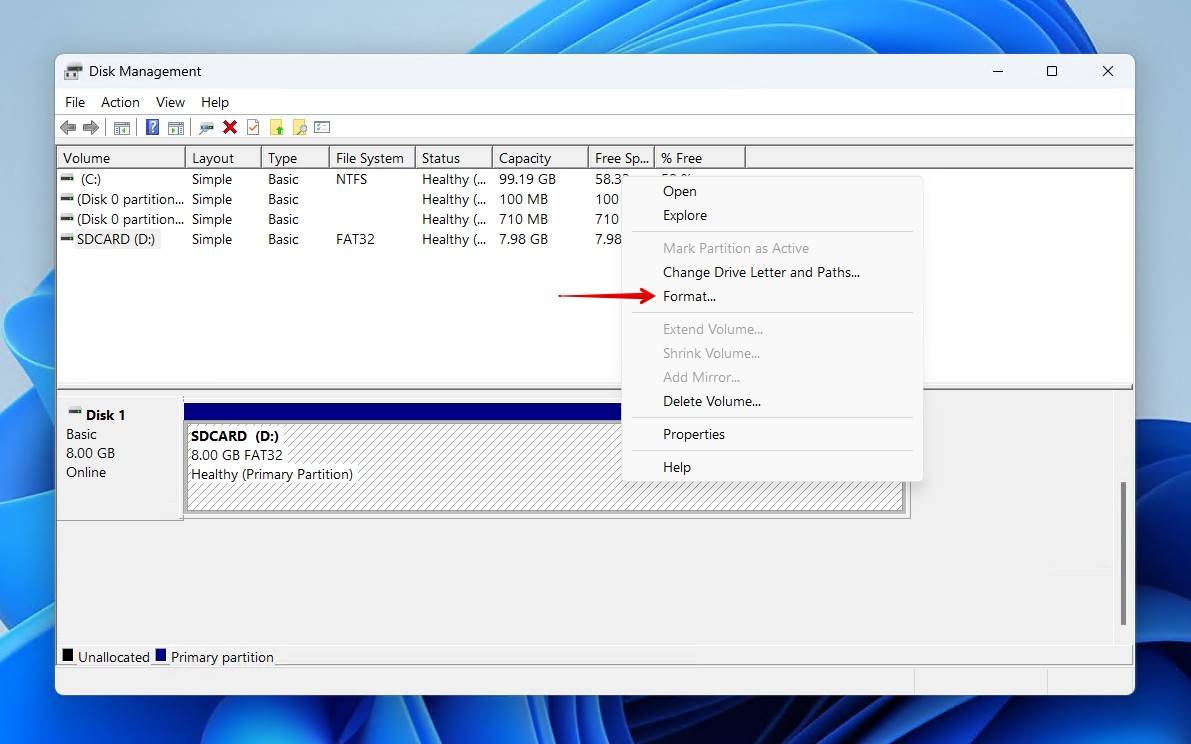
- If you need, enter a volume label, choose a file system, and check ‘Perform a quick format’ if you prefer it over a full format. Click on OK to proceed.
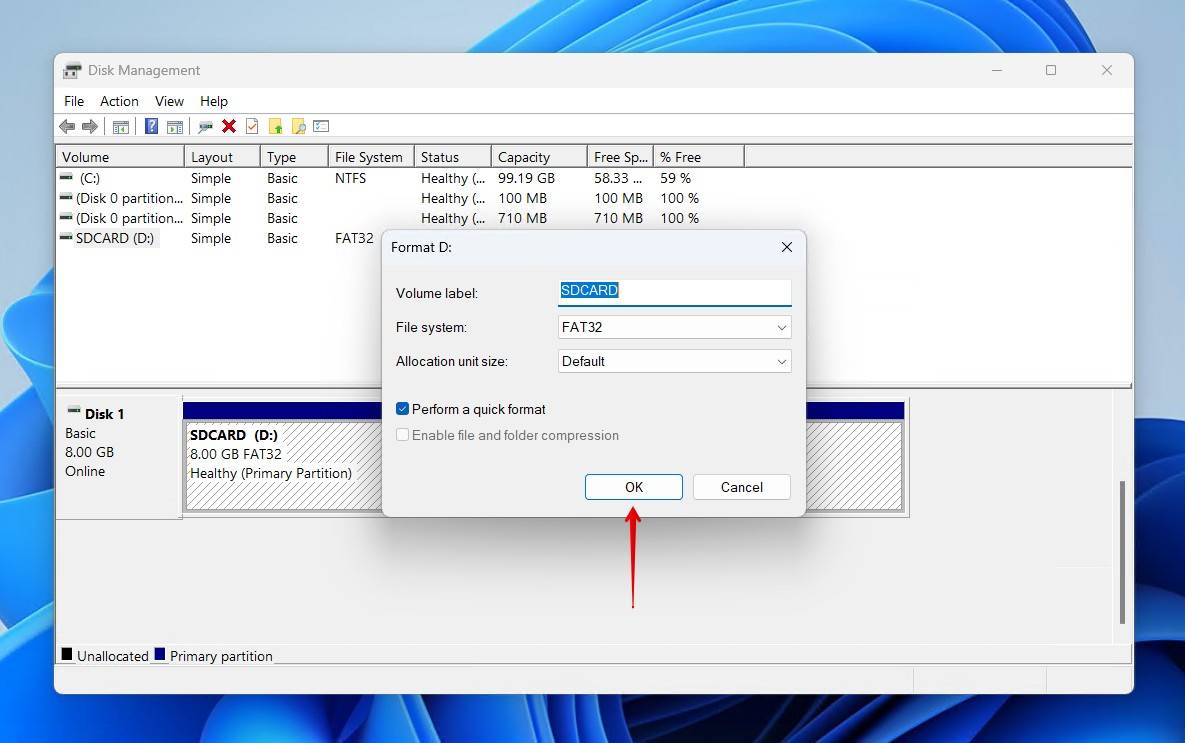
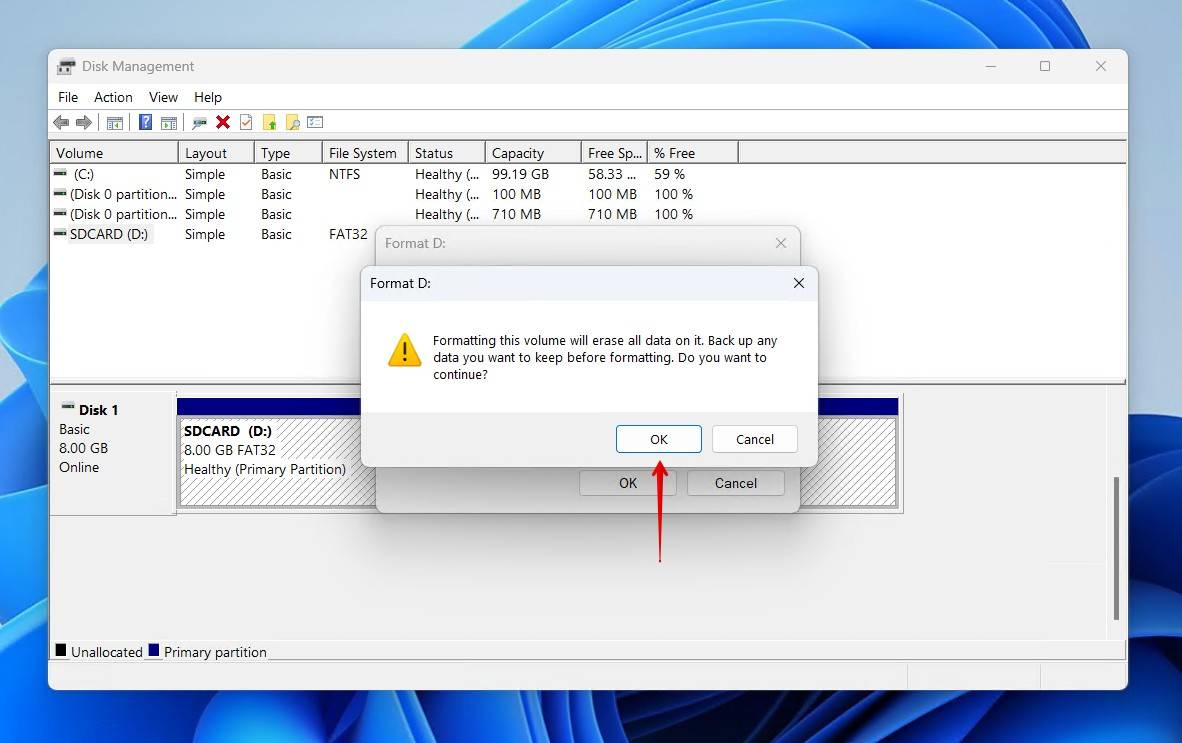
- Click OK once more to acknowledge that formatting will erase the data on your SD card.
Method 3: Using Command Prompt
If you’d prefer formatting the SD card using a command-line interface (CLI), you have a few options on Windows. For Windows 10 users, you can use Command Prompt (CMD) or PowerShell. Windows 11 users have the same options plus the new Terminal app. The following steps will work with any of the mentioned options.
To format your SD card using CMD:
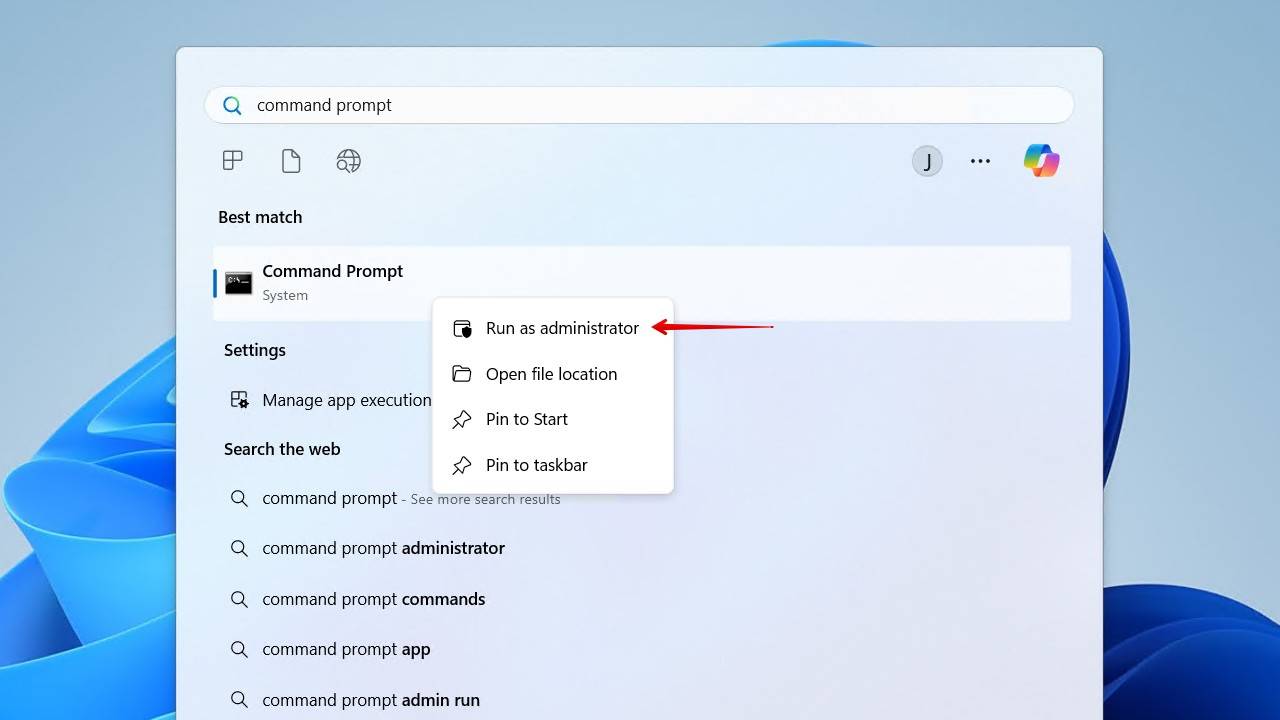
- Use the Start menu or Search to seek either “command prompt” or “CMD”, and Run (it) as administrator.
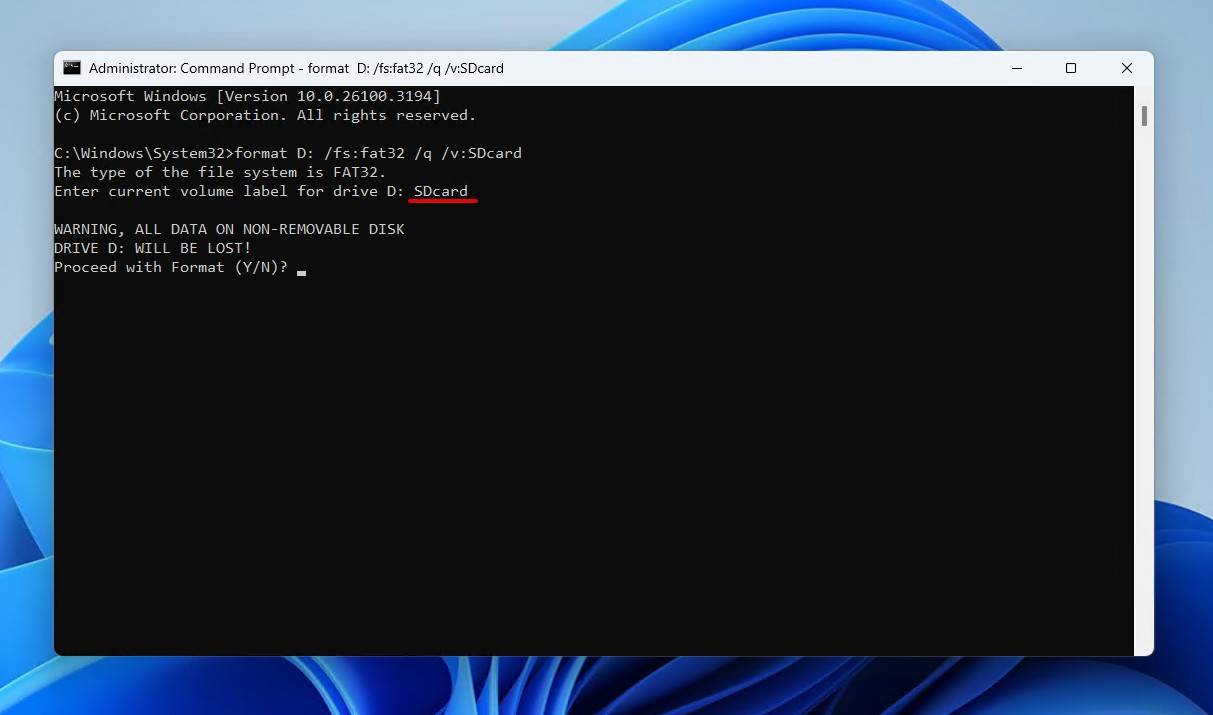
- Type the command
format DRIVE_LETTER: /FS:FILE_SYSTEM /Q /V:LABELto quick-format (/Q) your SD card. Replace “DRIVE_LETTER” with the actual letter from which your SD card is accessible, “FILE_SYSTEM” with the file system you want to use for the format (out of FAT32, exFAT, and NTFS), and state the “LABEL” you want to add to it. For example, to format our SD card, which was accessible from the D letter using FAT32 and the label SDcard, we used the command:format f: /FS:FAT32 /Q /V:SDcard.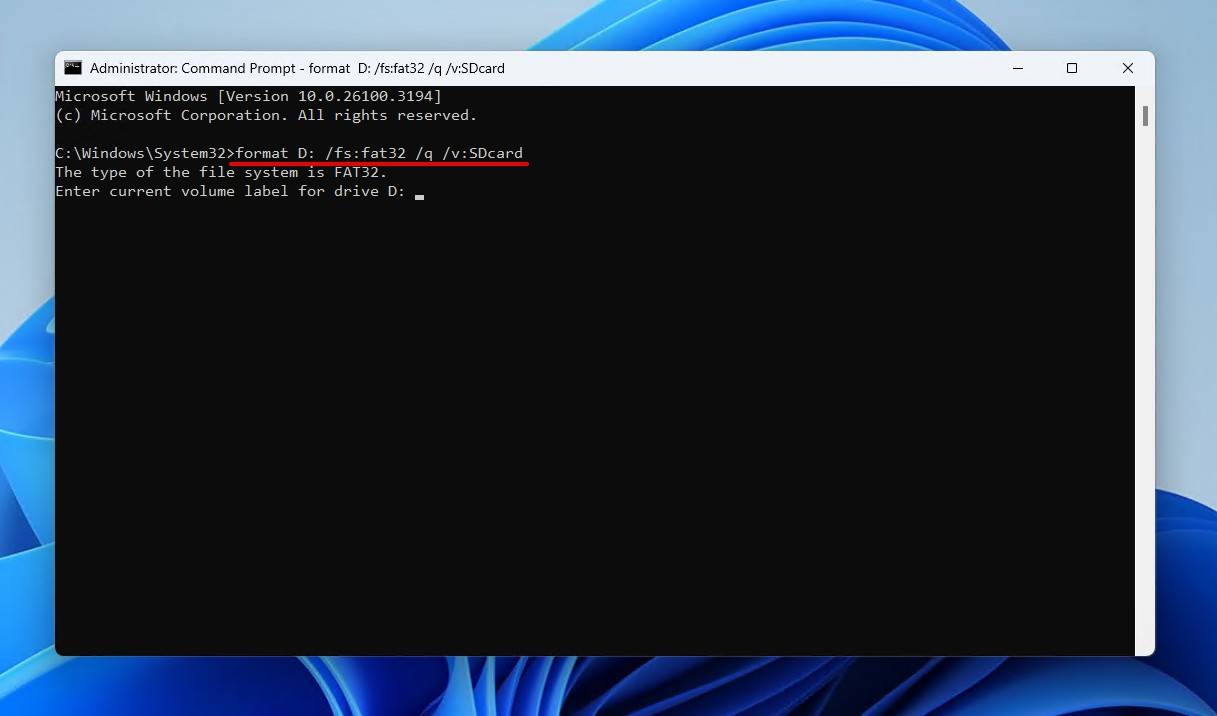
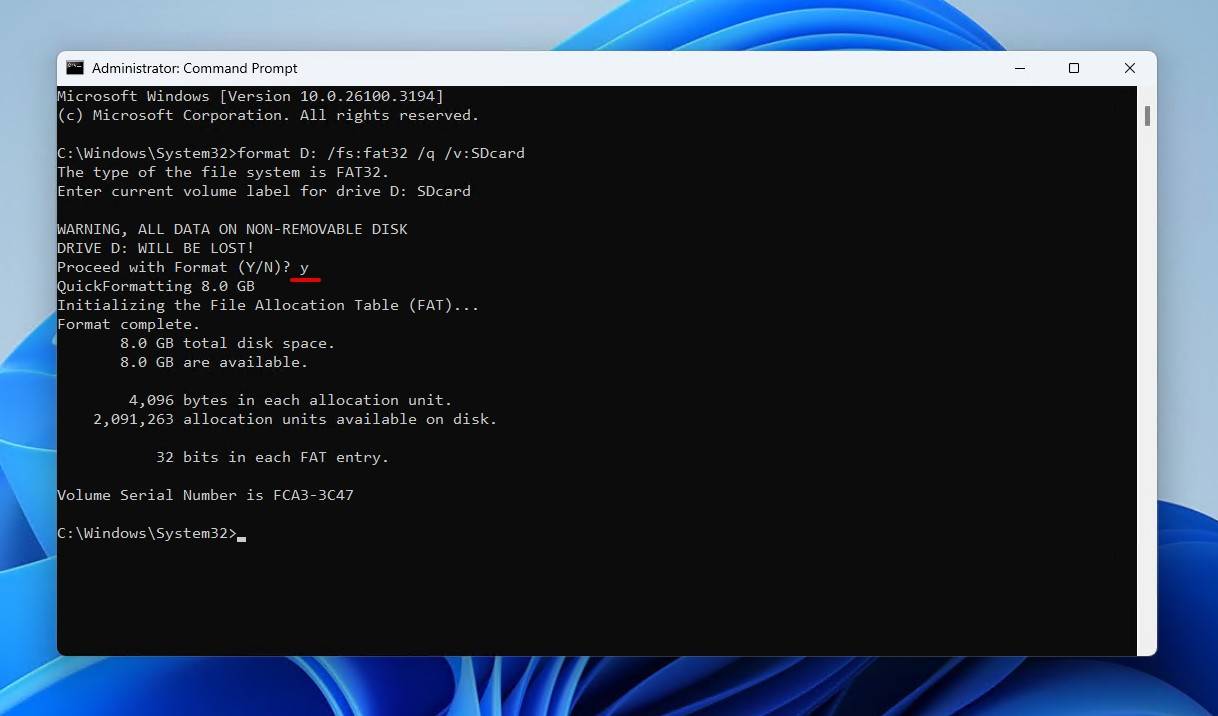
- Enter the current volume label for the SD card, then press Enter.
- Type Y and press Enter to confirm the format.
Step 3. Retrieve Your Data From the Backup
Now it’s time to get your data from the backup and copy it to your newly formatted SD card. Even if you already formatted the SD card before finding this article, Disk Drill can still recover data and bypass error messages.
To retrieve your files from a Disk Drill byte-to-byte backup image file:
- Run Disk Drill and click on Attach disk image on the bottom left of its Device/Disk list.
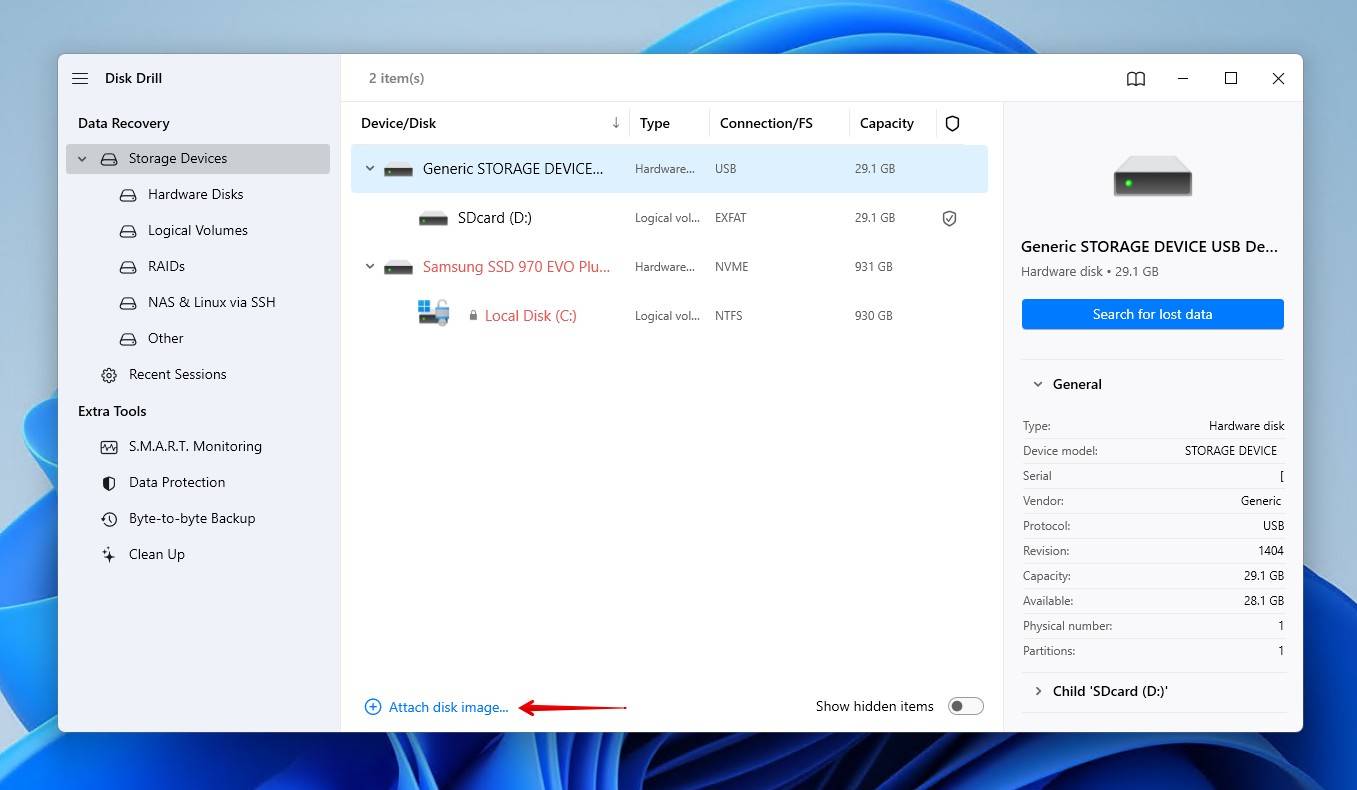
- Select your SD card’s byte-to-byte backup image file you created before, and click on Open.

- The attached backup image file will appear as a virtual device on Disk Drill’s Device/Disk list, with a “Mounted Image” type and a “RAW” file system. Ensure it’s selected and click on Search for lost data.
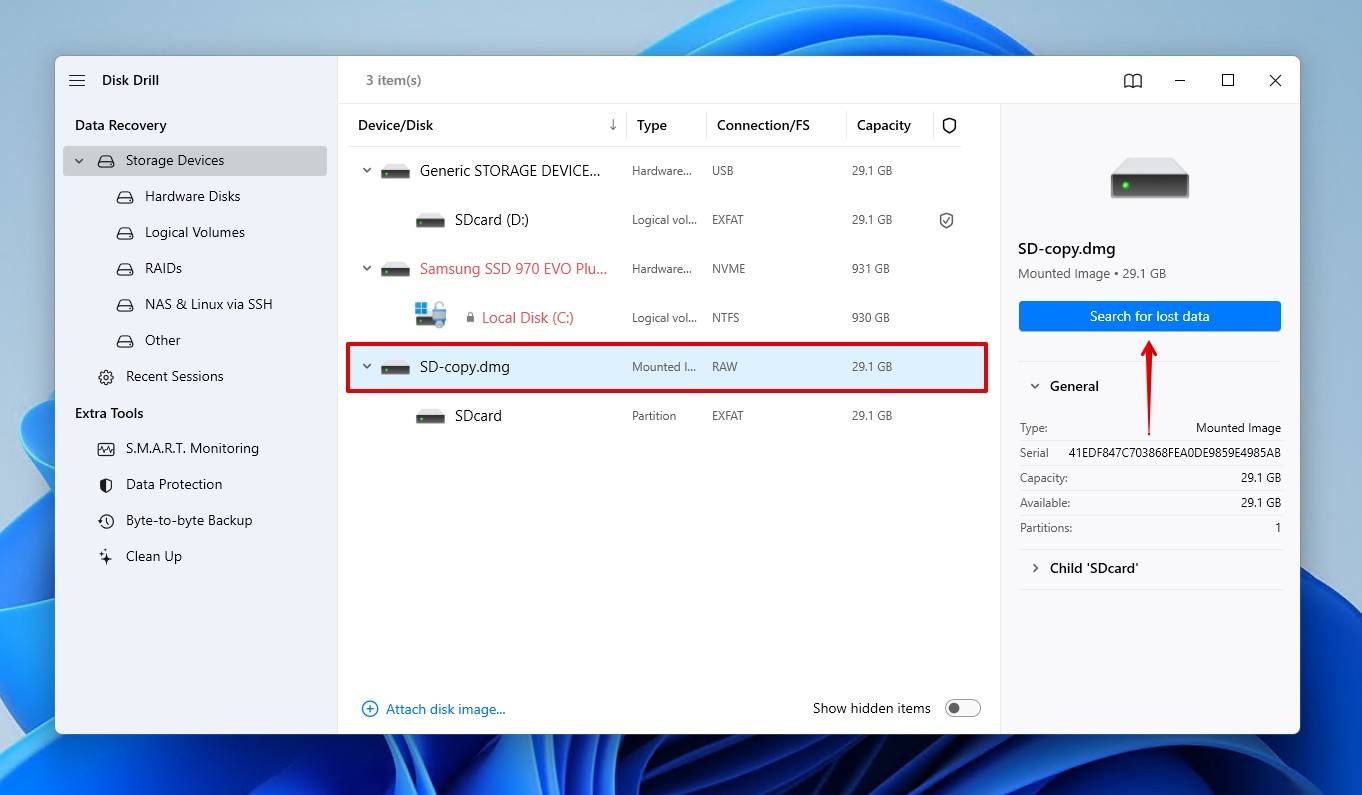
- Give Disk Drill enough time to finish scanning the attached backup image and locate all files stored within it.
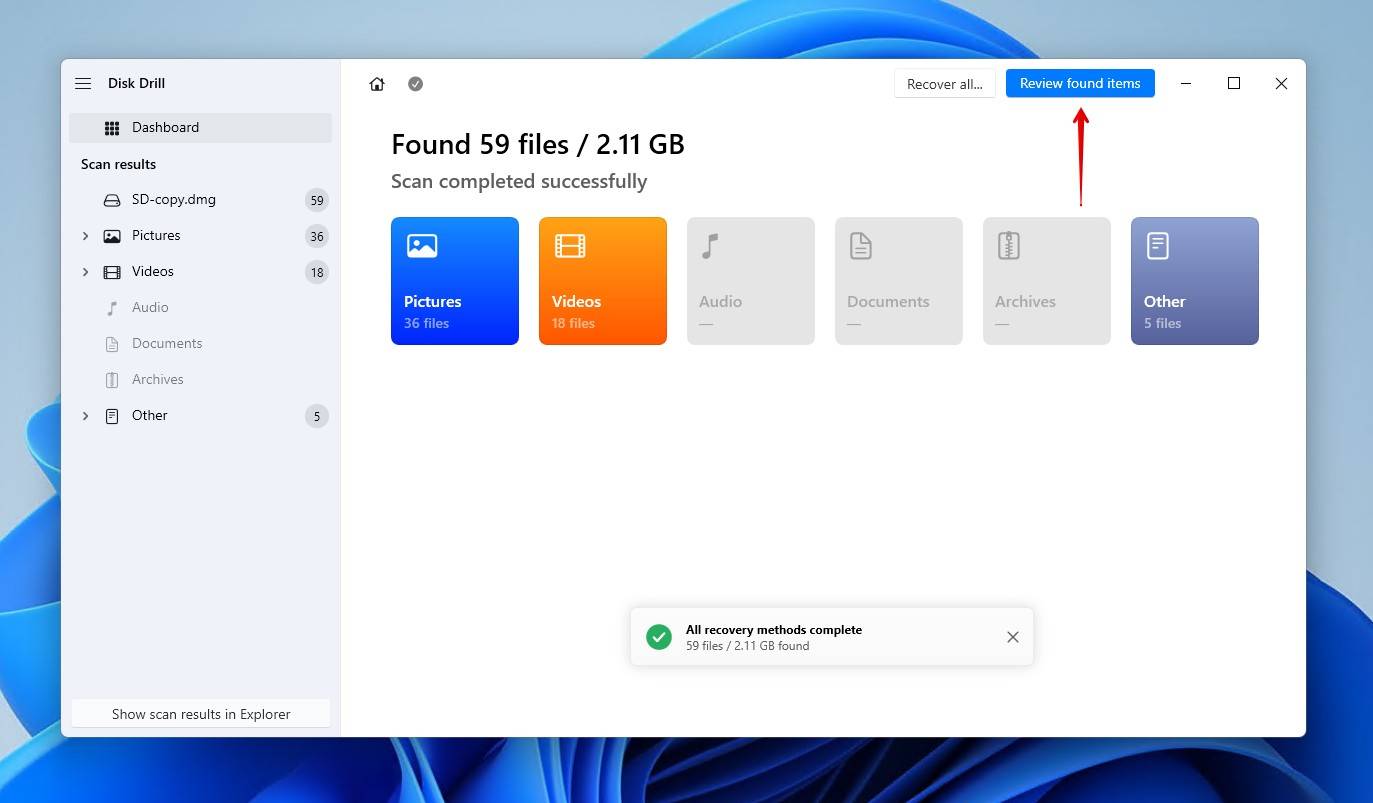
- When the scan completes, click on Recover all to get back all your files or Review found items if you want to recover some of them selectively. For this article, we’ll go with the second option.
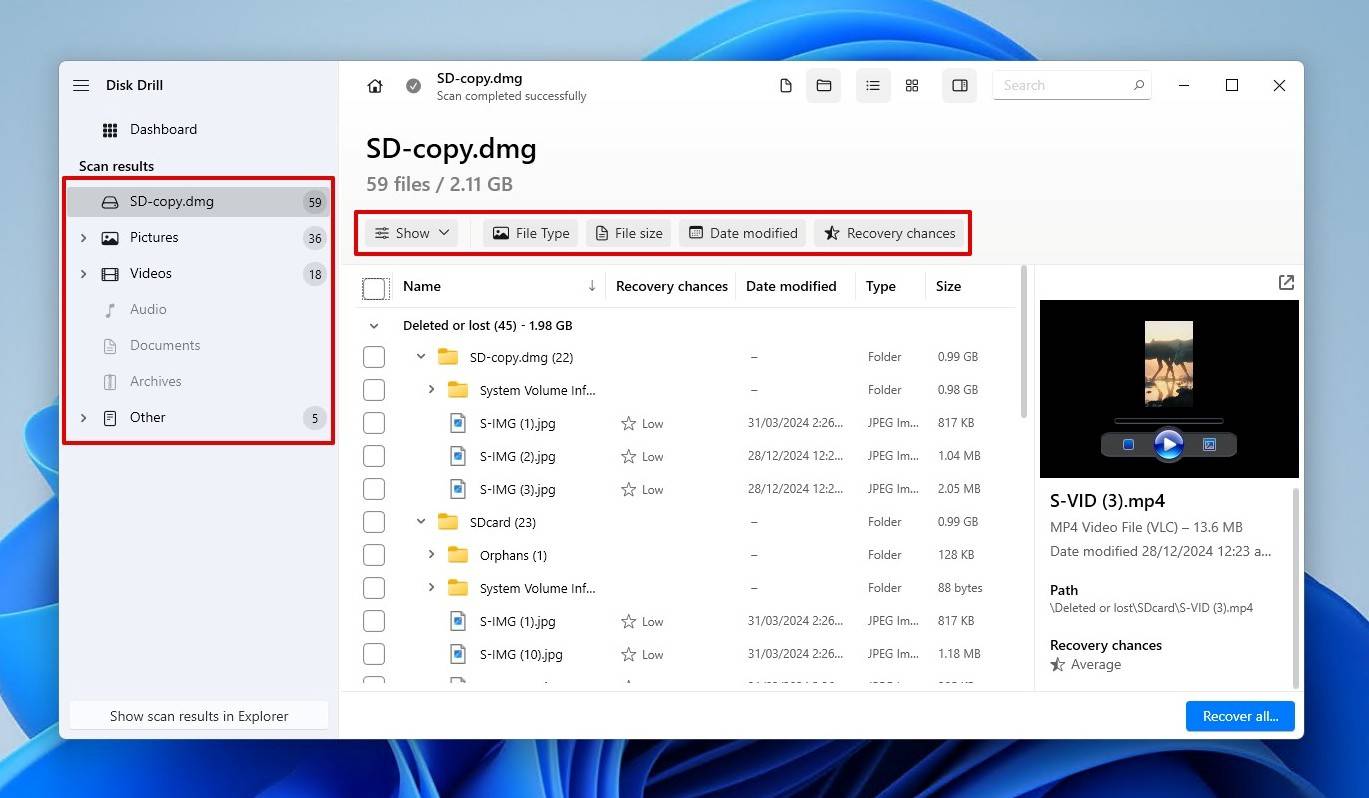
- Given that none of your data was lost or deleted, all of your recoverable files will appear under the Existing dropdown section. Use the categories on the left and the filters on top of the results list to effortlessly locate the files you want to get back out of the backup image.
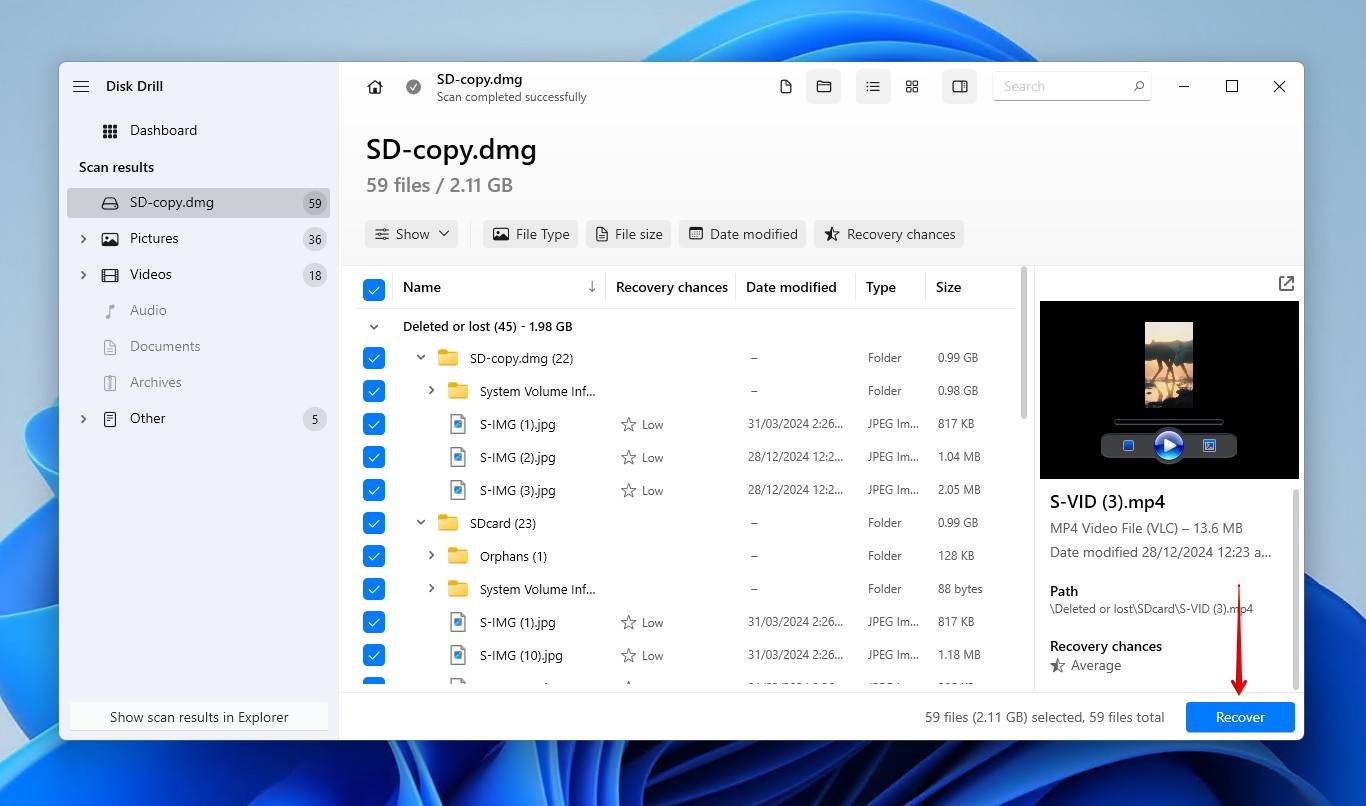
- Place a checkmark on the left of all the files you want to get back, and when done, click on Recover.
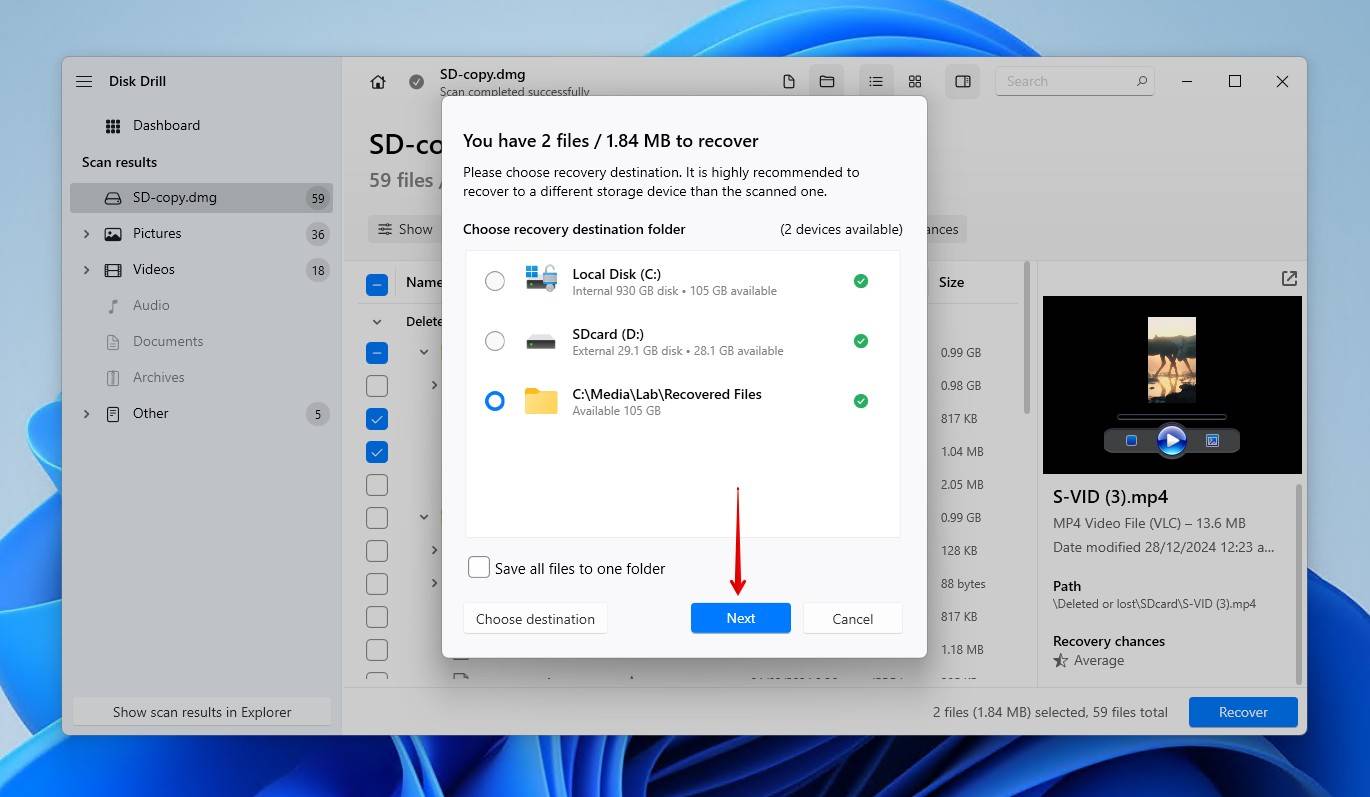
- Select where you want to store the recovered files. You can choose to restore them back to your SD card. Still, for this article, since we wanted to keep it empty for use with a camera, we decided to recover them to a folder named “Recovered_Files” on our PC’s system (“C”) drive.
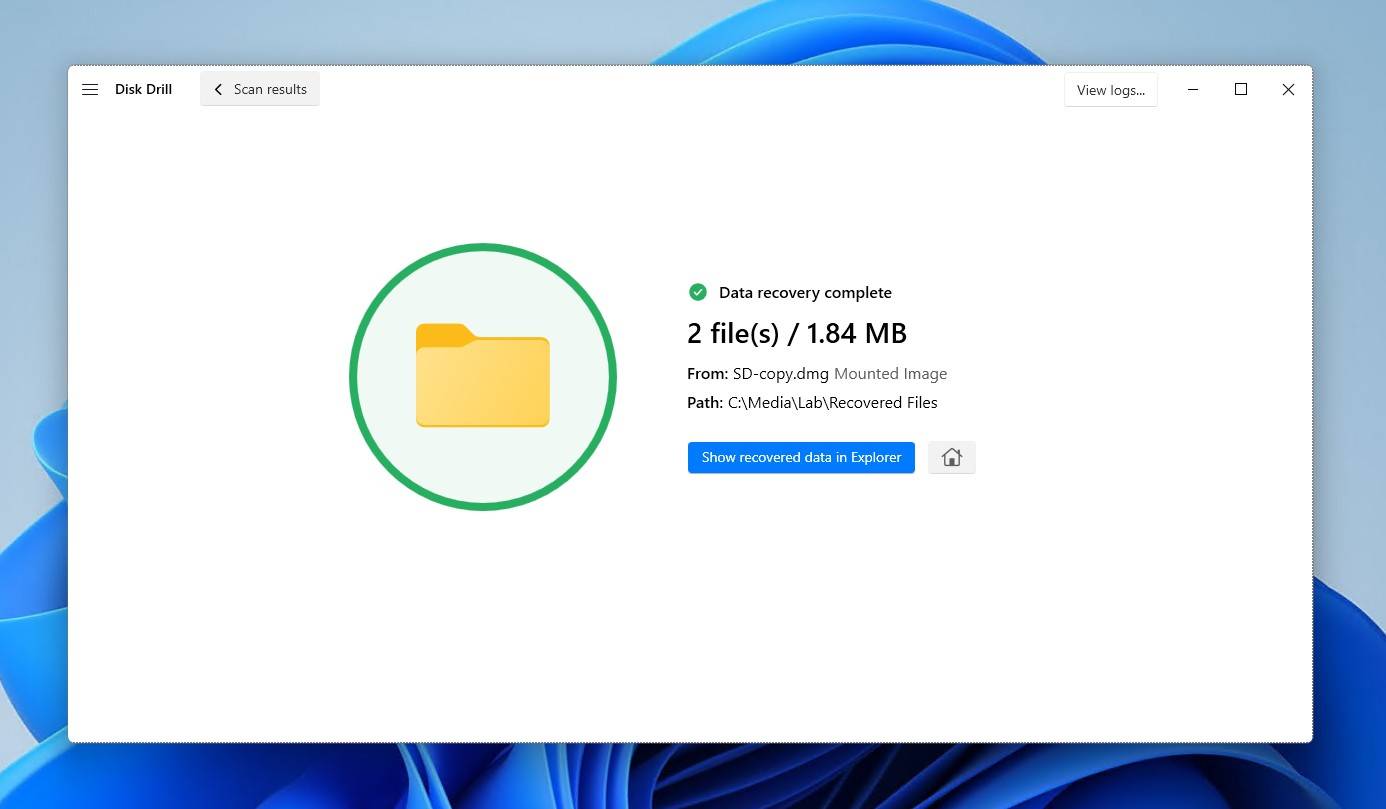
- Soon after, Disk Drill will inform you about the outcome of the process and offer the option to quickly jump to the folder where it recovered your files with a click on Show recovered data in Explorer.
FAQ
Using any file manager, you can manually copy the files from your SD card to another device. However, it’s better to use a specialized solution that takes complete byte-to-byte backups since it can copy everything from your SD card.
If you first take a complete backup of your SD card, you can get back all your files from that backup afterward.
If you skip that crucial step, it’s still possible to recover most of your files from a newly-formatted SD card using a data recovery tool like Disk Drill, but only if:
- You performed a quick instead of a full format (or a secure-erase process).
- You didn’t use it afterward (using it could overwrite some of the files you want to recover).
There are many ways you can fix an SD card without formatting it. You can use tools like CHKDSK, Diskpart, or the Repair Tool, which are built into all modern versions of Windows. For more info on that, check our article on how to fix corrupted SD cards.
You might find yourself having to format an SD card for various reasons, like:
- A new device where you’re trying to use it might be incompatible with its existing format.
- Its file system might have become corrupted after an interrupted writing process.
- The SD card might be failing.
Conclusion
In this article, we saw how you can format memory cards without losing data by first taking a complete byte-to-byte image of everything stored on them.
Still, even if you forgot or skipped taking a backup, you’ll probably be able to recover most of your files from a quick-formatted SD card using a data recovery app like Disk Drill.
And if that fails or you don’t want to spend your time trying to bring back your lost files with questionable results, you can consult a data recovery service for the best results.
However, the alternatives demand time, effort, or may come with a cost, and none can offer guaranteed results, making the backup route the optimal (and saner) choice.