If you’re like me and have recently purchased a new M4 Mac, you might be thinking about selling your old Mac. Or maybe you’ve decided to stick with your current Mac for another year or two and would like to clean it up to improve its performance. It’s also possible that you’re experiencing serious stability issues that require a fresh start.
Whatever your situation, performing a clean install of macOS Sequoia (the latest version of macOS at the time of writing this article) is a logical next step. In this guide, I’ll show you exactly how to fresh install macOS and get your Mac running like new again.
What Happens When You Clean Install macOS

When you perform a macOS clean install, you’re essentially returning your Mac to its factory state – just like the day you first unboxed it. This means wiping away all your personal data, third-party applications, and custom settings. By doing so, you gain the following:
- 🚀 Maximum performance: By removing years of accumulated system clutter, temporary files, and conflicting software, your Mac can operate at its full potential.
- 📂 Freed-up storage: All those forgotten downloads, unused applications, and hidden caches that have been hogging your drive space? Gone.
- 🛠️ Better stability: System issues that have been plaguing your Mac often disappear after a clean installation, as you’re starting with a completely fresh system.
If you’re using a Mac with either a T2 security chip or Apple silicon, the process of performing a clean install of macOS Sequoia is remarkably straightforward. That’s because modern Macs keep the operating system completely separate from user data.
When you make changes to your Mac, such as installing applications, changing settings, or creating documents, all changed data is kept separate from the system volume and encrypted by hardware before being written to disk. To wipe everything, all you need to do is discard the encryption key. Then you can install/reinstall macOS Sequoia to update the system volume to the latest version.
Before You Begin: Important Preparation Steps
While you might be eager to perform a clean install of macOS Sequoia, rushing through the preparation steps could lead to headaches later. There are two important things you need to do: verify that your Mac can actually run Sequoia and back up all your important data.
Step 1: Verify macOS Sequoia Compatibility
If your goal is to fresh install macOS Sequoia in the cleanest way possible, you first need to confirm that your Mac is compatible. Here’s a list of supported models:
| Mac Model | Compatible Versions |
| MacBook Pro | 2018 and later (including all M-series models) |
| MacBook Air | 2020 and later (including Retina and M-series models) |
| iMac | 2019 and later (including 21.5-inch, 24-inch, and 27-inch models) |
| iMac Pro | 2017 |
| Mac mini | 2018 and later (including M-series models) |
| Mac Studio | All models (2022 and later) |
| Mac Pro | 2019 and later |
Step 2: Back Up All Important Data
Performing a clean install of macOS means erasing everything on your drive, so it’s paramount that you back up all important data. You have three main backup options:
- 💽 Manual local backups. Copy your essential files onto an external hard drive or USB stick (even if the storage device already contains some other data).
- ☁️ Manual cloud backups. Services like iCloud, Google Drive, and Dropbox let you store files in the cloud. Just upload the files you want to keep, and they’ll be accessible from any device with internet access.
- ⏳ Time Machine: This is Apple’s built-in backup solution and my personal go-to method for a Mac clean install. It creates a complete backup of your entire system, including applications, system settings, and all your files. The only problem is that it requires a dedicated external hard drive.
- Connect a suitable external drive to your Mac (must be sufficiently large and empty).
- Open the System Settings (or System Preferences on older versions) app.
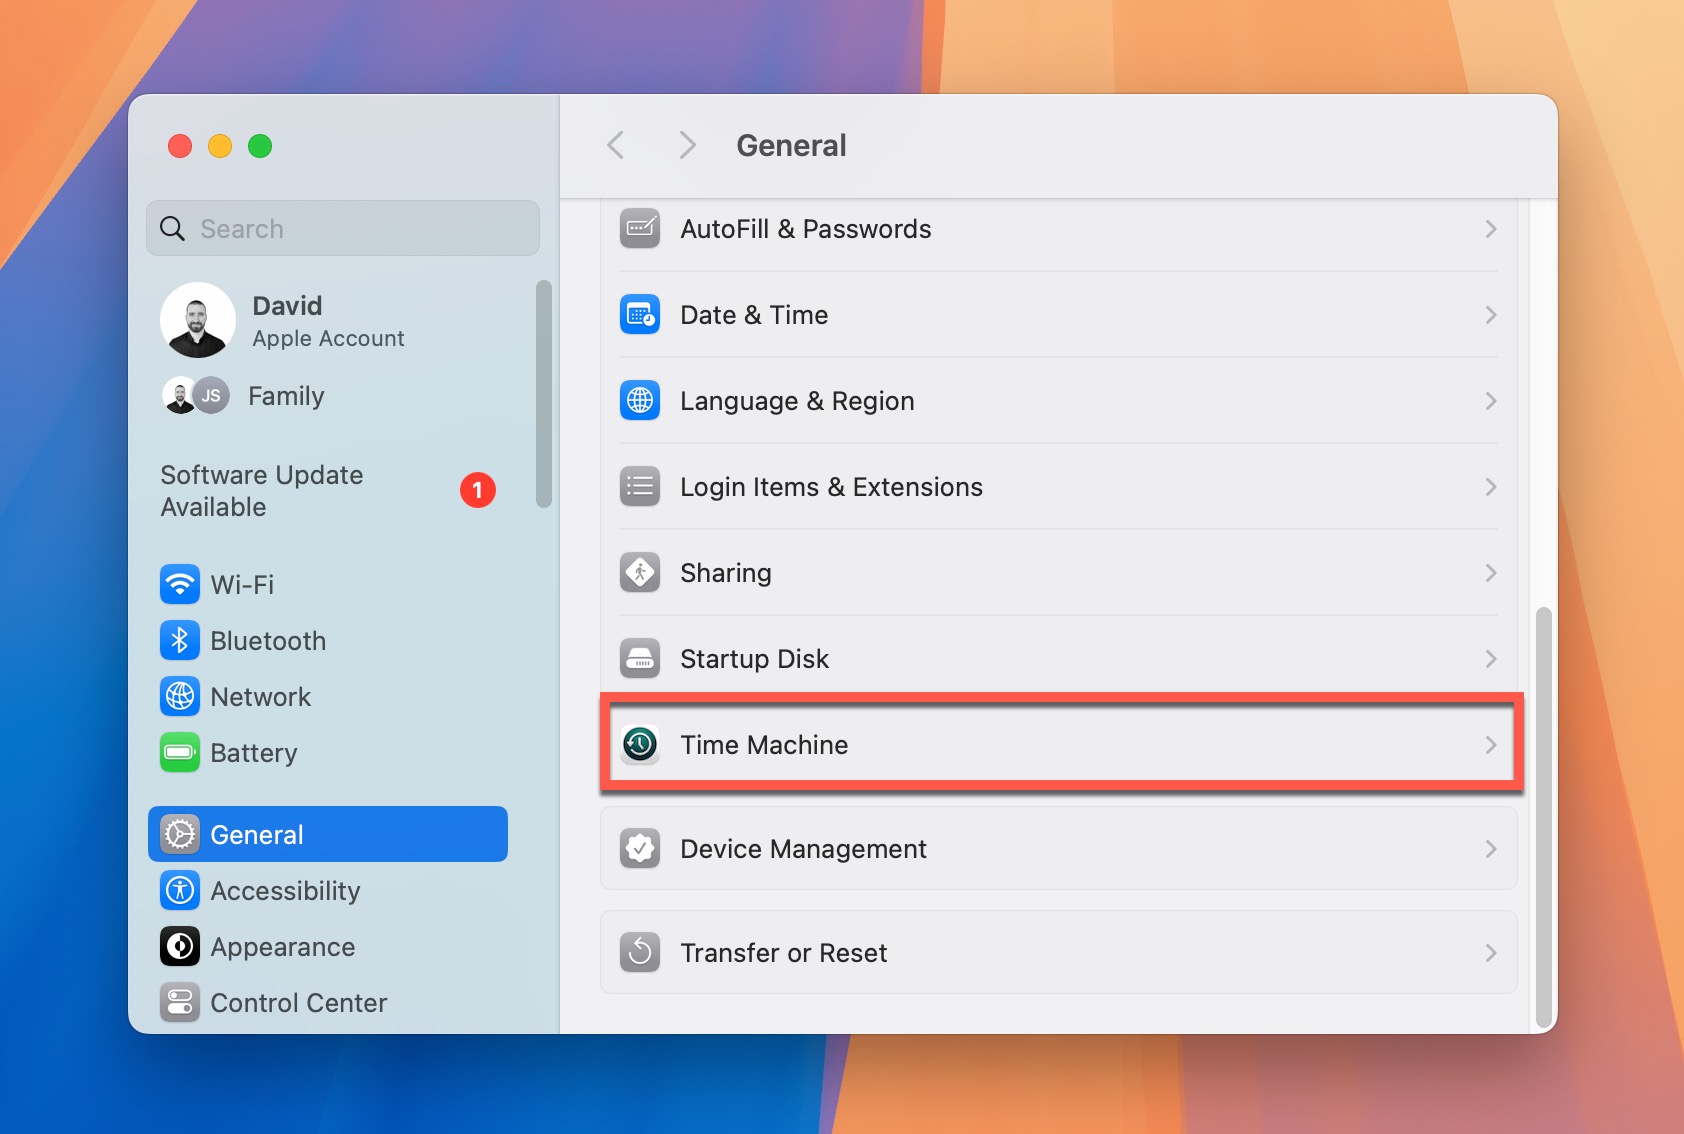
- Go to the General section and then select the Time Machine option.
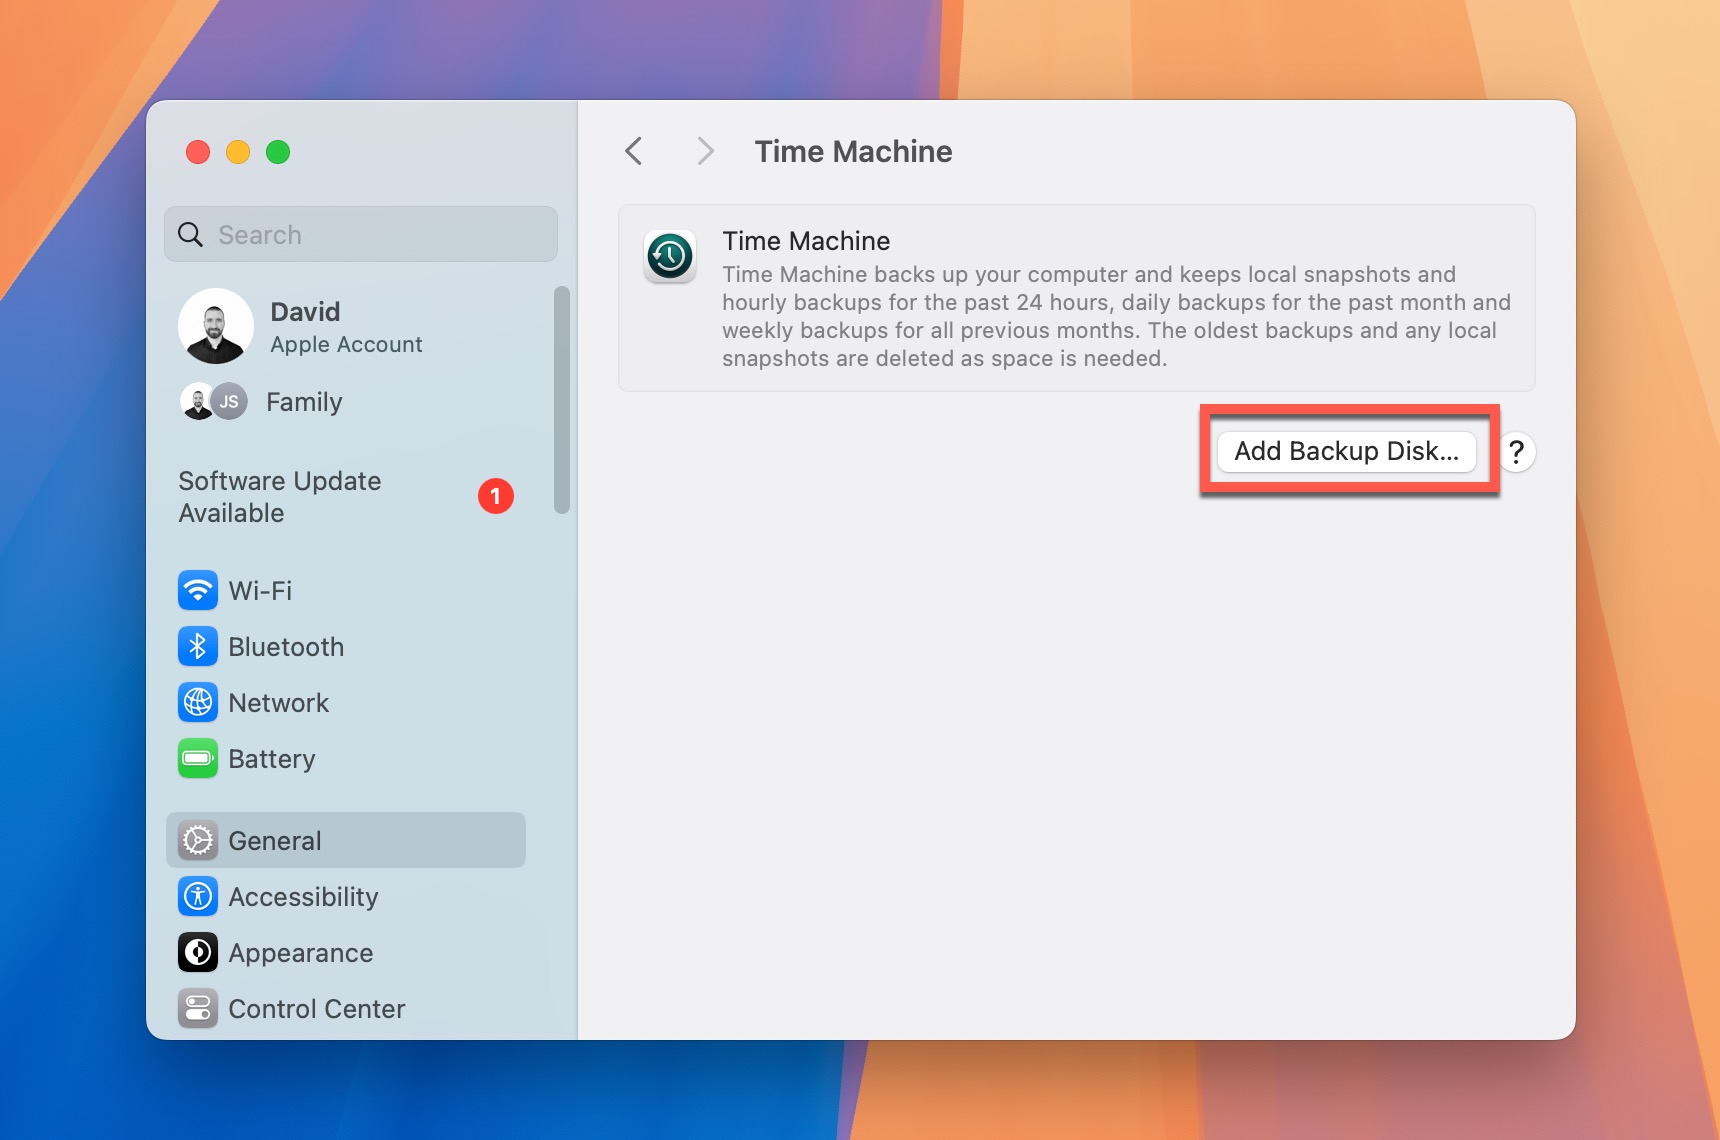
- Click the Add Backup Disk button.
- Select your external drive and choose whether to encrypt your backups (I usually encrypt mine, but it’s not really necessary as long as nobody malicious can access the backup drive).
- Wait for the initial backup to complete (this might take several hours).
However, if you don’t have a sufficiently large external drive, either manual method will work fine—just be extra thorough in checking what you’ve backed up.
Step 3: Deactivate Software Licenses
As your last preparatory step, you want to take a moment to consider any purchased software licenses you want to preserve. Many commercial applications limit how many times you can activate your license.
Deactivating your licenses before wiping your Mac clean helps avoid issues later. I learned this the hard way when I had to spend several days communicating with a software vendor to restore access to an important software tool after a clean install.
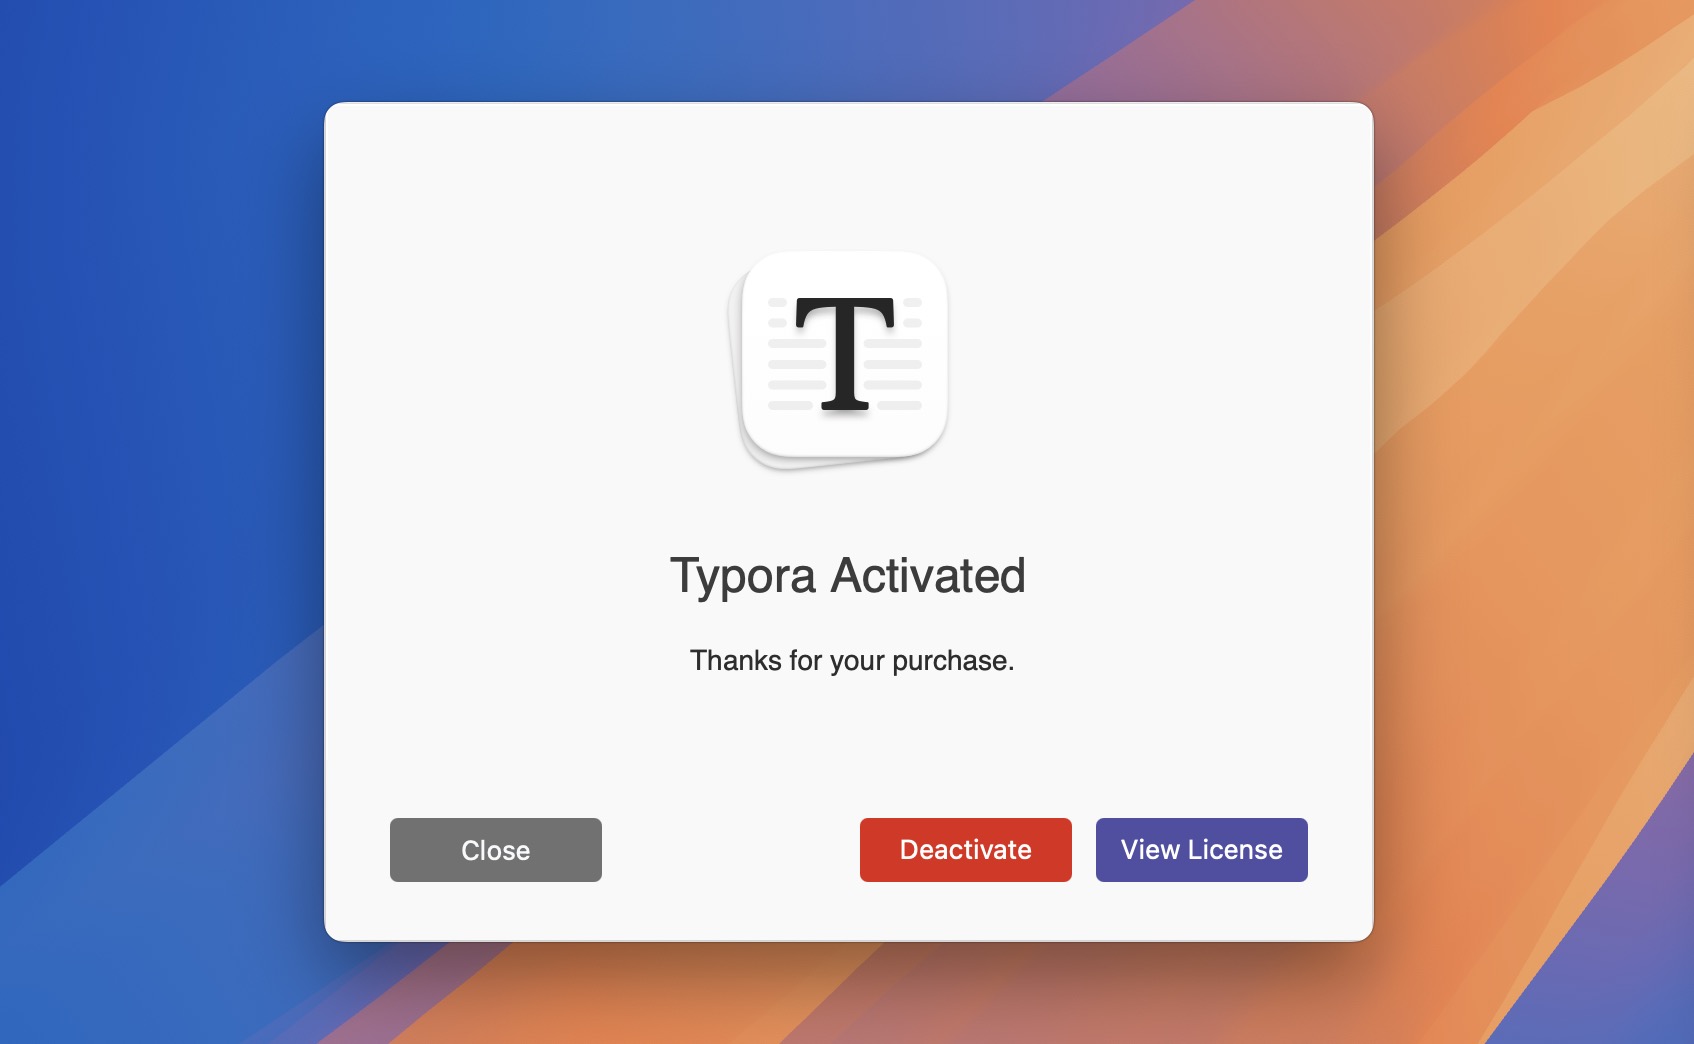
If you’re not sure which of your applications need deactivation, check your Applications folder and make a list of your professional software. Most paid applications have a “Deactivate License” or “Sign Out” option in their preferences or account settings.
Step 1: Upgrade to macOS Sequoia
Upgrading to Sequoia before wiping everything clean might seem counterintuitive at first, but there’s solid logic behind this approach.
As explained earlier, the system volume (where macOS lives) is completely separate from your user data volume on modern Macs and can’t be modified during normal operation unless you’ve deliberately disabled System Integrity Protection (SIP). This separation means that upgrading to macOS Sequoia first won’t affect our ability to get that fresh, clean install we’re aiming for.
Additionally, upgrading first gives you access to all the necessary tools you might need, depending on which of the three clean installation methods you choose.
Method 1: Upgrade to macOS Sequoia from System Settings
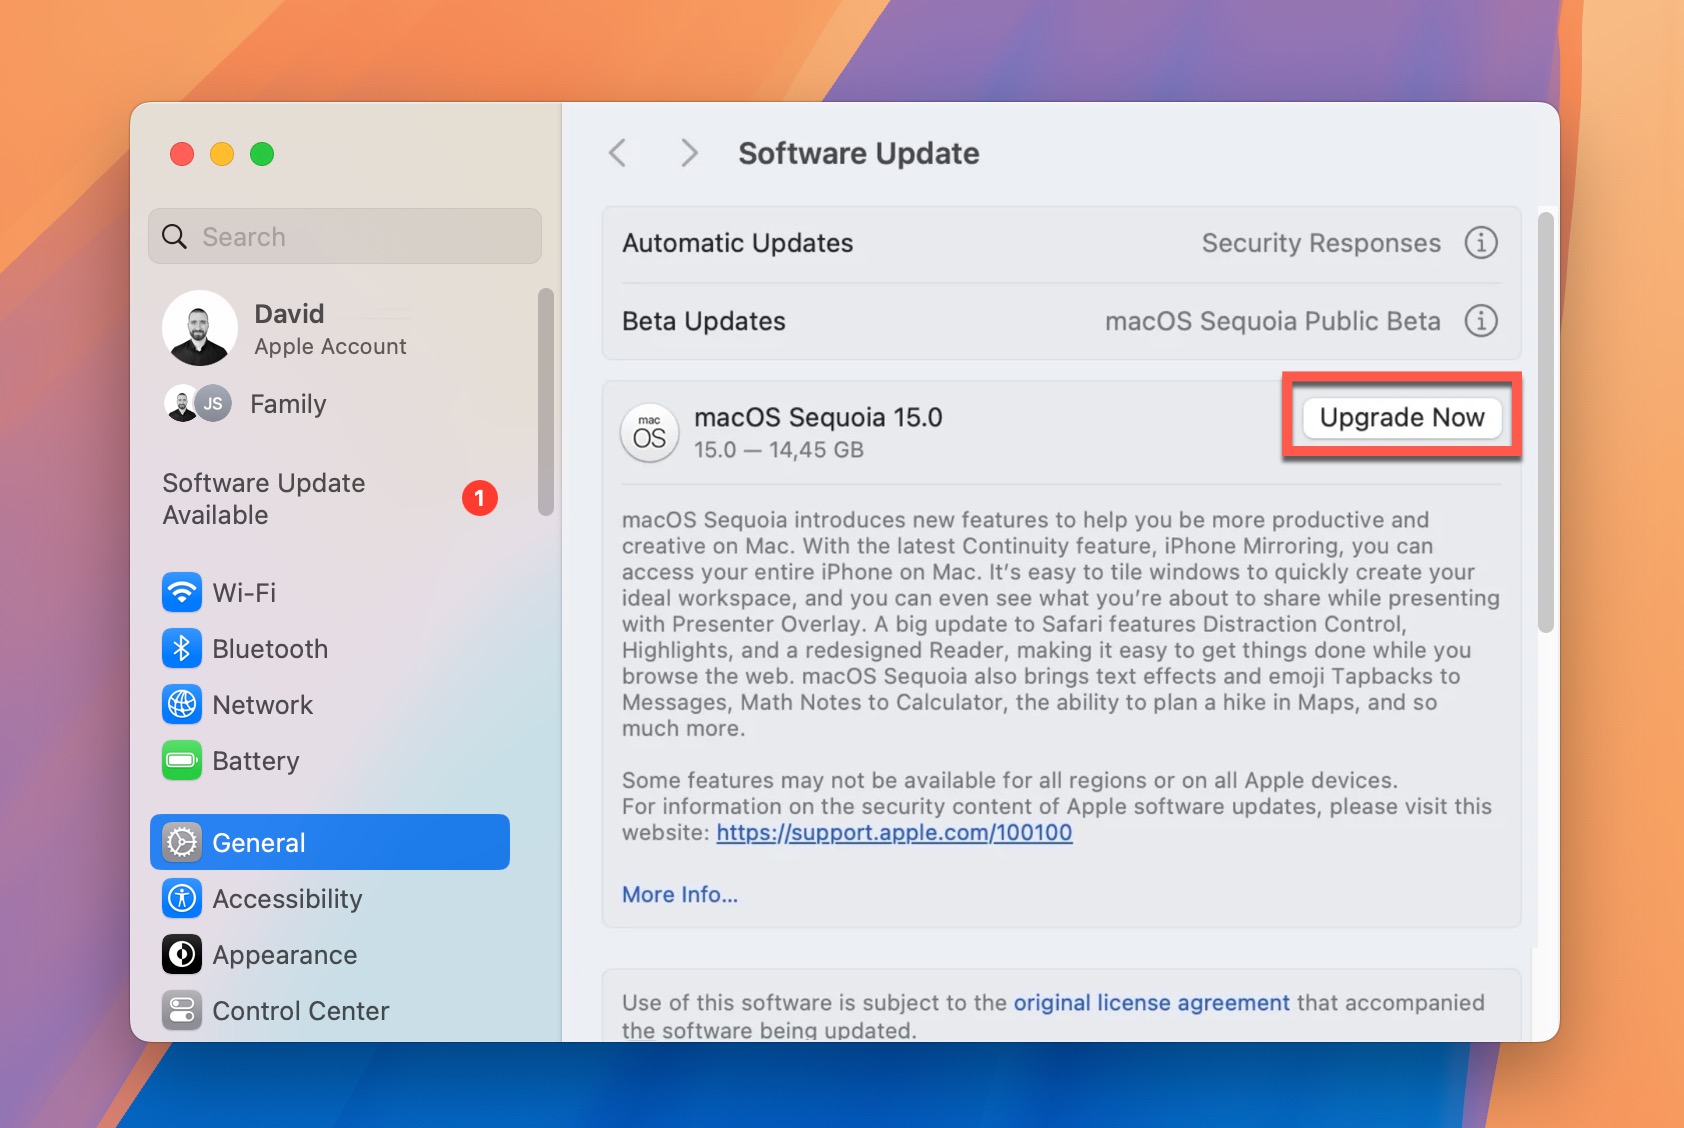
Whenever a new version of macOS becomes available, all users whose Macs are compatible with it, can effortlessly upgrade to it from the Update section of the System Settings app:
- Launch the System Settings app.
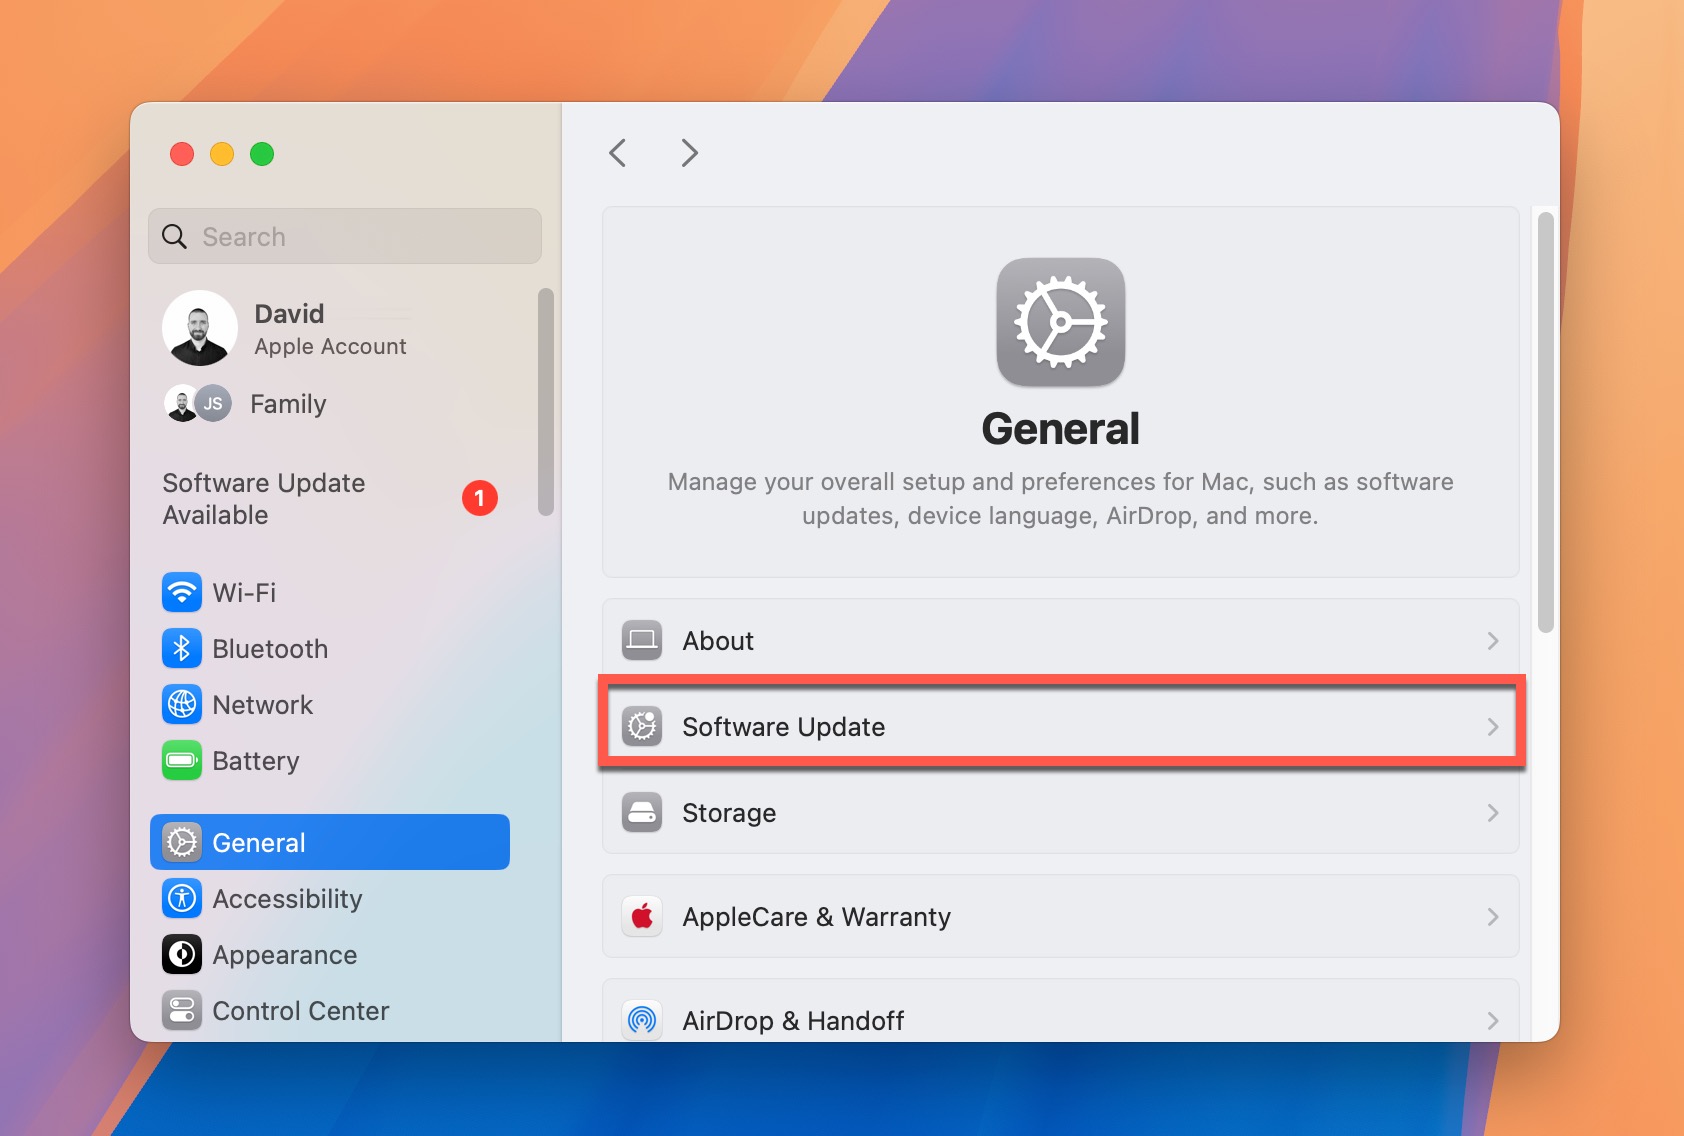
- Click on General in the sidebar, then select Software Update.
- Click Upgrade Now (or Update Now if you currently have an older version of Sequoia installed).
- Wait for the update to download.
- Follow the on-screen instructions to complete the upgrade.
Method 2: Upgrade to macOS Sequoia from App Store
If you don’t see Sequoia in Software Update, you can download it directly from the App Store:
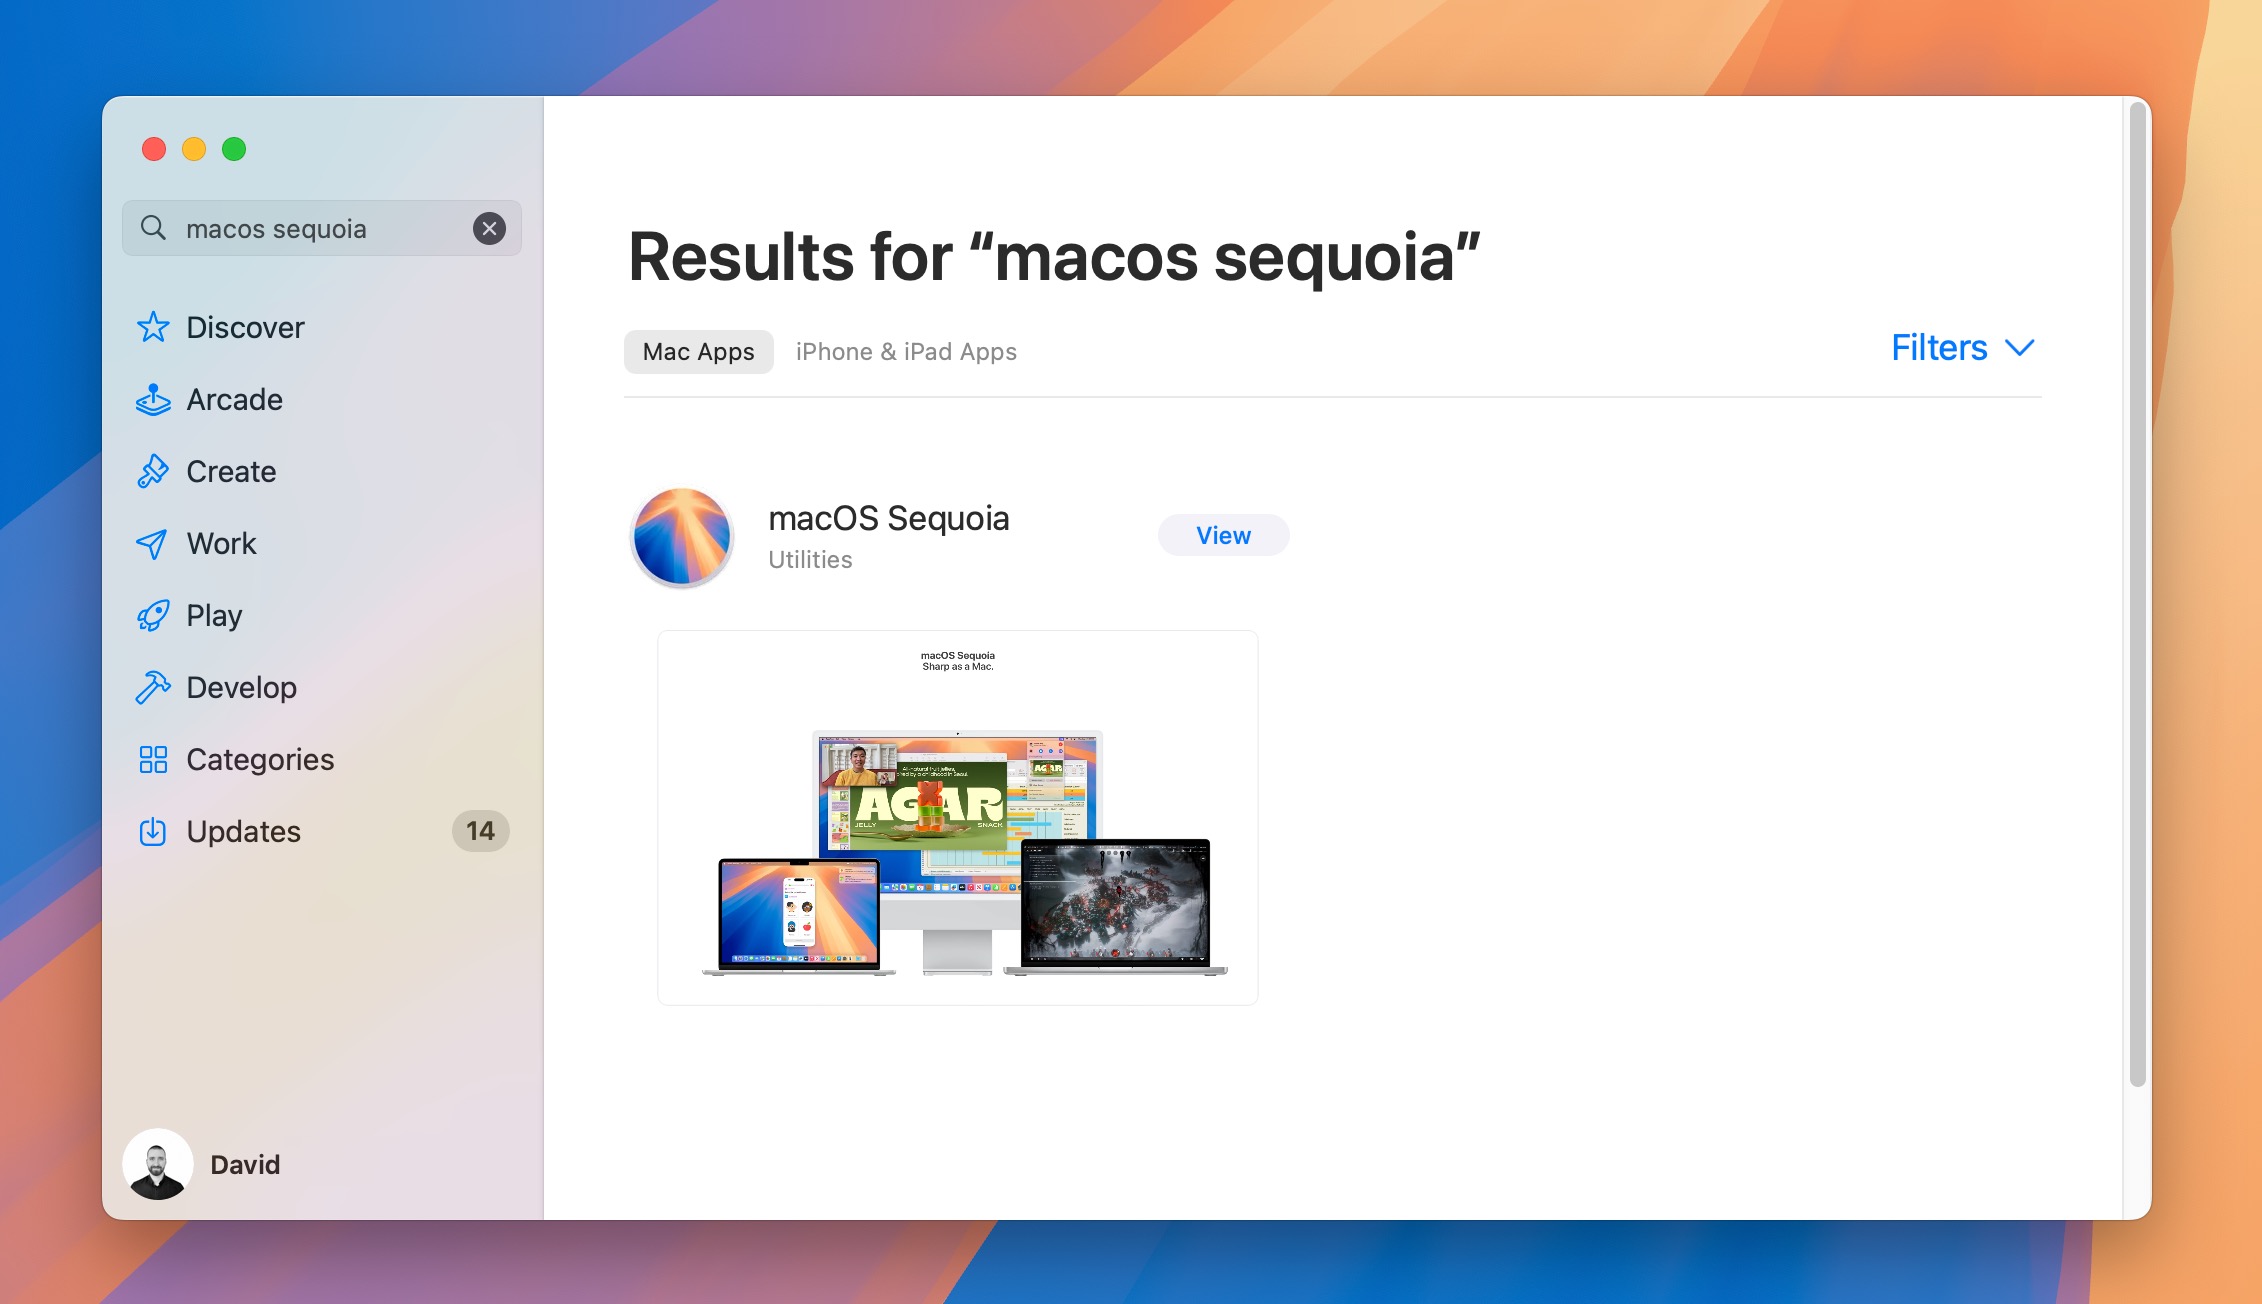
- Launch the App Store app on your Mac.
- Use the search field to find “macOS Sequoia”.
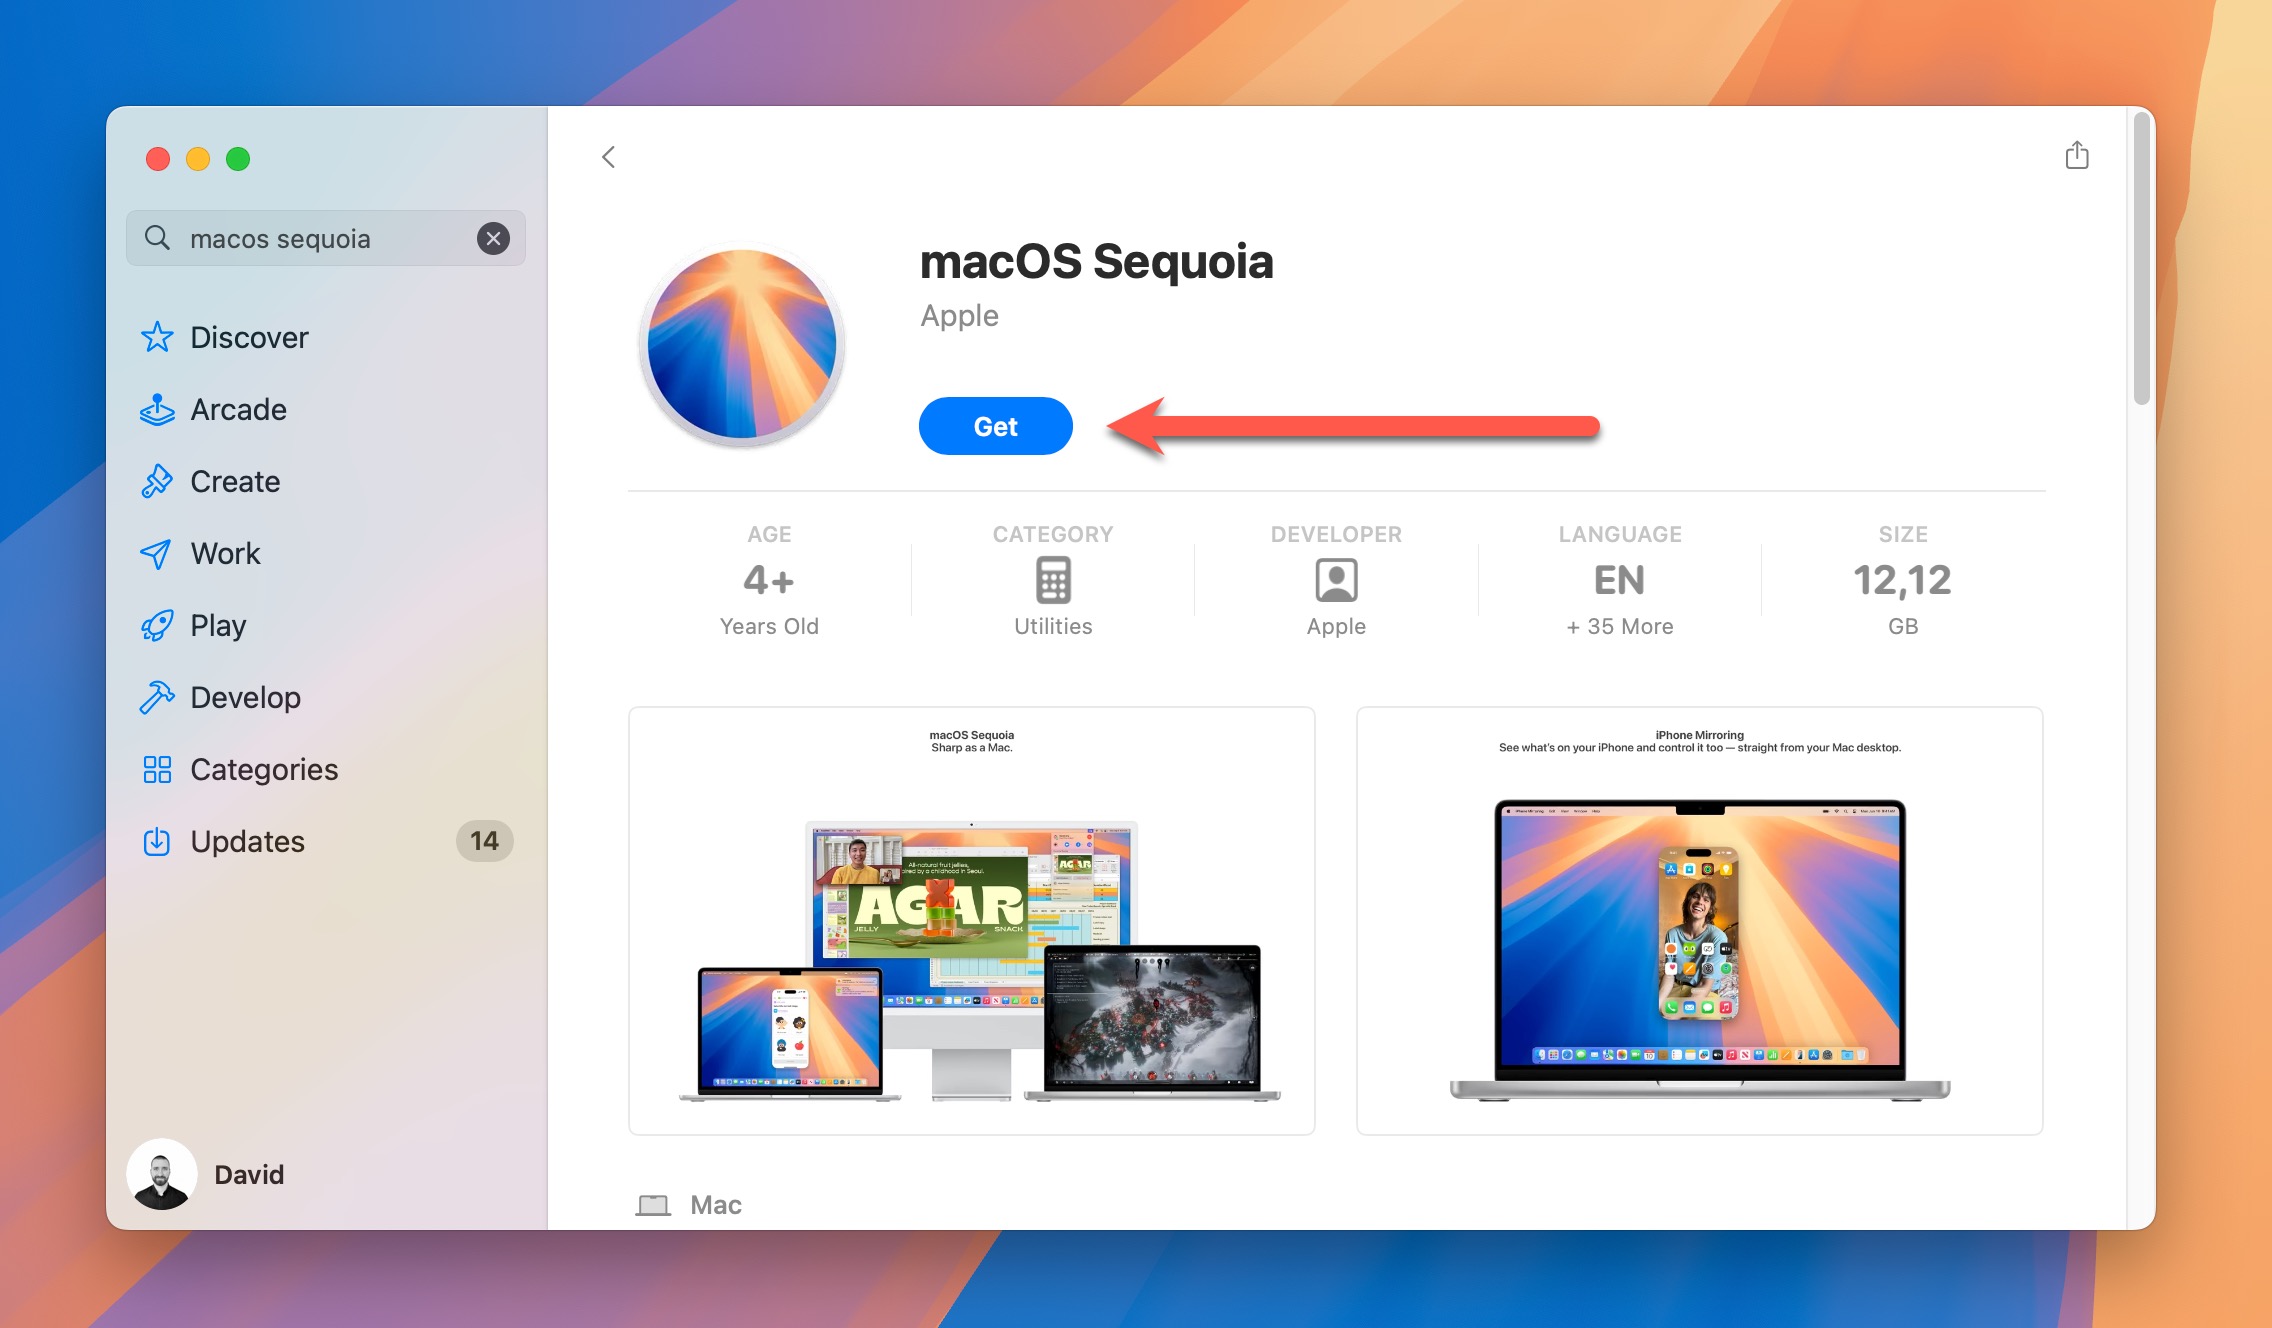
- Click the Get button to begin downloading the installer.
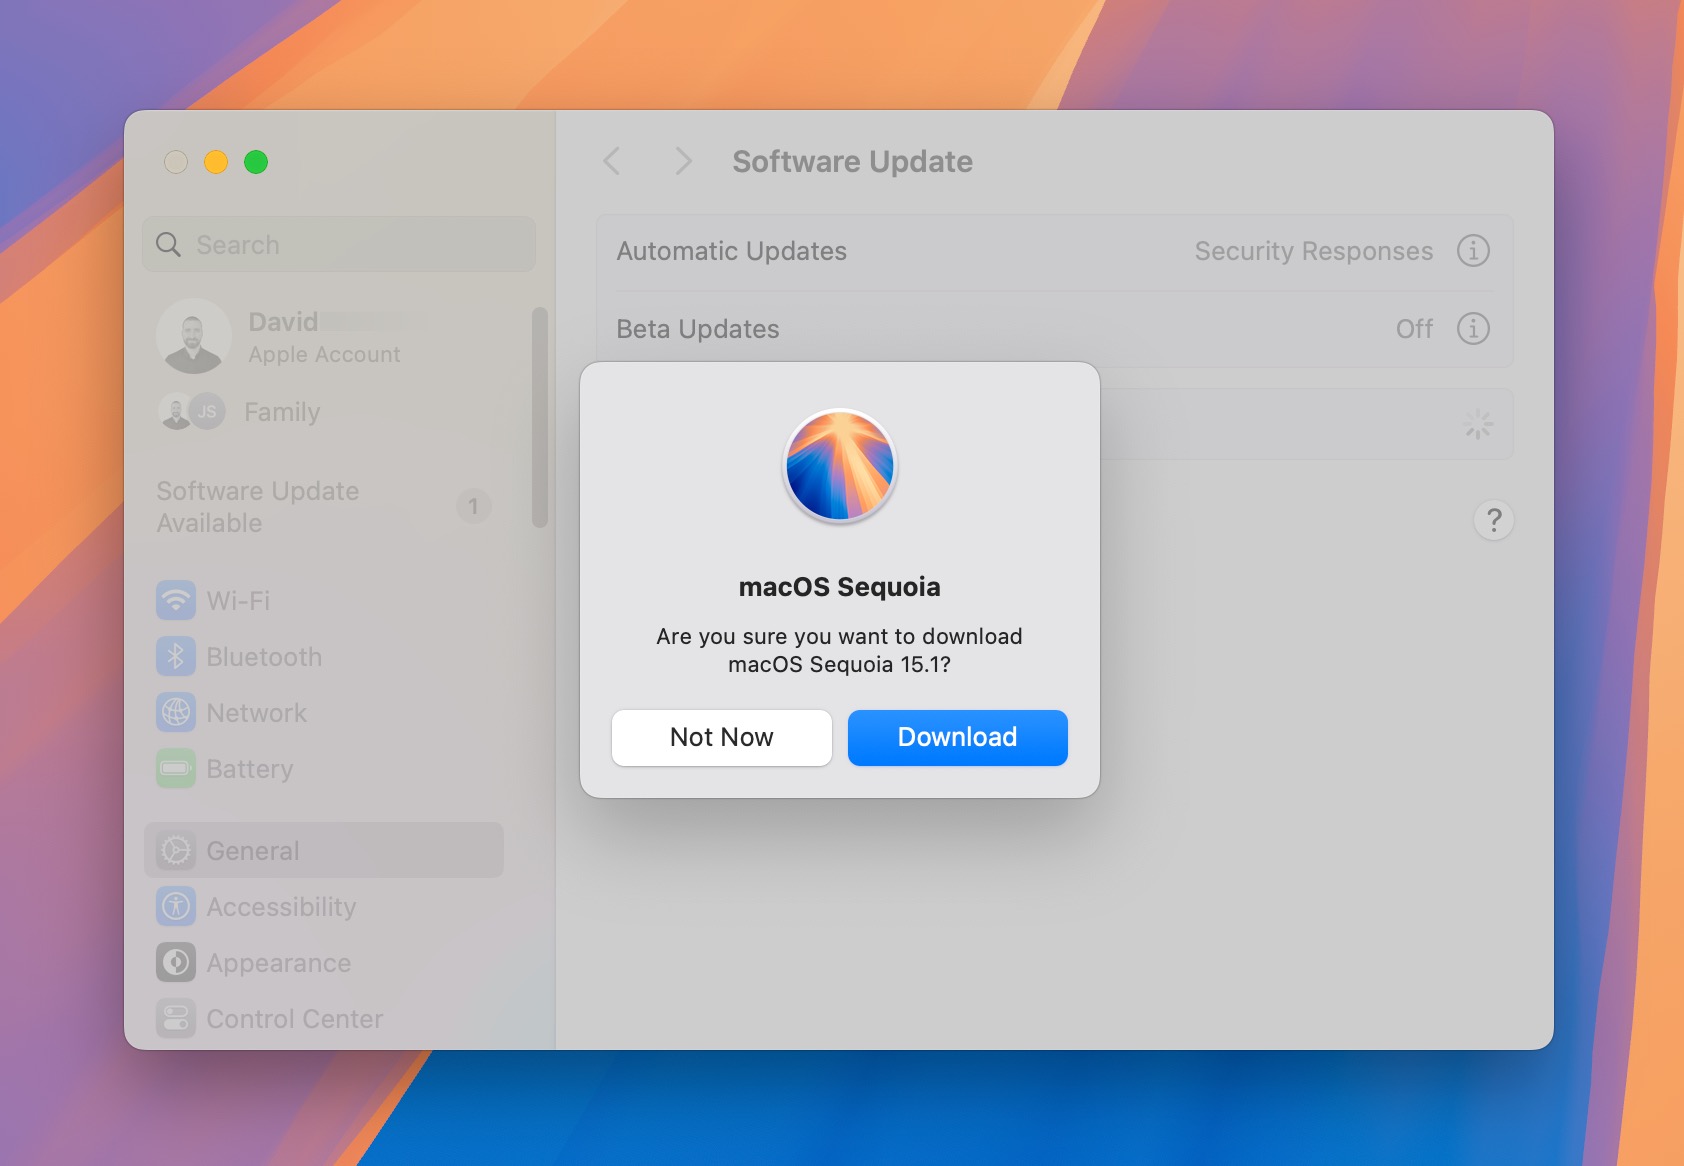
- The System Settings app will open, asking you if you want to download macOS Sequoia. Click Download to confirm.
- Once downloaded, the installer will launch automatically. Follow the prompts to complete the installation.
Method 3: Install macOS Sequoia from a Bootable USB Drive
Creating a macOS Sequoia USB installer gives you more flexibility and can be especially useful if you have multiple Macs to upgrade, your internet connection is slow or unreliable, or you’re planning to perform a clean install on a Mac that can’t run the Erase All Content and Settings feature (that’s quite unlikely because most such Macs can’t run Sequoia).
Here’s how to create a bootable USB installer for macOS Sequoia:
- Prepare your USB drive:
- Connect a USB drive that doesn’t contain anything important to your Mac. It should have at least 16 GB of storage space, but 32 GB is better.
- Launch Disk Utility and select the USB drive in the sidebar.
- Click the Erase option in the toolbar and choose Mac OS Extended (Journaled) as the format.
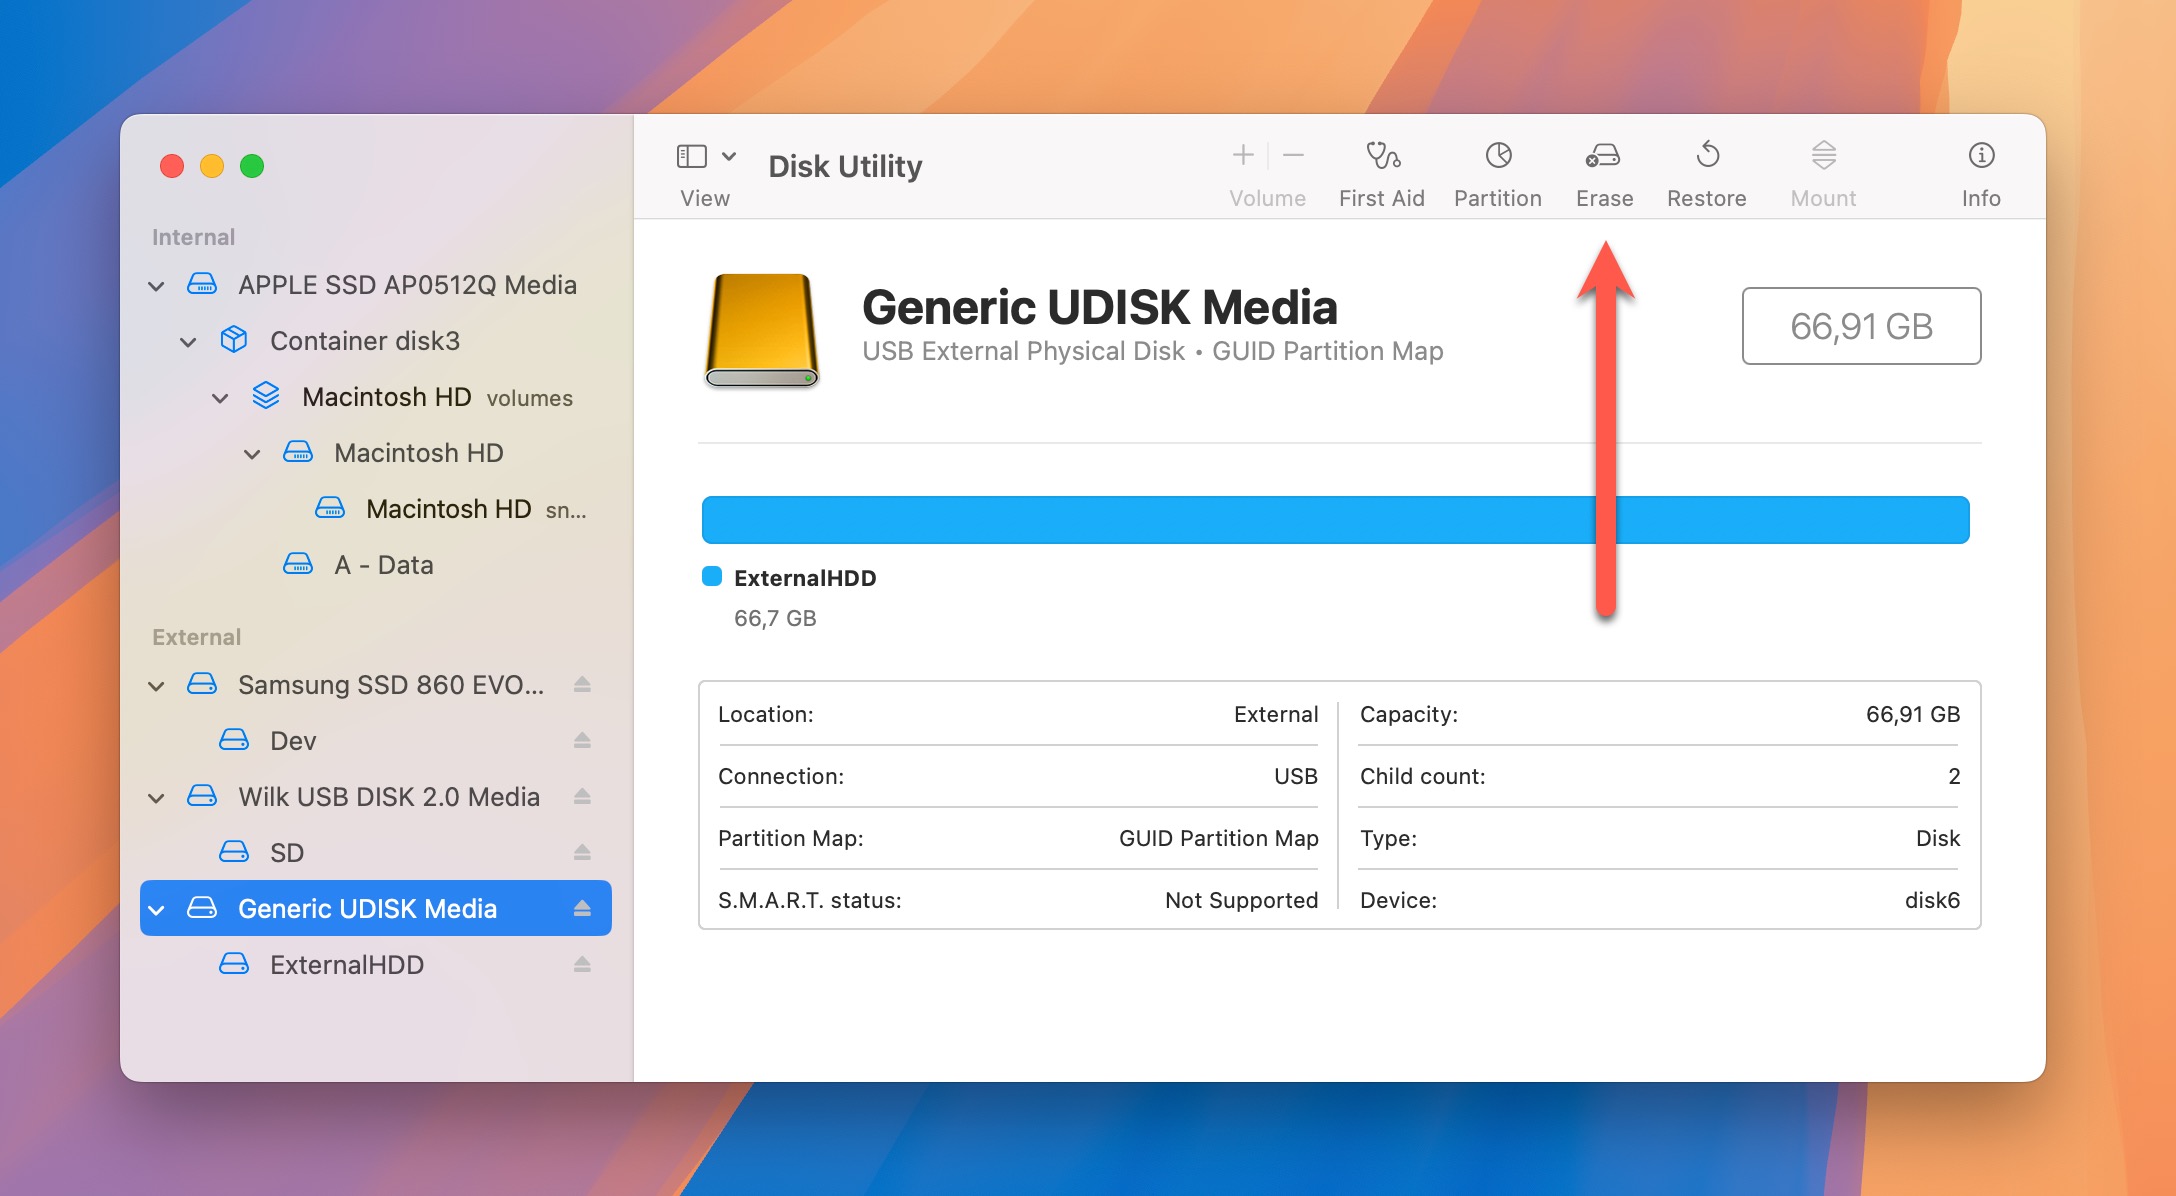
- Click Erase again to confirm.
- Download the macOS Sequoia installer if you haven’t already:
- You can follow the instructions in Method 2.
- Alternatively, you can download it directly from Apple. Mr. Macintosh provides an up-to-date database of macOS installers.
- Create the bootable installer:
- Download the free version of Disk Drill.
- Launch Disk Drill and select the macOS installer tool in the left sidebar.
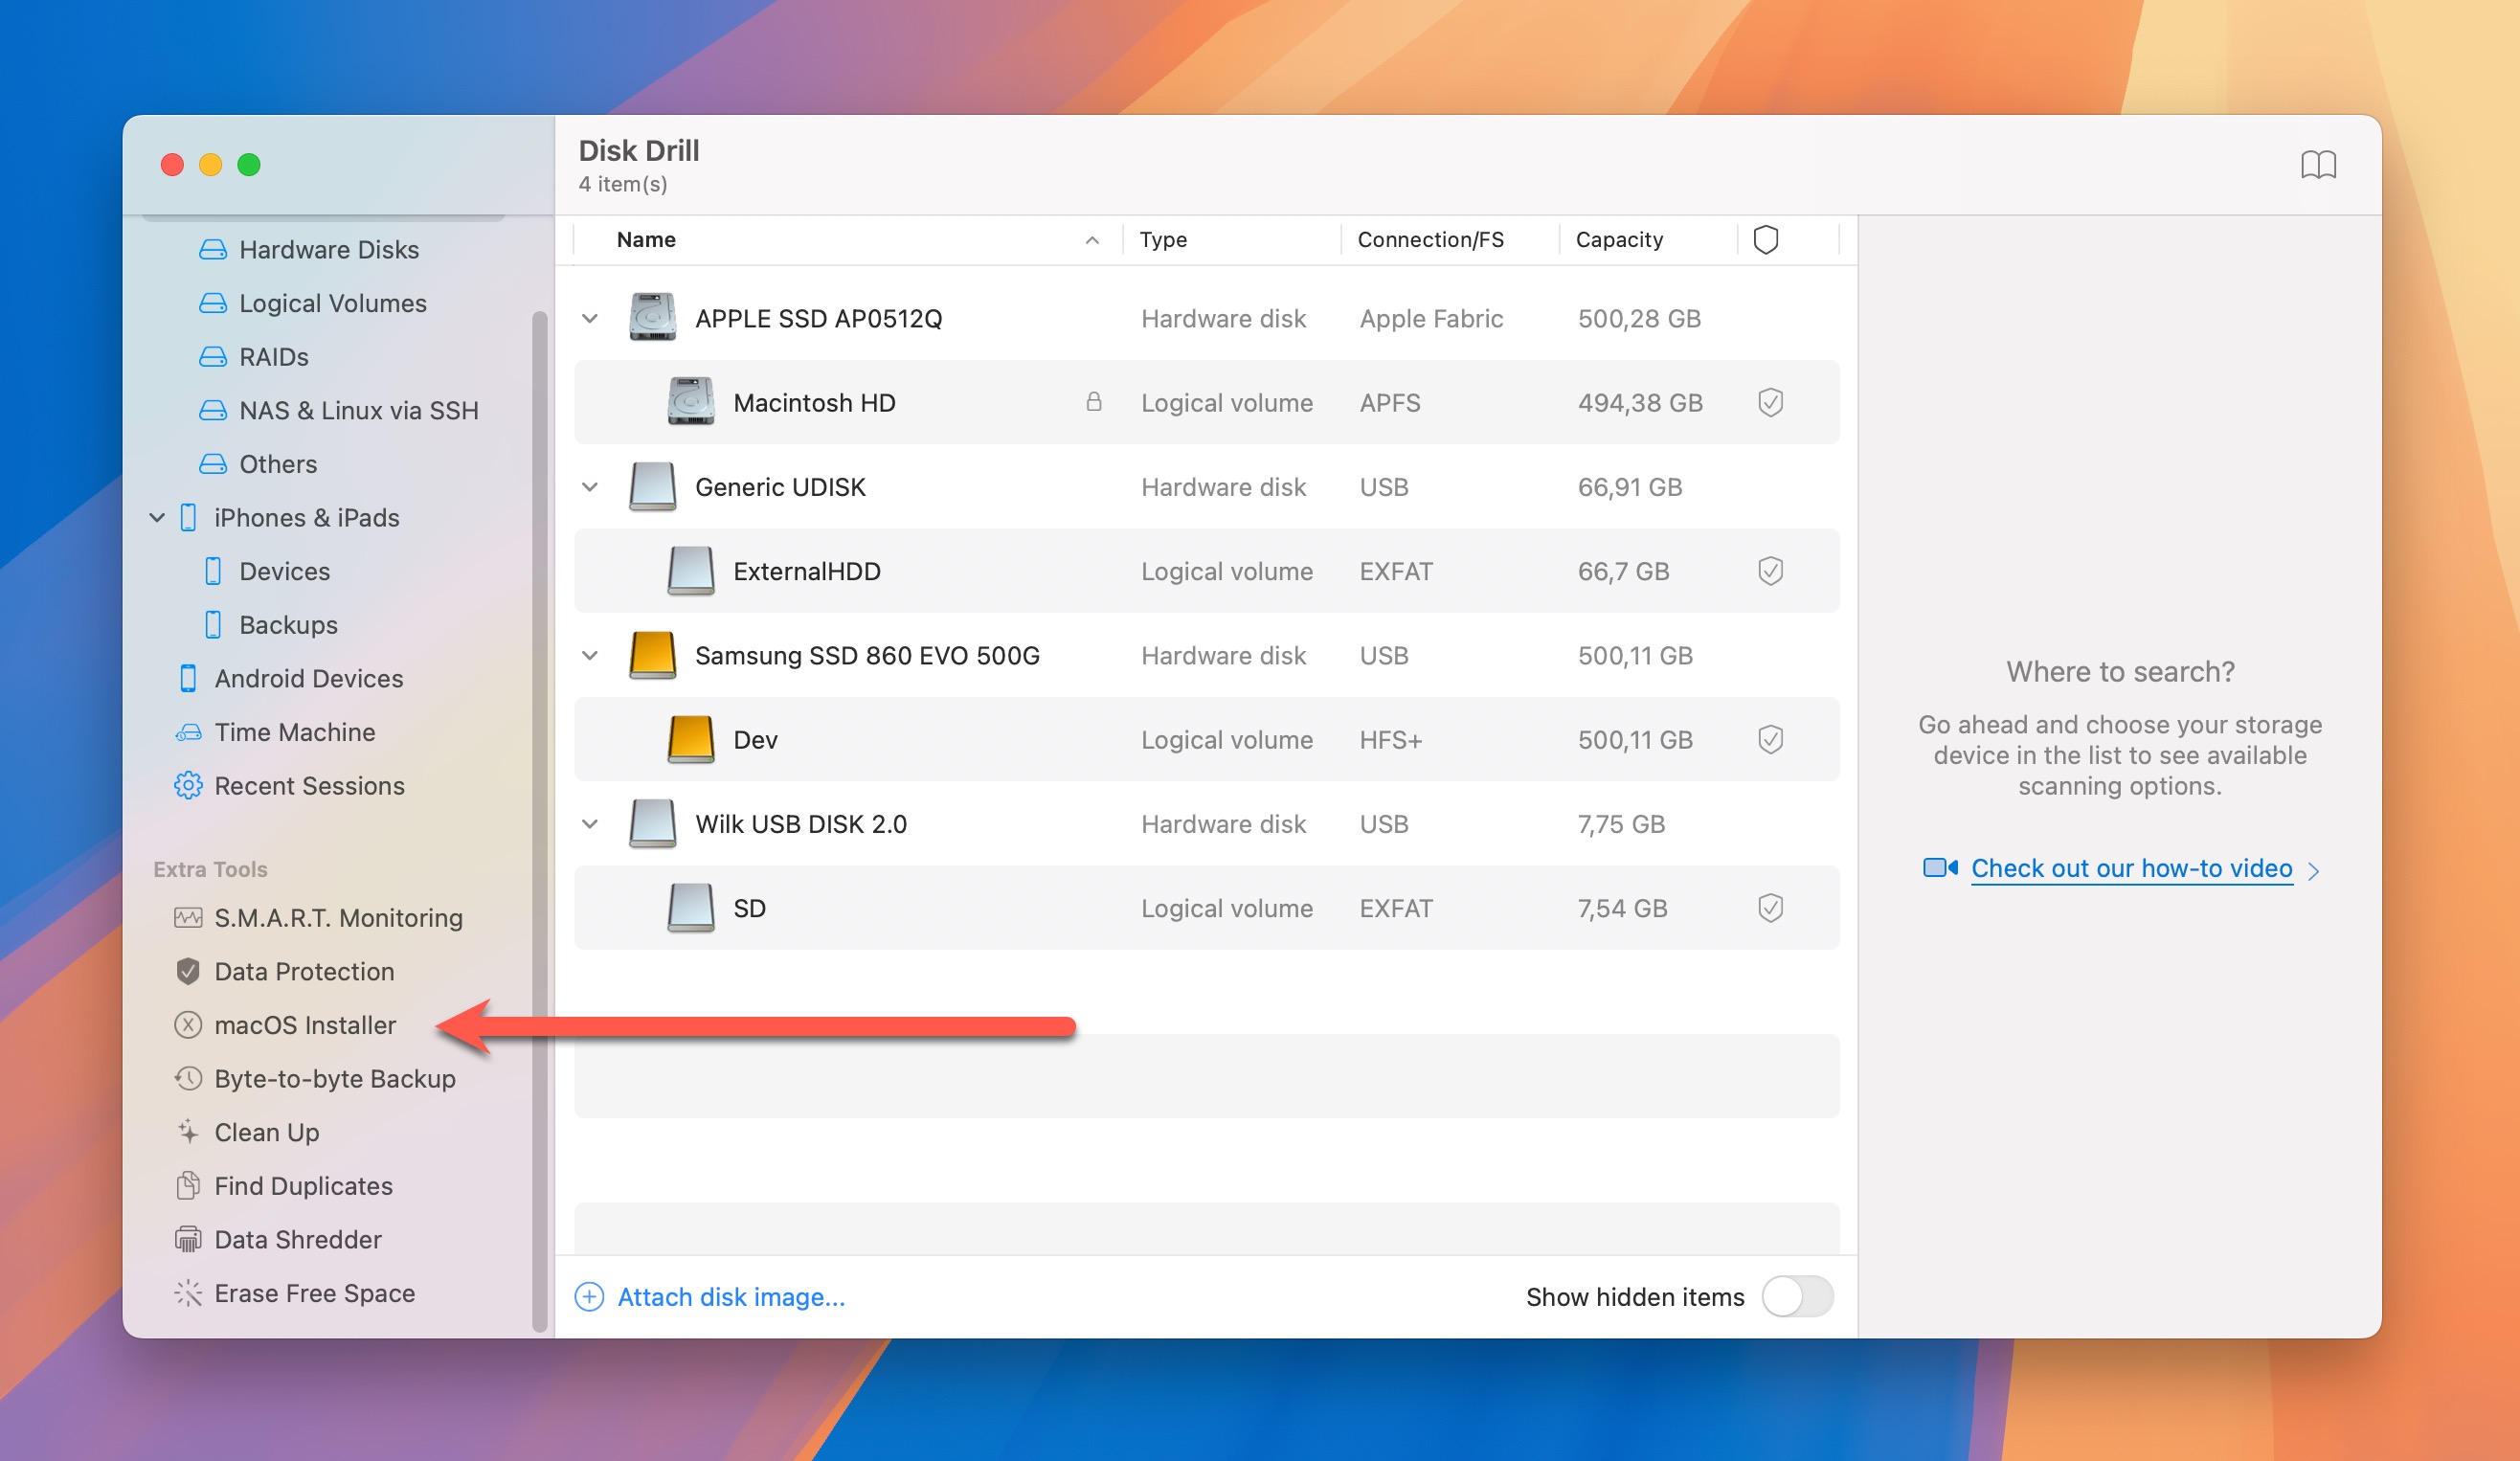
- Choose the macOS Sequoia installer and select your USB drive as the destination.
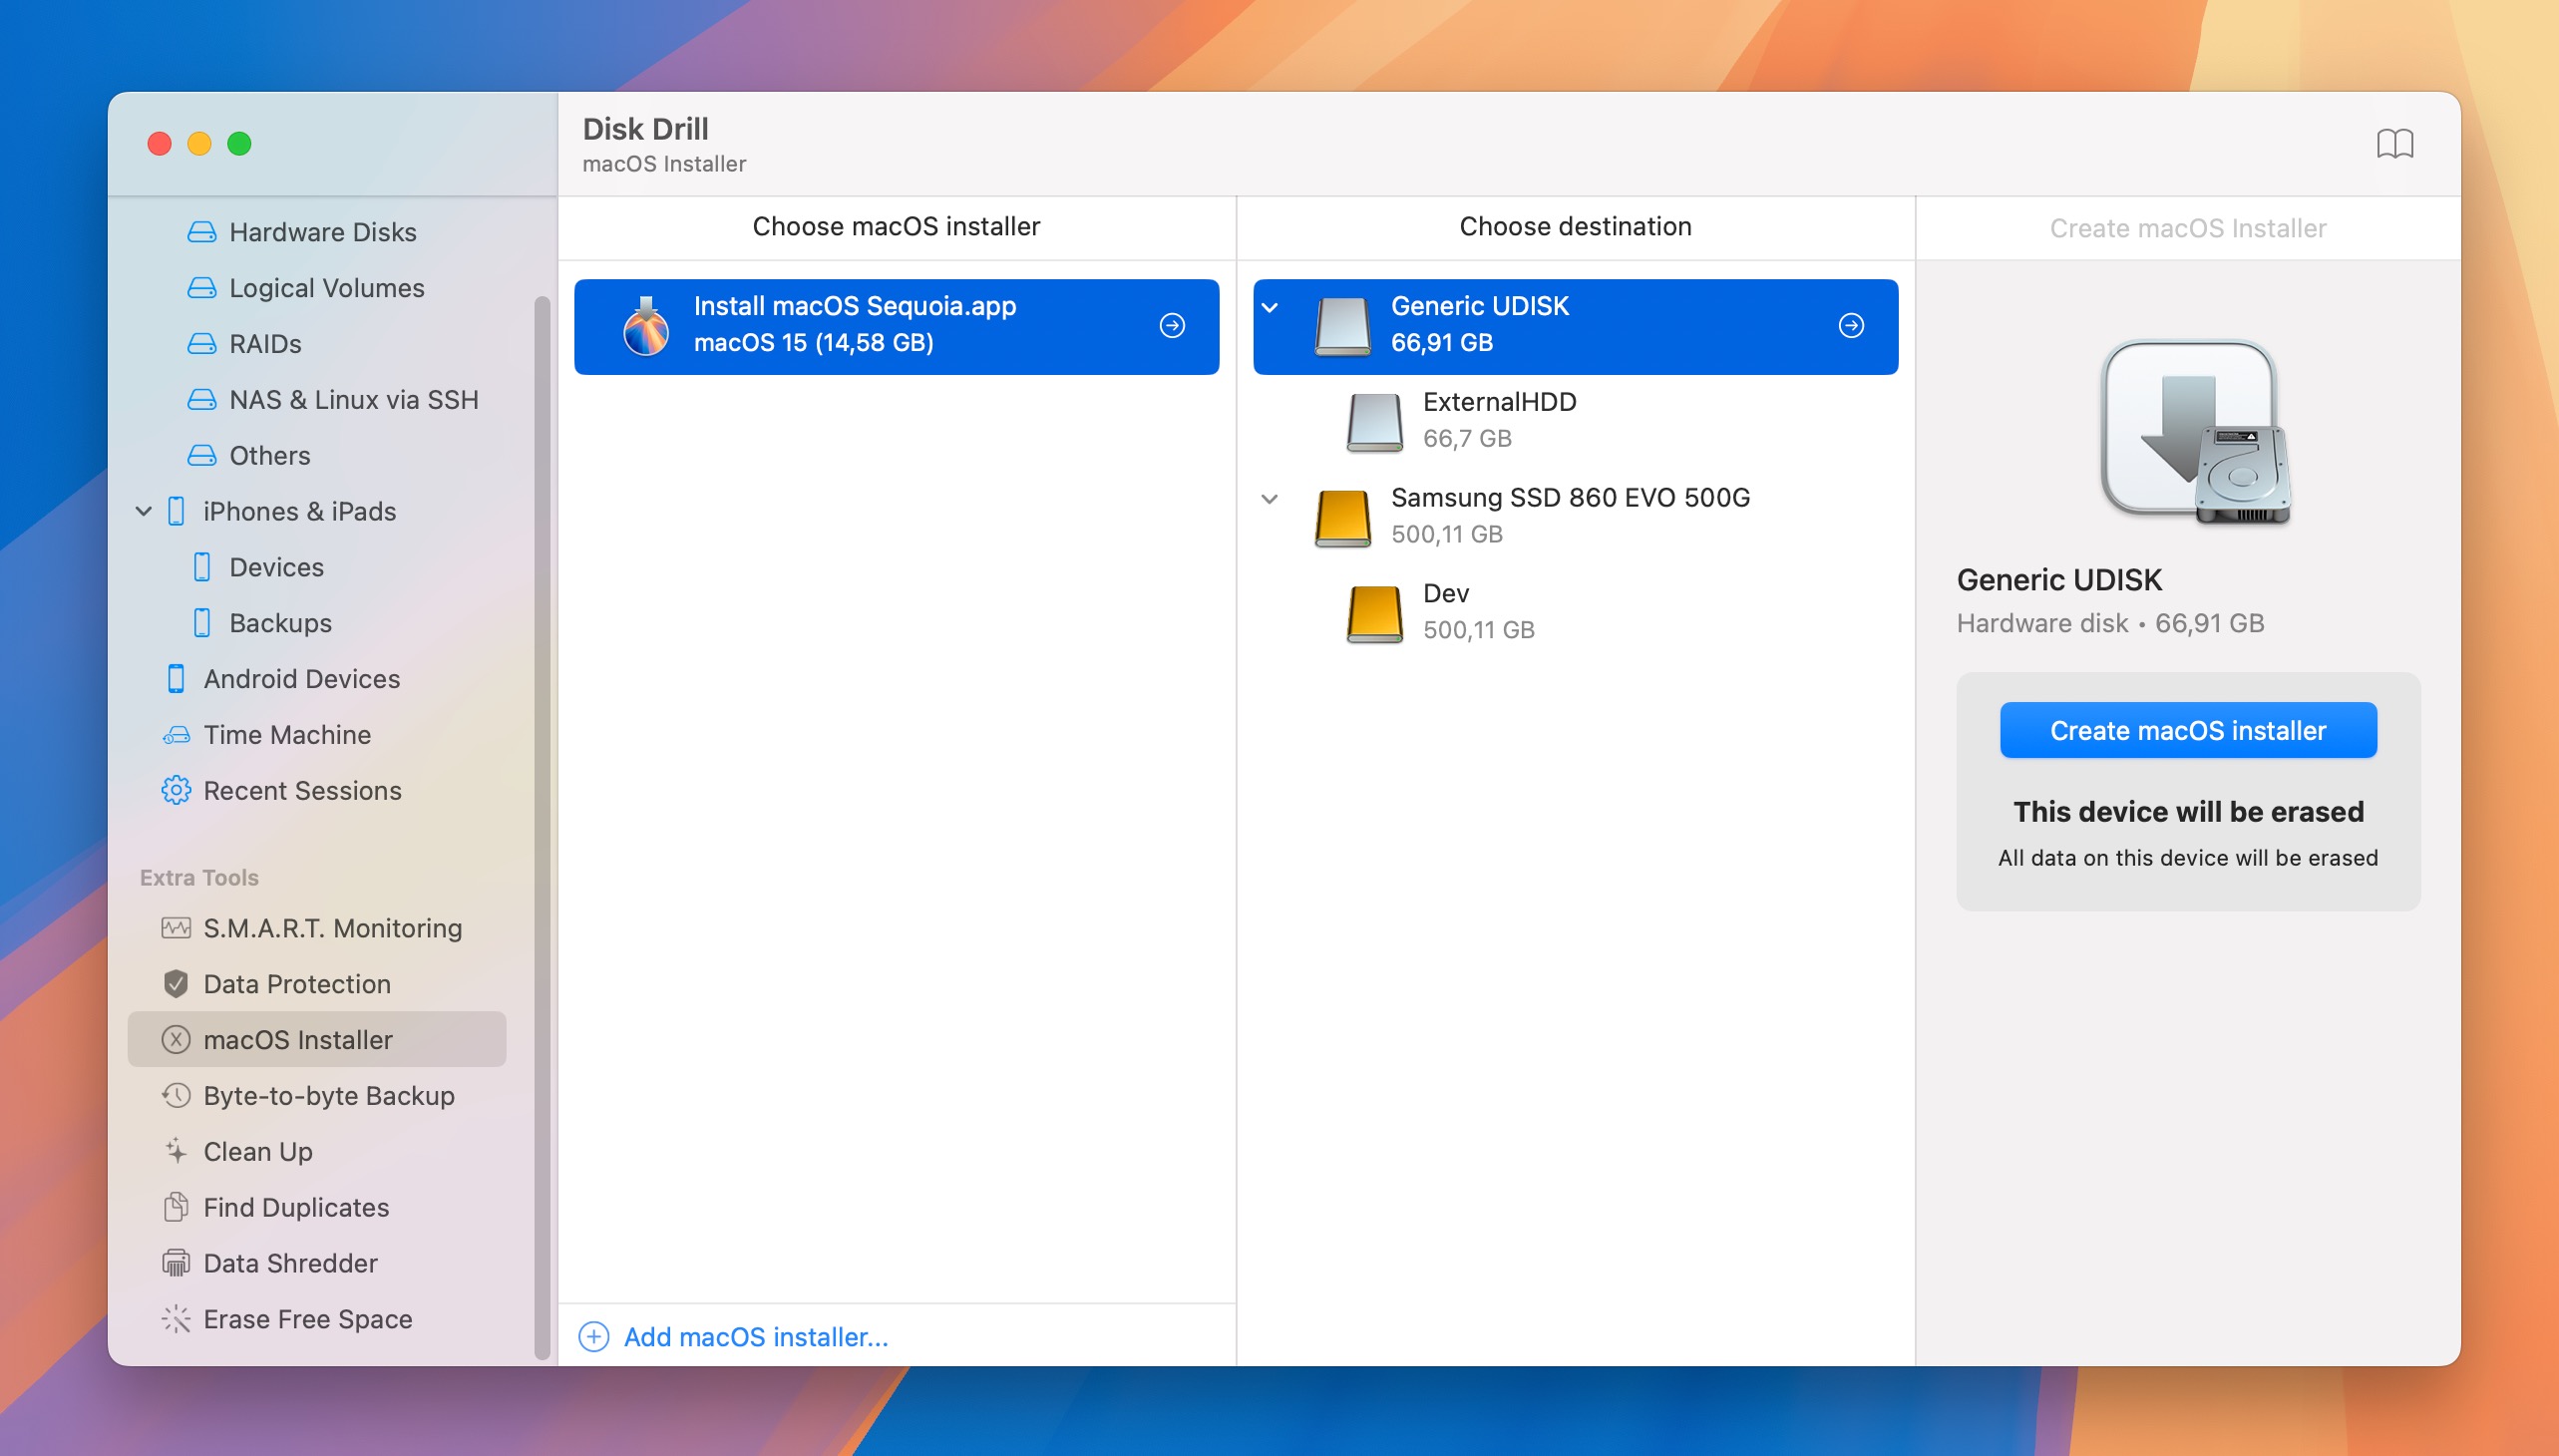
- Click Create macOS Installer and wait.
- Install macOS Sequoia from the USB drive:
- Connect the USB drive to the Mac you want to upgrade.
- Restart your Mac while holding the Option key (Intel Macs) or the Power button (Apple silicon).
- Select your macOS Sequoia USB installer from the boot options.
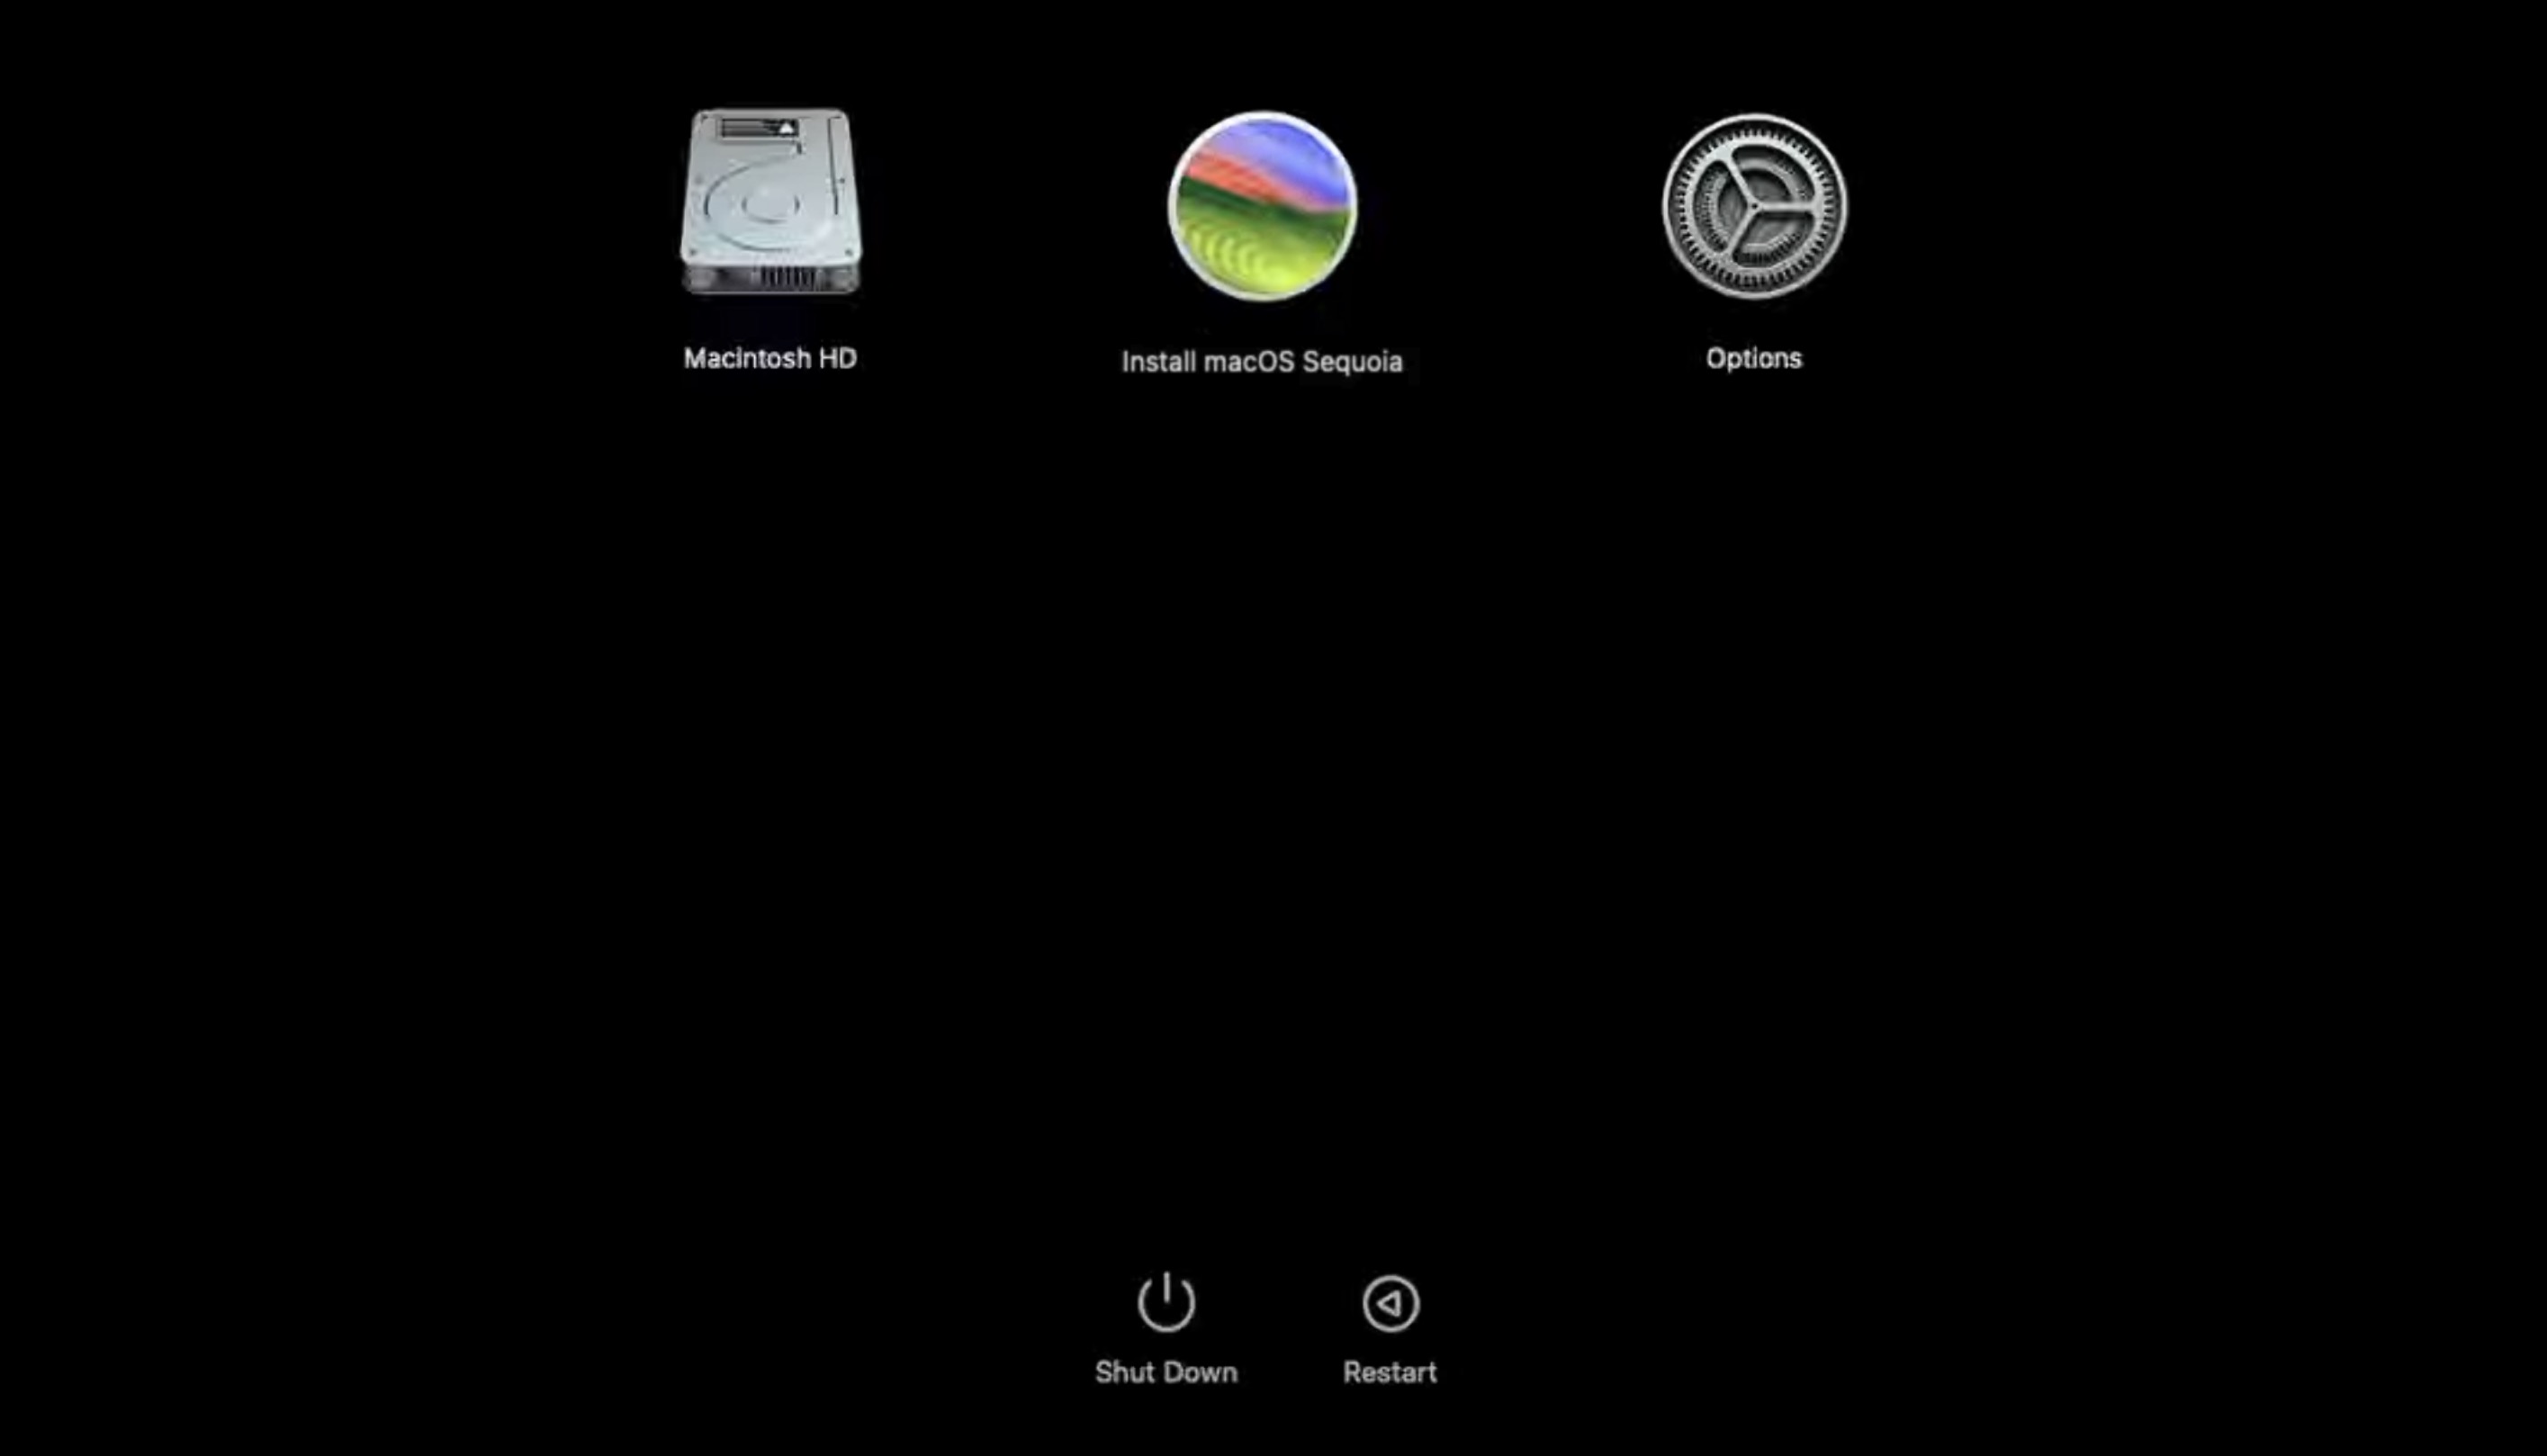
- Follow the installation prompts to upgrade to Sequoia.
Whichever upgrade method you choose, make sure you don’t skip any prompts or restart your Mac during the process. Once you’ve successfully upgraded to macOS Sequoia, we can move on to the next step.
sudo /Applications/Install\ macOS\ Sequoia.app/Contents/Resources/createinstallmedia --volume /Volumes/Untitled
I personally always use Disk Drill because it’s much more convenient and just as reliable.
Step 2: Wipe Your Mac Clean
Now that you’re running the latest version of macOS Sequoia, it’s time to restore your computer to the same pristine state it would be in right from the factory. This is where the actual “clean” part of our clean installation begins.
Method 1: Use the Erase All Content & Settings Feature
The Erase All Content & Settings feature, introduced in macOS Monterey, is by far the easiest way to perform a clean install of macOS Sequoia. This method is available on all Macs with Apple silicon (M1, M2, M3, M4) and Intel Macs with the Apple T2 Security Chip. To use it, you need to:
- Launch the System Settings app.
- Navigate to the General section and select Transfer or Reset.
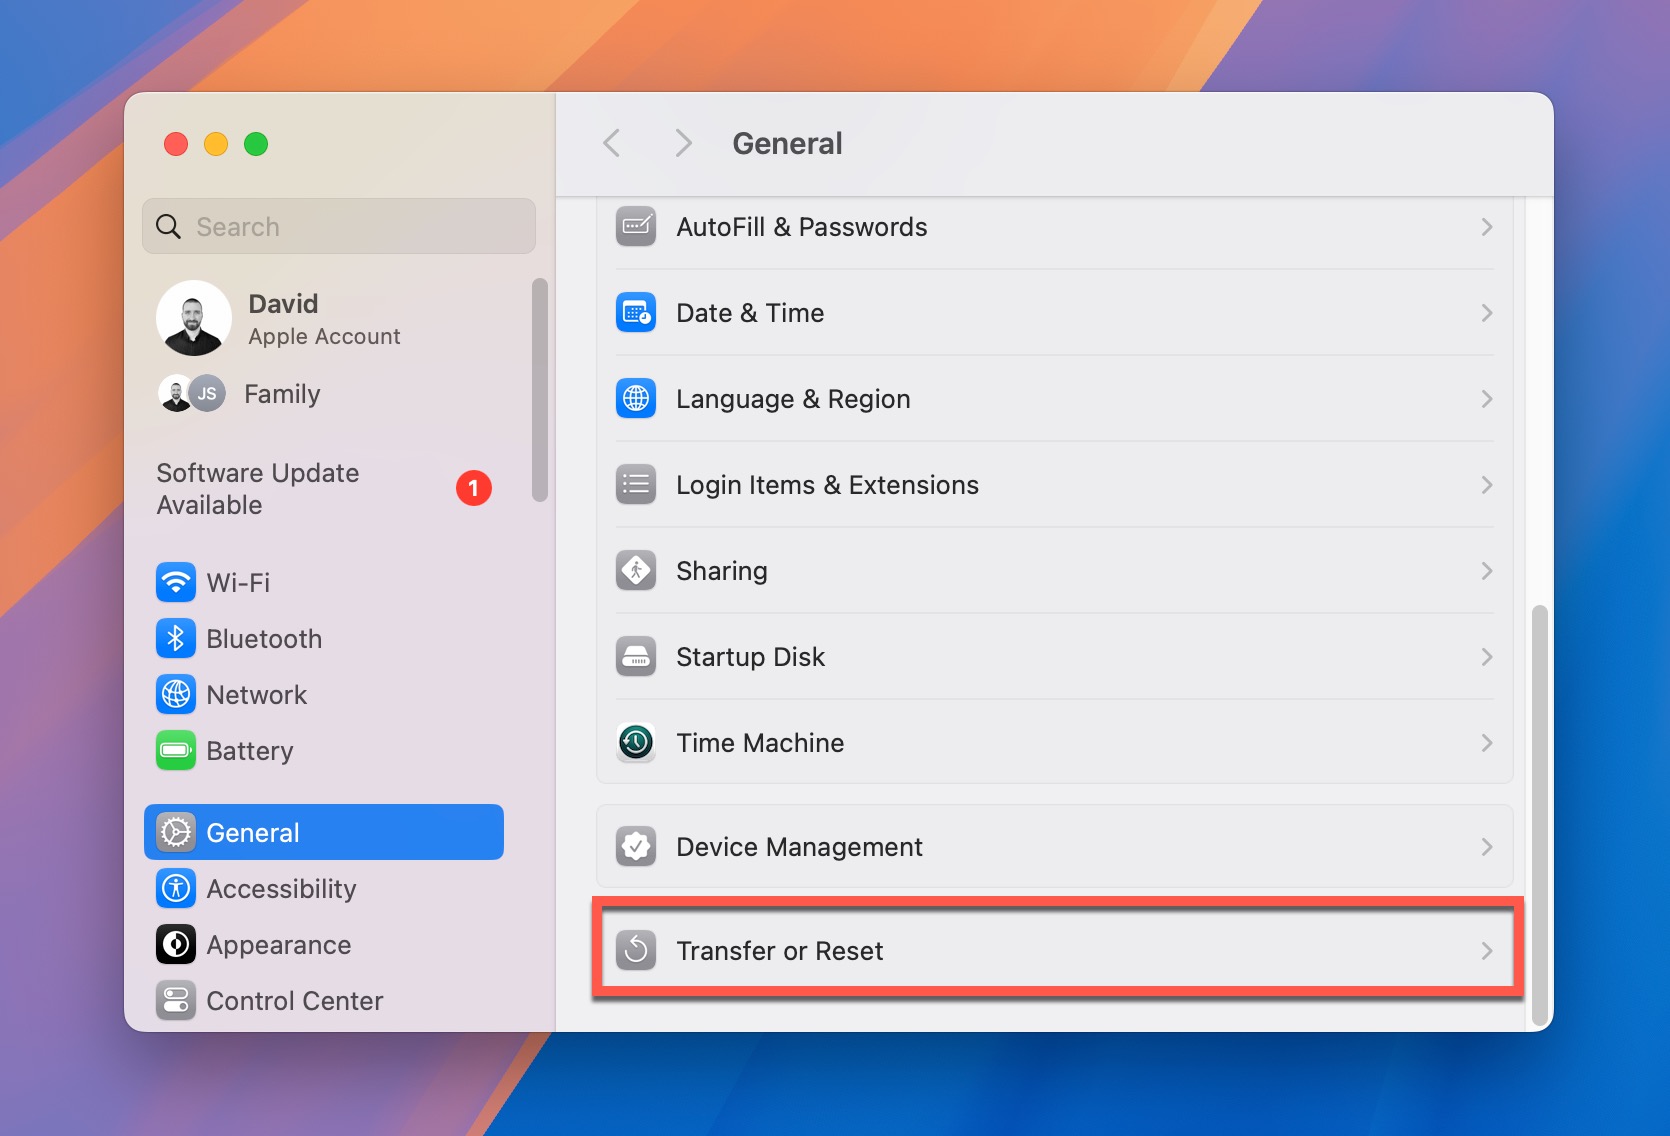
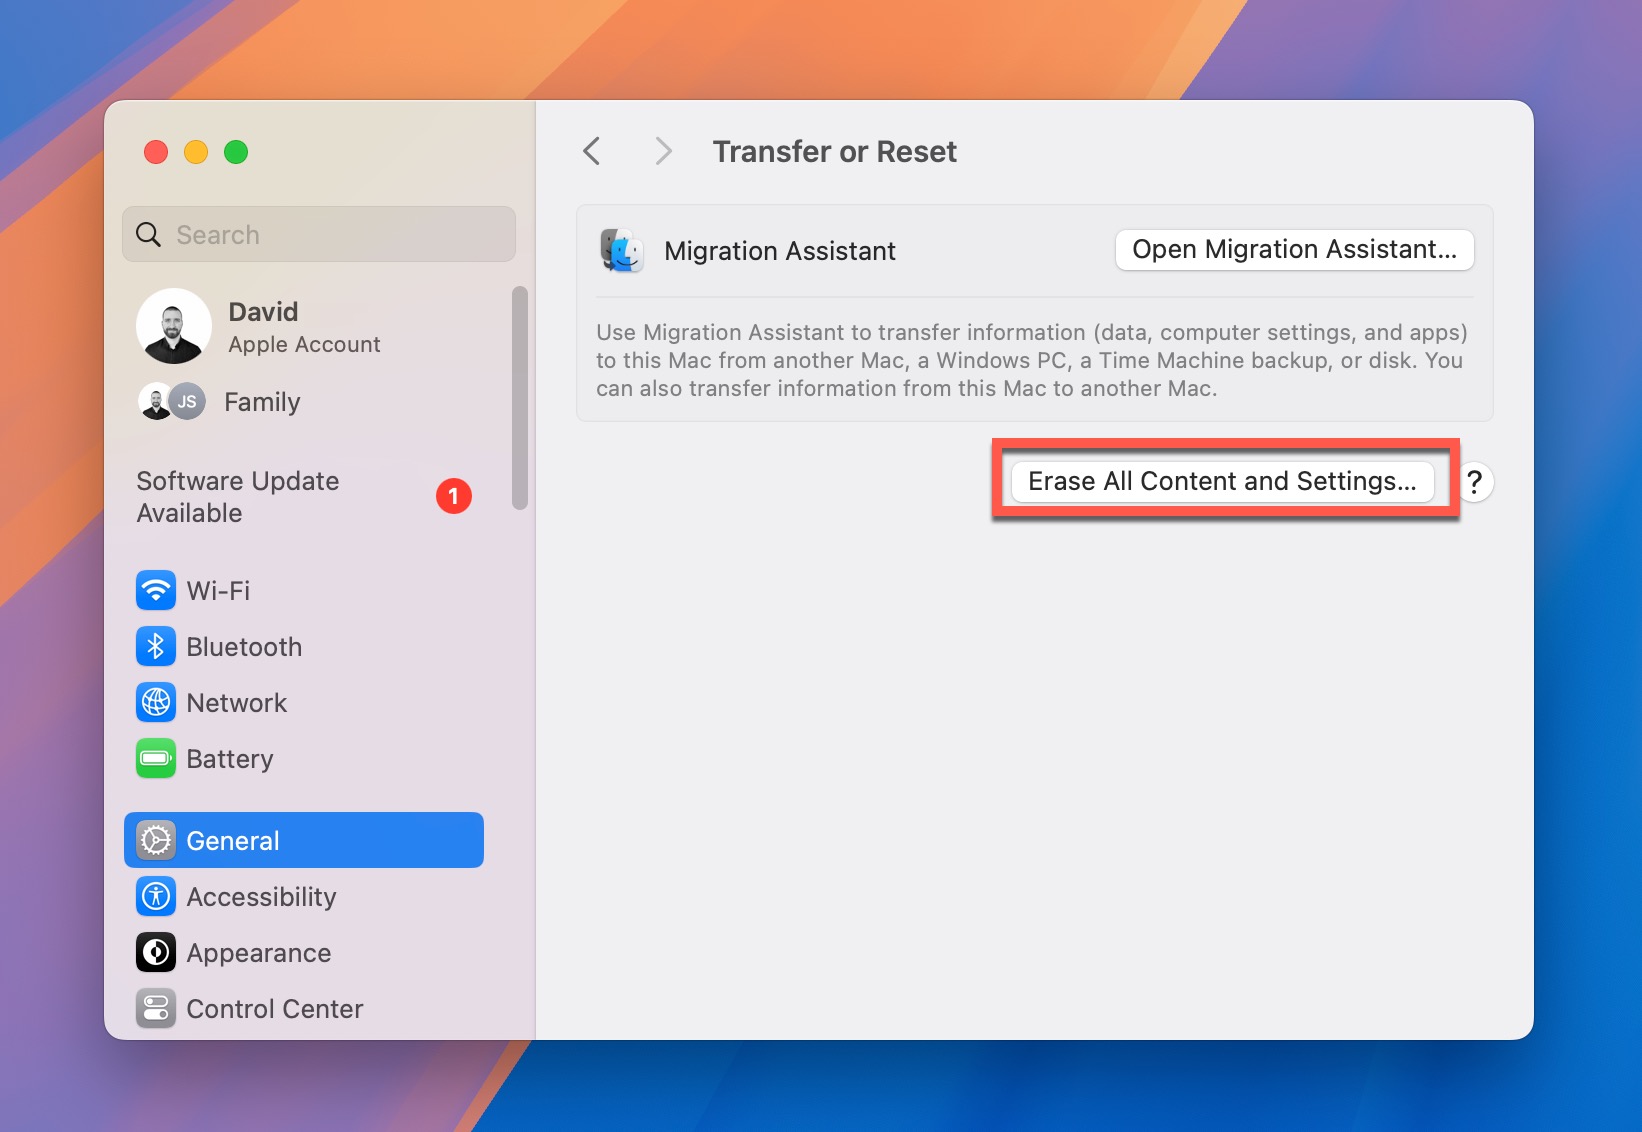
- Click Erase All Content and Settings. Enter your administrator password when prompted.
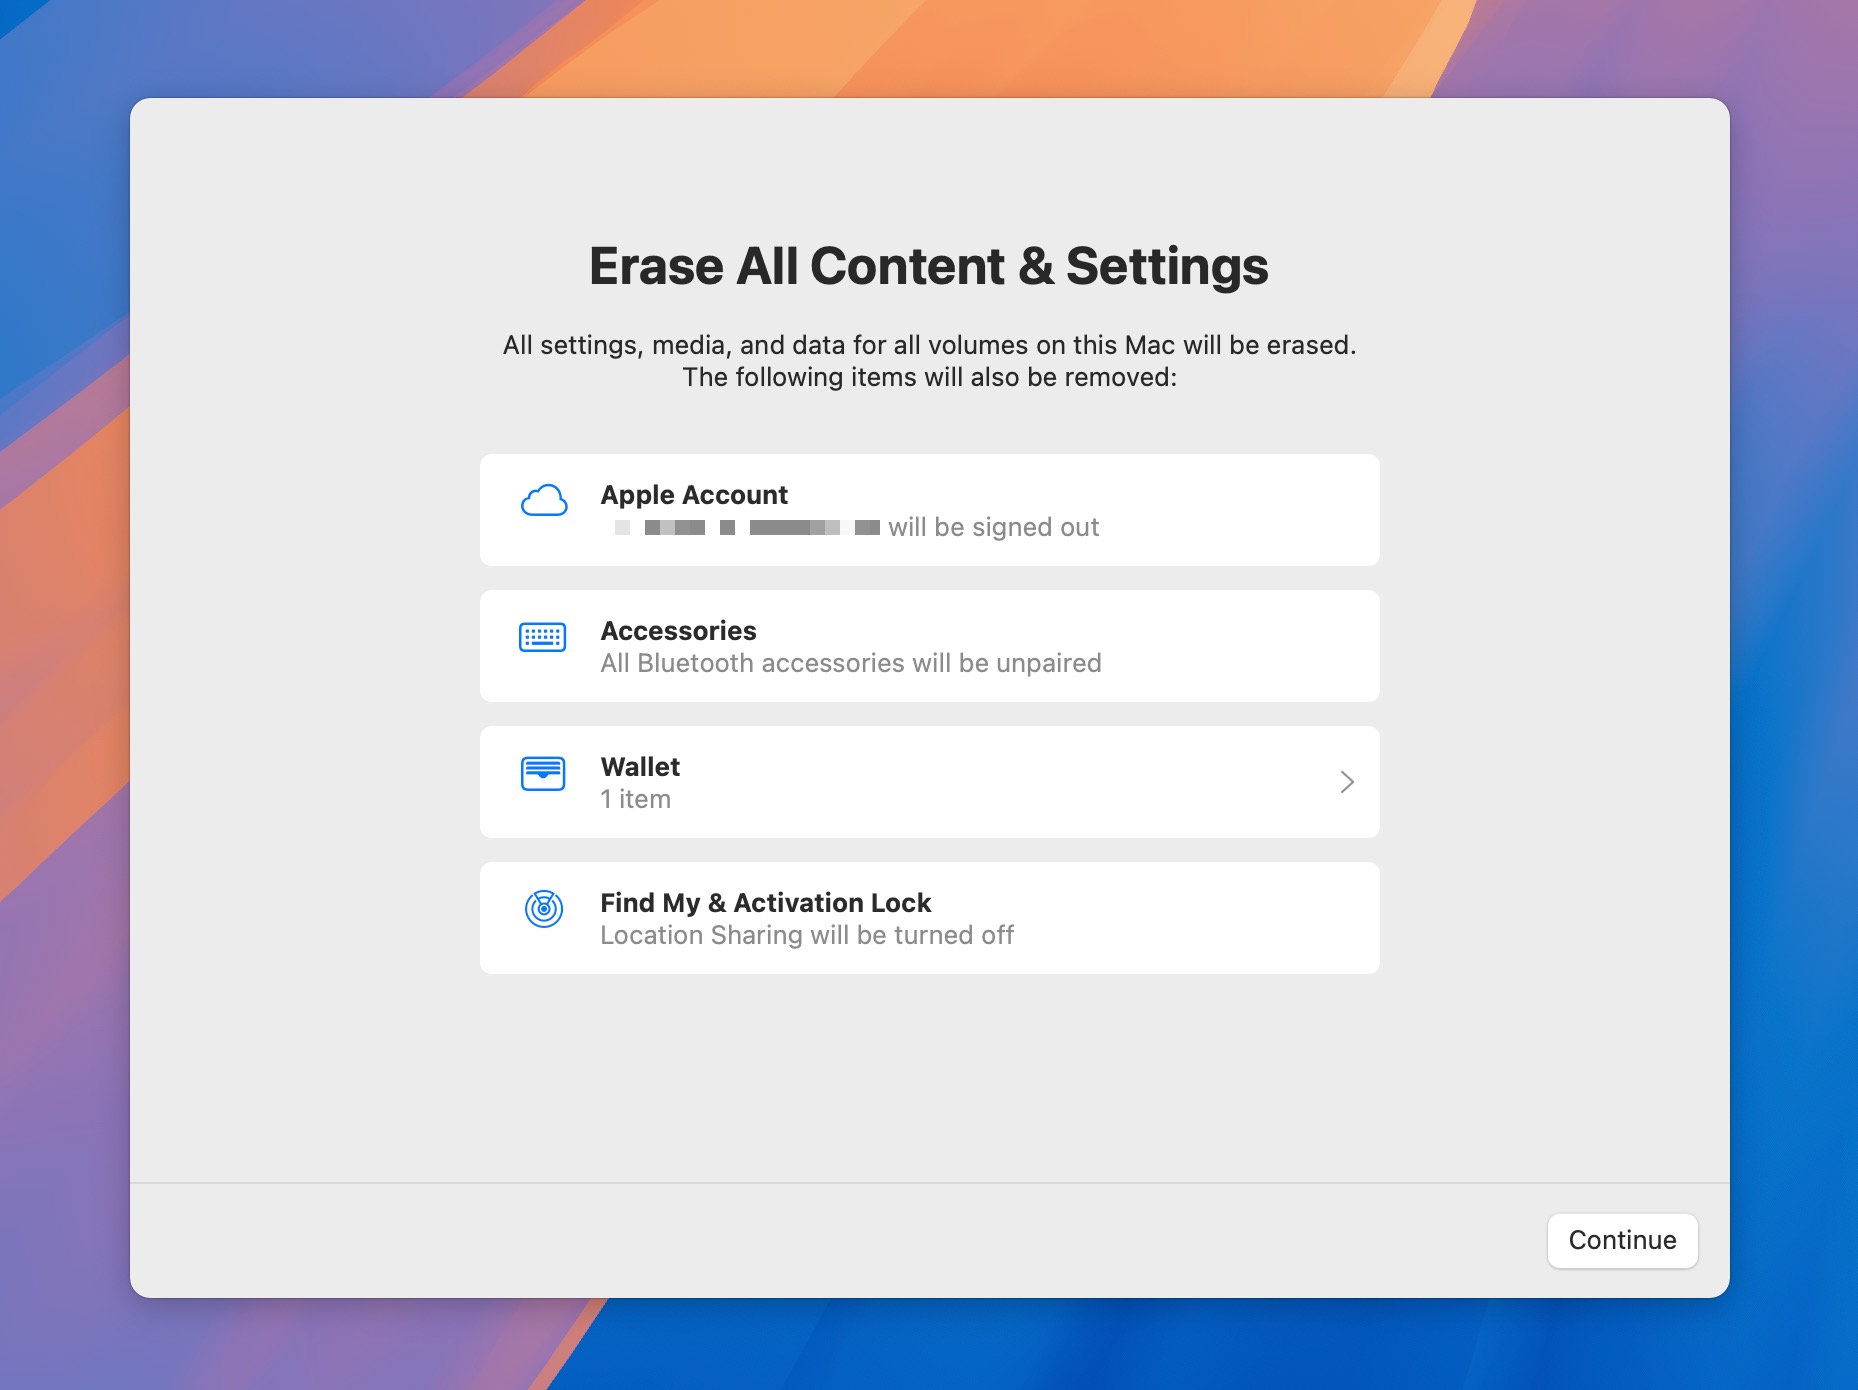
- The Erase Assistant will open, showing you everything that will be erased or disabled. Review the information carefully and click Continue.
- Click Erase All Content & Settings to begin the process. Your Mac will restart and show a black screen or progress bar.
Once complete, your Mac will restart again, and you’ll see the same setup assistant that greeted you when you launched your Mac for the first time.
Method 2: Use Disk Utility in macOS Recovery
If you’re using an older Mac that doesn’t support the Erase All Content and Settings feature (though this is unlikely since most such Macs can’t run Sequoia), you’ll need to use Disk Utility in macOS Recovery mode instead:
- Shut down your Mac completely.
- Quickly press the power button to turn on your Mac and then press and hold Command (⌘) and R until the Apple logo appears.
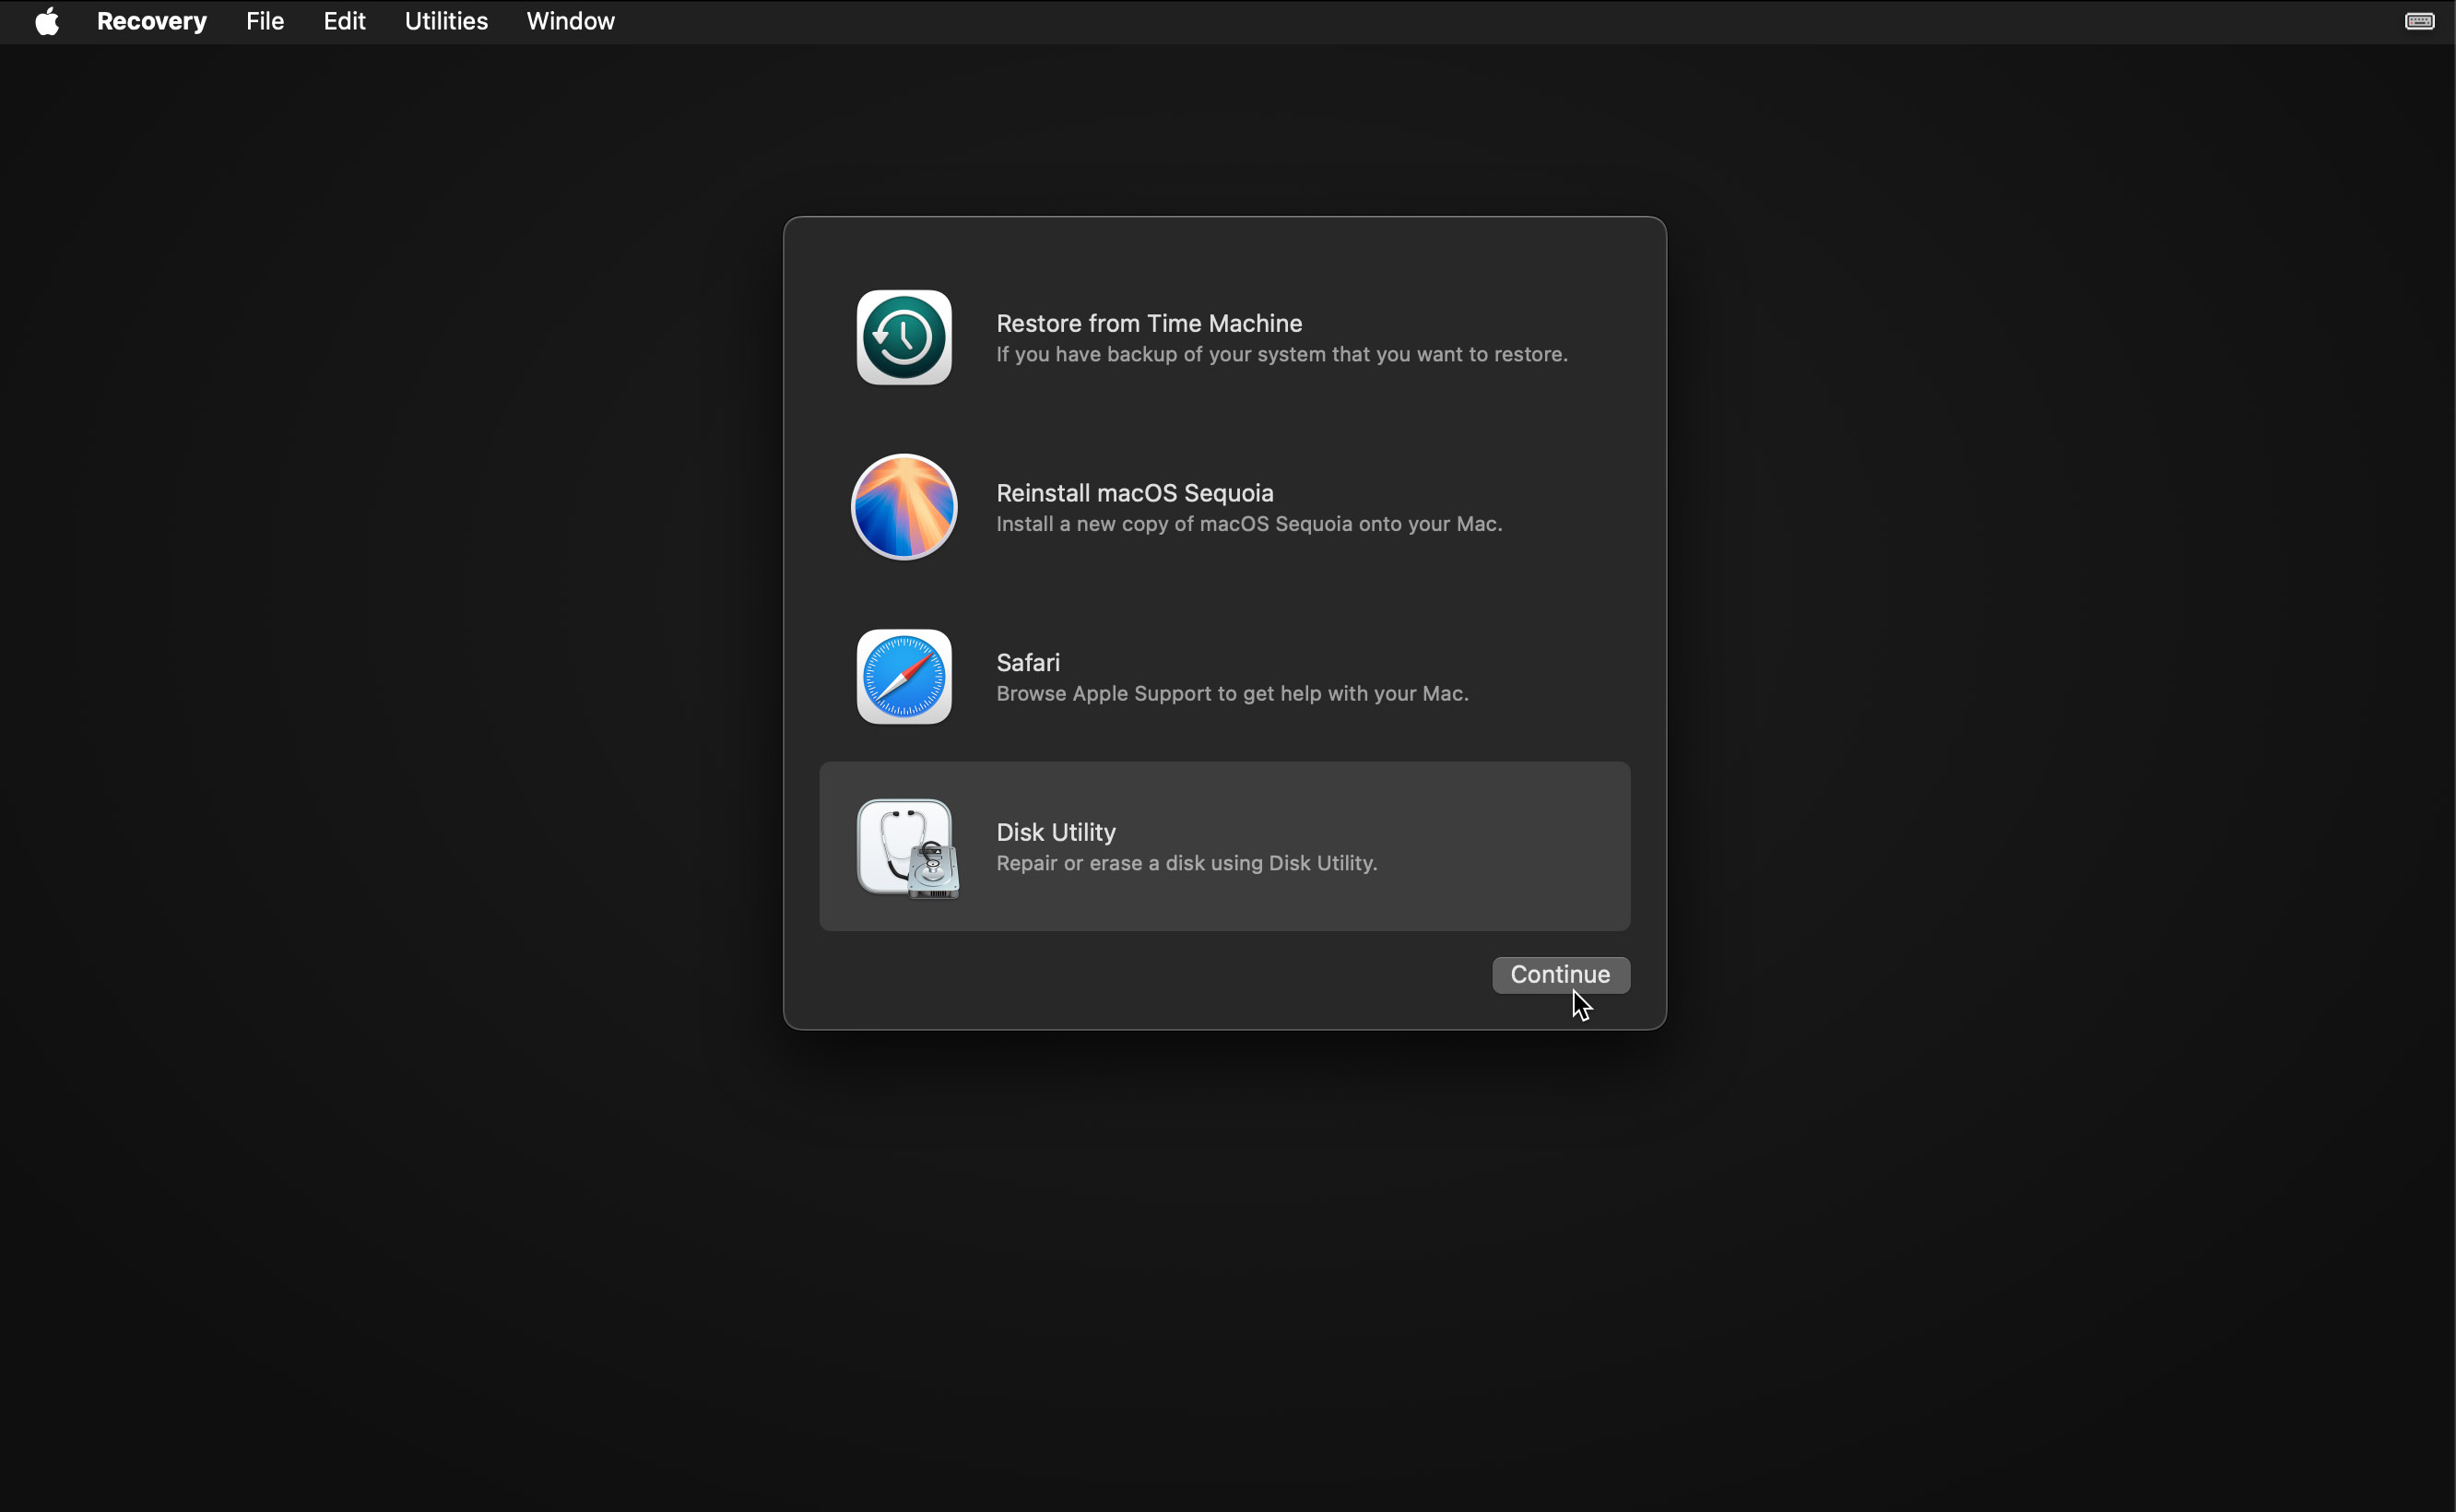
- Select Disk Utility in the macOS Recovery environment and click Continue.
- In the Disk Utility sidebar, select Macintosh HD (or whatever you named your system drive) and click the Erase button in the toolbar.
- Click Erase Volume Group or just Erase. If asked, enter your Apple ID credentials to disable Find My Mac.
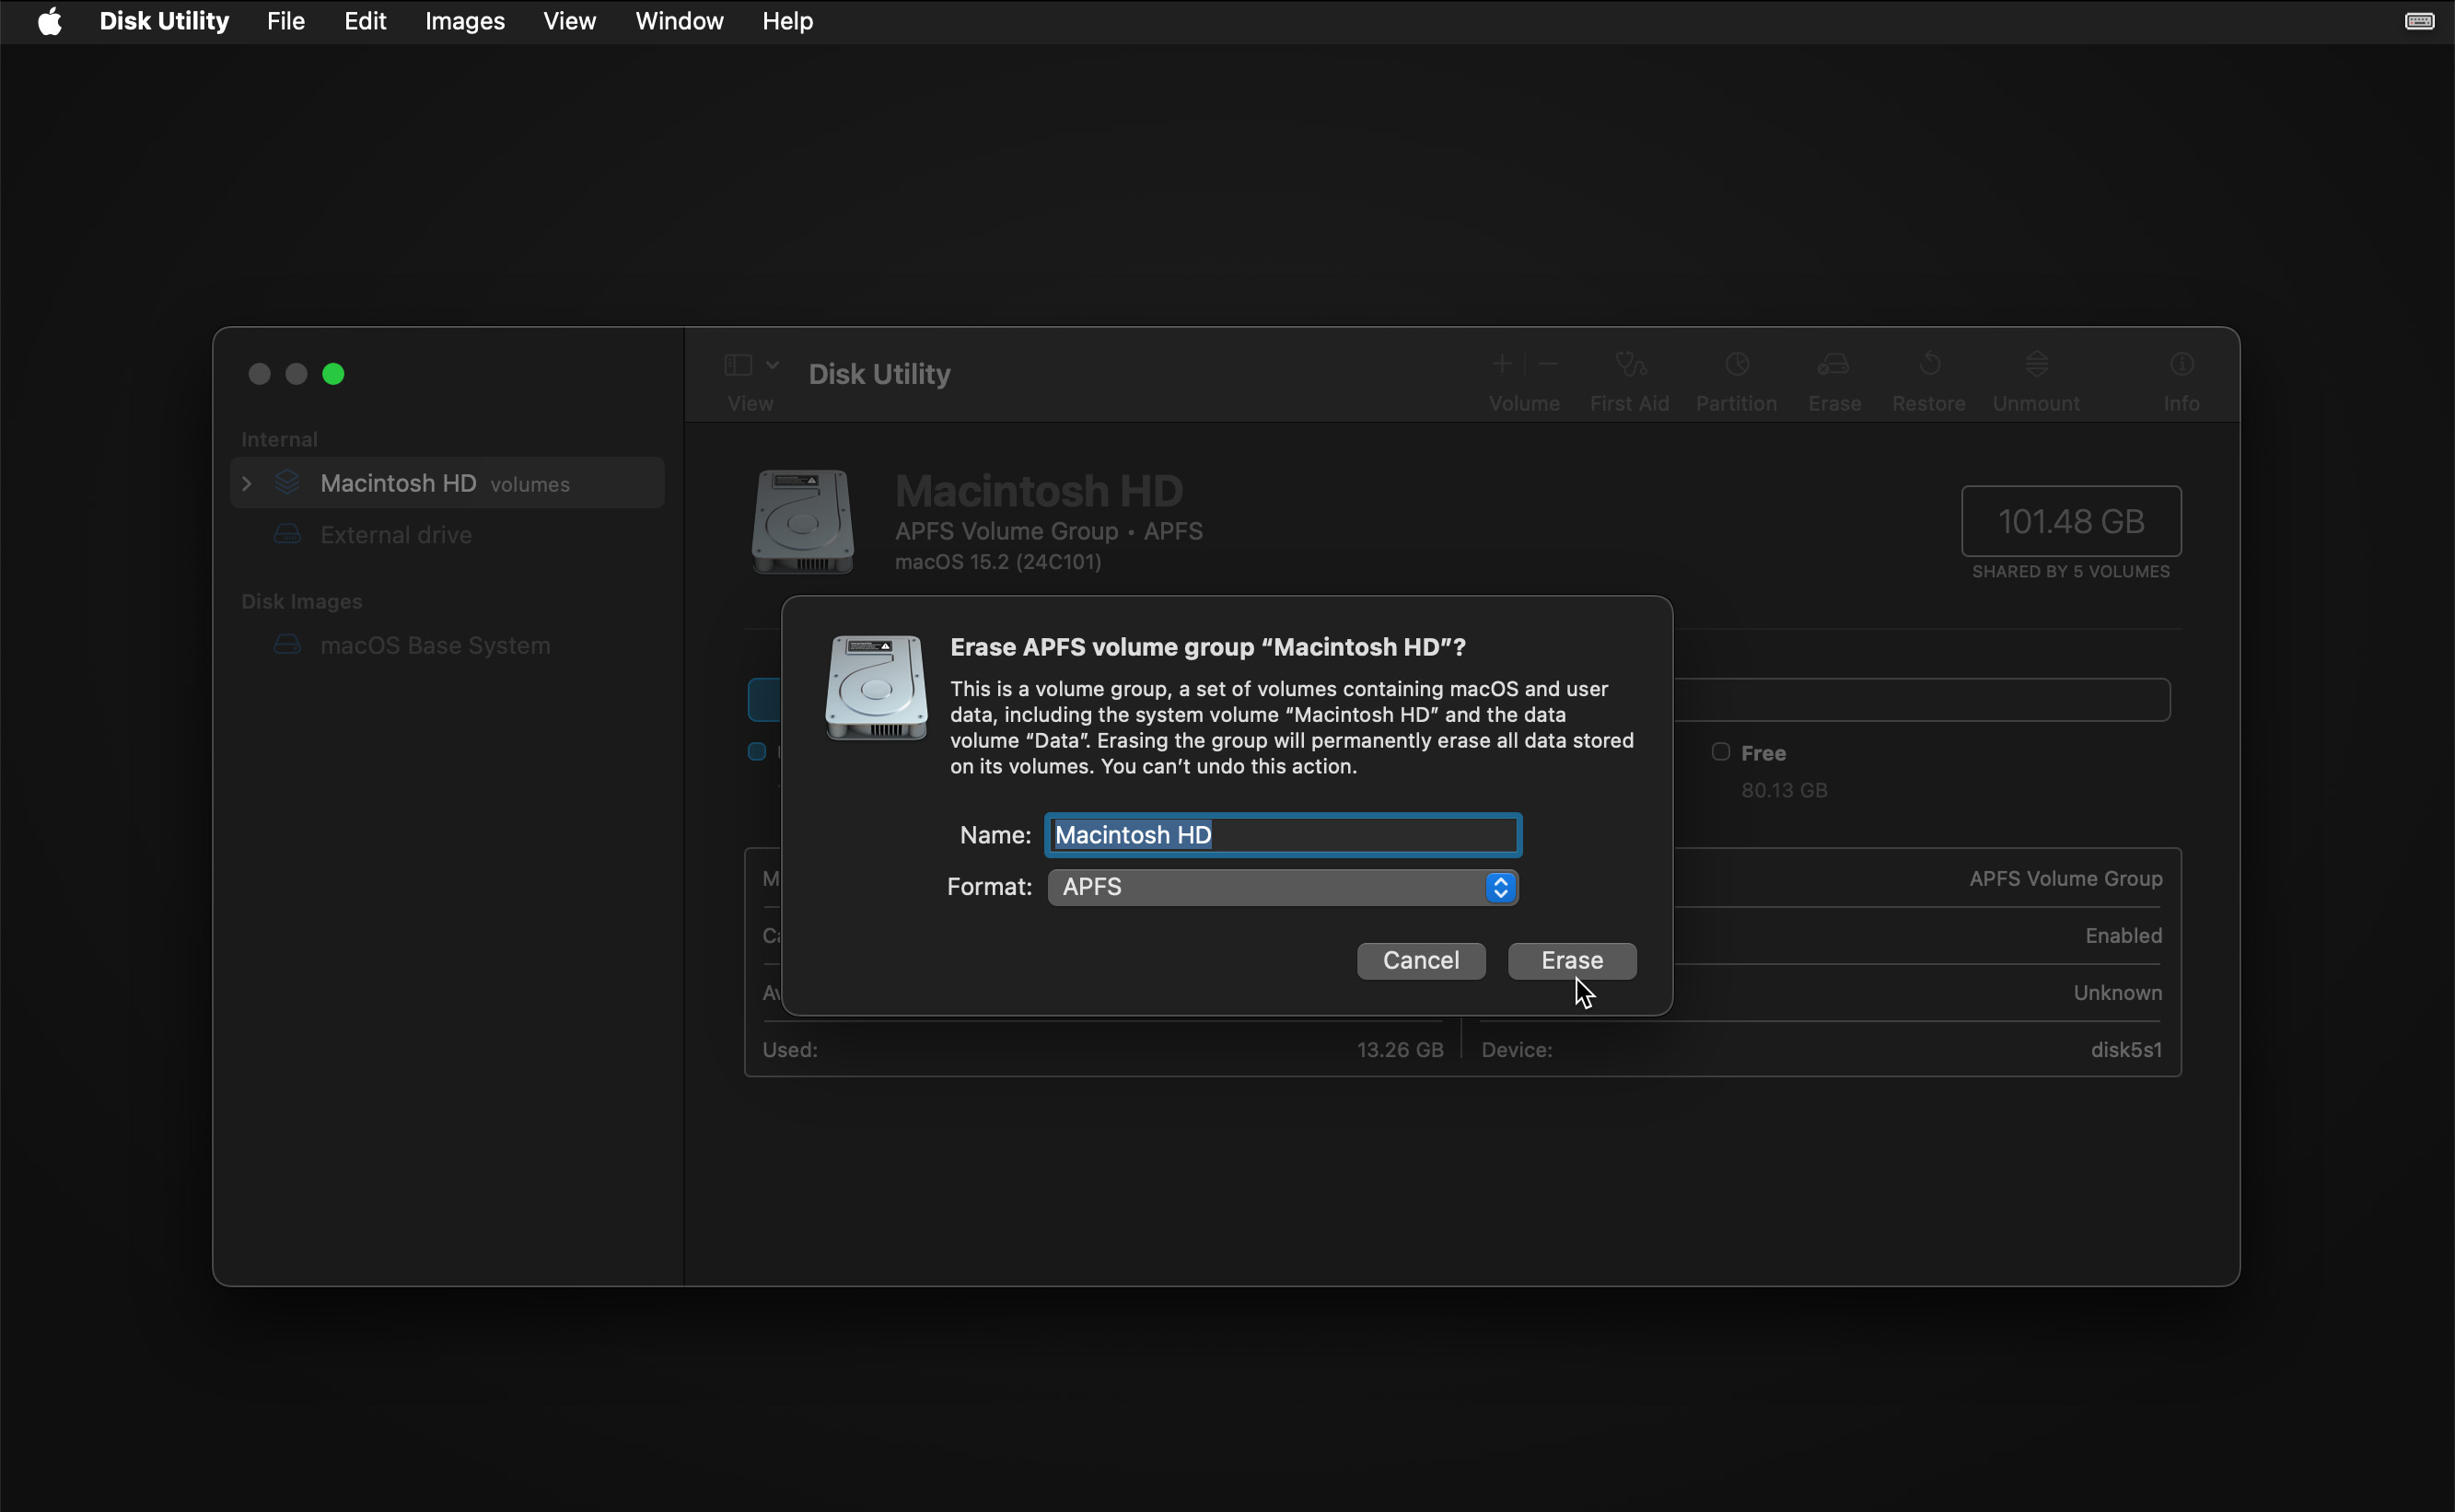
- Wait for the erase process to complete, then quit Disk Utility.
- Back in the Recovery environment, select Reinstall macOS and follow the prompts to install a fresh copy of macOS Sequoia.
If you’re planning to sell your Mac after performing a clean install of macOS Sequoia, there are a few additional steps you should take when using this method, and they include signing out of iTunes, iCloud, and iMessage, unpairing Bluetooth devices, and resetting NVRAM.
Step 3: Recover Backed Up Data
Finally, it’s time to bring back all your important data. The recovery process will vary depending on which backup method you selected at the beginning of this guide.
If you went with manual local or cloud backups, then recovering your data is pretty straightforward—just copy your files back to your Mac. But if you followed my recommendation and used Time Machine for your backup (which I hope you did!), you need to do the following:
- Connect your Time Machine backup drive to your freshly installed Mac.
- Launch the System Settings app and navigate to General and then Time Machine.
- Click Add Backup Disk and select your Time Machine drive. Enter the correct password if asked to do so (you will be if you decided to encrypt your backup drive).

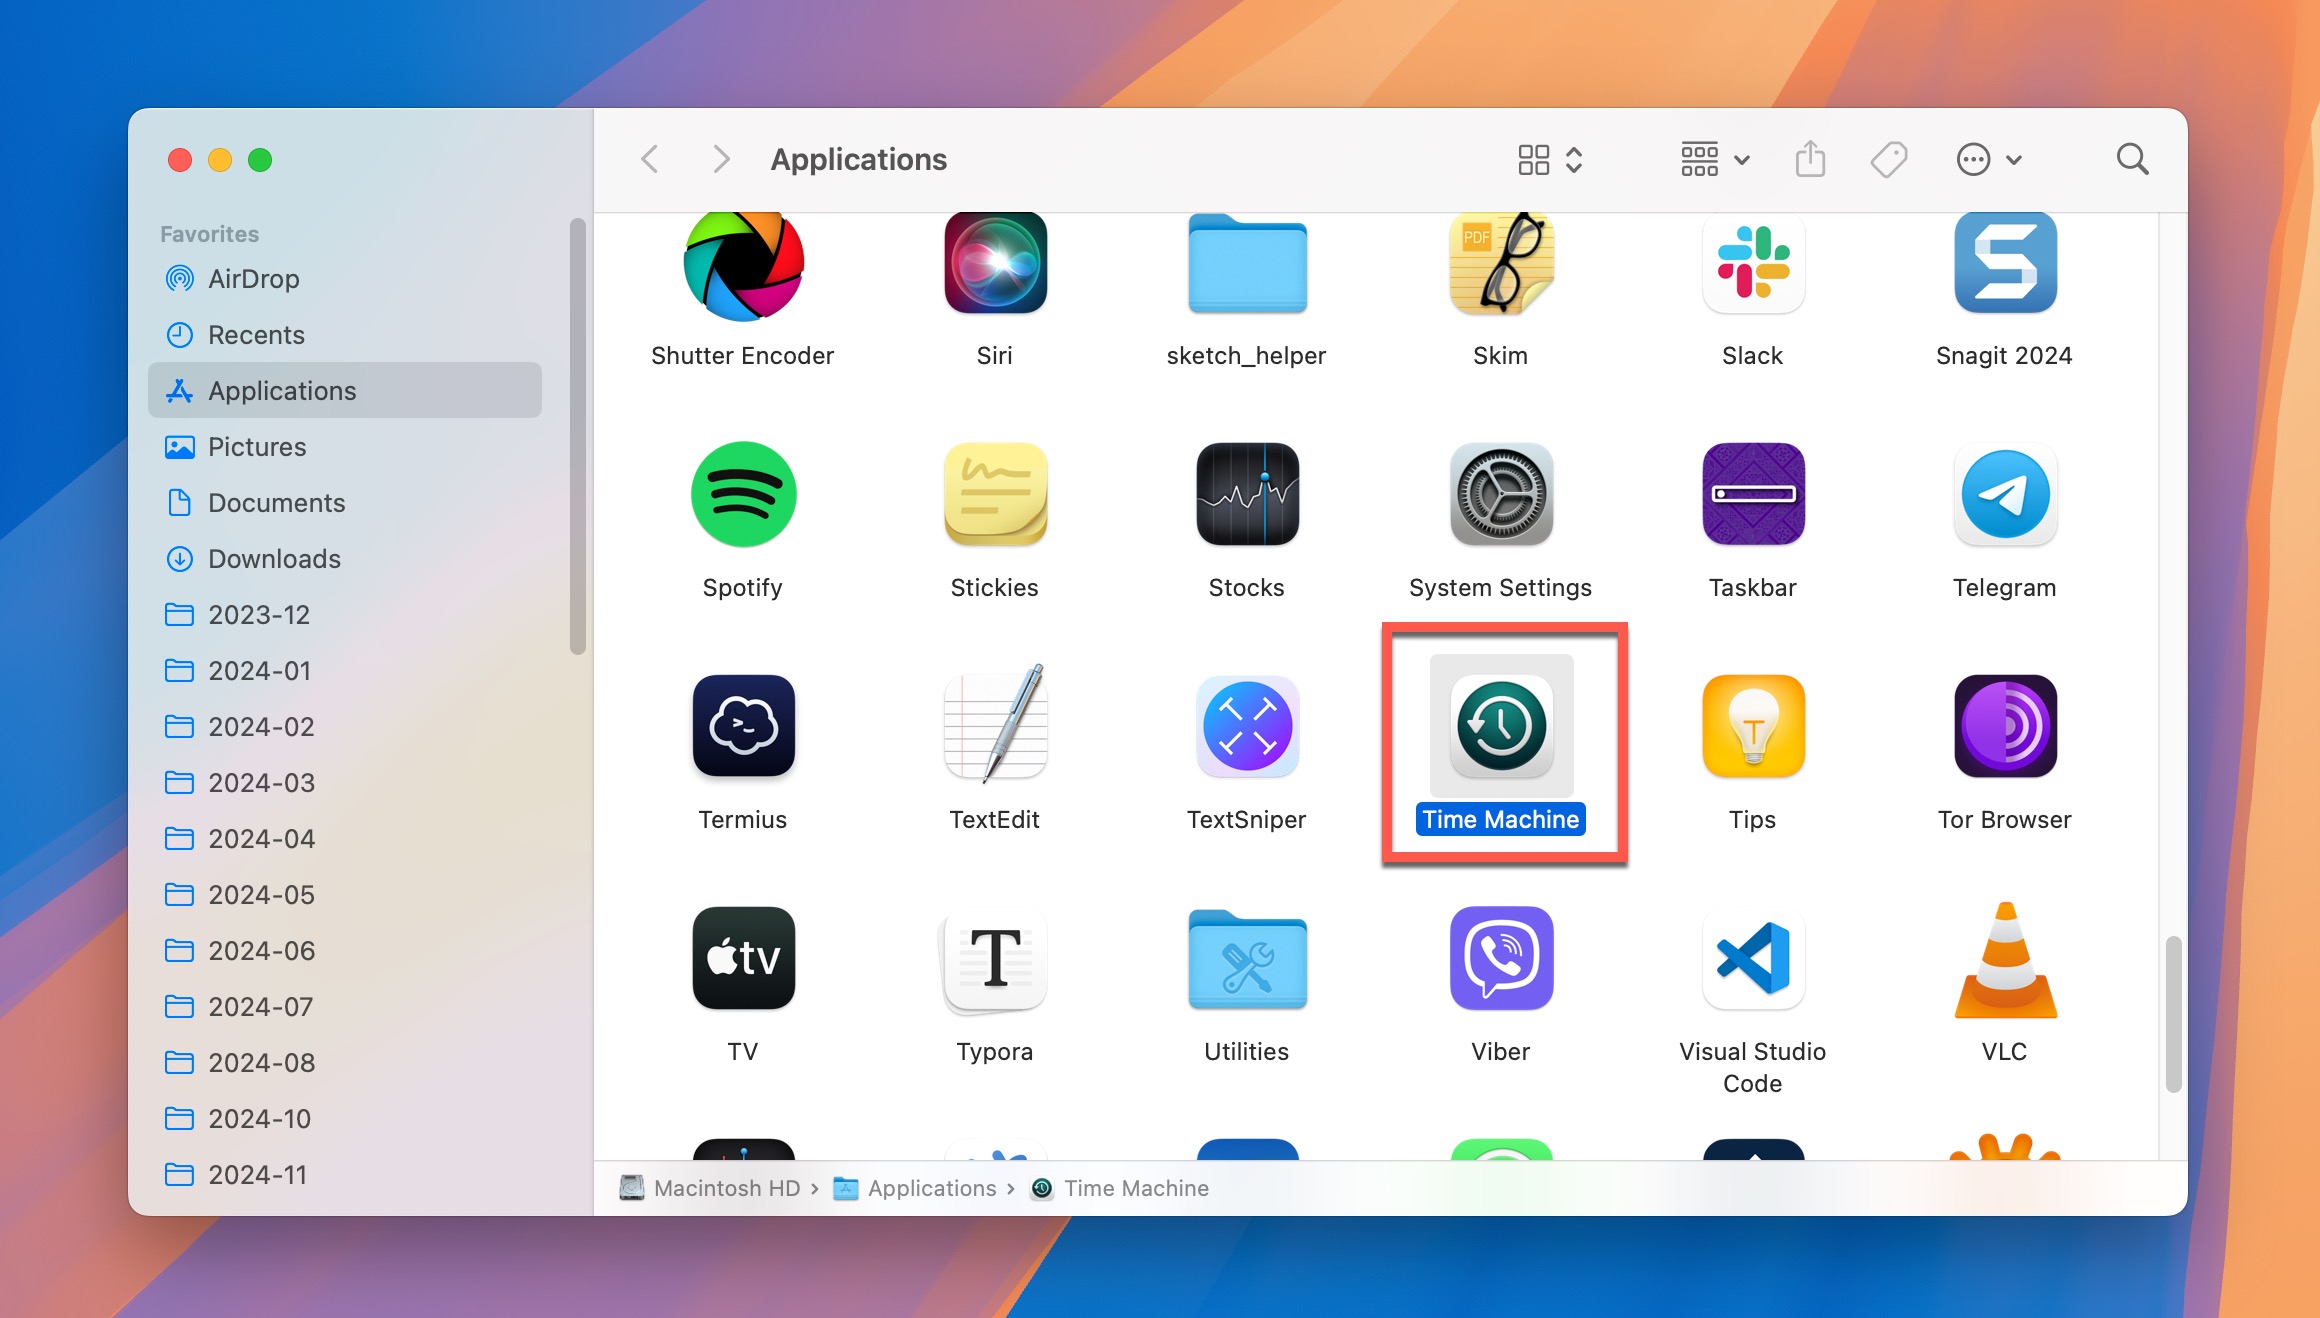
- Launch Time Machine from the Applications folder.
- Use the timeline on the right to navigate to your last backup (it should be selected by default).
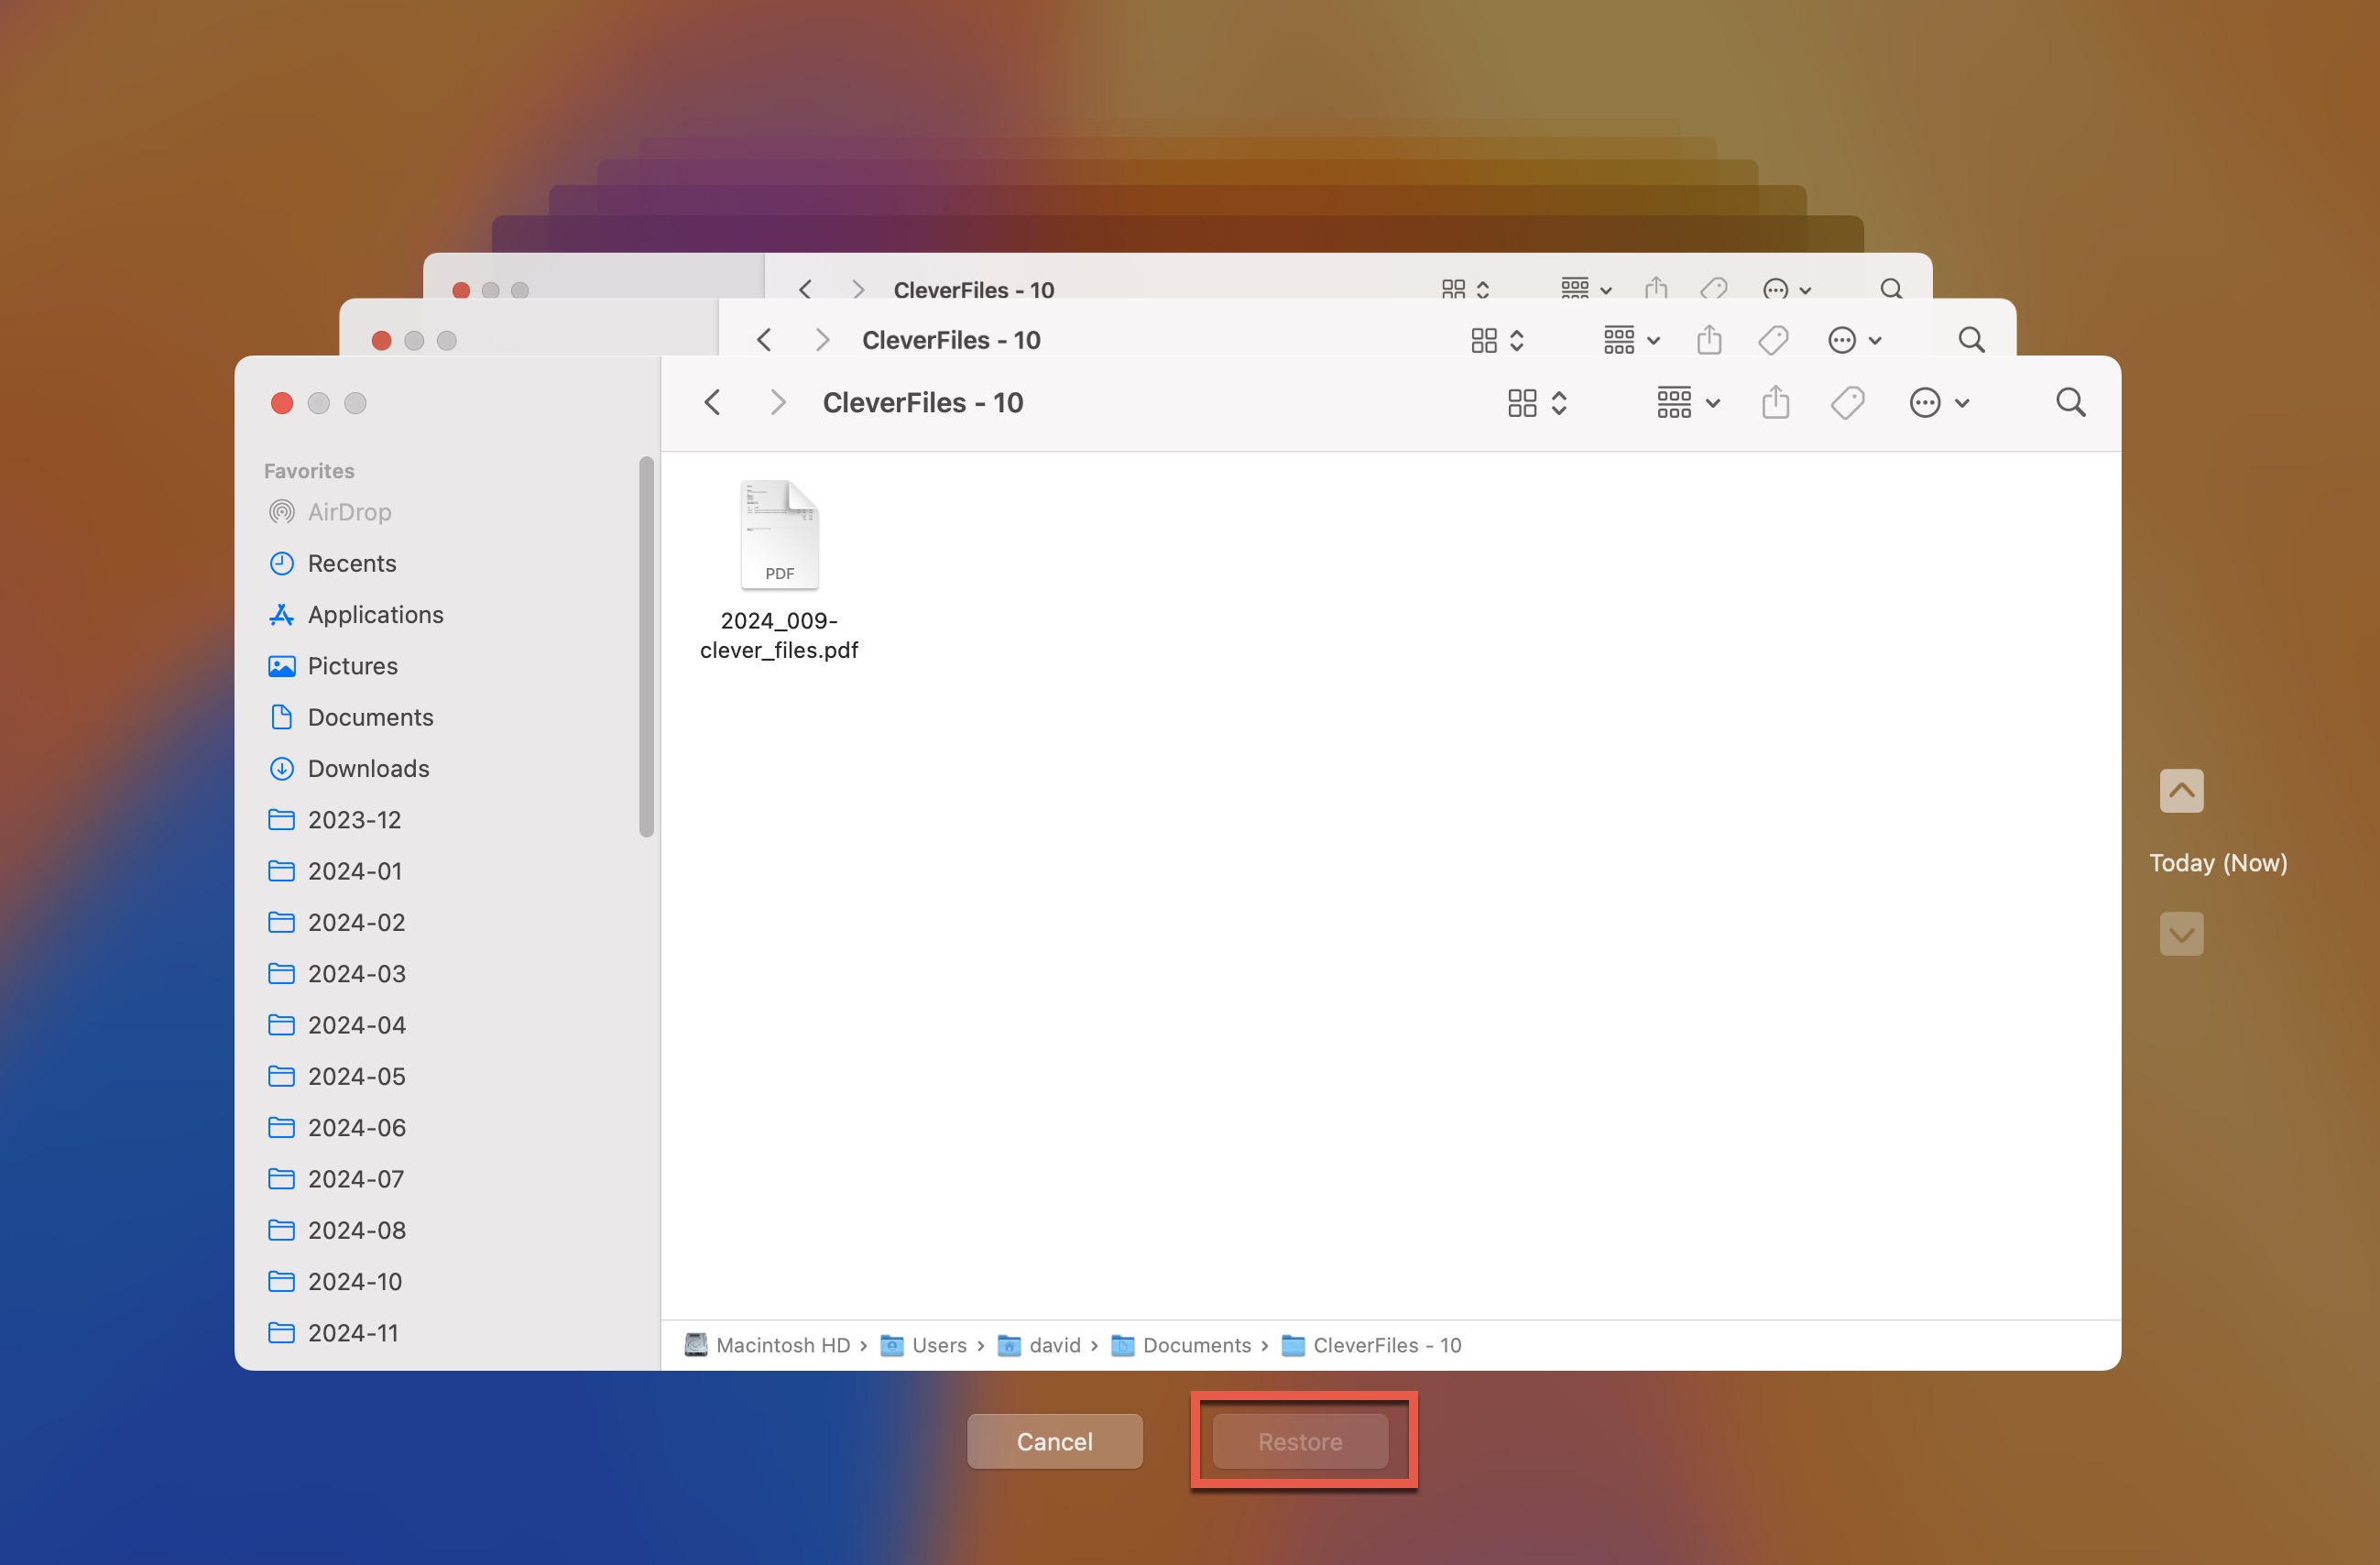
- Select the files or folders you want to restore and click the Restore button to bring them back.
Conclusion
Performing a clean install of macOS Sequoia does require some time and effort, but, in many cases, the benefits far outweigh the initial investment. Hopefully, this guide has helped you navigate through the process smoothly and get your Mac running like new again. Remember, maintaining that fresh start is just as important as achieving it, so try to be mindful about what you install and how you use your Mac going forward.
FAQ
If your Mac appears to freeze during the clean install, don’t panic or force restart immediately. First, wait at least 30 minutes as some processes can take longer than expected. If there’s no progress after that time, press and hold the power button until your Mac shuts down, then turn it back on. If it doesn’t boot properly, then you might need to revive or restore the firmware.
You’ll need an internet connection for the initial download of macOS Sequoia. However, if you create a bootable USB installer before starting the process, you can perform the actual installation offline. Just remember that you’ll still need to connect to the internet during the first boot to complete the setup process and activate your macOS installation.
While a clean install can resolve many issues, persistent kernel panics often indicate hardware problems. Your best course of action is to take your Mac to Apple so their technicians can take a look at it.