Are you having trouble accessing files on an SD card because it’s corrupted or damaged? We understand your pain, which is why we’ve put together this comprehensive overview of 13 solutions on how to fix a corrupted SD card and repair logical damage.
Common Signs Indicating SD Card Corruption/Damage
It’s possible for a perfectly working SD card to fail without warning, but most SD cards first show certain tell-tale signs of corruption/damage before they stop working. If you learn to recognize these signs, you’ll become able to back up your data in time and fix the underlying problem while you still can.
Signs of SD card corruption/damage:
| Symptom | Description |
| 👀 No SD card detected | You insert your SD card into your digital camera or laptop, wait, wait some more, but nothing happens. No sound, no message, nothing. In the next section of this article, we explain how to recover lost data from such an SD card using data recovery software ✅ and how to assign a new drive letter to make the card accessible. |
| 🖊️ Read/write issues | When transferring data to/from an SD card, there shouldn’t be any error messages indicating read/write issues. If that’s what you’re dealing with, you can try to use the SD card on another device/PC. |
| 🔌 Connection issues | If you have to reinsert the SD card several times before it finally mounts properly, you might be dealing with a faulty port or SD card reader. We recommend you try another USB port or change the adapter or card reader. |
| 🧹 Windows format error | If the SD card contains important data, and you see the dreaded Windows format error (You need to format the disk in drive X: before you can use it), you should first recover your files using data recovery software before formatting the card. |
| 📄 Missing files | One obvious sign that something is seriously wrong with your SD card is the sudden absence of files you haven’t deleted yourself. When files go missing, you should make sure that hidden files are displayed. |
| 🤨 Unknown files present | Conversely, corruption can cause unknown files to appear on your SD card. Such files tend to have nonsensical names and be impossible to open using any installed software application. That’s where Windows Repair Tool can help. |
| 🗜️ Wrong SD card capacity | If the storage capacity of your SD card is supposed to be 64 GB, but your operating system is telling you that it’s only, let’s say, 39 GB large, then it could be corrupted. Of course, it’s also possible that the SD card is simply formatted wrong. In that case, you can format it again. |
| 🐌 Slow performance | Bad SD card drivers can negatively impact the performance of your SD card and make data transfers take a very long time. In extreme cases, it might take you as much as several hours to transfer just a few photos or video files. Reinstalling SD card drivers is the most obvious solution. |
| 💥 Device Malfunction | If your SD card has become corrupted, it can directly cause malfunction to the device it’s been inserted in. A black screen can appear on your digital camera or an “SD Card error” message would flash on your GoPro when you try to access it. We recommend you retrieve your data using data recovery software and then you can attempt to create a new partition. |
| 📖 SD card displays as RAW | When your SD card is not properly formatted with a file system, it can become RAW. The RAW SD card becomes unreadable by any operating system and is a clear sign of SD card corruption. You can fix this by formatting the RAW SD card to FAT32. |
Ways to Fix Corrupted or Damaged SD Card
Let’s take a look at 13 ways to fix a corrupted SD card so that you have plenty of solutions to choose from when you recognize the first signs of corruption or damage.
Way 1: Check SD Card for Physical Damage

The first step in repairing a corrupted SD card is to inspect it for physical damage. SD cards are small, delicate devices that can suffer from wear and tear, mishandling, or environmental exposure, all of which can render them unreadable or unreliable.
Here are the key physical checks to perform on your SD card:
- Look for cracks or chips in the plastic casing: The outer shell of an SD card protects its internal components, and any visible cracks – whether from dropping it or stepping on it – can signal trouble. A cracked casing might expose the circuitry to dust or moisture, or worse, indicate that the internal memory chip itself is damaged.
- Check the metal contacts for scratches, corrosion, or bends: The gold-colored contacts on the SD card allow it to communicate with computers, cameras, and other devices. Scratches might come from rough insertion, while corrosion (greenish or white residue) could stem from water exposure – think a card left in a damp camera bag. Bent contacts, often from forcing the card into a slot, can also disrupt connectivity.
- Inspect for signs of water or heat damage: SD cards don’t fare well in extreme conditions. Submersion in water or prolonged heat (like being left in a hot car) can fry the electronics or warp the card. Look for discoloration, a warped shape, or a musty smell as clues.
- Examine the lock switch (if present): Many SD cards have a tiny sliding switch to lock or unlock write protection. If it’s stuck, broken off, or loose, the card might appear corrupted because it’s stuck in read-only mode. Try sliding it gently with your fingernail – if it doesn’t move or feels detached, this could be the issue.
If any of these checks reveal damage, stop troubleshooting and reach out to a recovery center. Data recovery professionals have the experience and equipment to not just repair corrupted SD cards but also to recover lost data from physically damaged SD cards, so they can save the day even when DIY fixes can’t.
Way 2: Try Different Hardware

This is by far the easiest fix you can try, which is why you should always start with it before moving on to more complex methods for repairing a corrupted SD card:
- Try a different USB port: Start by trying another USB port on your computer, as a single faulty port could be the cause.
- Get a new reader/adapter: If you’re using a laptop with a built-in SD card reader, grab a USB card reader instead and test it across several ports, ideally on more than one computer. For microSD cards, rule out a defective adapter by swapping it for another or connecting the microSD card directly via a microSD reader.
- Test the card on a different PC: If the SD card still doesn’t work, then you should test it on another device or PC to confirm whether the issue follows the card or stays with your setup.
Once you’re done testing different ports, adapters, readers, and devices, you’ll have a much better idea if the problem is with your SD card itself or simply with its connectivity or your computer’s system.
Way 3: Use SD Card Data Recovery Software to Recover Files
Before you learn how to uncorrupt an SD card, you should learn how to recover lost data from it. Why? Because most repair methods involve altering the card’s structure, which could permanently overwrite your files. To get your data back, you can use SD card data recovery software like Disk Drill.
Disk Drill is a reliable data recovery solution with support for all types of SD cards, including SD, SD High Capacity (SDHC), and SD Extended Capacity (SDXC). It can quickly recover any files (pictures, videos, audio, documents, etc.), and you can preview recoverable files before recovery.
FAM!! I DELETED SOME FILES BY ACCIDENT ON MY MEMORY CARD!! LITERALLY 15MINS WORTH OF FOOTAGE! I TRIED MANY RECOVER PROGRAMS ALLLLLL NIGHT! PROBABLY SPEND $300 ON SCAM ONES! FINALLY GOT ONE! BIG TIP FOR ANY YOUTUBERS WHO NEED THIS IN THE FUTURE! USE DISK DRILL!
— Cash ✌🏾HYPE (@CashNastyGaming) June 8, 2020
The free version of Disk Drill lets you recover up to 500 MB, and it comes with several handy data protection and backup features, which you can use to protect your SD card against future data loss. Importantly, Disk Drill is effective in recovering files from a damaged SD card, provided the card is still recognized in Disk Management without the “No media” label.
To recover files from an SD card using data recovery software:
- Download and install Disk Drill.
- Connect the SD card to your computer and launch Disk Drill.
- Select the SD card and click Search for lost data.

- Check the files you want to recover.
- Click the Recover button at the bottom.

- Specify the recovery destination and click OK to begin the recovery of your files.


Way 4: Fix a Card by Trying CHKDSK Command to Check for Memory Card Errors
Included in all versions of Windows is a command-line utility for checking the file system and file system metadata of a volume for logical and physical errors. This utility is called CHKDSK, and it’s actually much easier to use than most people think.
To fix a corrupted SD card using the CHKDSK command:
- Press Win + X and choose Terminal (Admin).

- Enter the following command, ensuring to replace X with the letter assigned to your SD card, and press Enter: chkdsk X: /x /r. The /x parameter instructs CHKDSK to dismount the disk volume before the process begins, which is necessary for making repairs. Meanwhile, the /r parameter enables CHKDSK to locate bad sectors and recover readable information from them. This option includes the functionalities of /f, which tells CHKDSK to fix errors on the disk.

- Wait for CHKDSK to finish. The process may take several hours, depending on the size of your SD card.
Unfortunately, CHKDSK won’t help you if you’re wondering how to fix corrupted a microSD card that doesn’t have a drive letter assigned to it. In situations like that, you need to first assign a new drive letter (as explained in the following section) and then run CHKDSK.
Way 5: Assign a New Drive Letter
One of the most puzzling SD card issues occurs when your card is physically connected to your computer but doesn’t appear in File Explorer. This problem frequently happens because Windows either fails to assign a drive letter to the SD card or assigns one that conflicts with another storage device. The good news is that assigning a new drive letter to the SD card is easy.
To assign a new drive letter to an SD card:
- Press Win + X and choose Disk Management.

- Right-click on your SD card and select the Change Drive Letter and Paths… option.

- Click the Change… or Add… button.

- Select a new drive letter and click OK.

- Click OK again to close the Change Drive Letter and Paths window.
After completing these steps, check File Explorer again – your SD card should now appear with the newly assigned letter. If you’re still experiencing issues with your SD card not showing up after trying this method, you may need to try more advanced solutions as outlined in our comprehensive guide to fixing SD cards that don’t show up.
Way 6: Reinstall SD Card Drivers
Windows automatically downloads and installs the most recent drivers through Windows Update, but not all driver updates go exactly according to plan. If you suspect that your SD card is misbehaving because of a faulty driver update, you should reinstall it manually.
To reinstall card drivers:
- Type “device manager” in the search on the taskbar and select Device Manager.

- Go through the available categories and look for your SD card (we found it located under Portable Devices).
- Right-click the SD card and select Update driver.

- Select Search automatically for drivers.

- Select Update Driver.
If Windows doesn’t automatically find a suitable driver, you can look for it on the manufacturer’s website and install it manually by selecting Browse my computer for driver software in step 4.
Way 7: Fix SD Card Using Windows Repair Tool
Included with Windows is a graphical tool capable of checking drives for file system errors. This tool is commonly referred to as Windows Repair Tool, and Windows sometimes automatically launches it when you insert a corrupted drive. That said, you can also invoke it manually and use it to scan any drive for errors.
To fix an SD card/USB drive using the Windows Repair Tool:
- Type “file explorer” in the search on the taskbar and select File Explorer.

- Select This PC from the left panel.
- Right-click on your SD card and select Properties.

- Click Tools and select the Check option.

- Click Scan and repair drive.

If you see a warning message saying that Windows can’t repair the drive while it’s in use, save any unsaved work on the SD card and choose to repair it now or on the next restart.
Way 8: Fix SD Card by Formatting a RAW SD card to FAT32
If your operating system can still detect your SD card as a physical device but is unable to interpret its file structure, then the card may appear as a RAW device, and you’ll typically see error messages like “The disk in drive is not formatted. Do you want to format it now?” when attempting to access it.
A common misconception is that a RAW SD card contains no data. In reality, your files might still be physically present on the card, but the operating system simply cannot access them because the file system is unrecognized, absent, or corrupted.
To format a RAW SD card to FAT32:
- Connect the SD card to your computer.
- Type “Terminal” in the search box on the taskbar and select Run as administrator.
- Type diskpart and press Enter on your keyboard.
- Type list volume and press Enter.
- Type select volume <the number corresponding to the RAW SD card> and press Enter.
- Type format fs=fat32 and hit Enter.

Way 9: Create a Partition on the SD Card
Sometimes an SD card might show up as corrupted or not show up at all because its storage space has become unallocated – a condition where no partitions exist on the card and it’s impossible for the operating system to recognize or use the card.
When your SD card appears as unallocated in Disk Management, the first step should always be to recover any important data from the card, as creating a new partition will erase all existing information.
After safely recovering your data, the next step is to create a new partition and format the SD card to a suitable file system (usually FAT32 or exFAT for better compatibility). By creating and formatting a fresh partition, you’re essentially providing a clean, recognizable structure for the operating system.
Fortunately, you can create a new partition in just a few steps:
- Connect the SD card to your computer.
- Press Win + X and launch the Disk Management tool.
- Right-click the SD card and choose to create a New Simple Volume.

- Follow the step-by-step partition creation wizard.

- Enjoy your working SD card!
Way 10: Format to Repair Corrupted SD Card
Formatting is a last-resort method how to fix a corrupted SD card, but it’s remarkably effective because it can:
- Repair a damaged file system structure.
- Replace a corrupted partition table.
- Restore the correct capacity when an SD card shows the wrong size.
- Identify and isolate bad sectors (with full format).
- Resolve persistent read/write errors.
The downside, of course, is that formatting will erase all data on the card, so always attempt data recovery methods first if you have valuable files on the card.
Windows includes a built-in formatting tool that works well for most SD card issues. Here’s how to format an SD card with it:
- Open File Explorer and navigate to This PC.
- Right-click on your SD card and select the Format… option.

- Select the desired File system. You can leave the allocation unit size as it is. The difference between Quick Format and Full Format is that the former simply rewrites the file system declaration, while the latter overwrites every sector on the device with zeros and scans for bad sectors. For our purposes, it’s better to leave the Quick Format option unchecked.
- Click Start to format the SD card.

In cases of severe corruption where standard formatting fails, your SD card may require a low-level format. Unlike regular formatting, which primarily rewrites the file system, low-level formatting resets the card at a deeper level by:
- Completely wiping all data structures.
- Reestablishing track and sector markers.
- Identifying and marking truly bad sectors.
For this level of formatting, specialized tools are required. One reliable option is HDD LLF Low Level Format Tool (it supports SD cards despite its name), and you can download it from HDDGURU.COM. Once you have it downloaded, follow these steps:
- Install and run HDD LLF Low Level Format Tool with administrator rights.
- Select your SD card from the list of detected devices (double-check you’ve selected the correct drive!)
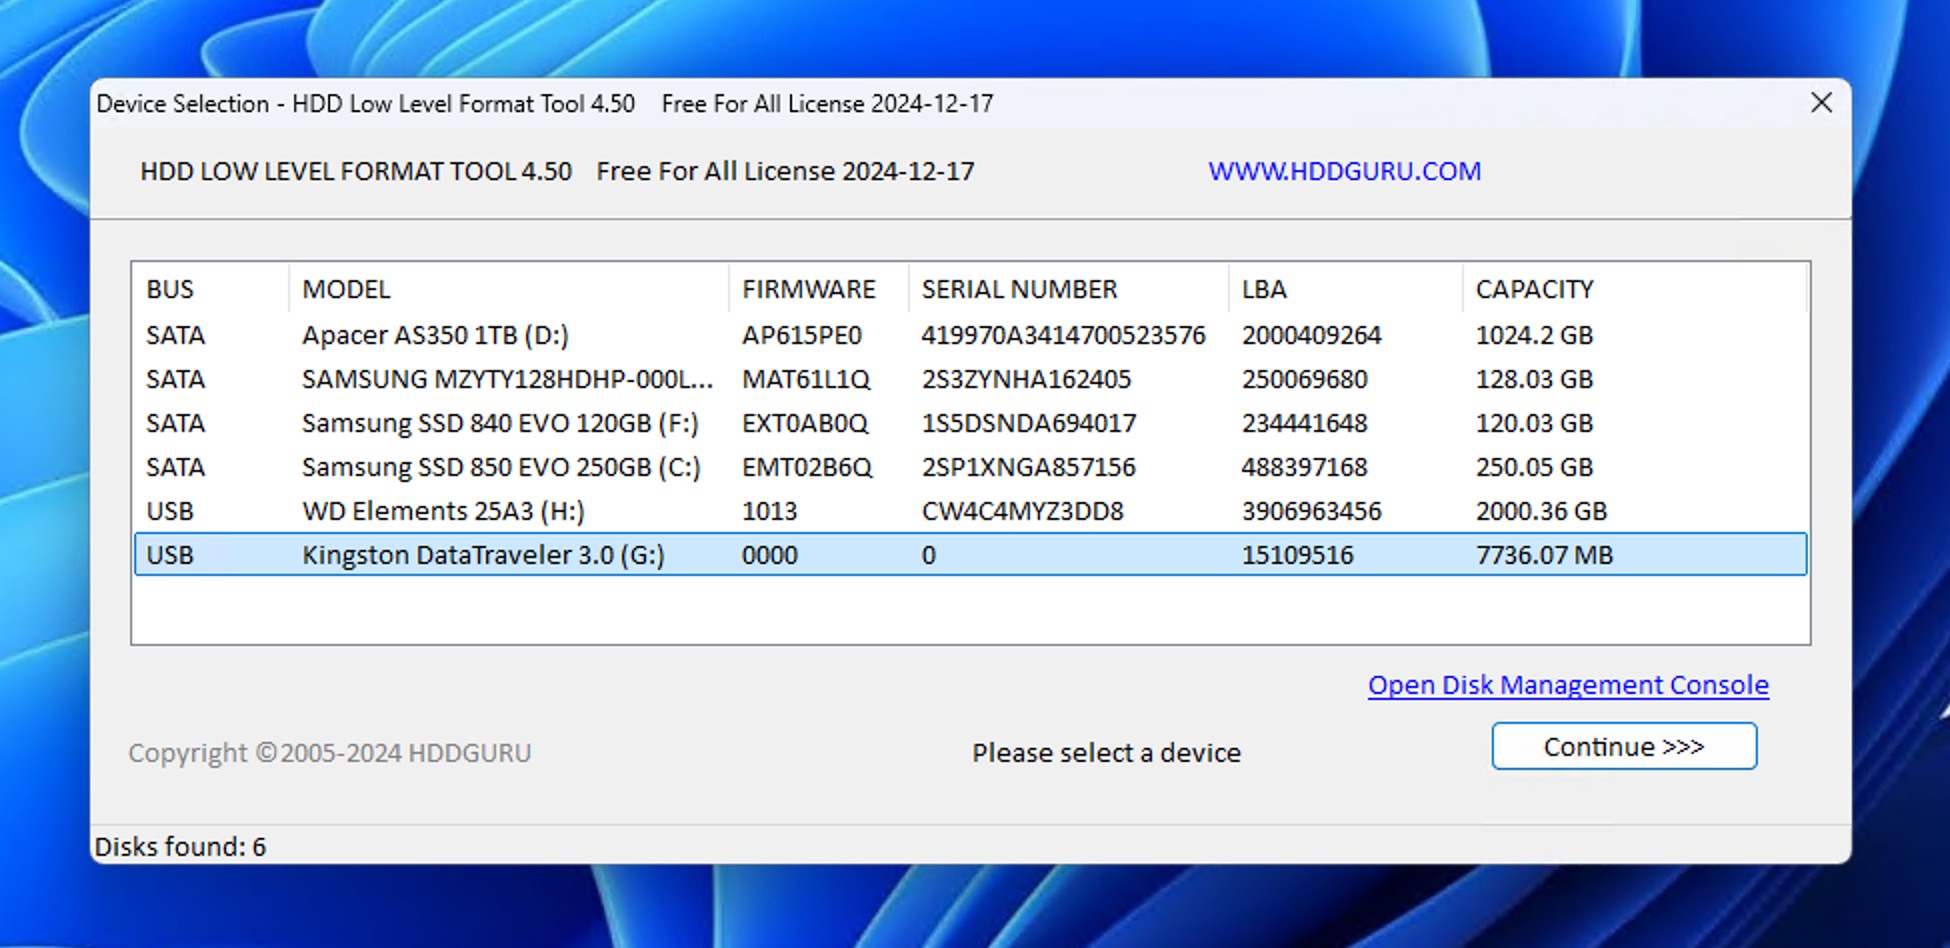
- Click continue and then initialize the low-level format process by clicking the Format this device button.
Low-level formatting can sometimes recover SD cards that appear completely dead, but it can’t perform miracles. If your SD card has exceeded its write endurance limit, even low-level formatting may not resurrect it, and you should buy a new one instead.
Way 11: Fix SD Card Without Formatting Using TestDisk
When your SD card shows as RAW, unformatted, or has missing partitions, you might still be able to rescue it without formatting using TestDisk, an open-source application designed to, among other things, recover lost partitions.
Do the following to fix your SD card without formatting using TestDisk:
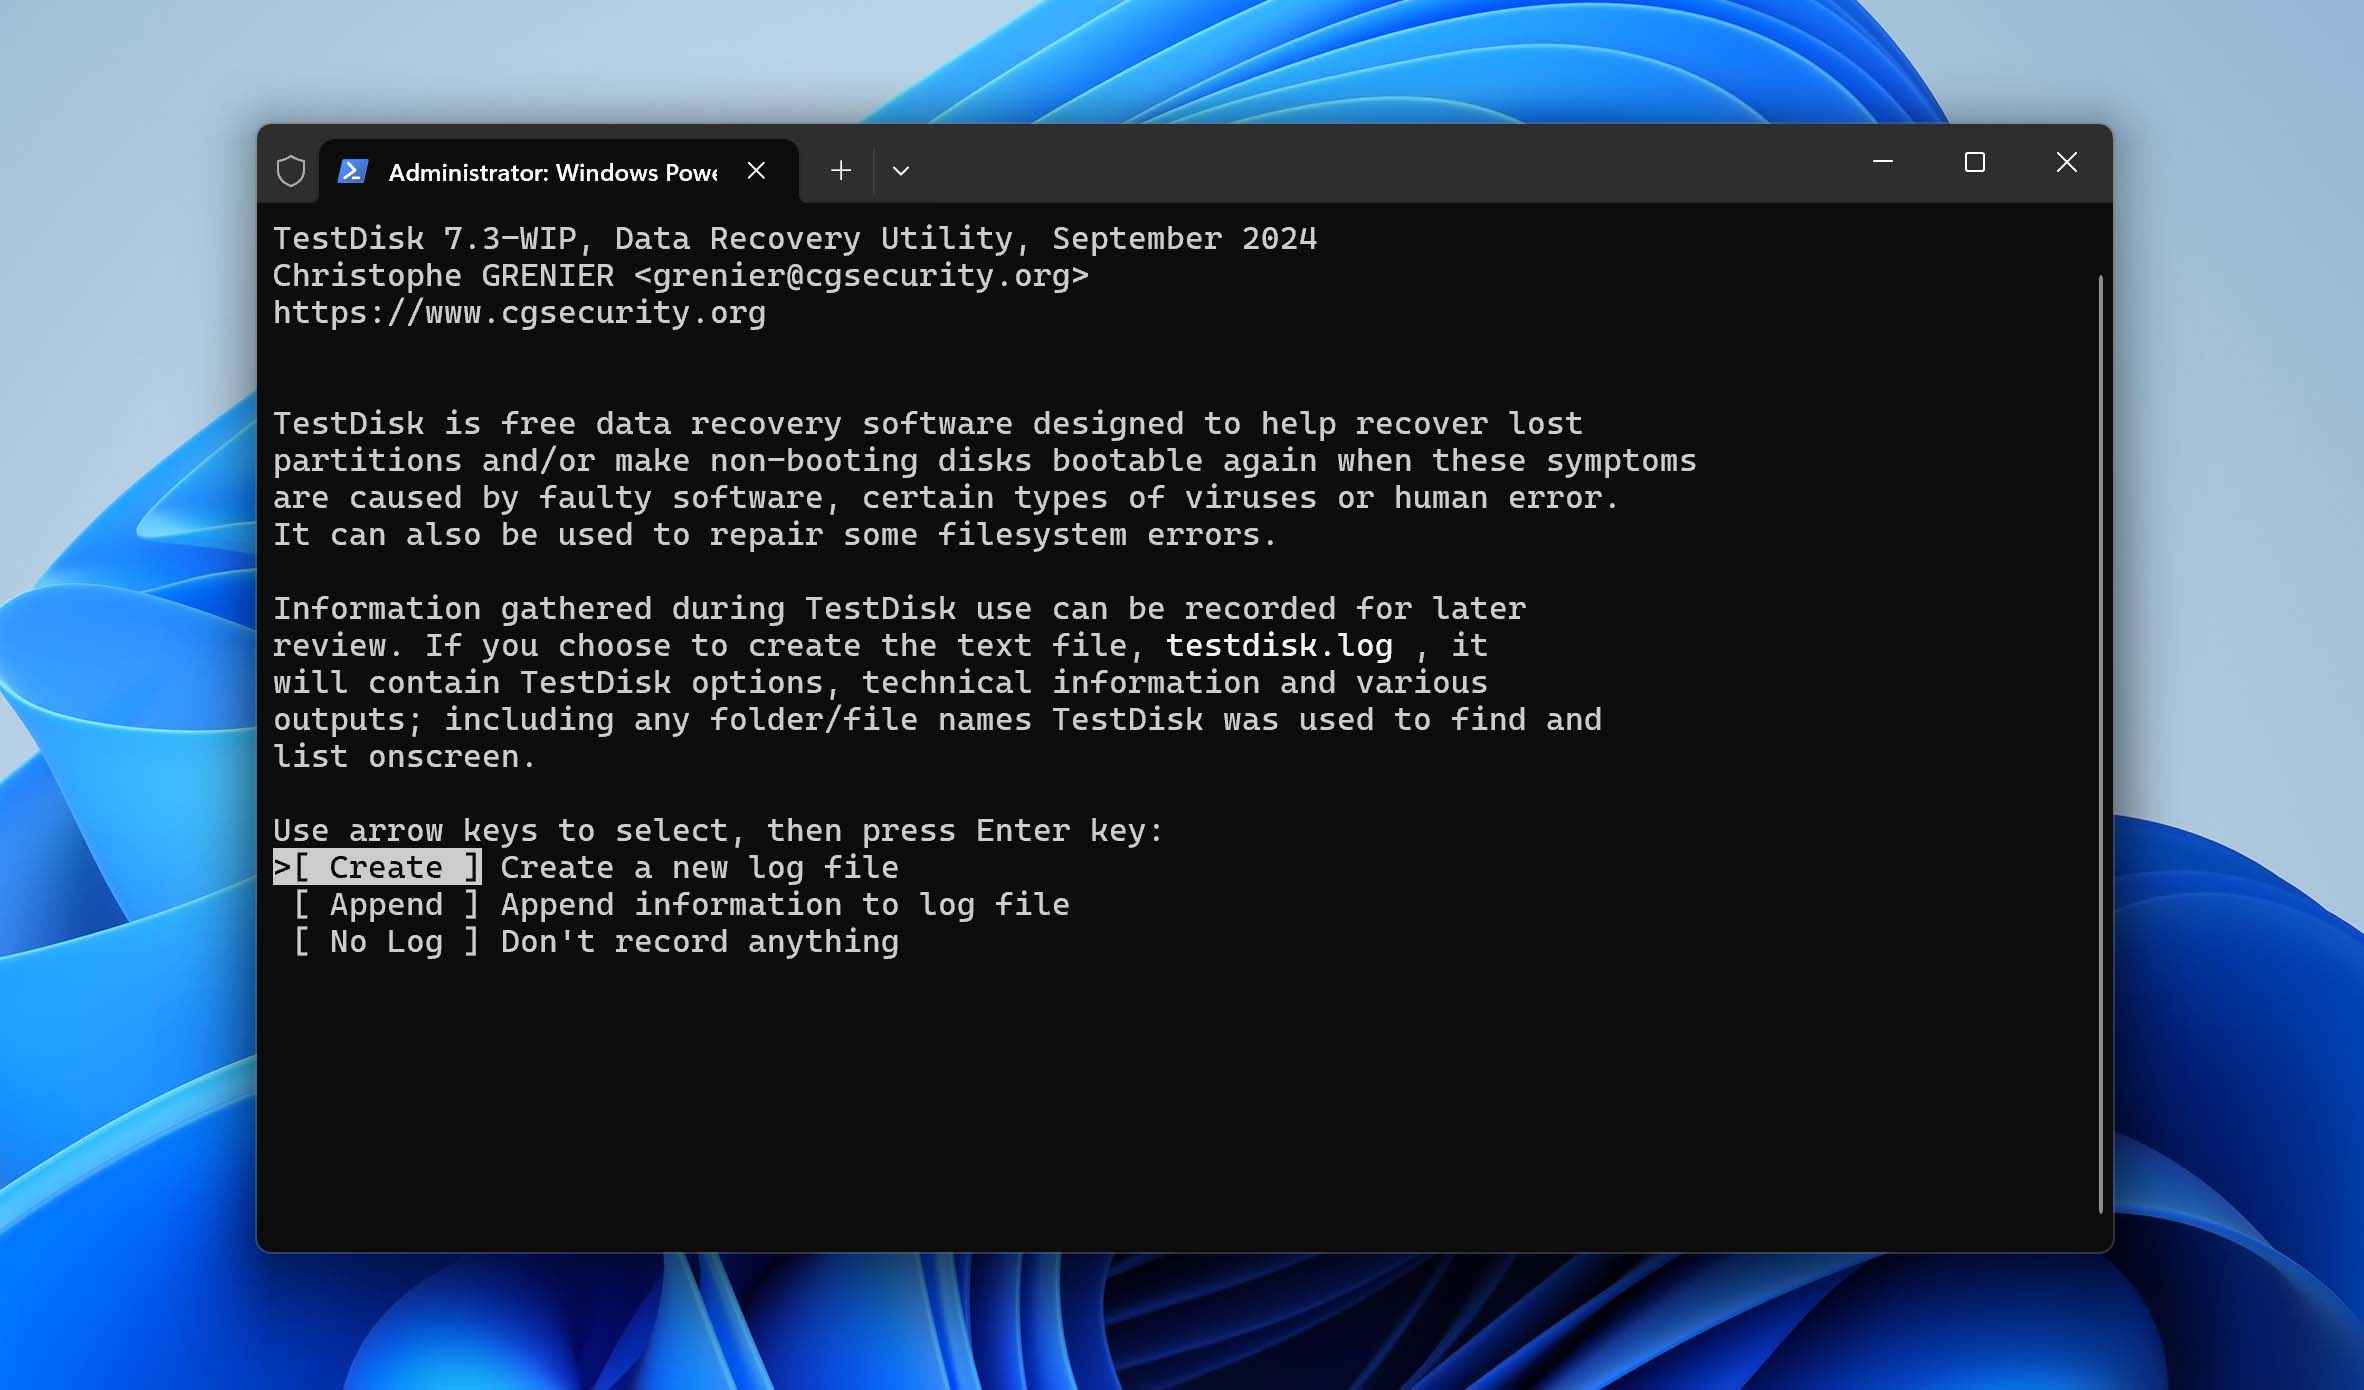
- Download TestDisk from its official website (CGSecurity.org). It’s a portable application that doesn’t require installation. Simply extract the ZIP file to a folder on your computer and run “testdisk_win.exe” as Administrator.
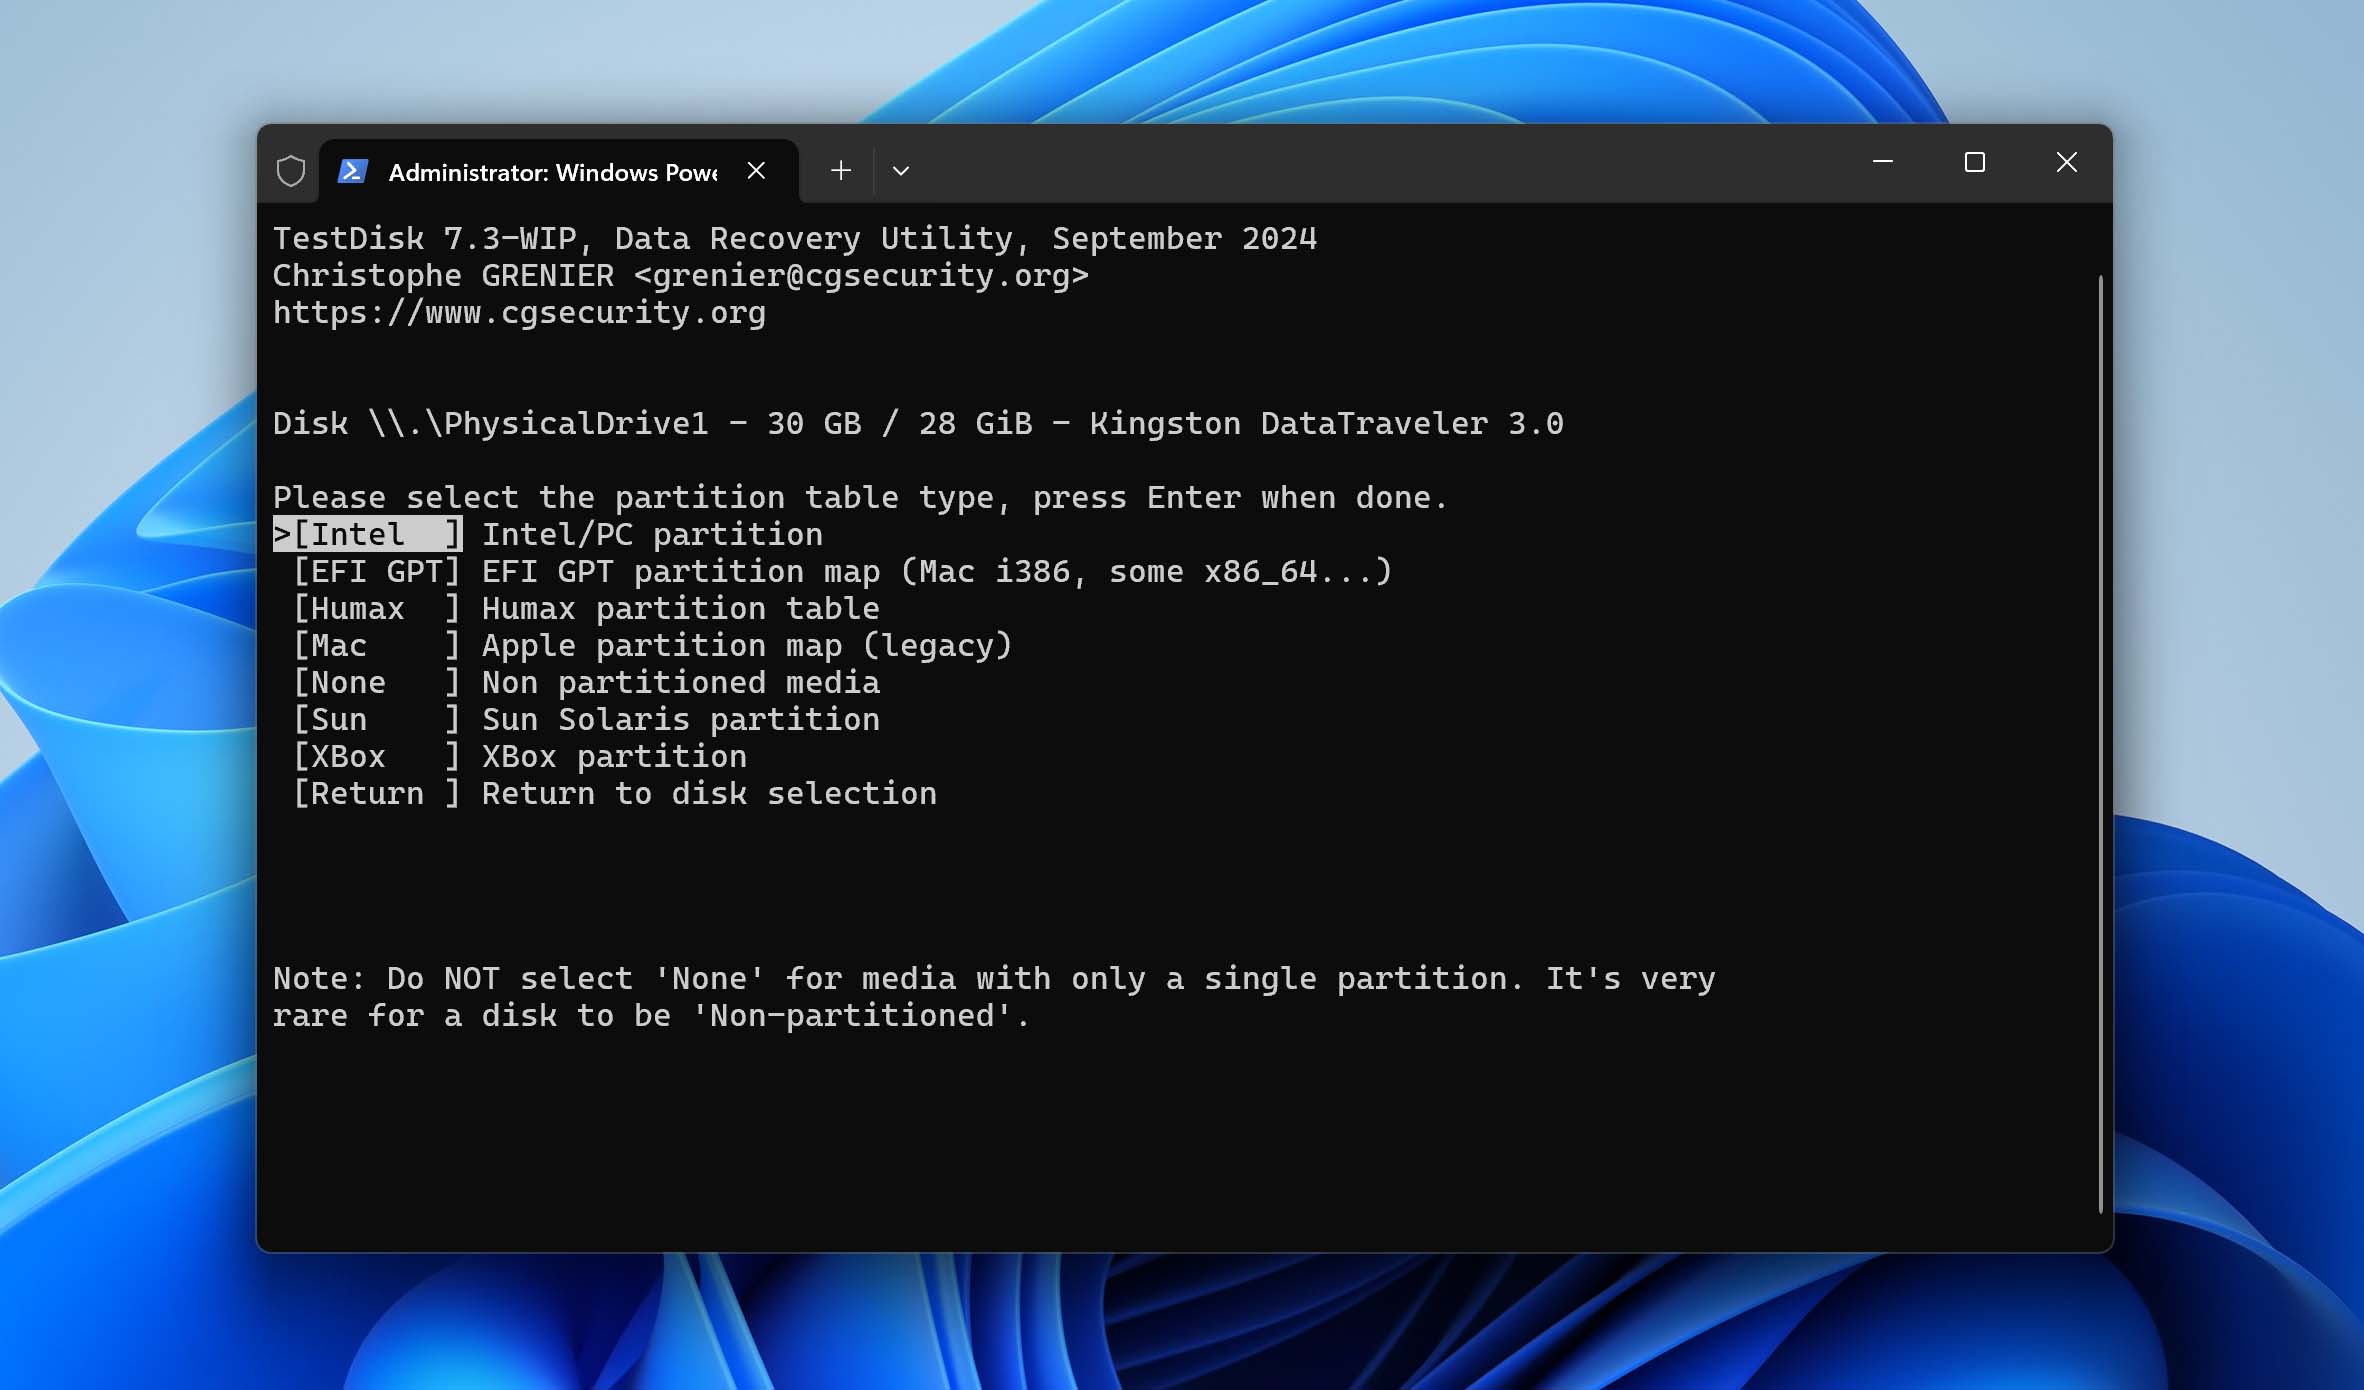
- Select “Create” to generate a log file that records all operations (can be helpful for troubleshooting if something goes wrong), use the arrow keys to highlight your SD card (verify by checking the correct size), and press Enter.
- TestDisk typically auto-detects the partition table type. If uncertain, accept the default selection and press Enter.
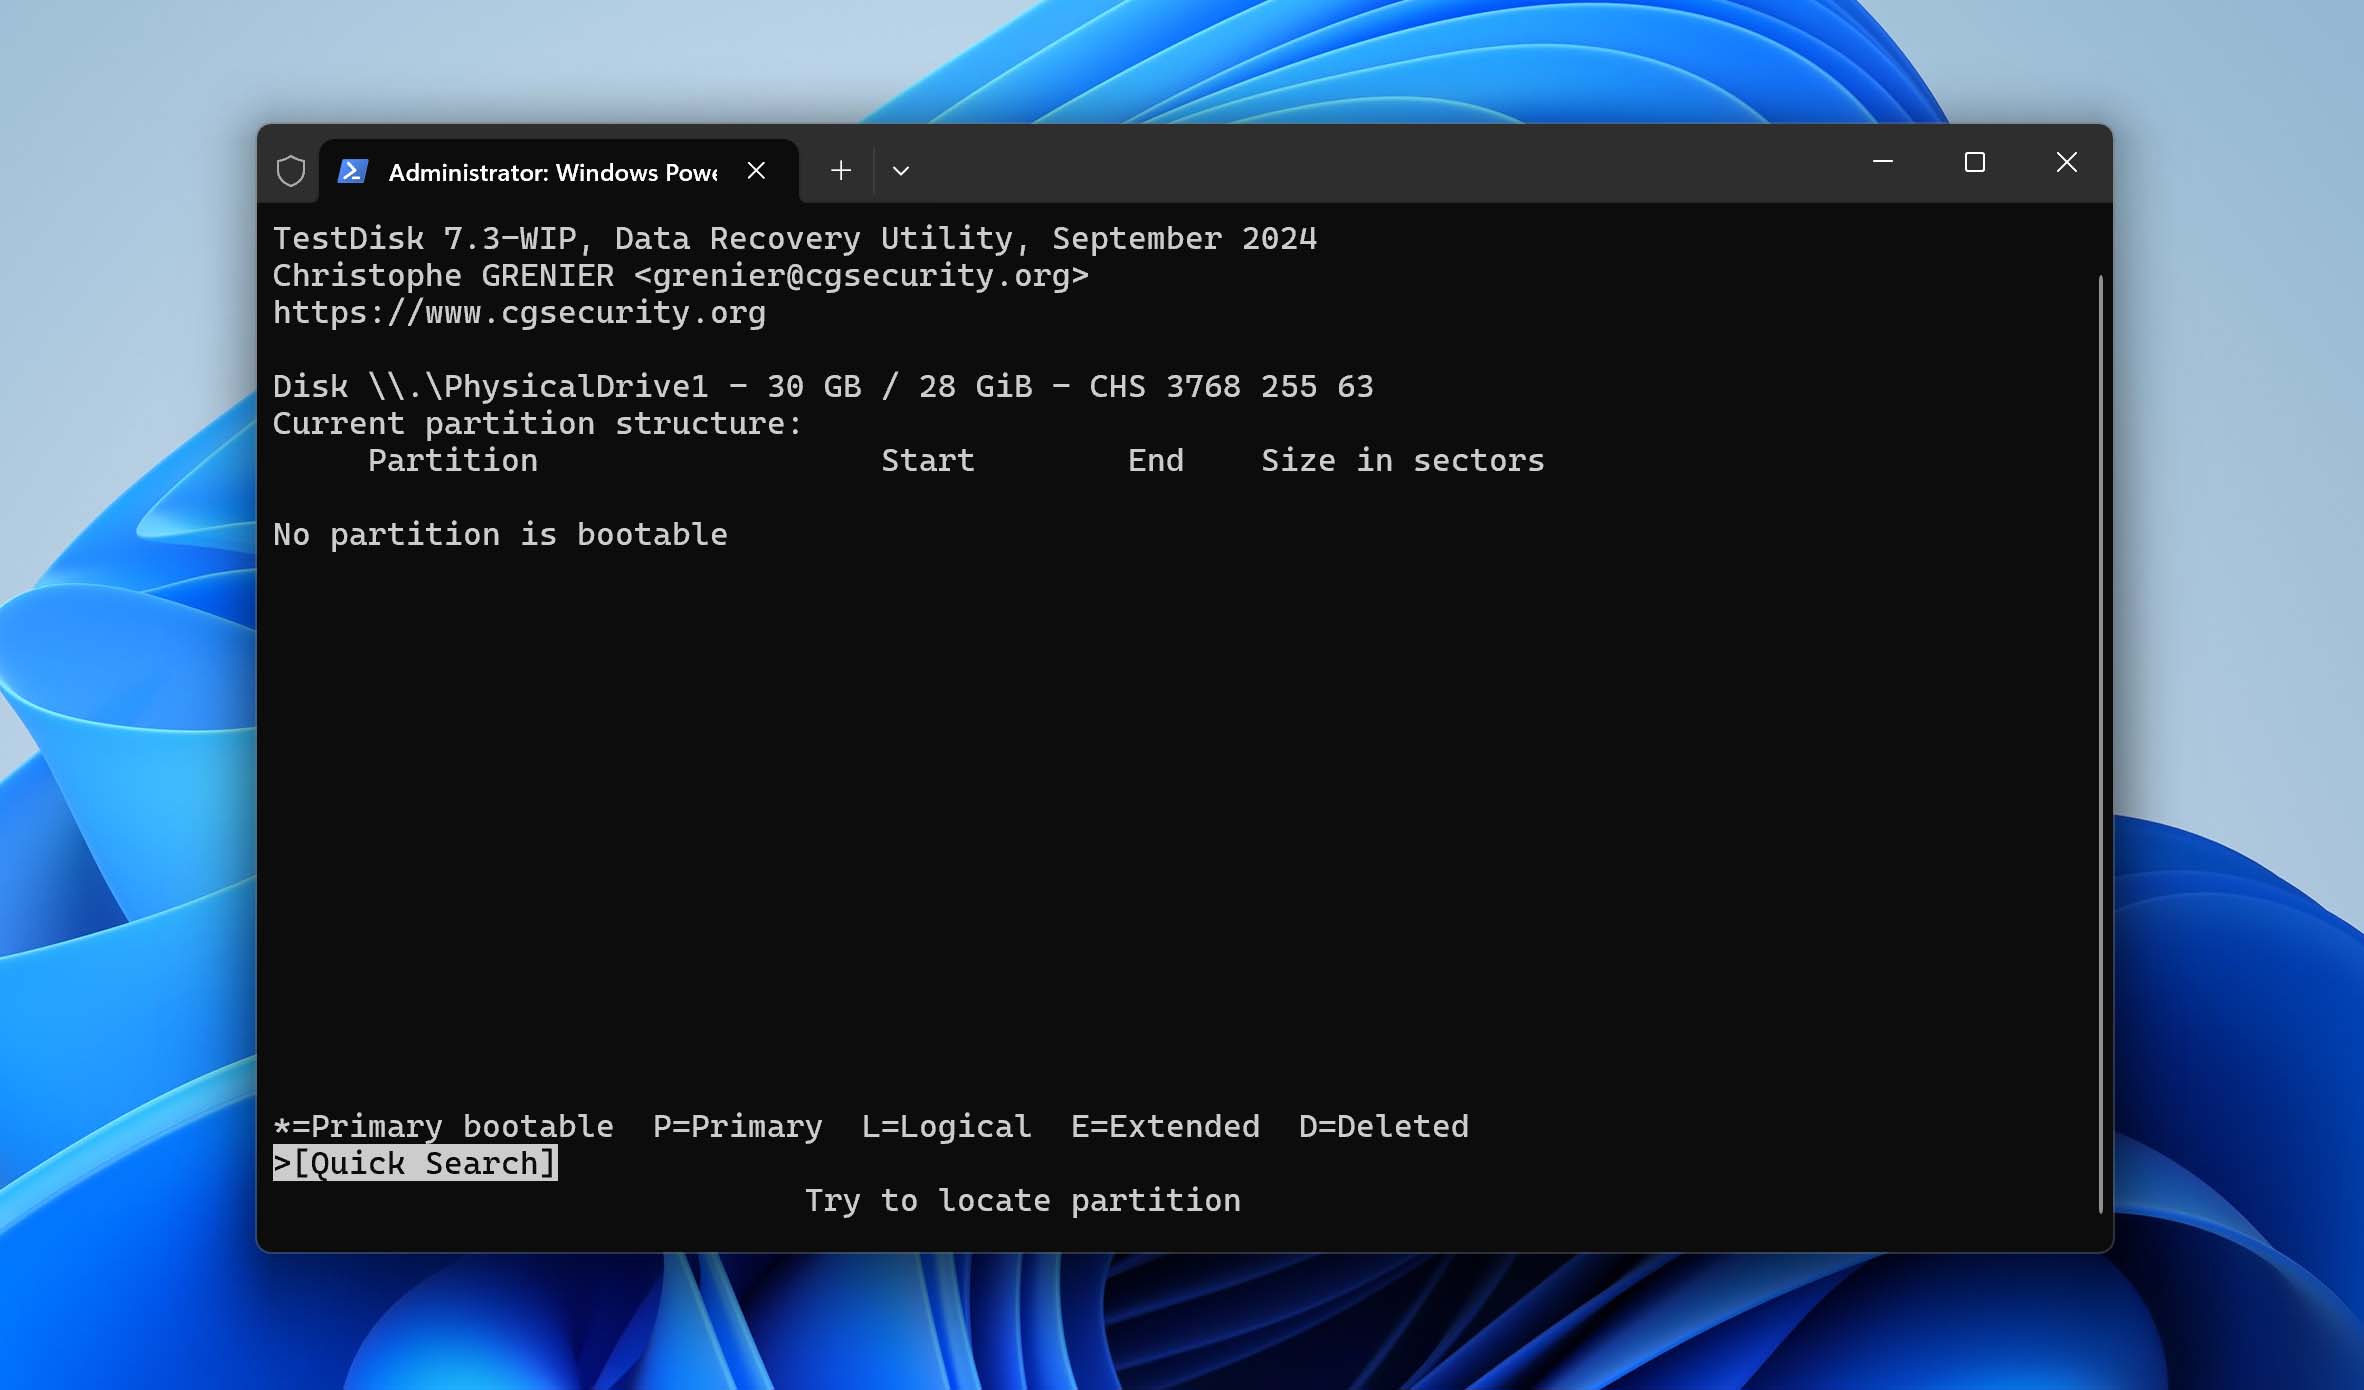
- Select Analyse and press Enter. TestDisk will examine your SD card’s current partition structure and display what it finds.
- Select Quick Search to scan for lost partitions. TestDisk will search through your SD card and display any partitions it discovers, including those that might be missing from the partition table.
- Once TestDisk completes its search, it will show any partitions it found. You can highlight each partition and press P to list the files and verify if it contains your data. If your partition is marked as D (deleted), use the left/right arrow keys to change its status.
- After confirming your partition structure is correct, select Write from the menu, press Enter, then type Y and press Enter again to confirm. This writes the corrected partition table to your SD card.
After completing these steps, safely remove your SD card, reconnect it, and check if your files are now accessible.
Way 12:
In some cases, your SD card might suddenly show that its empty or only partial data might show up on it after you’ve fixed the corruption error. This happens if your data is hidden. To unhide your data and files, you would have to modify viewing settings and allow all files on your SD card to be viewed.
To show hidden files on the damaged SD card on Windows 10/11:
- Open the Windows search bar and type File Explorer Options. Select the matching result.

- Navigate to the View tab. Locate the Hidden files and folders section and select the Show hidden files, folders, and drives option.
- (Optional) Uncheck the option to Hide protected operating system files (Recommended) if you also want to reveal system files that are normally hidden to prevent accidental modifications.
- Click Apply and then OK to confirm your changes.

- Open File Explorer, navigate to your SD card, and verify if the hidden files are now visible.
Way 13: Nothing Worked? Use SD Card Data Recovery Center to Restore Lost Files
Have you tried all solutions described so far in this article and found no success with any of them? Then, it’s probably the right time for you to take your SD card to a data recovery center and let professionals restore all lost files for you.
When selecting a data recovery center, look for the following:
- Clean rooms and professional equipment: There are many people online who offer data recovery services but lack the necessary equipment and expertise. Even though they might charge cheaper prices than professionals, the extra risk is almost never worth the discount.
- Recovery guarantee: Avoid data recovery centers that charge money even for failed data recovery attempts. True professionals don’t charge their customers for jobs they don’t finish successfully.
- Positive reviews: Always read online reviews when selecting a data recovery center. If you stumble upon a data recovery center with a suspiciously high number of negative reviews, we recommend you avoid it unless you’re ready to write your own negative review in the future.
One data recovery service that meets these criteria is CleverFiles Data Recovery Center, whose offline data recovery services are provided by ACE Data Group, one of the most respected players in the data recovery industry.
Tips to Protect Your SD Card from Data Loss
Even though we’ve described several different ways to fix corrupted SD cards and recover data from them, the unfortunate reality is that not all cases of data loss have a happy ending. That’s why it’s so important to protect your SD card from data loss by adhering to the following best practices:
- Always safely eject your SD card: It’s true that many SD card users have been improperly removing their storage devices for ages without suffering any negative consequences. However, there are also people like this Redditor, who have lost access to all data due to improper SD card removal. Unless you’re okay with data loss, then you should always take the few extra seconds it takes to use the eject function in your operating system (e.g., right-click and select “Eject” on Windows, or drag to the trash on macOS).
- Avoid exposure to extreme conditions: SanDisk and other manufacturers have extensively tested their SD and microSD cards to withstand harsh environments, but even these cards have specific tolerances. According to SanDisk’s official specifications, their cards can operate in temperatures from -13°F (-25°C) to 185°F (85°C) for up to 100 cycles (equivalent to 28 hours). They’re designed to withstand up to 72 hours in 1m of fresh or salt water (IEC 529 IPX7 rated), up to 500G of shock, drops from heights up to 5 meters (16.4 feet), and even exposure to X-rays and magnetic fields (up to 5000 Gauss). If you live somewhere where it, for example, gets very cold, then you should get a tough SD card like the Kingston Industrial series, whose operating temperature is between -40°C and 85°C,
- Minimize sudden loss of power: It’s never good for the integrity of your SD card file system (and the SD card itself) when power suddenly stops flowing white data is being written to the flash memory chips. When this happens over and over again, corruption becomes virtually inevitable. For this X user, the consequence was a Raspberry Pi that refused to boot, but it could just as well be the loss of precious family videos or pictures or business documents.
- Choose reputable brands: Opt for trusted brands like SanDisk, Kingston, and Lexar to minimize failure risks, as no-name brands have higher failure rates due to using lower-quality flash memory chips. What’s more, no-name SD cards also often advertise fake speeds and storage capacities, both of which further increase the risk of corruption and data loss. If you absolutely must use a no-name SD card, then at least verify it before use.
- Don’t ignore SD card error messages: If your card suddenly appears write-protected despite the physical switch being in the correct position, this often indicates file system corruption or controller failure. This is the moment to back up your data immediately, as detailed in our article on handling write-protected SD cards.
- Beware of static electricity: Static discharge can instantly corrupt or completely wipe an SD card without warning. As one DPReview forum user documented: “A static electricity charge seems to have wiped out my SD card… I had a small static electricity charge (not an uncommon experience in Canada in winter). Now, the computer will not recognize the card and the camera no longer recognizes it either – gives an ‘ERR’ code.” This photographer lost 250 irreplaceable photos from a brand new 64GB SanDisk Extreme Pro card due to a simple static discharge that most wouldn’t think twice about. This risk increases dramatically in dry winter conditions or when walking on carpeted surfaces. Before handling your SD card, touch a grounded metal object first, and consider investing in an anti-static wrist strap if you regularly work with memory cards in dry environments.
- Don’t use a faulty memory card reader: When I was younger, I had an SD card reader that had some manufacturing defect that made it extremely difficult to insert cards properly. Instead of replacing it, I kept forcing my SD cards in with increasing pressure until one day, I physically damaged the card’s contacts and connector pins. Not only did I lose all the data on that card, but the physical damage was irreparable. Card readers should accept SD cards with minimal resistance – if you find yourself having to apply force, stop immediately and replace the reader. A quality card reader costs far less than the data you might lose from a damaged card.
- Understand write endurance limitations: All SD cards have a finite lifespan based on their underlying NAND technology. According to Kingston Technology, different types of NAND flash have dramatically different endurance levels: SLC (Single-Level Cell) can handle approximately 100,000 Program-Erase cycles, MLC (Multi-Level Cell) about 10,000 cycles, and TLC (Triple-Level Cell) only around 3,000 cycles. Most consumer SD cards use TLC or QLC NAND due to cost efficiency, meaning they’ll begin to fail after a few thousand complete rewrites. For photographers and videographers who frequently delete and record new content, this can translate to just 1-2 years of heavy professional use.
With these simple tips, you can prolong the lifespan of your SD card and protect it from data loss.
Conclusion
SD cards can become corrupted or damaged for many different reasons. Luckily, there are just as many effective solutions that you can use to fix them. In this article, we’ve described 13 proven ways on how to fix a corrupted SD card, including a versatile data recovery software solution called Disk Drill.

FAQ
To fix a corrupted SD card:
- Connect your SD card to computer
- Type “this PC” in the search on the taskbar and select This PC.
- Right-click on your SD card and select Properties.
- Click Tools and select the Check option.
- Click Scan and repair drive.
To fix a corrupted SD card on Android:
- Connect the Android SD card to your computer.
- Open File Explorer and select This PC from the left pane.
- Right-click on your SD card and select Format.
- Select FAT32 as the new file system and click Start.
You can also try to fix a damaged SD card using an Android app like SD Maid.
To recover photos from a corrupted SD card:
- Connect the SD card to your computer
- Download and install Disk Drill.
- Launch Disk Drill, select the SD card, and click Search for lost data.
- Select the photos you want to recover.
- Click the Recover button at the bottom.
- Specify the recovery destination and click OK to begin the recovery of your photos.
To recover a corrupted memory card without formatting using CMD:
- Connect the corrupted memory card to your computer.
- Type “cmd” in the search box on the taskbar and select Run as administrator.
- Enter the following command (make sure to replace X with the letter assigned to the SD card you want to fix) and press Enter: chkdsk X: /f
- Wait for CHKDSK to finish.
Some of the most common causes of SD card corruption include improper use, malware, accumulated bad sectors, manufacturing defects, and physical damage. The good news is that most cases of SD card corruption can be fixed without formatting.
Here are the top 5 most common signs of SD card corruption:
- No SD card detected when inserted
- Persisting read/write issues that have no other explanation
- Connection issues when transferring data to/from the SD card
- The Windows format error message.
- Slow performance during data transfers.
Yes, unless the corruption was caused by physical damage, it’s usually possible to reuse the SD card after the corruption has been fixed.
When an SD card is corrupted, it means that it has either software issues or a physical problem stopping it from performing a requested process. Usually, corruption is the main reason for data loss.
If your SD card is having one of these issues, there is a chance that it is corrupted:
- It won’t open the image or video files stored there;
- It shows empty, or you’ve noticed that files are missing;
- It is not being detected either by your computer or camera;
- The SD card becomes RAW;
- When trying to transfer data, a popup window appears saying there is a read/write issue;
- It takes forever to transfer photo/video files;
- A format error appears when you connect the SD card to your computer;
You can use TestDisk to fix a corrupted SanDisk SD card. This powerful open-source software is designed to repair damaged file systems on various storage devices, including SD cards, and you can download and use it for free on just about any operating system. The only downside is its lack of graphical user interface.
The only way to fix a corrupted SD card using an Android phone is to format the card. If you have any important files stored there, it is best to create a backup of the SD card or retrieve the files to a different drive since this action will erase all of the data stored there.
Here’s how to fix a corrupted SD card on a phone:
- Head to Settings > Battery and device care > Storage.
- Tap the three dots at the top right and then go to Advanced.
- Select your SD card and tap Format.